Sewing Vloggers

Showing posts with label Hems. Show all posts

Saturday, September 2, 2023

Sewing with Sequins


While working on my current project, McCalls 8406,  it occurred to  me that the fabric used and the techniques required really deserved its own blogpost. I am making this dress from a sequin fabric. The first thing I have learned is that all sequin fabrics are not equal. I am lucky in that the sequined fabric I fell in love with is definitely, in my opinion, one of the easier types to sew. My fabric is a random trail of VERY tiny sequins, also very thin, that are sewn by machine all over a base of netting. It's a bit stronger than tulle but not that heavy net business. Also, and important for ease here, it DOES NOT stretch.  Equally important, the design has a fair amount of negative space that is just netting. This is not the fabric of larger sequins that  solidly cover a substrate and you find used for mermaid outfits and  lovely formal garments. My fabric has a lighter, more ethereal feel but like all sequin fabrics, also has a weighty drape, but not the heaviness of the big sequins. I highly recommend sewing this sort of sequin fabric as you will see ahead. It is simply less problematic. So rule number one is that if you are searching for a sparkly fabric, consider a sequined fabric utilizing smaller  sequins in the design and maybe an amount of  half negative space with the base fabric. Also being non stretch helps but not mandatory. That just eliminates another factor to deal with. You will need certain supplies to ease your journey. 

to indicate scale 

Supplies needed:


* Old junk scissors.  Do NOT use your good scissors for cutting this fabric or a rotary cutter. It will be fine. I am using my junk scissors that I bought in a bin for a dollar 30 years ago. They cut the fabric just fine. 

* Wood clapper. You CANNOT press your sequined fabric.  It will tarnish, lose it's color and/or melt. But, you can "faux" press it and I will show you how with a clapper and a few other tricks. 

* Seam roll. I used a length of wooden pole. Worked great to lay the sewn seams on and not crush while "faux" pressing. 


* Brayer. Same as the clapper but with the addition that it will crush the little gems together at the seam line effortlessly and they will lie beautifully flat. I did not remove any sequins in the seams for the project other than the zipper area. 

* Straight stitch foot, one hole. This was best for making  the 1/4 inch width for the Hong Kong seams . 

* See thru foot. Used for general stitching- s l o w l y .

* Silk thread for basting. It slides in and out of the the sequins and stitches so easily. Very easily removable. I used it to block baste the sequin fabric to the lining, working flat on a table to prevent bubbles.  

* Regular thread for sewing. You can use lighter weight thread if you get the right color. You need a good match here . 

* Glasses for eye protection when sewing and cutting. Sequins go everywhere and I have read of them flying into people's eyes when cutting and sewing. Don't risk it. 

* Paintbrush, soft and at least two inches wide.  Great for brushing up all the sequin drops into a pile and putting in the trash. They will fall off your fabric and reproduce as you sleep. Clean up after every session. The less sequins hanging around the less opportunity for accidents. 

* Sticky lint roller. Use for a quick cleanup. You will be finding sequins everywhere but they are not bad like glitter. 

* Oak tag or manila folders.  You will need two.  They will be used to make your pressing jigs. 

* Hand needles for basting. 

*Microtex needle, 12, for sewing. Halfway thru the garment and no broken needles yet and still sharp. 


\Sequin Myths that did not apply here:

* You will break tons of needles. Did not happen to me. I am still on the same happy needle halfway thru my garment. 

* You must remove all the sequins from all the seam allowances before sewing. Nope, I haven't removed a one. I only plan to remove where the invisible zipper will be placed. These tiny sequins are so thin and small  that they don't get in the way and they don't scratch you either, at least not me. I do have sensitive, thin skin  too! I also got validation on this from a couple youtubes. 

* You can't iron the fabric. Well, you can't, but you can get around that.  Make sure your lining is nicely pressed before starting. Keep your pieces in a flat position to eliminate further wrinkling. Treat them kindly. I keep mine in a half sheet pan. Do hand work flat on a table.  I will show you how to get a flat seam with the ironing jigs. 


Sequin Must Dos

* You must make samples of  pressing before starting, with and without lining. 

* You must make samples of stitching. Using a zigzag of .5 wide and 2.5 long gave a much better result than a straight stitch for seams.  I actually forgot to take off my 1/4 inch foot from doing my HK seams and found out that this single hole foot will do a .5 zig zag so I left it on to do all of my HK seams. Worked great. I used the wider see thru foot for all of the rest of the stitching. 

* You must interface linings as needed, definitely not the netting. 

* You must use the right tools and rules to get a decent, flat pressed looking seam. 

* You MUST sew s l o w l y,  every step of the way. 

* You must, unless you remove all those sequins, treat your seam allowances to a finish. I did Hong Kong seams on mine out of the same Ambiance lining. Don't ditch stitch the HK seams. Topstitch instead.  HK seams will cover any edges of the sequins that could irritate and they finish any loose threads. This way you won't have sequins falling off on the dance floor. 


"Faux Pressing" Sequins

Jig #1


Take your first manila folder, just as it is being held in your hands and putting down and measure down from the fold about 5 inches. Cut on that line. You can see my cut is uneven. That's OK. You want the fold, not the cut line. Here you can see where I have sewn a bias strip to the fabric for a Hong Kong seam. I need to press that strip away from the fashion fabric. BUTT the folded edge of the manila folder right up to the stitched line of the fabric strip. Hover your iron, set up for steam, over the folder area ONLY, for about 3 seconds and move away fast.  Quickly slide away your jig and hand press down the fabric strip. Take your clapper and press down and away and hold it for a few seconds. When you remove the clapper you will see the lining pressed away and nice and flat. The double thick folder paper helps prevent the steam/heat from damaging your sequins. Slide the folder up the seam and continue pressing the strip away from your garment until done. 

Next for your HK seams you will need to wrap the strip around the the edge and pin in the ditch securely. I used silk pins as they handled the sequins really well. Go to the machine. and EDGE STITCH the strip fold on your seam allowance as opposed to the usual ditch stitching done on HK seams. When done remove the excess seam allowance on the back. 

Anytime you need to press an area, butt the manila folder, doubled like here, up to the edge to not let any heat/steam heat anywhere else on the garment. At no time touch the garment. Just hover with 2 or 3 seconds of steam and get away fast. 


Here are some seams in the bodice all put together, shoulder and back, below. 


Jig #2


Above, on the left you can see the seam before being treated with Jig #2 method and on the right after #2 method. We will use the brayer, the seam roll , the clapper and the jig and iron again. 

To make Jig #2, take your second folder and fold it as it's meant to be and get out your rotary cutter and ruler or scissors. Doesn't matter which. Accuracy not too important here. About 4 inches from either edge cut a fat eighth inch away from the fold to make a long slit. Do a little short cut on the ends. Now, if you open your folder up you have a long slit roughly a 1/4 inch plus wide. As you use your folder, use it folding down to make things easier. Place your garment. seams open, wrong side up first on your pressing stick/seam roll. The picture above is for when I turned over and did the same process to the right side of the garment. You will do both sides.  Get your brayer or clapper handy. Place your Jig Slot over your seam line, centering it in the slit. Holding the jig securely, once again, HOVER your iron about an inch above for about 3 seconds of steam/heat and get away. Immediately grab the brayer and roll over the slit with pressure or use the clapper. I prefer the brayer here. Take your time. Gently remove the jig. Admire your seam, give it a little contented pat and move your way up the seam with the same process. Again. Press your seam open first on the wrong side, then flip it over and do the right side as you see above. The brayer forces the sequins to mesh together and really hold the seam flat. Don't be afraid to press hard. 


Here we go, above, all nice and smooth! Whew! 

When I went shopping for my fabric for this dress there was soooo much to choose from that would have fit the description of small sequins with a good amount of negative space, really lovely fabrics. I have even seen some beautiful ones at Joanns that would fit the description nicely as well. So, these fabrics are not hard to find and you cetainly get the wow factor. Many are more subdued than this one, lots of options, colors, etc. If you pick a pattern with few pieces, details, etc, and that is easy these days, you can make a garment that I think will be amazing.  I hope my jigs and suggestions will help you along. I welcome comments. May your sewing sparkle!....Bunny

Tuesday, September 18, 2018

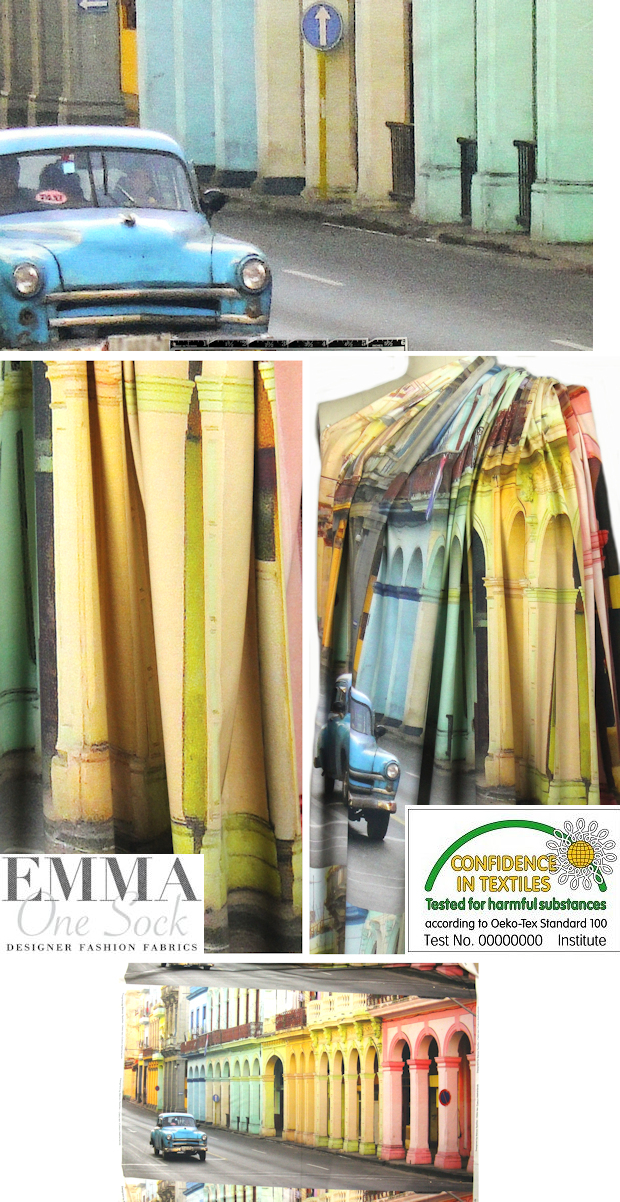
The "Viva Cuba" Skirt is completo!


Viva Cuba! While this skirt has been done for a while, the fashion pics have been fighting with what has become a rather active social life lately. Sewing continues but I am now working and weekends are spent sharing with family. Life is good....

Sewing with these digital print panels definitely presents specific challenges, the biggest being the limited shape and size of the fabric and how best to utilize the designs.Luckily in my favor was the fact that I am short but I am sure with thought any print panels could be worked up for any height person to enjoy.


Pattern:

There really was no pattern used here, just my own evolving design. I knew I wanted a flowing skirt with a waistband to best show off the print and it's lovely colors, which really are magnificent and even more so off the computer. I used a lapped zipper on the side, a waistband interfaced with wide elastic and a hem machine top stitched on the edge and further up as well. I needed to get all of the width into the waistline and that was the biggest challenge but I think I pulled it off comfortably and with no crazy bulk. 


Fabric:

courtesy emmaonesock


This is "Viva Cuba" from Emma One Sock.It is a digital print panel designed and manufactured in the Netherlands and one of several they offer.  The panel is 31 inches long so that is what I would have to use for the length and hems of my skirt and the width is 60 but there are 2 1/4 inch selvedges on each side. These wide selvedges came in VERY handy as you will see. . In the end,  the length of the finished hem  of my skirt was 120 inches.  Emmaonesock says the fabric is a " cotton/lycra blend with 40% stretch in both directions."  It is a very thin but totally opaque fabric, really nice quality and perfect for this skirt as bulk was a worry. Think very high quality white tee shirt fabric. When I first received it I was a bit put off by the feel of the public side as the photo process seemed to make it a tiny  bit "plastic-y". I swear, as I worked with it, it seemed to soften up and lose that feeling, particularly once it was ironed a couple of times. In the end I am really happy with it and the way it feels. I think it is too thin for a body con type of garment but any design that moves away from the body would be perfect. While this digital photo of what appears to be Old Havana is beautiful, my goal was a garment that let the print and its lovely colors flow together and not let me look like a tourist billboard, pretty as it was. I wanted to just show the amazing colors as they moved around the skirt in a rather diagonal fashion.   ETA: I just checked the EOS site and this fabric is no longer available bu there are other great Dutch digital prints and they can be found under "conversational prints". Go figure. Another ETA: the print panel is back in stock. Yay!


(Please forgive the shadow on the left edges of everything in several pics. Life is just too short for me to change into everything again and visually lose 15 pounds by retaking the pics. Thx for your understanding.)

Construction:

I'm going to break this down into the different stages it took to complete this design. 

The first challenge was cutting out the skirt. The fabric was a  31 x 60 inch rectangle panel with additional very wide  white selvedges. I purchased two panels. The challenge was to design a skirt, utilizing every inch of the panels, that would be feminine and would accentuate the colors and drape, not so much the subject. This meant there would be no shape to the pattern pieces as in  curved hems or angled side seams. That would have been a waste of my fabric dollars and frankly the fabric was pricey. In the end the challenge was met.


 I cut the waistband from a length of one panel's selvedge  and it included an inch and a half of panel that would become the public side of the waistband.


 The white selvedge side of this strip would become the back of the waistband. It would eventually be folded to the back and ditch stitched on the front as in Nancy and Debbie's technique (more later). The strip, minus seam allowances, was fused with fusible tricot. (green arrows). Normally with the process I used to interface the waistband this isn't done but this fabric was quite thin and would need to carry a lot of weight. 

To the zipper! I did a classic lapped zip on the side. This allowed my panels to be sewn uninterrupted with only a seam at each side. I installed the zip with one side seam sewn and the other left open, all to make the pleating easier and as you can see below. That final seam wasn't closed until all pleating and gathering were completed. I always use zips longer than needed and extend them beyond their end in the garment. I then catch the zip in the waistband seam allowances, no lumps, no bumps.


Here you can see that one side of the zip is sewn with yellow  thread and the other with salmon-y color, all the better to match in the end. I was constantly changing thread colors with this project.


The next challenge was figuring  out how to fit 120 inches of fabric into 26.5 inch waistband. Yikes! I loved the look of box pleats and really hoped I could make that work. Well, math was never my strong suit and after a bit of frustration, what I decided to do was to make 3 inch box pleats and then do a slight gather to fit them into the waistband. This avoided all those math issues and the fabric is thin enough to pull this off without signs of bulk. The panels were marked every 3 inches and the fabric was brought from the marking to the center back of each pleat with lots of pins to hold it there. Behind each 3 inch box pleat on the wrong side are two pleats kissing each other. They are the edges of 3 inch box pleats on the wrong side of the skirt. After all was pinned in place hand basting was used to keep it there and the pins removed. I am doing more and more hand basting all the time. I find it really saves time in the end.


I am really pleased with how the gathered pleating worked out and for those whose math is more fuzzy than accurate, it's a great way to fit a lot of fabric into a small waistband. Three inch box pleats and then gather it all in! I only fudged one pleat and you would never know which one! The pleats were hand basted a 1/4 inch and  a  3/4 inch away from the top edge of the panels. They were then gathered to fit the waistband and were ready to install.  See how smooth that waistband is? It is slightly gathered when off the wearer from the interior elastic used for interfacing.


 I wanted to use a wide non roll waistband elastic as the interfacing. I learned this technique from Nancy Zieman back in the eighties and honor her by using it in this garment today. I've used this technique many times but with my sewing hiatus of nearly a year I thought it would be wise to refresh my memory with a bit of Googling.  While I couldn't find a video from Nancy, I did find Debbie Cook's fantastic version of this technique. Forgive me Nancy, but I am preferring Debbie's. Nancy has the elastic included in the "laps", the short ending seam allowances  of the waistband.  It can give a pulled effect.  Debbie's version has the elastic hanging freely in the end of the waistband and the laps are filled with regular interfacing, a big improvement. No unsightly pulls and easier to install buttons, snaps and such! I highly recommend you check out her tutorial for a clear description of how I did my waistband on this skirt. It's an awesome tute. Thank you very much, Debbie. (Oh, laps are the over and underlaps where the zipper closure is.)

Pleats and gathers done. Waistband is all interfaced, elasticized, connected to the skirt  and then ditch stitched on the front to secure.  Yay! I did have to do some futzing on the over and underlaps to get it all even and matched. For some reason the elastic wanted to flare out at it's open cut ends so I used my pinking shears to shave it back a bit and that worked fine. All is now equal in shape and size. I can't stress enough how important it is to match and rematch like areas of garments while you are sewing. Don't just cut a collar out and sew it. Cut the top and bottom out and then match the two sides as well. Recut them if they are not perfectly matched before you sew them for that final time. Things stretch. I am now in the habit of doing this for anything that has a mirror image of itself.


The final stage and I think what gave me the greatest satisfaction with this no pattern project was the hem. I did samples first and they taught me that it really didn't make much difference which choice of interfacing I used. I used my final choice simply because I had plenty of it. Remember also,  I am trying to keep as much length to my skirt as possible. I don't want to lose any of the digital image  in a turned up hem and I don't want my skirt too short. Early on I decided on a faced hem. The lower edge of the print is in various shades of gray, being the street the car is on. I found a great, similarly thin rayon knit in gray that I would use to face the hem and then top stitch it down. But then I had one of my middle of the night Eureka Sewing Moments. You all get those, right? It's when I bolt out of my sleep with a solution or better solution to a sewing challenge, in this case the lifeless, thin knit hem of 120 inches!

(If you look closely in the middle of the facing you can see where I overlapped the cut edges of the facing strip. It is cut with pinking shears to prevent transfer through.)
I made samples with various interfacings and in the end did my hem by stitching a one and a 1/4 inch strip of 100% cotton woven fusible interfacing to the hem edge. Right side of interfacing (no glue) to right side of skirt. I used a fat 1/8th inch seam allowance. I pinked the short edges of the interfacing and lapped them as need to make the full width of the skirt hem. When that was all stitched on I went to the iron and wrong side of skirt up, turned the interfacing to the wrong side leaving about an 1/8th of an inch of the panel showing on the inside of the skirt. I fused this down. My interfacing became the hem facing. The edge appeared to be corded on the inside and it gave a beautiful finish. This was then top stitched a fat 1/16th of an inch from the hem edge and again one whole inch from the hem edge. Then it was pressed and hung.

I was amazed at how well it came out and the pretty folds the hem makes. I say that because a couple years back I did a full knit skirt on a dress and used a one inch horsehair braid to get this same effect. It was awful, just too bouncy and sticking out. I donated it after wearing it once. The hem on this skirt of panels came out the way I wanted that first knit hem to look, with just a beautiful curve and movement, nothing trying to hard to look vintage. I hope you agree. So facing the hem with a fusible woven interfacing, cut on the cross grain and then turned and topstitched was a success and I will definitely do that again!


In conclusion:

I will be wearing this with black tights, black flats and a black tee to an upcoming "casual" restaurant get together of old friends. We will be enjoying a meal and drinks so it's a good thing that waistband stretches! All in all I am happy with my fabric, my skirt and most of all the pleasure the challenge the digital print and no pattern provided. Sure, I made little dirndl type skirts for my Barbie eons ago and could probably still do so in my sleep but the challenge of this skirt along with the width of all that fabric, making the wonderful print design work with my vision and utilizing modern techniques really made this a most fun project. I hope you have enjoyed this journey as much as I have..........Bunny


***********************

courtesy fabric.com


Fabic.com also has some digital print panels, too. These panels are out there but each vendor gives them a different name so it's a tough search. If anyone out there has further search suggestions please let us know your  terms. Oh, I/we am not looking for quilting cotton panels here but thank you, anyway. At Fabric.com they have what are called "photorealism wall decor panels". They could be great in a Jean jacket or a bag. Marcy Tilton has some as well that are "digital print panels" and of French origin. Have fun searching and make sure you know which way the print lays out in regard to the measurements! ....Bunny


Monday, July 16, 2018

Lany's Dress


Grab a cup of your preferred beverage and bear with me as I tell this story of my next project, one in the making for over twenty years.


Let's first check out this little dress.  I didn't make it. It has been put away in a special place for a long time, however. Now it's time for it to come back out. The fabric is a basic soft cotton.


Do you see the proportion of the sleeve compared to the narrow bodice yoke? Huge and puffy was the way back in the day. . Notice how the collar doesn't meet at center front but that is quickly remedied with the addition of the pink satin rosette. I suspect the manufacturer uses pre made eyelet collars that got put on garments no matter the size. There's no top stitching and yes, it is sorely in need of a good press but I pretty much just unpacked it.


This pic give s better view of the "interesting" proportion. Huge buttons can often be cute on a more whimsical child's garment but here, with the delicate blue and white print, they are just too heavy.  Ugh. Again, notice how the collar doesn't meet at center back either.


In the logo conscious early 1980s, this label was put on the front skirt of the dress, but of course!

Now go back and look at the picture with the buttons down the back. Right about center, to the right of the dress, you will see on the wall a blurry picture of a lovely, smiling brunette. This was my sister in law, Terry. That's right, was. Terry is no longer with us, having suffered instant death from an aneurysm at the age of 32 in front of her young daughter and husband, my brother. I love this smiling picture of her as she smiled a lot and laughed a lot. We miss her tremendously. Life went on. My brother added an apartment to his home so my parents could care for his little daughter now that her mother had passed. It was a really happy arrangement but choices were made fueled by grief and wife number two came on the scene far too quickly. She removed any reminders of Terry and my mom found them in the trash. She pulled out the framed portraits from a big trash can and also this dress. Terry, loved this dress. It was sweet, feminine and the colors went beautifully with her daughter's dark hair and eyes. She had her daughter's portrait taken in it. It was her favorite picture of Lany and she never failed to mention that. My mom remembered that as she pulled the framed image from the trash. My  mom knew where the dress had been kept and was afraid that it would be tossed as well. She went into the home while they were out and took it out of the closet and brought it to her apartment. She packed the picture and the dress away. My mom and Terry were extremely  close and my Mom missed her terribly. The marriage to wife number two lasted six months, as one would expect in these grief driven situations.

Life went on. I never knew my mom had the dress or the picture. As my mom's health declined she called me in one day to her bedroom and went into her closet and pulled out the dress and the picture. She gave me the dress. My mom asked me to promise to give it to Lany when and if she ever had her own  little girl. I told her I would. I took the dress and packed it way carefully with my best sewing fabric. It hung with velvets and hand smocked Christening gowns for years, moving through three homes.  I took it out this week. Lany is due any minute for her second child, a girl. I will give her the dress......... But  more.........

This is where the incredible community of sewing bloggers steps in. Some of you may remember a blog by Kristine  B. from the Chicago area, husband firefighter, made gorgeous garments, particularly gowns. She no longer blogs but we still keep in touch. She now has a terrific business making formal wear and SHE IS GOOOOOD. Back when she was blogging something came up and I told her the story of the dress and even showed her a picture. Out of the heavens, Kristine told me she was pretty sure she had the same fabric or at least something very close to it. She had made her own daughter a dress out of it and would gladly send me what was left if I was interested. Her generosity will tell you what a lovely person she is.  She sent the fabric. It was extremely close to the dress fabric and I decided I had enough to make something work that could be worn by Lany's  own daughter, should she ever have one. For Kristine B.'s generosity, I will always be grateful and so appreciative.

Today I pulled the fabric out and dug for patterns. I will do a similar back opening yoked dress. It will have puffy sleeves but hopefully more in proportion. I will do a plain white linen collar and sleeve bands.  The bodice will be lined. The skirt will be fuller. If I can find the right color, there will be piping on the dress as well. The back will have buttons but a much smaller scale.I will make a size one. My plan is to give it to Lany for her new baby girl as soon as she arrives. My mom took care of Lany through my brother's tribulations and grief and the two were always very close until my Mom's passing. I know she will love to have this.

*********************

Back to the picture of the back of  the  dress... It kept twisting around and I took tons of pics. I never noticed that her mom's photo, on the wall of my sewing room, was also in the photo,  directly looking at the dress. I sure pray my hands pull this off and it goes well......Bunny


Monday, January 19, 2015

Fur, Hems, and Bags!

Today I am begging off my Next Level Sewing. It's been a rough week around here. My hubby spent the week in the hospital with a serious infection and will need surgery soon. I no sooner got him home than I woke up Saturday morning with a dreadful cold. Right now I am just looking forward to a hot steamy shower to loosen some of this yuk out of my head and chest. I figured yesterday would  be a great time to face some little mending and some other projects that needed small spans of attention. No real mojo happening this weekend! But I do think there is a little to be learned in what I managed to do so I am passing it along.

First project was the bag. I purchased this bag before Thanksgiving, of course threw away the receipt, and not it is coming apart at the junction of the gusset, zipper and side. I LOVE THIS BAG. You will see it has a bit of bling  and is really pretty. Could I fix it? Upon inspection I think the junction was not sewn properly to begin with, Fast Fashion and all. But some how I was blinded by the bling when I bought the bag.

I
I used a combination of glue and stitching with white bead "wire" to give a secure fix.  I stitched one side of the zipper leather first. I used a heavy tapestry needle and went through the existing holes with a backstitch. Once that was done I put a big blop of glue where the zipper, the leather part , crossed over the side of the bag and clamped it. Then I stitched the other side of the zipper leather to the side of the bag.  Then I clamped the whole thing to dry. 


After a few hours I removed the clamps and used a brown fabric marker to color the white thread. I then rubbed the too dark thread with alcohol and that weakend the color and all is fine. It looks really good now and we will see how it holds up. 

Next chore, two pair of pants that needed hems lowered. This has become standard procedure lately around here. I am five feet tall and every pair of pants I buy needs shortening. I take up the hem. I double fold and try to make it look like the original hemline. Then a couple of months later the pants invevitably shrink despite all efforts at washing care and the hems need to be let down. To get max length back I need to lower them and what can happen is this is what you get:

A fringey, stringy mess that looks crappy. Here's how I handled it. 

I cut a strip of  fusible tricot that is wider than the edge of the hem to past the original stitching of the previous hemline. I place it right on the edge of the pant leg and fuse.
Now it is off to the machine with my edge stitching foot and I edge stitch to secure further the tricot to the pant leg. 

Sometimes I will stitch again further up to imitate the original as I did on these knit pants. 

The knit is  not too bad but you can see a nasty white line on the corduroy pants from the previous hem. Here's how I've dealt with that.  BTW, all these pics have been major lightened so you can see the detail. They look better IRL. 


On these cords I took a black sharpie and LIGHTLY rubbed it on the old hemline. Then I dipped a Qtip into good old rubbing alcohol and lightly rubbed the sharpie line to  blend it into the pants. I think you can see the difference between left and right here. I really like  both these pants and can now wear them beyond the two months it took to shrink them into near oblivion. Hope this hint helps some of you. Two pair of pants back in the rotation!

And now for the piece de resistance! My DD's mother in law had a fur coat made about ten years ago. She became tired of it, full length, and took it to be restyled. Evidently it is proper to return the not needed fur to the client. She had a muff made for my grandaughter and sent me the remaining leftovers. I thought it was very generous of her and I now have this windfall to play with. 


You can see the two sleeves they cut off. What  I really found interesting was the inside of the fur.  Here's a few pics:

Pretty fascinating, isn't it? This could maybe be a fur collar for my cashmere coat, a great hat, or just a cowl to be thrown over whatever. Any ideas? 

That's this week's output from the cave. My felt jacket is now totally done with it's covered shoulder pads but today is not a good one for modeling pics. They will come with a review of the pattern soon. Next Level Sewing will return as life settles down as well. Hope this nasty bug misses you all out there. I can't wait to get back in the cave! ....Bunny

Friday, March 14, 2014

Hemming ITY Knits

Someone has asked me to please show how I did the hems on the asymmetrical top, McCalls 6400. First, if you read the past few posts you know I am a very recent convert to these knit fabrics and their patterns. Therefore, this is no expert talking here. However, before I started on my projects I did a fair amount of research. Because what I had on hand was fusible tricot tape, that's the method I used. It was logistics, not experience sewing knits that brought me to that choice. I am still happy with the results but may very possibly find a better way further up the road.


First, about that tape....what I had on hand was a roll of fusible tricot tape, purchased years ago and on it's last legs. I had no packaging at this point nor a name but I definitely remember it being called a "fusible stay tape". I finished the roll with only inches left on this top. With more tops planned, more tape was needed. I hit Joanns as I needed instant gratification at this point and there was nothing similar. I found Steam a Seam and Tricot tape, non-fusible, not what I needed. One of the lovely Joann ladies walked the floors with me until we both gave up. I told her I was going to check out the quilting notions on the other side of this little store. She got back to her draping.

What's this? Batting tape? I squished it and it felt just like my used up roll did. I looked and it sure looked like tricot. But, batting tape, to tape batting pieces together for quilting??? Guess what, it is exactly the same thing as the "fusible stay tape" I put in the top. So if you need this product and don't want to wait and/or pay shipping for something in a different package, got to JA's and get yourself some 3/4  inch batting tape. It also comes in an inch and a half width and I am trying to think how I could use that!


Here is my simple hem. It does stretch as I gave it the slightest tug while sewing. That's why the stitches are a bit irregular upon close inspection but it's good enough for government work. On a more ambitious day I would use a double needle for the topstitching but that old I.G. (instant grats) was pushing me on.


The 3/4 inch wide tape was fused to the hem edge of the top on the wrong side. Then it was simply folded in half, matching the edges of the tape, and pressed. I think a tad of the fusible stuck through because it kept the fold in place nicely while I stitched, no pins. I just topstitched from the right side with an edge stitching foot and voila - decent hem. 

I am sure there are other methods and I look forward to finding them and trying them out. In the meantime, I think this is pretty OK for a rank beginner.

******************************************

I think the feedback from friends, family and co workers on my work shirt is the best of any garment I have made in the past couple years, really. For some reason this shirt represented something really difficult to do to a lot of my friends. I appreciate all the great feedback but it is really just a basic shirt with little fit.Thanks to all for the lovely words. 

******************************************************


If you've been around the Northeast borders/southern Canadian areas of our country you will know that we had an epic storm finish up yesterday. Halfway through, in the dark of night, I looked out the window at my little car. Storm Vulcan transformed it from a little gas saver into what appeared to be a Volvo Wagon. I snapped away and submitted my pic to the public radio station website up here for their Photo of the Day. I've submitted lots of photos to them, thunderstorms, birds eating, sunsets, rolling fields, lots! But it took my little eco car to get my pic on for all to see. I glowed.............Bunny


Sunday, January 26, 2014

She hems and haws!


I had to show the piece de resistance first, didn't I? You probably were tempted to turn away from that hem title but look at that back neckline! Pretty cool, eh? I have run a folded strip of poly charmeuse all around the facing from hem, around the neck, and back down to the other hem facing. The charmeuse is sort of a tie dye look varying from navies, greens, to oranges and back, just the right tiny pop of color this dark coat needed. It's on the inside between  the lining and coat facing. I added my hanging loop chain and did a feather stitch on the pleat as well. I am going to make a label but that will go on the front facing, the better to impress when I whip open my coat!  {; )

So now lets get down and dirty with the hem situation. It took a LOOOOONG time, people. Bear with me as this was no simple hem. This pattern is basically a bathrobe with cool pockets so I really feel the additional touches of tailoring are going to hopefully take it out of that realm.
First I wanted to "pad" the hem. Nothing says homemade to me more than a pointy hem. Padding the hem will add a nice roll to the edge and add weight to the bottom so it will hang a bit better. I had enough howling wolf flannel to cut bias strips with a bit of piecing. I butted them up and pinked the top edge for no transferral. Where to place the strips? They extend on the bottom straight edge a quarter inch past the fold. when the hem is folded up the flannel is short enough to be well hidden. Did I say these were bias?

The bottom edge of the strip is catch stitched to the coat as well as connecting the abutting edges.


Once that was done the hem was folded up and basted on the edge with the silk thread again. In case you forgot the silk thread doesn't leave marks when steam pressed. Next I pressed just that edge on the wrong side on a thick towel with steam and a press cloth.

Check out that nice padded edge! Yahoo!

The top edge was bound, flipped over and stitched in the ditch with a bias strip of the same charmeuse edging the facing. There really is not all that lint on my coat. I had to do some adjusting so you could see the details.
The hem is now basted closer to the top about 3/4 of an inch from the edge. Are you counting how many passes I've made on this hem? I told you it wasn't a basic hem!

The bound edge is given a good steam press with oaktag under the seam to prevent showthrough, once again.


The top of the hem is flipped back and catchstitched to the coat. 


A completed, invisible, padded hem! Muy lindo, verdad?  These linty pictures are giving me the creeps as my coat fabric is so pretty in real life. I hope that comes through with the final photos. Thanks for bearing with me and my hem obsession. How many passes did you count? 
  1. Catchstitch flannel to coat
  2. Baste bottom edge
  3. Apply bias binding
  4. Ditch stitch bias binding
  5. Baste top of hem
  6. Catchstitch hem
I think that was all! So it was time consuming but I think it is worth the effort. The lining is sewn in and all that is left is sleeves and connect them to the lining. Almost there!.........Bunny


The Ray Pinafore, 2025's Epic Fail

  Happy New Year and welcome to my epic fail of 2026. I guess you have to have one, right? This is the Ray Pinafore from Paper Theory Patter...