Sewing Vloggers

Showing posts with label McCalls. Show all posts

Wednesday, July 13, 2022

A Helpful Tip! Collars and Stands

 Right now I am working on a yarn dyed linen/cotton big shirt with a stand collar, my ode to the classic workshirt. I made a denim workshirt some years back and have worn it to death and will continue to use it around the house and in the garden. Love that shirt. This is it right here.  It was made from McCalls 6613, great, classic, unisex "bigshirt"  pattern.


The pattern has now been re-issued as a Butterick and has a different vibe being sent out on the cover. I think they would sell more patterns with the original cover photo. What do you think? Current cover below. I think the shape of View A is being made to look very A line, aka, tent-ish. It really is cut straight down from the armscye. 
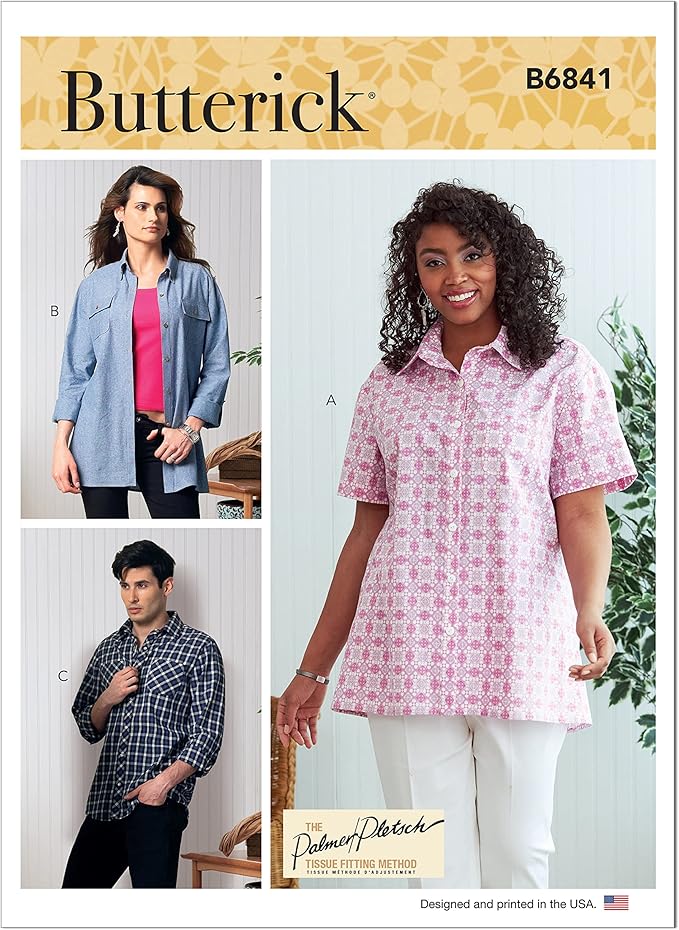


It is now being marketed as the, are you ready for this? Butterick Mister and Mrs. Fitted Shirt on Amazon. Those Amazonians need some help with their pattern marketing. There is NO FIT on this pattern, anywhere! It is a big ole shirt.  There is not  a dart anywhere on this shirt to be sewn. It is a perfect match to the original McCall when I laid them on top of each other, sold as unisex. I was referred on the McCalls site to this Butterick pattern as its actual replacement. Oy,,,,,  rant over. 


Back to my handy dandy tip. This is a traditional collar with a stand. I use to sew quite a few of these but  have pretty much put them aside the last few years.  I needed to brush up on my skills for collars with stands. I remember Nancy Zieman literally drawing out the stitching line on that last inch on each side of the stand part of the collar. Doing that really helped me get equally sized matching shapes, once turned, and without points, something I was having a hard time with.  Today I went to work on this detail of my shirt. My cutting table was messy with bits and pieces of all sorts of sewing detritis. As I picked up some leftovers of oaktag, it occurred to me, why not make a template for the collar stand out of the oaktag? It could be a permanent, easily  trace-around-able object and kept with the pattern in the envelope for the next blouse iteration. Yes!! Why, I could even do this with every stand collar I ever make again, just paper clip the templates to the pattern piece for the stand and tuck those little templates right into the pattern envelope ! Here is how I went about it:

* I simply traced the last 4 or 5 inches of the collar stand pattern piece on to a piece of oak tag with a light pencil and the help of a curved acrylic ruler. 

* I marked thru the tissue to get my large and small dots, center front lines an notches. I used my eyelet cutter to mark my dots. Making holes makes them reusable. The dark hole is my "large" hole. I cut two of these  stand pieces out, one to copy the entire pattern piece end and one to make a template for the stitching lines. On the first piece we have marked all the needed markings and the template is used to match the cutting lines of the fabric and make the markings accurately. 

*On the second piece of oaktag we will measure a 5/8th inch seam allowance out and cut the seam allowance off. 


This piece will be used to mark the stitching line but can also be used to fussy cut the interfacing which I did not do here, just eyeballed it. 

* I will paper clip the collar stand pattern piece and the oaktag templates together when done using them and put them into the pattern envelope until the next time.  Fingers crossed! We'll see how the finished product affects accuracy. This is such a fussy area.....Bunny


We were lucky to be in the Azores when the hydrangeas were in full bloom. They were truly spectacular and miles and miles of roads are lined like this one. This is a simple farm road as seen everywhere. The hydrangeas run from the deepest purple to plums and bright blues and baby blues, breathtaking.  They are everywhere....Bunny

Saturday, July 2, 2022

McCall's 8220, Something Different


There is a lot that is different for me with this top. First the V neck. I rarely wear these as they are almost always way too low in patterns but this one worked out nicely without any adusting. 


It is McCalls 8220, one of their 2021 designs and suggested for wovens. It has a wide, boxy cut and dolman sleeves that are quite puffed. I like them pushed up a bit. As often happens with Big Four patterns, it is poorly photographed for the pattern cover. The garment is pushed back with the shoulder seams not settling where they should to give that half-tucked look. This is not a half tuck top. It is short and boxy, nothing extra to tuck so why fake it? That makes the top button pull the bodice out of whack, oy......


This line drawing gives a far better depiction of the pattern. Bust fullness is accomodated with gathering at center front. There was plenty enough to accomodate my bust, particularly given the width of the top, but with the fabric I chose, it literally steamed out as I pressed the garment. It wasn't shrinkage but more a matter of shaping. When I took class with Claire Shaeffer we did a lot of shaping with steam to hide construction details. On my top you will see no gathers but if you saw it up close there is a roundness in that area that appeared as I pressed the garment with steam and high heat for linen.  

*ETA: Just want to add that the gathering at the bust is very akin to a sleeve cap, at least it was in my size. It steamed out as I pressed.

Notice on the pattern that the full sleeve version which I used has far less side seam height. These are serious dolman sleeves. This is a great pattern to disregard some fit issues. 

Fabric:


Beautiful fabric purchased online  from Stylemaker fabrics. It comes in some glorious colors but I have been wanting to put some more red into my life. It's a good color on me, particularly if it is not a solid blob, but more softened as it is in this print. The fabric itself is yummy, a mid weight 100% linen but towards the lighter end, perfect for a top or dress. I might line a dress. This washed and dried beautifully and could easily avoid ironing but of course I did iron throughout the construction process and the end.  It's interesting how over the years I so often end up using Kaufman fabrics. 

Construction:


 This was an easy make and could even be made easier. It is clearly a top that I discovered, after installing my buttonholes, that could have just been a pullover. You could just stitch those buttons on and pull it over your head. 


The seams were stitched, pressed to the side and serged. I have been doing more of that lately, encouraged by Linda Lee of the Sewing Workshop.  This pattern has the band shaped to the neckline and center front. I had a bad experience with a Vogue pattern last year with a similar neckline that was just an on grain strip. If you ever see that in a pattern with this sort of neckline, it WON'T work. 

It was a journey to find the fabric for the binding, which was easy to assume was black but it really isn't. It is a wine-ish colored deep brown. Believe it or not, I found the exact color at Joann's in a 100% cotton. I prewashed and it worked out great. If you look in the pic in the middle of the facing there is a tiny line of stitching. This is where I stitched in the ditch of the piping to secure the facing. It does not show at all from the public side. 


This is the simple treetment for the hem edge of the sleeve, just folded up over elastic to make the gathers. 


Here you can get an idea  of how deep those dolman sleeves are and how wide this bodice is cut. I did no attempt at pettiting here. I have plans to make another by fall. I believe I will cut in a half inch on each side and go up and remove some depth from that armpit area as well, probably a half inch. I plan to make the next one in a nice white and gray knit stripe , a  barely 1/4 inch stripe. I think it will be really effective with the design. I also think I might add some very slight shoulder pads as well. 


In Conclusion:

I really like this top. I love the fabric and welcome the cut, color and style, something different for me.  I look forward to making it again and I know I will wear this a lot throughout the summer. It will definitely be cool and comfy. Without the piping and making the button band permanently closed it would be an even easier sew. I highly recommend.


One of the many public gardens and beautiful churches found throughout the islands. This one is in Angra de Heroismo and much larger than this small segment. The sign announces a tour later in the day.  Happy Sewing,,,,,,,,,,,,Bunny

Monday, January 18, 2016

McCalls 6532, Completed!


Finally! Ok, the worst part of this project was hand stitching the lining to the zipper at the very end. It was a mere three hour project involving waxed and doubled thread, a thick heavy needle, a thimble  and most importantly, a pair of pliers. If I had a buck for every needle stab and pin prick I wouldn't have needed to buy that Powerball ticket last week! Finally its done!

I really like this bag. It is a bit larger than I thought it might be. I would make it again but cut down the size a bit. Here's the 411:


Pattern:  
This is McCall's 6532, a Kay Whitt design. I will be honest and tell you I really don't know who Kay Whitt is. I will have to do some googling on that one. But it is her design and a nice one. It is much larger than I thought. Sure, I can measure and I did but its sort of like buying food in restaurant. You see things and just buy too much. I saw that the bag was large and just  kept going. What I am going to do to make this bag work a little better is make an organizer for the inside. More to come on that front. This, with a bit more interior organization would be a great diaper bag or carry on bag.

I did not follow the pattern. I was convinced I had an easier way to deal with the future bulk of it all and I did until I got to inserting the lining.


Fabric:
The fabric comes from Joann' clearance home dec area. It is a heavily embroidered design in rayon thread on black denim. I easily found the same denim to match at fabrics.com. I needed that for the straps and bottom. The tapestry was purchased for five dollars a yard and only wish I had purchased more but the next delivery is always around the corner at Joanns. I have seen some really great fabs in their home dec clearance. 

The lining is a quilting cotton, a not really nice one. By that I mean the fabric was heavier than I would like for a quilt but perfect for this use. It has little sparklies all over. and is nice and bright to dig around. I passed on the interior pockets because of the future "organizer". 

The interfacing is what really made the bag. It made it great and it made it frustrating. The exterior bag was fused to fusible fleece as the pattern recommended. This would have been fine with quilting cotton exterior but I had upholstery fabric going on here. The pattern has you interface the lining. This is where I went overboard but it what got me the luggage look, which I think is rather professional looking. I first fused Decor Bond to the lining, never in the seam allowances. Then I fused on top of that a layer of Peltex. The Peltex, heavy board that it can be, got cut back a half inch away from the seam allowances. I also pieced the Peltex so that there was no interfacing in the areas of the bag that needed to fold. It would have been a nightmare without doing that and there is more on that two posts back.  


Construction:
We have established that I didn't follow the directions. I STILL read them through at least three times as this bag is rather involved. I needed to be careful about the sequence and put some thought into what would come next. My goal was to have a sturdy bag that would require as little turning right side out as possible. I accomplished that by making the bag and lining separately and dropping in the lining at the end and hand stitching it around the zipper to close. That last hand stitching was brutal so I don't recommend it. I would only use my sequence if you are dealing with really heavy fabric like this home dec piece and all that interfacing. That Peltex is a bitch.  Making this in a lighter fabric or quilting cotton, I would just follow the pattern. 

The bottom and straps are the matching black denim. You can see I put bag feet on the bottom.The bottom of the bag has a piece of Peltex that is covered with muslin and attached at the bottom side seams. It "floats" and gives hardness to the bottom. There is also another layer of Peltex in the bottom from the lining bottom. I don't like how the straps are secured at the zipper height. If I made this again I would do that as suggested but would also secure the straps to the bag a few inches higher as well, maybe with a buckle or such. 

I topstitched as much as I could but that wasn't much. It was just too hard to maneuver this hard bag under the needle. I did use my workhorse now 40 year old Kenmore for all of the construction. I also used a size 16 jeans needle throughout. I had no tension or stitching issues.  The zippers are home dec type zips. I use them a lot. They are rugged, quite neutral in color, inexpensive and I like the heavy brass look. 

In conclusion:
Would I make it again? Yes I would and I may. However the next time I make it I will take it down a couple of inches in length and width. That will keep the luggage look away. I actually have fabric ready for another one but we'll see what becomes priority in the cave as I reassess my wants and needs. I recommend but not for the faint of heart or the inexperienced bagmaker.
***************************************


First egg of the season after a long molt period. The first was yesterday and two more today! The girls are back in business!.................Bunny


Tuesday, January 12, 2016

McCalls 6532


The outer shell of this bag is complete. It is too soft and needed more structure. I sort of expected that as there was only fusible fleece on the outer tapestry. This pattern has you interface the lining so I decided to go with that technique. I applied Decor Bond to the lining pieces. It was not enough to stiffen the bag. So I added Peltex on top of that. Now we are talking some serious structure here and it ended up being the perfect combo. Was it a PITA to sew? Youbetcha!

You can see above how the Peltex is cut back from the seam lines quite a bit. That is really necessary. In the end I cut back the Peltex on the upper curve of the gusset even more once it was complete. The Peltex gave a real box structure to the bag, actually just right. Above you can see the piece ready for the bottom seam line and to get "boxed". The stiffness presented a challenge. This is not for the light of sewing machines and I have used my two ton battle ax old Kenmore to put this together. Aside, if you can get a yard sale or thrift store heavy machine of some sort into your collection of sewing goodies, it is well worth it. I've made heavy bags on my fancy Pfaff and had to send it in to be retimed after. This has never happened with my vintage Ken. The Pfaff gives me so many things the Ken doesn't but the Ken is one strong sucker and that is just as valuable, IMO.

Here you can see the two sides piece at the bottom. Now I will put in a separate section of Peltex to cover the bottom of the bag. Both the sides and the bottom were cut back to create a folding edge without any interfacing between the two pieces. There is about a 1/4 inch crack between the pieces so they can fold and have a sharp edge. I could have done that to the side seam as well but the force exerted by the Peltex to resist any folding is just what holds the sides out nice and firm. Now to stitch and box those sides!


Here you can see me holding up the lining by the edge with one hand. It totally stands on it's own.  It is a board! You can also see the "crack" for folding  between the sides and the bottom. The good news is this lining will not be turned right side out. It will simply be dropped into the bag and stitched in at the zipper opening. I would not want to wrestle with that Peltex turning this puppy inside out!


This is how the boxing was sewn. I had to move my light to the right of the machine and stick my head into a sort of bag helmet to see what I was doing, challenging! I did not do the inset corners a la Shirley Adams here. This thin  fabric's uninterfaced areas were very cooperative and the inset corners came out just fine.

Once the lining was complete it was dropped into the bag. This pattern gives separate pieces for the lining which I assumed, without any testing, that the lining was cut smaller. It wasn't and it should be. There is excess fabric in there but for now it will stay there. If I use this pattern again I would definitely cut the lining pieces smaller. The Peltex keeps it all in check and it really isn't bad. Now I am sewing the lining edge, interfaced with Decor Bond as the bigness has me turning the seam allowances at the zipper in deeper than the half inch they should be. So one heavy duty needle, a thimble, heavy thread and a pair of pliers to pull the needle through is getting this puppy finished. It is very time consuming and the toughest part of the whole process. I have stabbed my hand and fingers with that needle more times than I've bought Powerball tickets and still have the other side to do.

Basically, I've made the outer bag, made the lining, dropped it in and closed it at the zipper. This is NOT the way the pattern has you do it. They have you stitch/serge the lining and bag together at the upper gusset/sides seams which looked a bit raw to me and even more awkward than the way I've done it here. I can see that working with lighter fabrics, however. So if you are making a cute quilting cotton version of this bag that should work fine. This was just too heavy.

***********************************

I've been contemplating my next projects. It will be a BIG white shirt and either a skirt or flowy pants to go with it. Here's a preview:


                                                                  ....................................Bunny

Saturday, December 27, 2014

McCalls 6938


The Christmas holidays have been wonderful here. The laughter of children is truly a heavenly sound. We have hiked, launched bottle rockets, knitted, played games and ate, ate and ate too much! We even sewed a bit, too. The house will be so silent when our daughter and family leave tomorrow. I hope all of you have been able to spend your holiday just the way you wanted to. We have been blessed to have done so and for that I am truly thankful.

The tiny ski suit was completed just in the nick of time. Those skis really were more of a project than I thought they would be but they look pretty good. Carly L O V E S her dolly's ski suit and it matches ner new vest. Santa left a matching hat for her as well as you can see above. DD's family opened Christmas presents Christmas morning, had breakfast and then headed out on the five hour journey to our home up North. Seems Santa did not deliver Carly's number one item on her list, but being the little trooper that she is , she was totally content with what she recieved. Halfway through the long ride she told her Momma, "maybe Santa will leave a ski suit for my dolly at Bunbun's house". He did and to say she was thrilled is an understatement. I think she thought it was a lost cause but Santa came through. Now for the reality of it all: I was finishing up ski poles at 3:15. They arrived at five! Let's do a review.

*****************************************


Pattern:

This is McCalls 6938. It consists of  a tennis outfit, swimsuit/beach outfit and bag, ice skating ensemble and the ski suit and accessories. This pattern alone could keep you going for a long long time making dolly clothes. Making the full ski outfit does take time with most of it on the shoes, skis and poles. The hat, which I love, and the suit are pretty simple and fun.

Fabric:

The suit, boots and hat are made from fleece, green, blue and white. The goggles are made from white poly felt and a clear piece of plastic from a produce container, in this case salad greens. The ski boots also used findings such as large hook and eyes and clasps for closing pants to give them that more authentic look. While it wasn't a perfect reproduction, I think it is pretty stinkin' cute. The ski's are made with layers of cardboard glued together, boning like we use in formal wear for shape  and duct tape. Duct tape was pretty critical to this entire project. The ski poles are knitting needles that have been cut down with the handles and bottoms out of clear plastic and  duct tape again. The zip is a separating zipper that I cut down.

Construction:

This was involved and took more time that I thought it would but was worth it in the end. I would say the skis were the most fiddley. Honestly, with the skis and poles I went with the "idea" of the instructions, adapting to my own ideas. For the ski poles I searched "American girls ski outfit" on Pinterest and numerous DIY methods came up for the skis and poles. I think I took a bit of technique from each. The design on the skis was done with a Sharpie, much like the trim on the jacket. And the flag, after all, our girl is an Olympic skier, was made by a much appreciated blog follower, Penny H. She even sent me six different sizes to choose from. I just simply hand stitched the flag to the jacket.  I think the most fun was making the hat. It literally took me ten minutes and was so cute I made a larger version for Carly to wear  with her doll. If you attempt this project, know that you are getting into fiddly business but nothing too complicated that any beginning sewist couldn't handle. It just takes time, so don't underestimate that like I did or you may be still at it right before the gift is due!

Conclusion:

This is a great pattern with lots of cute, very detailed options. If you have shopped for anything American Girl you know that the prices are beyond the pale and to be able to make them yourself allows you to gift nearly any of the collection to your young lady. There are myriad patterns from the Big Four, great to stock up on with the 99 cent sales. And there are also free patterns on the web as well. This is fun sewing and I highly recommend it. This particular pattern was clear enough to follow with a successful result. Know that there is also much on the web about making clothing and accessories for these dolls as well. You really can craft a great gift for your favorite young lady and her American Girl doll friend.


Wednesday, March 12, 2014

The Denim Workshirt - McCall's 6613

The work shirt is done. I hope it is the first of several. I like the roomy-ness and casual attitude of it all. I will wear this to death. I hope to make a couple more. The way you see it here is one way I would wear it, with jeans and brown leather boots. There are just so many ways a good ole' boy workshirt can be feminized.

Pattern:
This is McCalls 6613, a Palmer Pletsch Unisex pattern.  It is sized by chest size and I made the smallest size,  34-36 chest, and that gave me a finished chest measurement of 40 inches. So this is very roomy. There are not darts or any fit for that matter. This is not a difficult pattern. I actually never really looked at it. But I did refer to the Zieman Collar and the Colllar Band Tute in the sidebar tutorials.

Fabric:
This is a hundred percent cotton denim from Joanns, nothing special other than I did not want lycra and I did not get any. It's not easy finding denims without stretch. It is relatively lightweight. It is too light for jeans but it is a bit heavier than a chambray, what work shirts are often made of. It washed really nicely and took the topstitching well.

Construction:
I did some changes with the garment fit. I cut down the pockets all around by a 1/4 inch . You can see they are still pretty large. I think I would cut them down a bit more the next iteration. It's a petite thing. I try to make any details smaller to be more in scale with my proportions. I also cut down the collar band by a 1/4 inch width as well as the collar. I am glad I did. I think you'll agree the proportions are good. This is a unisex shirt and they compromised the details toward the male wearer, IMO. Did I "petite" the cuffs? No. I like deep cuffs and actually recut them to the width that I wanted. I felt their cuffs were too narrow. Seams are stitched and serged and topstitched. The topstitching was with variegated "denim" thread. Never again. It looks spotty once stitched and I don't recommend it. Live and learn! I used my monster old Kenmore to do the buttonholes. Facings with graded interior seams and collar band buttonholes are just not anything I even wanted to try with my computerized Pfaff, just too much aggravation. The old Kenmore sails through buttonholes perfectly no matter how many odd layers it has to go over. I treasure that old machine and it is always set up in buttonhole mode, at the ready!

One thing I did not care for but it was too late when I realized it, was the placket for the cuffs. The pattern would have you do a simple seam, ironed open and clean finished. I never would have chosen to do a placket that way and next time won't. I was able to save the situation by lapping one seam allowance over the other and double topstitching. The interior edges were serged. It looked a bit more finished than just a pressed open seam.

All in all, this is a pretty good pattern with some adjustments made to more flatter a small female. I can see myself making this again. I would do the pockets differently, smaller and maybe with a flap. It's a keeper!


Today was a daycation, a sewing one! We are in the throws of , no kidding, an epic blizzard. This area pretty much shut down at noon today and it looks like it will take major digging out tomorrow. We already have a foot and we haven't had the worst of it yet. The storm warning is on till 8:00 tomorrow night. They are talking2-3 feet of snow, temps in the single digits (we are almost there now) and very heavy winds and "thunder snow". Hubby and I are hunkered down and it doesn't look like we will have work tomorrow. 


I managed to prep my pattern and cut out another ITY top. This one is a tunic and a Very Easy Very Vogue pattern. It is oddly cut for fit adjustments. I am hoping my flat pattern measuring will serve me well. It looks like it will fit other than a couple of small tweaks. More to come......Stay safe all in the path of Vulcan...Bunny

Wednesday, February 5, 2014

The latest fabrics and plans!


My BFF will be welcoming her third grandchild into this world shortly. This little angel did not come by her arrival easily but will  be here by caesarean in a couple of weeks. I always make something in a sixth month size as new moms just get tons for the newborn but maybe not so much a bit further up the road. A cute little smocked dress is planned.

My coat is done for the most part. I have found that since  where the facing meets the lining, where that colorful little strip is, well since that facing is not secured to the shell of the coat it BILLOWS and I am not likeing that. I can see this ballooning out on one of our windy cold days up here. So I have pinned together the facing/lining SAs to the shell/coat SA and will hand stitch them together. They are pinned together and it hangs much better now. So there is that handwork to do, make the belt, and fussy up a label. We will see what the weather provides for weekend pictures and hopefully will have those up soon.

My next big project will be jeans. I have to master them. We are allowed to wear jeans to work but they must be with nice shirts or sweaters, jewelry, etc, nothing sloppy or looking ready for floor washing duty. Since jeans do age and not look so well after a while I use a lot of them and need to get this down. I have taken the RTW Fast pledge and these jeans are a big priority. In the meantime I will have some fun with this little baby project. I always like to have a hand project and machine project going at the same time anyway. This little dress will be hand smocked. I haven't settle on the design yet and need to do a bit more research.
The fabrics are a quilter's cotton in a rose pattern that I just fell  in love with and two white eyelets from the collection. One eyelet is 24 inches deep so I cut off the some of the plain batiste to do my smocked insert. There will be an eyelet underskirt and maybe something special going on with the rose top skirt. I am not finalized on this design yet. I also have an allover eyelet that I will use for the sleeves . The eyelets match perfectly.

The pattern is McCalls 6015 and you see the area on view F that will be perfect for the smocked insert. I will do the little cap sleeves from view E. I love that type of sleeve on chubby little baby girl arms. There will be some white eyelet panties too. All in all, this will be vivid and fun to make so stay tuned for this one. At this point the batiste is backed with a tricot interfacing and ready to hit the pleater. I won't cut out the rest until that is complete. 

I need to make a muslin for my jeans. I picked up this stretch cotton twill at Joanns for that. I'll be using my Sure Fit Designs sloper and the Sure Fit DVD for jeans. I figure that fit won't be too off but if it is, this print will hide things so I can still wear them and get in some good practice on the topstitching, rivets and such. Then it will be on to heavy denim. Does anyone have a preference as far as the weight of the denim? I'm not a big fan of stretch denim so that will affect the fit also. I really don't want stretch denim. And the weights, it's looking like an 8 ounce might be right? Any input appreciated. 

This is the state of my sewing right now. I should be able to get a lot done on this weekend and am planning it. The next weekend, a long one, I will be travelling to the Boston area to get my implant finished, I hope. It will be great to see family and hopefully wear my new coat!.........Bunny

Sunday, November 17, 2013

American Girl Double Doll Carrier, McCalls 5019

 
This project was completed last night and this afternoon, quick and cute! It is a gift for my little granddaughter, Carly. Rumor has it that if she is a very good girl Santa may bring her a second American Girl doll for Christmas.  And this is a carrier for TWO American Girl dolls, perfect for girly overnights and friendly visits to Grandma's.

Pattern: 
This is McCall's 5019. The pattern features some cute jammies, a sleep fleece, a robe, a dolly sleeping bag, a "chair/pillow" and the double doll carrier. I don't think there is any other pattern out there like this, one that accomodates two dolls and all their paraphernalia at once. It is VERY easy and is ripe for additional embellishment. which I did. The heart design comes in the pattern. 

Fabric:
This is made from inexpensive 100% quilter's cotton from Joanns. You don't need anything fancier than that to make this wonderful, IMO. Whenever I make something for my granddaughters I try to make it in colors that will flatter them. Carly is platinum blond with turquoise eyes and a big tooth missing in front, therefore the turquoise fabrics. And because she loves animal prints I threw in a bit of zebra too. Anyone can do leopard, you know! ;)

The entire outer bag, other than the pocket is interfaced and I used Decor Bond here. The pocket is simple a large rectangle folded in half to make the top edge. I thought that edge was a bit weak so I added the black bias tape and some more calico to give it a little more heft. 

Construction:
This is easy peasy. I cut it out in short time last night. There is a big chunk of fusing to be done here and that took a bit of time. Then I basically made two tote bags, one being the lining. The lining has the pockets added to the sides to accommodate the dolls. Stitch lining to bag, turn, and done! Need a cute Christmas or Hanukkah gift? You can whip this out in no time. I did topstitch the top edge to keep it from turning out. 

Opinion: Easy, great gift, nothing complicated and fun! Highly recommend. It will make your little darling very happy!
****************************************
I want to sew. I want to blog about sewing. My attentions lately have not been on either. We have major company coming for Thanksgiving. Since we downsized to our little retirement home in the Adirondacks we have always gone to our daughters' homes for the holidays. They are much better equipped at this stage to do lots of entertaining. But this year, this year it's at our home, at their request, and we really are excited. I will have 8 adults and five children for dinner. Some will go to the lodge up the road, very nice, and others will be staying in our home. We are so looking forward to it. So the past two weeks we have been cleaning, moving furniture, finishing overdue decorating projects, etc You know how that works. I must say the house is looking pretty good. So if I am scarce for the next few weeks you will know why. We will have a repeat at Christmas! Prime rib, anyone?..................Bunny

Here's our new back foyer off the family room, all of which were ruined by last fall's flood. Finally done......


Sunday, January 13, 2013

Real Sewing Returns

I am finally starting some real sewing, after this hiatus I am ready to roar. The remodel is finally complete. The holidays came and went and the nasty,nasty flu is but a memory. I even got the final leg of my sewing room re-org complete today. The "fabric closet" which joins the studio with the back "fabric room" got a thourough going through this morning and a total scrub down as well. What to begin with?

So many things have been backed up in the queue but it made logical sense to me to do my dress form re-do. I am sure you have seen Kenneth King's custom dress form in Threads recently. There have been more than a few successful outcomes out there in blog land of this technique. Oh, you remember the duct tape form my BFF and I did? In late August I think the heat and humidity just did it in and all sort of sagged in the most awful way. At first I thought it was just continuing to mimic my ever changing and aging shape but truth be told, It just died. So a different "mini-me" has been on my mind ever since. To get started I picked out my Vogue Sloper pattern, Vogue 1004. It's been around for years. I never have quite gotten the sloper thing, at least the part where you make it work on a different pattern, so I never took this out of the envelope till today.

 I folded the skirt pieces under to just give me the hip length needed to cover my current dress form. At this point all pieces have been cut out, marked, and are ready to sew. I did NO alterations to this pattern as tempted as I was. This is a size 8 and upon reading the finer print I realize they are nowhere near my own measurements. A disadvantage of this pattern is that it comes in one size, the one you decide will work. Since I usually use a Vogue size 8 and then do my usual alterations, I went with an 8. I followed the initial instructions for measuring and quickly realized I probably have the wrong size but I know if I had the "right" size it would be swimming on me. Anyway, you can see the very generous seam allowances so I think in the end I will be fine. Also, the pattern does provide pieces for different bust cup sizes. According to the measurements on the directions I needed the D front. When I alter a pattern it is always to a C cup and that's been fine so we will see how this turns out.

Here you can see the horizontal balance and grain lines marked in with marker. You can't see all the other lines, every single one of them, which are marked with waxed transfer paper and a serrated wheel. Love that technique!
I will say, this sloper pattern has LOTS of information inside, six pages both sides, on how to do all sorts of alterations. It's a great reference. But remember, they are teaching you to make a bodice sloper, something you can use to later fit patterns. I am going for a skin tight facsimile of my personal body space so it will be a tad more snug. I am going to sew everything up with big stitches right where they want me to. Then I will do further adjustments. I will probably wait for my BFF to come over for that next weekend. Then it will be Stuff the Dummy time, yahoo! Cross those fingers.

****************************************************************************

I am still languishing over the pattern for my winter coat. I will probably be sewing it over Fourth of July! Some years back I tried on a 3000.00 swing coat at a store in Boston, can't remember which. It was the most beautiful thing I think I have ever tried on. It was simple and exquisite black wool. It took everything I had to not hand over the plastic. Ever since that day I have been craving me a gorgeous swing coat. I have seen on PR a few iterations and the upper part of the current patterns seems to have a lot of volume. The sleeves are huge as well, which I do understand is a nod to it's retro roots. But all that fabric would be overwhelming on me. I want a narrow upper chest and a wide triangle at the bottom. Today while looking for this sloper pattern, which required that I go through every pattern box I own, I found this forgotten swing coat pattern that may be the one.
It's from 1995. I like the collar a lot as it fits the need to keep the neck extra warm in this climate. Other patterns and their collars have never been just right. This one is. The sleeves also don't seem to be as voluminous as other patterns currently available and I like that. Given that the date of the pattern is 1995, around the time when I tried on the 3000.00 coat, those shoulders shouldn't be as wide as those of the eighties but a muslin will prove that out.  I also like that this coat has long sleeves. Every other SC pattern I have seen has 3/4 sleeves and that won't work up here. I also like the version shown with the tie belt. So this may be the one. It's McCalls 7947. But first  I have to get my "mini-me" put together!....Bunny

Tuesday, May 1, 2012

McCalls 5721, Cart Cover finis!


Cart Cover is done and I love it. Yup, this is a lousy shot. This is what happens when it is pouring out, you've just finished working all day, and your hanging out in the local supermarket parking lot and want to go home. But I think you get my drift. On the left you can see the giant pocket which really is a bag that the whole magilla folds up into. The white belting is the strap which becomes the handle to the bag if you do a perfect job of folding it all up. It's hard to see but there are two pockets on the inside that the child has access to, great for little toys, bottles or sticky gooey snacks. It is all totally washable and with a little effort and some body mass inside I think it will be pretty cute. No baby in my family is going to chew on those germ encrusted handlebars!

Pattern: McCalls 5721,the Three in One Cart Cover.

Fabric:  Joann's calico wall's finest! 100 percent cotton. This was a border print with a different border on each side of the yardage which I didn't pick up on till home. You can see here that the border difference was a non issue. The filler is a wool/poly blanket. The easy way to pull this off would be to use purchased double sided quilted fabric . It would whip right out in that case but the price would increase bigtime.

Construction: Not much unusual here. Most was discussed in the last post. Basically:

* Make your casing one inch wide.

* Use a French binding for the legs and pockets.

 ETA Update: Here's a pic of it all folded up in the bag. Thanks for this suggestion:


Everything else was just as the pattern spec'd.

This gets packed up tomorrow for our new Mom who is eagerly awaiting her arrival. She will not know the sex until birth. Maybe there will be more smocking in my future....Bunny

The Ray Pinafore, 2025's Epic Fail

  Happy New Year and welcome to my epic fail of 2026. I guess you have to have one, right? This is the Ray Pinafore from Paper Theory Patter...