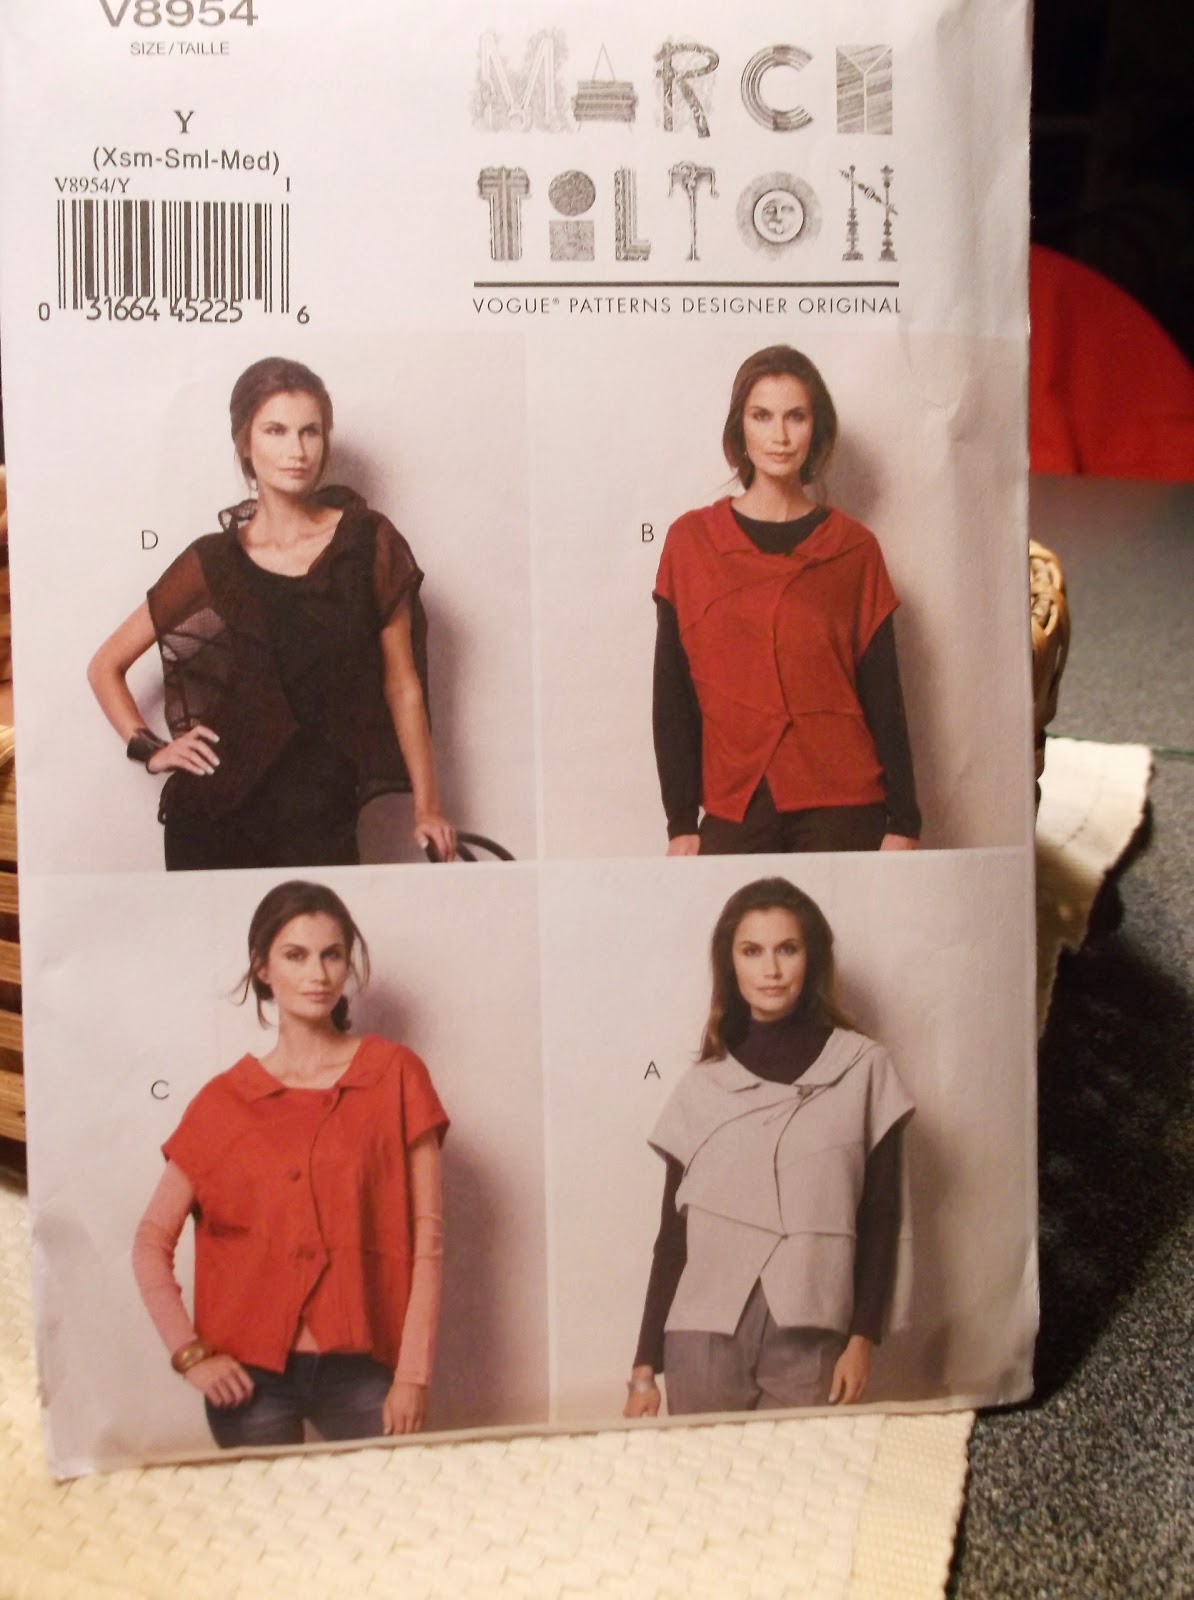
Let's start with the actual pattern envelope. There is so much to be gleaned from this little package. The front of the pattern will give you the Pattern number, which can belong to more than one company or even be used more than once by the same pattern company! For whatever reason the numbers seem to be recycled which a google image search clearly shows as well. If the pattern is a designer pattern, like the one below, their name will be on the front. Different versions of the garment are shown, each having it's own letter designation. Some are drawn. Others are photos. The letter is important for following the cutting layouts and instructions inside the envelope. But here is what I really want to impress on you. Before sinking money into a pattern purchase, look at the photos REALLY CLOSELY. Notice below view B is no where near as full as the other views, but the other three views show lots of volume in the sides and back. Do you want the voluminous look or the more shape hugging look?
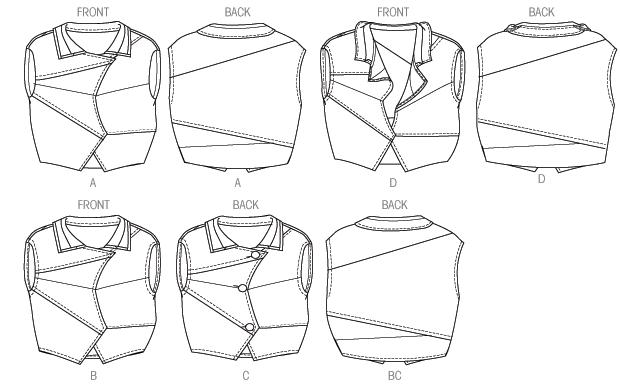
This is when you have to flip over the pattern and look closely at the
technical drawing, also known as
line art or
schematic. Are they all the same volume and maybe the collar or closure is what's different? The tech drawings will give you much more information than any model pic on the front. The front picture gives you clues. The tech drawing gives you reality.
We can see all these vests have the same volume in their technical drawings and it is the way the photo is styled that makes them look different! Or is it Photoshop, or maybe even clamps at the back of View B? The line drawing also shows the separate pieces that are necessary to make this garment. and their seamlines. It's hard to see that in the photo. Beware photos with print fabrics!
Pull your pattern out of the drawer, if your store lets you, and really look closely at both the photos and line drawings to see what you are getting. I don't hesitate to pull the directions out of the package to make sure I see what I am getting.
This is the Donna Karan dress I recently made into a jumper for myself. I did not look at the pattern closely enough. The bodice on this dress has issues that are clearly visible but I was so taken with the design I did not see them. Love is blind and it applies to patterns and their buyers too.

The little black arrow is pointing to the diagonal wrinkles. This woman has no bust to make those wrinkles. My garment didn't get the diagonal wrinkles until I wore it a few times. The bodice is cut on the bias. There is huge volume in the lined skirt and therefore heavy and pulling weight on those bias straps. This could have easily been solved with some fusible interfacing to counterbalance the bias and weight making those wrinkles. There are no instructions in the pattern to interface this area. Do you see how on the left side of the dress here hair is covering them up? Beware of hair being pulled around to the front and over the shoulders to hide fit issues. Children's patterns are particularly notorious for this. Read these pictures and lines! ( I still love my jumper!) Look for gaping, wrinkles, questionable hair placement, arm folding, how low sleeveless armholes are, etc.... Really analyze the photos. Last year I took a class in photoshop. I will never trust a photo again!
The models used are generally stick thin, beautiful women. They are "selling the sizzle". We need to see beyond the sizzle and ask, is this a really good design and will it work on my own body? If the model looks "hippy" in the photo and hips are your styling concern, you can bet the farm it will look even more hippy on a real woman with glorious hips. (Feel free to call your own wide hips glorious as I do mine.) We all need to be more objective in our pattern purchases. If it's for kids, how are the sleeves hanging? Is the crotch dragging? Where is the shoulder line? Buyers beware.
Some garments on pattern envelopes do not fit the model well at all and it shows. Do you love the pattern enough and have the skills to make the pattern work with alterations? If so go for it. If you are a bit squeamish about your skill set, look very closely at the fit on the perfect body of the model. If it has issues with her, it will definitely have issues with a real woman and move on. Don't buy it unless you are up to a challenge and then, make a muslin first!
According to McCalls Pattern's blog,
this post, you are seeing the
actual designer garment in the photo on the cover of any of their
designer patterns.

On the back of the pattern you will always find a description of the garment. It almost always starts with something like "loose-fitting" or "fitted" or some other words of how the garment fits the wearer. If this is confusing, and it is mysterious for sure, in the back of the pattern catalogs and on the websites of the Big Four you can find "ease" charts which well tell you exactly what that description means in inches of ease in the garment. I highly recommend you check that out when pattern shopping. These ease charts are specific to the pattern company so don't cross reference them. This ease business is critical to the fit of the garment. If I am making what is described as a "semi-fitted" jacket, that means there will be 4 3/8 to 5 3/4 inches of extra room in the bust area of the jacket. That does not include any additional ease added in by the designer for his/her design. So my 37 inch bust can have a jacket that is over 42 inches wide in the bust. Do you see where this is going? So if I bought a pattern by my bust size (don't do that, nuther story, nuther post), this thing would be huge!!! In my many years of sewing I have found that 95% of fit complaints about the Big Four result in a misunderstanding of Fit Ease, Design Ease and Pattern Description words. I highly suggest Nancy Zieman's books on fitting, any of them and there is information on her site as well on getting the proper size Big Four pattern. I've never run into the issues others have with "huge" patterns from the Big Four since learning how to buy the proper size from Zieman.
There are suggestions for fabrics on the back of the pattern. A few years back I had reason to get involved with customer service at I think Simplicity. They answered my question about my pattern and then we had a nice discussion. I learned from that conversation that the first fabric listed on the pattern is the one the designer used to make the original garment as well as the fabric that is used in the photo on the front of the envelope. Suggested fabrics are really important to follow. Two things always stand out to me as the sign of an inexperienced sewist, lack of ironing and the wrong fabric for the pattern design. Read the fabrics listed, ask the store clerk for help or look at the more detailed fabric descriptions on line. Don't stray from the suggested fabrics until you have at least worked the design out in the specified fabrics. Getting fabric to work with the pattern is one of the toughest things to do in sewing and it can take years to acquire that skill. Let the pattern help you. Follow it's suggestions.
Notions are listed on the back of the patterns of the Big Four, not necessarily on all the Indies. It's nice to come home with everything you need to start your project so this list is worth looking at. On this Sandra Betzina pattern I am currently working on the pattern actually tells me what to get for notions, specifically.
Not all patterns get this specific with the notions list but I like how Betzina's patterns do.
Also on most patterns are finished garment measurements. I can't tell enough how important this is. If you are not the standard 5'6", B-cup body that the pattern has been sized for, you can now look at the finished garment measurements, measure the pattern pieces as they are laid out flat and compare to your own. This is where that amount of ease and the word description of the fit gets meaning. You will learn what will need adjustment.
*************************
Let's discuss differences in patterns. There are the Big Four: Simplicity, Vogue, McCalls, Butterick. (As of 2019, Simplicity is now owned by BMV, therefore, now the Big Five) My understanding is the Big Four all use the same sloper based on measurements taken many years ago from many women across the country. The book
"Overdressed" gets into exactly this. If you know the alterations you need to make to get a garment to fit you well, you can usually do them to any of the Big Four and get the same results. Nancy Zieman says there is no difference in their slopers and I have read that elsewhere as well. I know many sewists feel there is. My personal experience agrees that there is none. I can do the same alterations for my shape to all of them and get the same results.
There are also Indie patterns, as in Independent, not associated with the Big Four. Indie patterns run the gamut from very professional designs by trained and educated pattern makers to the most basic design for a child that a SAHM mom has had success with and now markets through her blog. Here are some of the differences I see:
* Big Four patterns can often, in the U.S., be purchased for as little as 99 cents on a regular basis. PDF and paper Indie patterns can run from some promotional freebies out there on the web to 32.00., like one I saw the other day, a wide variation.
* Big Four patterns are almost always on thin tissue paper which some use to fit directly on the body. Marfy and Sandra Betzina patterns, part of the Vogue family, are the exception, using better quality papers. Indie patterns, depending on the designer, are often available only in PDF format which you download, tape together and either trace or cut out. Some Indies put out paper patterns as well. PDFs are generally less expensive than paper patterns.
*Big Four patterns subscribe to the same measurements for their slopers. If you learn to fit one, you can fit them all, and I can personally attest to that. Many will tell you that only Vogue fits, or they only have to adjust such and such on Simplicity but I really think it is more the nature of the design, not the sloper that they all share. (See my thoughts above on ease and fit wordds.) Many are introducing patterns with different bodice pieces for different cup sizes, Hoorah! Indie patterns are often geared to a specific body shape, which I think is wonderful, as well. Some are designed for C cup bra wearers. Some are designed for the "Petite Plus" or the "pear" and so on. There are many variations you can seek out for your specific fitting challenges with the Indies. Just be aware of these differences. If you are slim hipped and buying a pattern designed specifically for a "pear" you will have to make adjustments.
*Big Four pattern companies have access to the big name designers. Cynthia Rowley is one of my favorites but there are so many. You can literally follow the runway shows and see the designs come out in patterns not too much later. Indies are designed by themselves, so there is a wide range of ability and experience and name recognition. Many designs are redundant, just think tee shirts and pencil skirts! However the Indie world has great industry trained and educated designers providing us with designs that are innovative, flattering and well drafted as well.
* Big Four patterns have those technical drawings. Some Indies have them, some don't. I know many Indie aficionados who will not buy them any more unless there is a technical drawing, front and back!
* Big Four patterns aren't hand holders and may not give all the instruction a newbie sewist may need. But most of the Big Four have patterns specifically aimed at the beginning sewist now, so those are worth checking out. This is when a great sewing book comes into play. I've made a few Very Easy Very Vogues and liked them. Do you know why they have that name? It is because of the limited number of pattern pieces. They are not necessarily easy as they can have welt pockets, plackets, etc, but just a few pieces. Some of the indie patterns are really good at the hand holding type instructions and assume the sewist needs every bit of instruction along the way. Not all are like this but I think those that are are really filling a niche and I applaud them.
* I would advise any and all to check out the pattern they are interested in on
Pattern Review, be it Indie or Big Four. PR has over 450,000 sewing members and I would venture most have done a review at least once. They have every pattern company imaginable on the site. Search out the opinions. If five people have made a pattern and each one had the shoulders hang too low, well, watch out for those shoulders! It's a fabulous resource!
* The Big Four all have websites and Facebook pages. Many of the Indies have sites and FB pages as well but quite a few of the children's designs are marketed through blogs as opposed to a separate business site so may be more difficult to find.
***************************
About sizing: Pattern sizing has absolutely nothing to do with ready to wear clothing sizes, ever!
This is the most important thing you need to know about a pattern. Big Five patterns are made for a 5'6" tall woman who wears a B cup bra. You don't wear a B cup? Fully expect that any pattern won't fit well until you learn to do a Full or Smaller Bust Adjustment for your cup size. It won't fit, I tell ya, until you do.
Not 5'6"? Big Four patterns all have adjustment lines in the bodice and skirts and pants legs to lengthen or shorten and even lines to "petite" the pattern. It won't fit correctly until you make these adjustments. Some of you know I am petite and in my tutorials are lessons on petiting a pattern. I also run through this with each garment I make and post on the blog.
Sewing is Fitting. I read somewhere that there is only one woman in a thousand who has the same figure as Barbie. I would venture that the odds are even higher in reality. But I think the odds of anyone buying a pattern, cutting it out and sewing it as printed and having it fit perfectly are just as high as the Barbie odds. If you want to sew, fully, fully expect to make alterations to get your garment to fit. Sewing is Fitting.
There is sooooo much more about Patterns that I want to share so I may do another chapter of this next week. I think we need to get into the actual tissue and that could be fun. I have a few tricks regarding that part. This post has been pretty much expository, but it sets the groundwork for what is to come with using patterns and sewing. Below the pic I have printed some lingo you may find when dealing with patterns.........Bunny
photo courtesy asewingjournal.com
Some lingo:
the Big Four---this is the term for the four major pattern companies in the US. They are McCall's, Butterick, Vogue and Simplicity. Today McCall's, Butterick and Vogue are one company and Simplicity is its own separate company. (Now the Big Five with Simplicity under the umbrella.)
BMV---Butterick, McCalls and Vogue, again, the same company
McVoguerick---same as above.
KS----Kwik Sew patterns, reknown for their great knit and undie patterns
Simplicity---. The Simplicity Creative Group owns New Look patterns as well as other needlework related companies. They are currently owned by the Vogue/McCall family.
Burda---European pattern company. Their paper patterns are available in the US at the chains. Those have seam allowances included. They are also available in their magazine, without seam allowances.
Burda magazine---Published in several languages in Europe, including English,and available here. There are many patterns in each issue. The patterns are "nested" with all sizes and styles on a few sheets that must be traced in the proper size to make the pattern. Direction assume you know certain techniques and they are therefore not mentioned. Directions are chancey and patterns have no seam allowances included.
Marfy - Hand cut designer patterns from Italy that are fabulous and come with
NO directions. They are under the Vogue umbrella and are famously drafted well.
Indies----These are pattern companies unaffiliated with the previously mentioned companies. There are many and more new Indies every day, Indies as in "independent".
OOPs---These are Out Of Print patterns. You may be able to pick them up from Ebay or Etsy but often they are still available on the pattern company's website.
Technical drawings--- These are the line drawings on the back and inside of the patterns of the big four. They show the details/seams without the distraction of fabric prints or body posing by the model. They are found on all of the Big Four patterns but only some of the Indies. I find them critical to making my decision to buying and making the pattern. They are sometimes called "line art" or "schematics".
Views---These are the garments shown on the front of the pattern envelope.They have letter designations and each vary somewhat from the other. These letters need to be matched up to the fabric amount needed on the back of the patterns for the style chosen In order to have the right amount of yardage