Sewing Vloggers

Showing posts with label fit. Show all posts

Thursday, August 5, 2021

This Tee Journey Is Not Easy!

All photos have been wicked enhanced for contrast because of the black fabric. This makes for weird shadows and I apologize. 

The Tee Shirt Quest continues................and this was a story unto itself as well. I haven't hit the Holy Grail yet! I do have lots to say about this pattern. You may be thinking to yourself "she is really getting grouchy in her old age." Maybe I am but I don't think so. Yes, after a certain age our lips and what comes out of them do get a little looser but I am not getting crabbier. I just have a lot more experience under my belt at this stage and perhaps expect more because of that. The sewing world is changing and I am not sure quite what is going on with it as you will see in my review. Let's get started. 


 Fabric:

The first thing my husband said when he saw the tee was, "Wow, that is gorgeous fabric." It really is and makes a great tee. It had the stretch needed and was from ancient stash. This fabric, which I think is a rayon/poly blend interlock, came from the Fabric Fix, an awesome Mom and Pop fabric store whose owner hit the Garment District every couple of weeks and brought back killer bargains on designer fabrics and sewing notions. I think I paid 3.00 a yard for this and bought tons. I made a voluminous skirt from this fabric that I wore to death for years at work. I still have the skirt to recycle its fabric. I wish you could see it up close. It is lovely and a delight to sew. It topstitched and eased beautifully. 

Pattern: 


This is where it gets interesting! This is Simplicity 9229, cute little tee shirt number from "Something Delightful" ugh. You need to really look at this pattern envelope closely, the model and the back. I bought this pattern on a big pattern sale at Joanns about a month ago. I bought 4 tee patterns. Two were Simplicity with S before the number on the patterns and dated 2021.  Now I don't know what is going on with Simp, if they were sold off, acquired, owned by CSS, or Design Group, or Something Awful or what but things are different. These 2021 versions have a confusing guide on the back. It says Sizes and then underneath European. You take a look and tell me what that means. 

OK, maybe I needed more coffee, but I thought size 6 had a 32 inch bust.  Luckily for me I always flat pattern measure. Seems it was only 30 1/2. Now, for about 2 1/2 decades I have been achieving pretty decent fit with the Zieman method which put me into a size 6 with an FBA , not a big one. This pattern was way too small all over. I knew negative ease was involved and I don't like negative ease but this was beyond that. I ran to Pattern Review. Low and behold, the one review was having the same experience I was. I will let you judge for yourself here. The envelope and others like it also have no description of the garment which I found frustrating. I would think a description acknowledging the princess seams would be nice. In the photo above you will see that the cutting lines for side front are wrong for the size 10. They put the size 10 lines on the size 6 cutting lines. I did end up cutting  a size 10 and did an FBA and did a MAJOR bicep adjustment. Since I stopped working I am more active plus those health issues and have lost weight.  So my 107 pound frame jumped up in size, and after losing weight (only a number)  then I needed to add a lot more to that to get it to fit my bicep. There is just something wrong here. Read the PR reviewers comments as well, including those below her review. 


So I don't know what is happening at Simplicity but for the first time in forever, their sizing is not working for me like it has for years. 


I will be the first to admit it could be me but the PR review does give a bit of validation. I have remeasured myself and cutting out another tee right now with another pattern and we shall see what happens. 

Construction:

This fabric was delightful to work on. The pattern did call for inserting sleeves in the round so I went with it being my first try  but next time will be in the flat. Between the last tee and this one I stumbled upon Sara Veblen's method of inserting neck bands and used it for this shirt. Wow, her tips helped me get perfection. I am really happy with my results and you can see her video here on the Threads website.  The pattern did not call for it but I stayed the neckline with fusible tricot interfacing.  Before I inserted the sleeves and after doing the neckband, I pinfitted the sides and they were fine, plenty of room. It did seem to need a bit of a sway back adjustment but I would catch that on the next make.  Sleeves went in. I did the hems and done. I tried it on and it did not fit. I don't know where the fit went but once the sleeves were in it totally changed and I had no extra seam allowance to play with. I was not going to wad this shirt. I loved the fabric too much. I ended up cutting gussets for the side seams.  They were shaped like picket fence stakes adding one inch to each side and terminating in a point at the armscye. Worked like a charm but took time, ugh. Size ten did not fit at ALL. You can see it does not have negative ease, but neither does the triple size 0 model on the cover of the envelope. Is it not fair to expect my ease to match that of the photo on the envelope? With no description saying "close fitting" or anything else, I thought mine would fit like the model's, at least in regards to ease. I hemmed the sleeves and hem with my usual manner. That means a fusible tricot applied to the full hem width and stitched on the edge and again about an inch further up. 

In Conclusion:

I don't recommend this pattern. It required me to rethink a method of fitting that worked for me for decades. I feel the pattern itself is faulty and it shows on the poor guide on the outside of the envelope as well as the printed tissue.  Upon further investigation of the back of the pattern you get a "6" size, a "32" European and a "34" in Francaise. Is Francaise not European and are these measurements or what? I think those may be just representative of further turmoil within this company and if so they better get their act together as their competition is nipping at their heels with foam dripping from their mouth. This pattern is not one I will make again. I have one more I will try on the cutting table as we speak. This five foot tall, 107 pound woman cut a size 12 based on my measurements. If it fits perfect, so be it it. Numbers don't bother me. Change without explanation does.  Maybe they took lessons from Nancy Zieman and redid their pattern slopers.  We can only hope..............................Bunny

Tuesday, August 18, 2020

Mimi G Style S8889 and pants


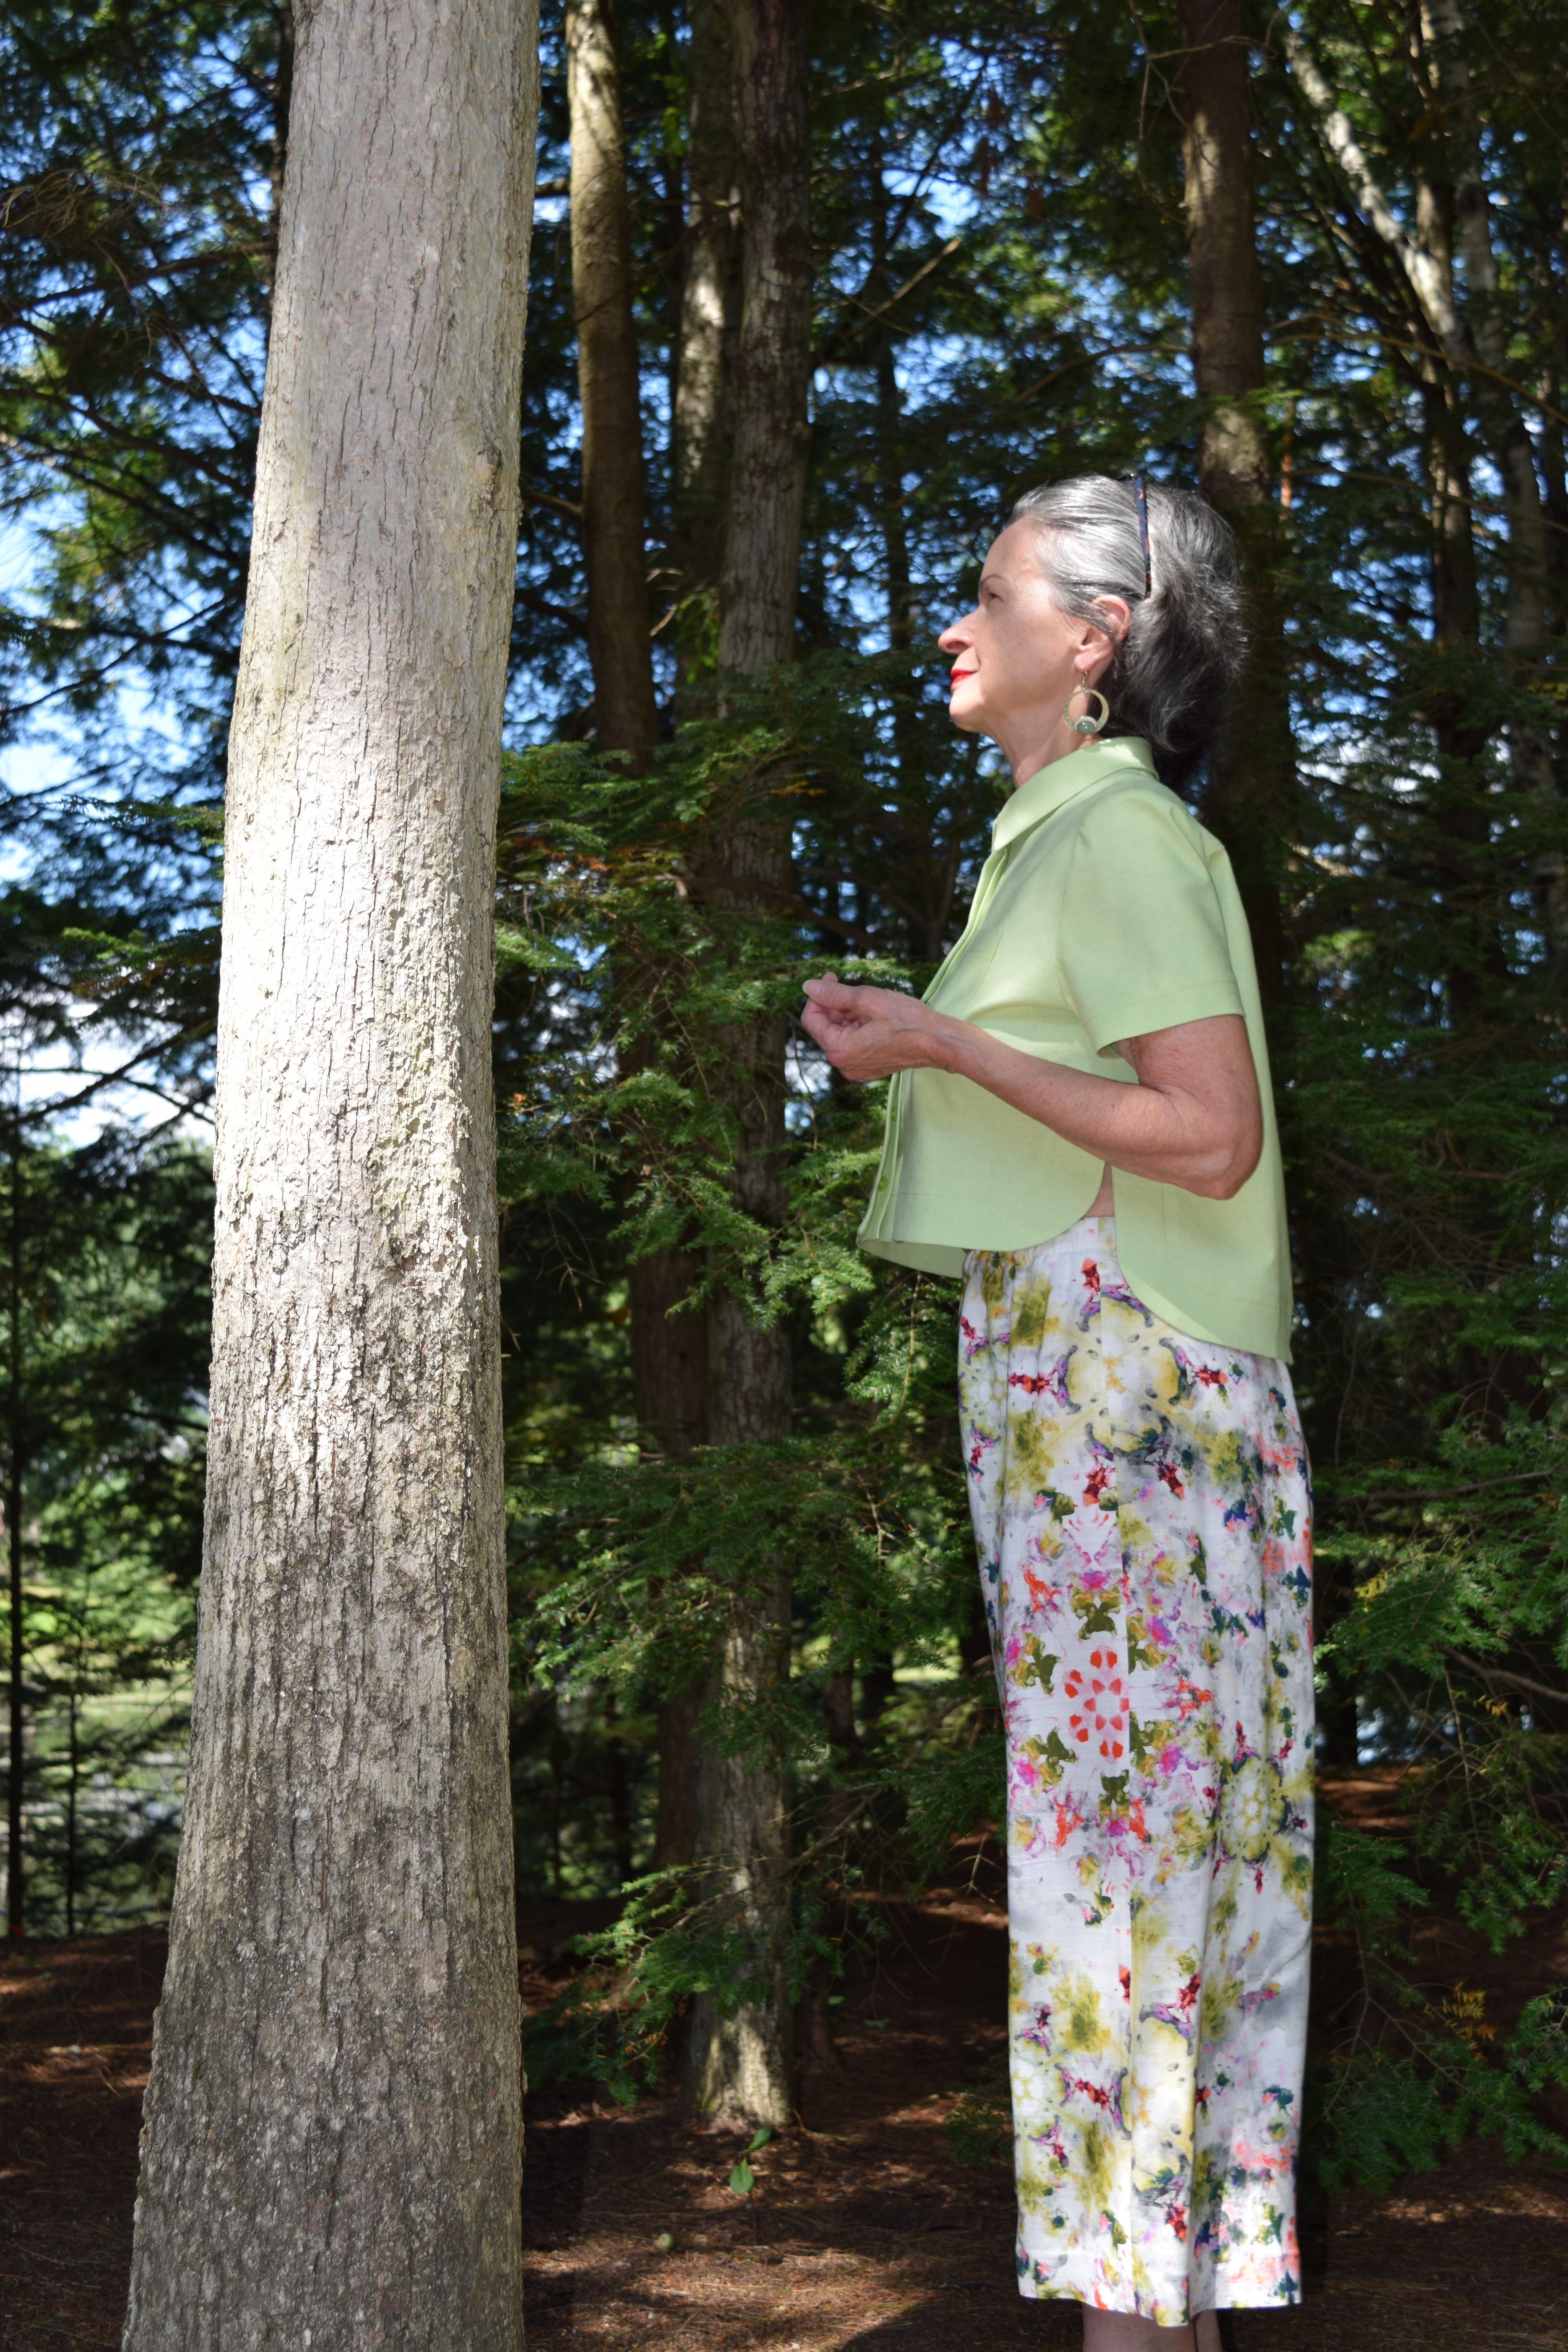
As soon as I saw Simplicity 8889, a MimiG Style pattern, there was something about it that said "petite" to me. I loved the detail, the high collar buttoned shut, the interesting hem band. I even liked the high low bottom edge, not my usual taste in hem finishes. It all just seemed a bit downsized for a petite shape. I also thought it would be the perfect foil for the rayon print pants I just made.  It would go well with some pale green I had in the stash. It would also allow the full length of the cropped pants to show. The sizing would  require a bit of adjustment for petiting but that was nothing new.  I will review the top first here and then the pants. 

The top

Fabric:  

This is made with a fabric that someone, can't remember who, gave to me. It looks like Brussels Washer Linen, or so I thought. Once I started working with it I realized it had a fair amount of Spandex fiber and that was all on the crossgrain. I DO NOT LIKE Spandex but it was in there and I was emotionally vested in the project so went with it. It was a pain to iron and at the end drove me nuts on the last horizontal collar stand buttonhole. ugh. I found it behaved like a linen blend on the straight of grain but had a springy bounce to itself as well. So, in the end it was OK but I would not have bought it. I thank whoever gifted it to me. The hemband, collar and placket were interfaced with sf 101. I bought a bolt of this for bag making and it was handy. It worked fine enough. If I did it again I would interface just behind the specific buttonholes as the three layers of cloth for the hidden placket plus the interfacing made for a lot of thickness. Add in the spandex spring and it was a bit thicker than I would have liked but it came out OK. 


Pattern:

This is where it got very interesting. This pattern has no darts. It is what I call a box top or box jacket style. If you are anyone who has a C cup bust or more you know a dartless woven top does something special. It hangs straight down from the peak of the boob as you see above. This extends the bodice out into space as you can also see on the dress form. Do you want to show skin? Wear a light cami as I will ? Does it flatter? Did you forget this style does this? Did you notice how this was hidden on the pattern cover photo?


 Here's my version:


See that skin peeking out?  You can also see the top trying to make a bit of a dart, extending out, and hanging straight down from my boobs. Do you see my flesh at the side slit? I brought that slit down an inch or so. It is what it is. I have a white chiffon cami I will wear with this next time. Don't get me wrong. I still really like the  top. What get's me is that I didn't follow my own often spoken advice to really read the pattern photo on the cover. Guilty.  I'm not sure I would recommend this pattern for a newer  sewist. The directions are excellent, very clear, nothing missing. It is a bit challenging on the step where the hidden placket meets the hem band but it is all laid out. The good thing is MimiG has a youtube video sew along and you can follow the entire construction if you like.

Fit:

I flat pattern measured and actually decided not to petite the upper chest of this pattern. It worked out fine. 

* I did an FBA adding  1 1/4  inches to the bust. I take a C cup. 

* I shortened the back length by 2 inches. Why? The hem it came with would have put the hem edge right at a full part of my hips and shortened my "leg look length". By raising it, it ends up in a more flattering spot for me.  Five footers fight for all the leg length they can get!  It is still very hi-lo.


Remember, if you shorten the length of the top, do it in the area above the hem band and below the armscye. 

* The last fit issue I dealt with was adding more room in the hips. I found I wanted just a bit more ease in the back so the easiest way was to just make the pleat deeper. I added one inch to the depth of the back pleat and to the hem band in back at the same spot.  


Construction:

This is a pattern where you really need to follow the directions. There were 26 steps. I liked the challenge of all the detail. I chose to topstitch most edges with the heinous "stretch stitch" , aka, triple stitch. It is great for topstitching,  giving a thicker look to this seam finish. For the less experienced sewist, the curved hem band meetings at side seam can get a bit futzy and there is always the fun of a traditional collar with stand in this pattern as well. That is the one place I veered from the pattern and did the Nancy Zieman method which you can find in my tutorials. It gave a nice crisp finish as it always does.


Once again I did my buttonholes without a buttonhole foot and they came out beautifully, except for the one on the collar stand. That part of the stand is on the bias. That and the stretch spandex insisted on a wavy BH. I ironed it away but it was definitely  not as nice as the ones hiding in the placket. I would use a lighter interfacing or just behind the BHs, next time I do a hidden placket like this. I cut down the pocket a 1/4 inch all around, the petite scaling thing. I didn't do the collar as I liked it as it was. The construction went smoothly, just following directions. They were well written. 

The Pants

Fabric:

The pants fabric is Telio Kahlo slub rayon in "seaweed" coloration. I was inspired by a pair of loose, cropped pants I saw Linda Lee wear on a video. Matching this print was a near impossibility. It would have worked just fine if I went the no match route. but my inspiration pant had a soft large print match around the knees and I wanted that. I found in this fabric a couple of large motifs matched but there were tons of random splotches that defied any sort of repeat. I went with the large motif I wanted to match and didn't worry about anything else.  Results below. 


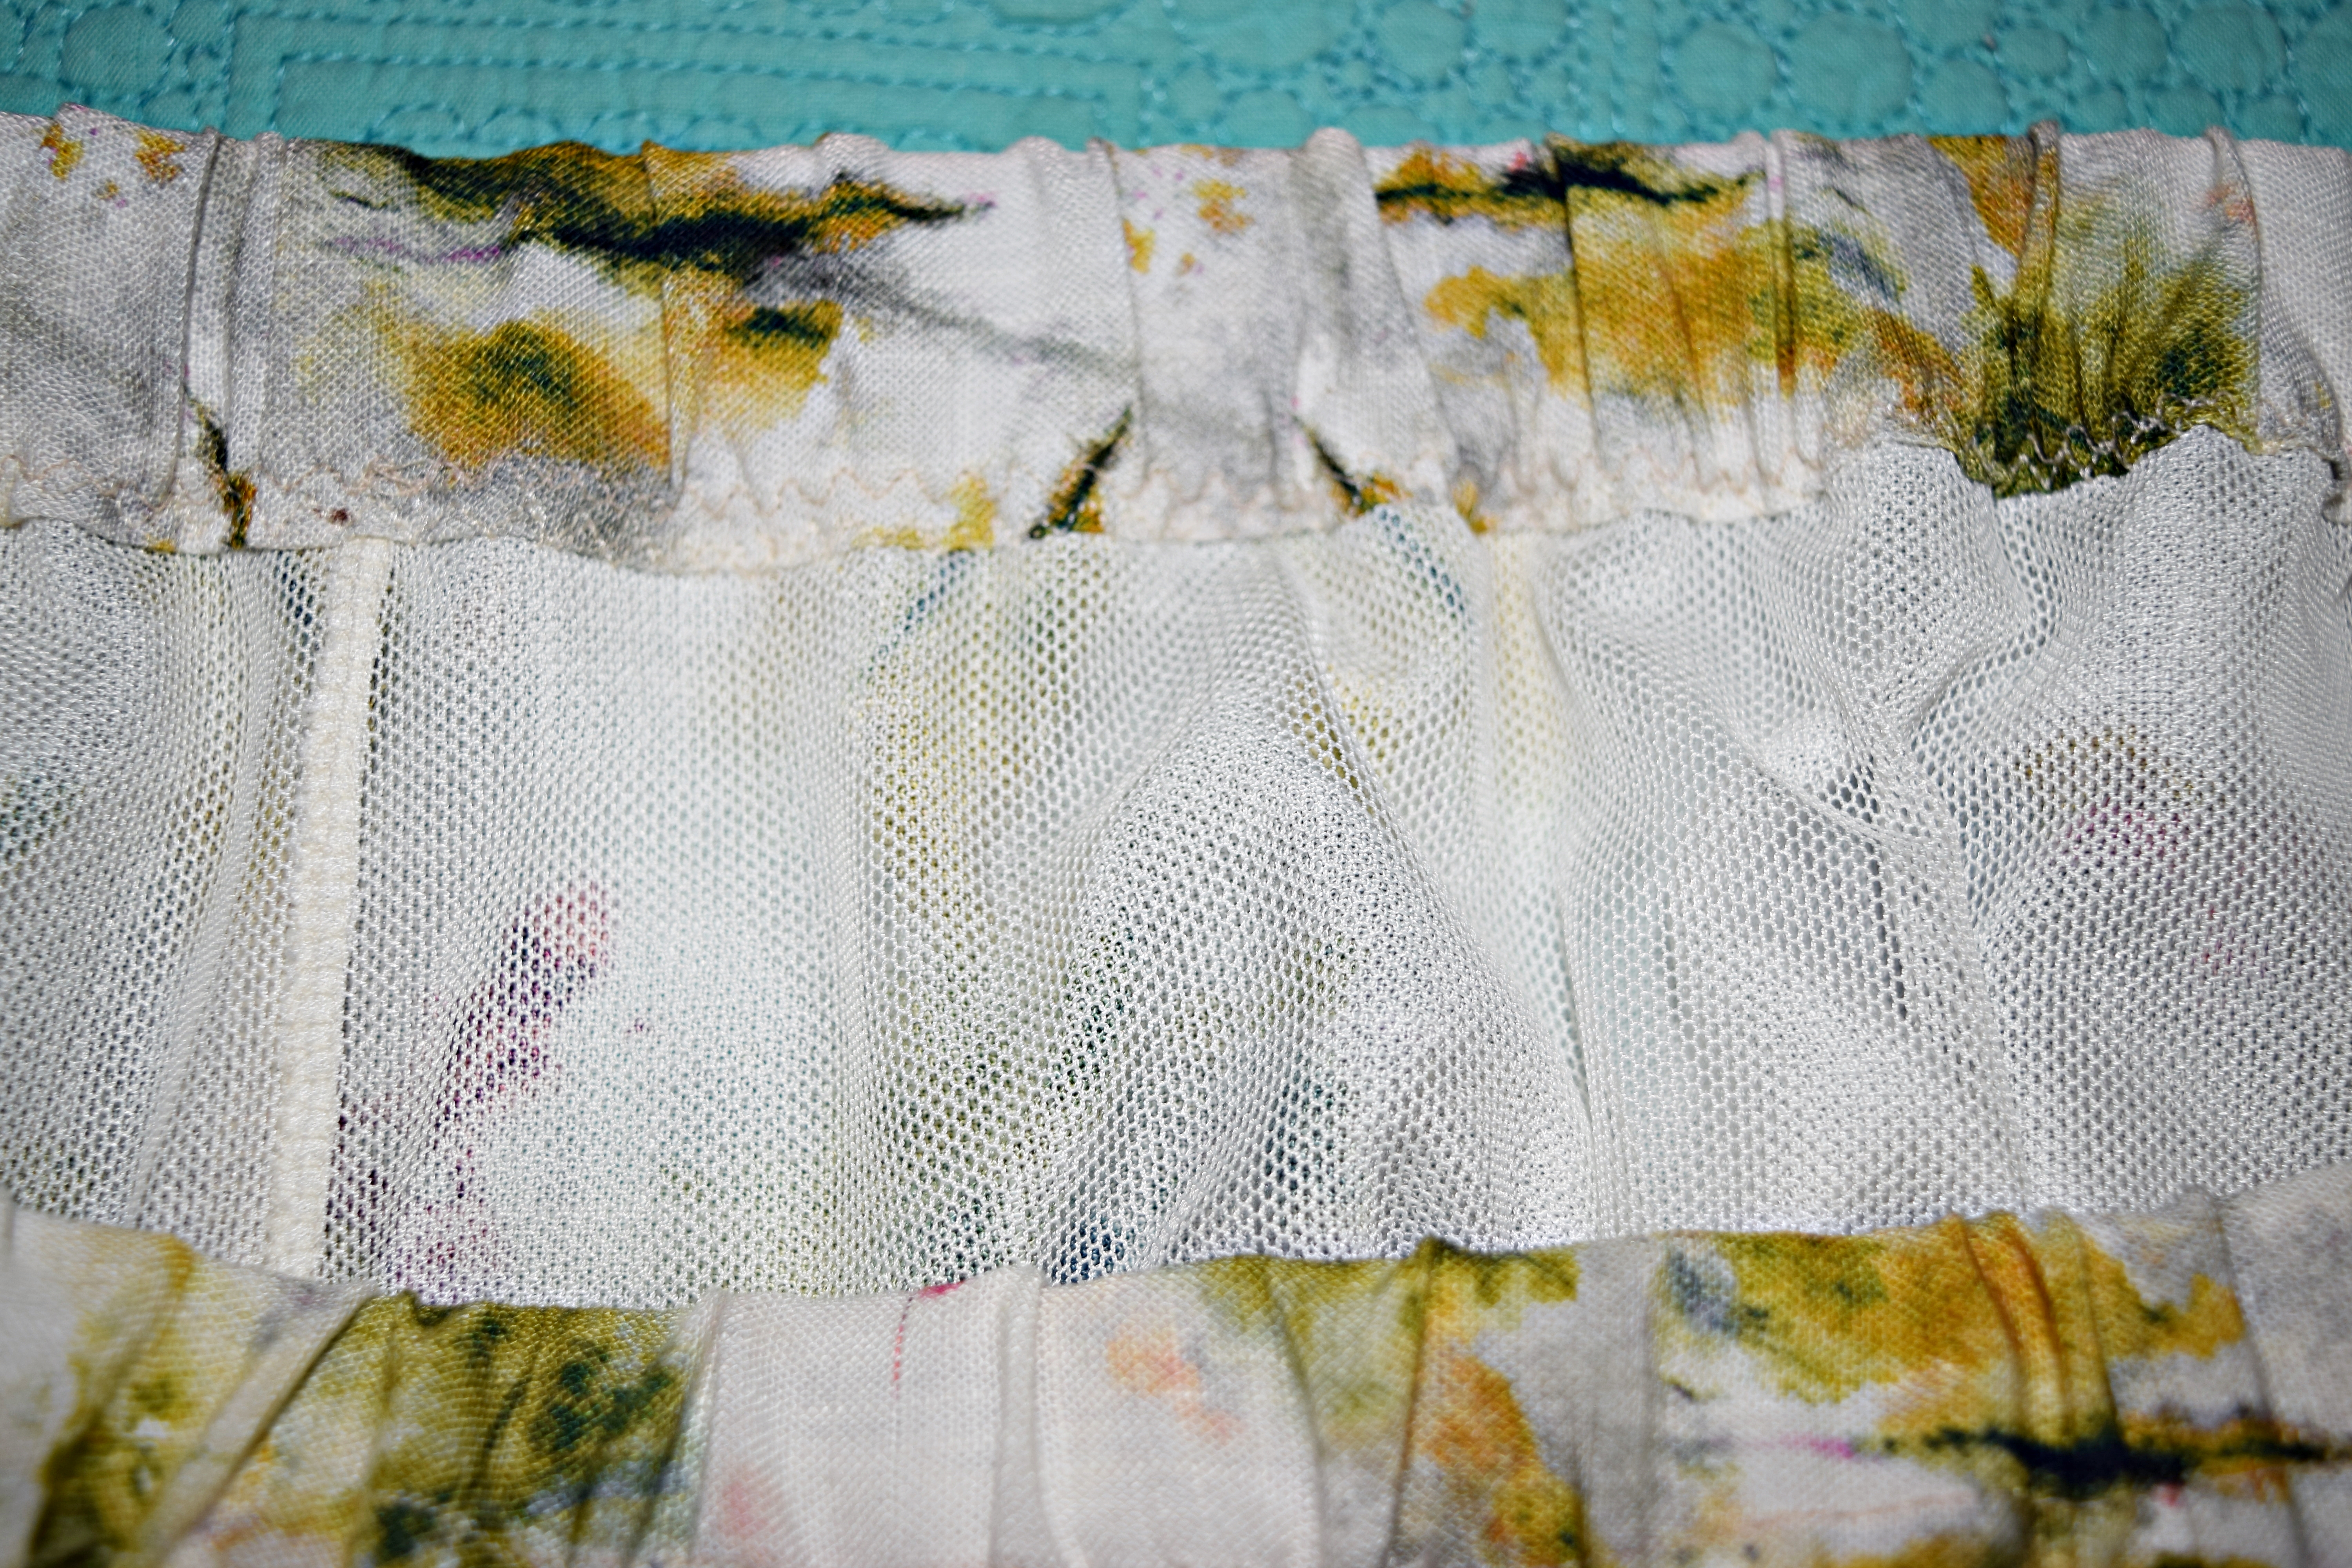
This fabric, 100% rayon,  is quite lightweight, I believe in the low 4 ounce range. It is near sheer. Lee suggested lining these near sheer rayons with polyester mesh. I'd never heard of such but gave it a try. It worked out great and I will do that again. The lining is a relatively heavy fabric so hangs nicely, doesn't ride or stick to anything and does it's lining job well. There is a lot more information on the fabrics I used HERE.

Pattern:

For the pants I used my Sure Fit pants sloper to start. I did a simple gathered waist and cropped leg with a 1 1/4 inch deep machine hem, no pockets. I rarely do pockets in pants as they add bulk and width to my already wide hips. I love this style and it's soft folds on the hips and legs help even out my proportions. I do think a short top makes it work. 

Construction:

These pants were very very easy to construct. They were classic  drop one leg into the other pants sewing. I have seen people on youtube making pants in such difficult other ways. Most patterns tell you to do the leg in leg method. It is so fast and easy. I don't get it. Oh, well, to each his own. 


For these pants the toughest part  was establishing the print layout. Once I had that done it was pretty easy. I made the lining in the exact same method. I dropped the lining into the pant and basted them together at the waistline, not the seam.  I attached non roll waist elastic, cut 2 inches smaller than my waist, to the top edge of the pant with a triple zigzag stitch. I turned it to the inside,covering up the top raw edge of the lining. I stitched the bottom edge again with a triple zigzag. Done and so easy. 


The hem was serged , then folded to the inside 1 1/4 inches and stitched down at the top edge. I liked this deeper hem on such thin fabric. The extra weight of a deeper hem helps it hang better. Oh, I let this rayon hang out for several days before hemming.  The mesh lining was simply cut with a rotary cutter about an inch and a half shorter. 


I love this outfit. I like MimiG's  pattern and it's clear directions.  While I wouldn't recommend this normally for a newbie sewist, if they want to sew along with MimiG's video on youtube, I think they can pull this off. I'm not crazy about my top fabric of these coordinates but I do have a lovely and short sleeveless top in olive green linen that I made a couple years back. It  goes really well with these pants.  I think I will get a lot of wear out of them. I liked this fabric so much that I went right out and bought another few yards of a different print but still Telio Kahlo slub rayon. it will become a tunic. I recommend this pattern with the caveat about the fit of the bustline that happens to box type tops. I will live with it and wear  a cami underneath. 

****************************************************************************


My husband and I have been devoting nearly every spare minute lately to painting our home. I'll post before and afters when we are done. This is a 1962 ranch house that was painted  mint green with maroon trim. I can honestly say I lived in a very ugly house.  You can see we've gone whole different route. We love how darker homes look in wooded settings and it worked out well here. This cedar sunburst was black with mold and had never been cleaned or treated since the day it went up. My husband got off all the years of crud and will be sealing it tomorrow.That will bring out the beautiful cedar even more. My job will be painting the last side of the house on the left, yay!  Almost done!........Bunny


Tuesday, November 4, 2014

The felted sweater jacket Vogue 1385

My personal Richard Avedon was not around today. That meant two things. First, I had the day to myself and second, there was no one to take my pics but me. I tried the old backward mirror trick and did not do well. but I have one photo that will give you an idea of how the muslin has worked out. It actually fit rather well  with the issues being in the back. I need to do a swayback adjustment and cut a smaller size for the back  as you can well see in this awful photo taken in my basement with the only full length mirror I own. Please tell me everyone's basement looks like this. 


The front of the jacket fit not too badly . The dress form is my clone. My previous issues with Betzina patterns is in the sleeve shoulder neck area. If I cut the smallest size of her's like I cut everyone else's smallest size and then adjust, well, her patterns are so tight in that area that they are completely unwearable. This size C proves that out as the upper chest area fits quite good on myself. I don't get why. I am very narrow shouldered and this  is her equivalent of a size fourteen, something I have never even come close to in patterns. I have to adjust down those size sixes I get from other pattern companies/designers for my narrow shoulders. This one fit really smoothly in that area (eye roll). But below the black line it is large. The bust is at the apex but the width is too much. So, I will cut the size C in the neck shoulder regions, cut a smaller size for the torso, and I am also going to cut this much shorter, about 8 inches. It looks much better as a short jacket with my proportions. 
                           

Now that the muslin is together I am firming up my other additions to the design. I think I am going to overstitch all the darts with a strip of the felted wool and a triple zigzag stitch to secure it down, all on the outside. The red lines show what I am thinking. Those are all darts. With the fabric being all one color, and no closure, the design really needs some further textural embellishiment and I think this is it. Creating your own look is an ever evolving process and this "strip dart" thing is today's brilliant idea. Tomorrow may be a whole different story. Do you work like that, creating as you go along? I always have a vision but remain totally open to change and my design ideas are ever evolving until a garment is completely finished. 


Isn't this ruffled neckline fabulous? I am also thinking of adding a center back seam to help with the swayback issues and doing the darted strip on the back as well. 


You can really see how large the torso and sleeves are in this pic. I do like those darted sleeve cuffs a lot. I am going to remove a tiny bit of ease from the sleeves but will keep the ruffle for the cuff and I plan on making them a bit shorter, more 3/4 length. 

So that is where we are in the fitting and design process for this garment. 
*************


And what on earth is this mess above?  Some years back I picked up the perfect light for my sewing room. It was a floor lamp, had three lamps that were adjustable, and was marked "FREE" on someone's curbside. I grabbed it, brought it home, and its been in my sewing room ever since, lighting up my cutting table and photos on demand. 

Today I moved it aside to get a better picture of the garment on my dressform,  No problem. Once done with pictures, I went to move it back and the lamp moved but this busted hunk of concrete stayed behind, making it now unusable. An unplanned trip to town, twenty bucks at KMart, and I am back in business with the same type lamp I just lost. I looked at the OTT lites at Joanns but found they just weren't bright enough compared to these three lamps on a pole with full spectrum bulbs. I am back in business!!!.............Bunny


Monday, September 22, 2014

Mr. Lauren, Please!

This week the Sunday Style magazine in the New York Times was devoted to men's clothing, clothing worn by men with stunning looks and come hither gazes. Hmmmm, this was going to fun to look at. The coveted inside cover and first and second page were plummed up by Armani, beautiful clothing and men. The next two pages were devoted to a Ralph Lauren advertisement. A man about as handsome as handsome can get is in a classic power suit with hands evenly placed on what one would imagine is the board room table. Then it took my breath away.


OK, first, please forgive these pics. If you can get your hands on this Sunday's NYTimes Style magazine, you will have much better photos to see than what I could take here. I took pics of the glossy pages as best possible. While not good, they still make my point so I decided to publish them anyway. Now that the disclaimer is out of the way..............

What's up with this suit? Here's what I see:

* the roll line on the left facing lapel is like, where? The lapel appears to be just one big folded over flap. The right lapel looks fine.

* Is that lumpy fusible in that left lapel? It sure looks like it. It is far more evident in the actual magazine photo.

*The right shoulder appears Ok but that left one ----a little droopy?

* Wrinkles  where the chest shield would/should be?  Maybe that's why the left lapel is folded over so far!

* What do you see? Am I imagining, being too critical of probably my favorite American designer, a man whose clothing I would love to wear every day? What do you think?


Now, if you keep turning pages in this mag dedicated to the peacock in every male you will see Burberry, Gucci, etc...... There garments all fit exquisitely and are beautifully tailored by comparison. Here is some Gucci for you:


See the difference?

And here's a Botega Vanetta coat with gorgeous tailoring.


I think the difference in quality, fit and tailoring is near embarassing, Mr. Lauren. What happened here?  Who had editorial control? And if a little old sewist in the boonies notices these things, is there something deliberately being fed to the readers of Style NYT? I am just so surprised at what I see.

If you continue throughout the magazine it is page after page of exquisitely tailored, beautifully dressed men, none of whom are photographed in less than perfect, albeit photoshopped (?) perfection.  Every designer imaginable is represented. The Lauren suit fell far short. I am disappointed. I love Ralph Lauren's esthetic, his all American signature style. His garments are classy, tasteful and so very American. I even think this power suit is beautiful but the fit and technique are surprising me. Sigh,,,,,,,

Again, these photos were the best of many I took and to really appreciate this try to pick up the Style magazine from Sunday's New York Times. Anxious to hear your opinions.......Bunny

Monday, June 2, 2014

The dumbing down of FIT


Just when you thought it couldn't get worse..........This past Wednesday's Wall Street Journal had a really interesting article on the sizing in clothing today.  Here are a few quotes:

"..."Alpha sizing", the industry term for a simplified apparel-sizing system where two numerical sizes, like 6 and 8 are combined to form an alpha size like Small or S."

It seems the "relaxed" styles, aka sloppy, that are trending right now have been contributing to this phenomenon. Items with stretch built in (everything?) also are more likely to come in alpha sizes. But the Journal also notes that more traditional items like bras, blazers and pants are getting "Alphasized" ( my word ) as well.

How does alpha sizing affect you?  Here's another Journal quote, "The difference between a Small and Medium might be 2 inches, 2 1/2 inches, or for some brands, even 3 inches. By contrast, the difference between each numeric size, from 0-10, s typically 1 inch."  Now add that fact to this one: "Women typically have a size the they feel is their size. More than half will walk away without buying if their size doesn't fit rather than try a larger size." See where we are going here? Isn't it always about the bottom line, the almighty dollar?

So, here I am in Macy's looking at jackets. I usually take a 4 or 6. But all I am finding is Small or S. Dang, the shoulders hang off, the jacket just does not fit like my size 4 or 6. What no Extra Small? Mediums are way too big. Now I walk away. But that is me and more than likely you, too. We know what good fit is. We don't' always achieve it but we get a lot closer than what is in RTW, and now you know one of the reasons. But what about those who don't sew? That is where vanity steps in and the manufacturer wins. Back to the store, but let's make believe I don't sew. I just need a summer jacket. I always take a size 4 or 6. Hmmm, all they have are Smalls and Mediums. I try them on. The Medium is huge. The Small is kinda big too. But it's a Small. It must be the right fit. A 4 or 6 is Small. I look around. Most of the people I see are pretty casually dressed. They look good, as in good enough. My jacket looks good  as in good enough and it is a Small so it must be the right size. I plunk down my plastic and am out of there with a new jacket. Now I will contribute to the slovenly masses walking the streets without a clue about fit. I think you are getting my view point here.

Why is this happening, other than the fact the most of the public has no clue what decent fit is anymore?  Back to our WSJ article here. "If I only have to build four sizes instead of eight, my supply chain is going to be much more efficient", says Ed Gribbin, president of a company called Alvanon. More efficiency, more profit! Once again good fashion is hijacked for margin. Chiching!

Here's another illuminating fact per the Journal. There is a lack of consistency in this alpha sizing.  "Not all brands combine the same two numbers for their alpha sizes." It seems that in women's wear a small is a size 6 and 8 for 2/3rds of manufacturers. For the remaining third of manufacturers a small is a size 4 and 6. I  think at this point, as I am standing in my imaginary Macy's I start to spin and shriek. WTF size do I wear???

OK, back to sewing. We have the power and don't ever underestimate that. First, I feel really good that no one is pulling this crap on me. I'll make my own jacket, thank you very much. I feel good that I am not contributing to the already disgusting margins being made by clothing manufacturers on the backs of the poor and desperate. I don't want to contribute to Mr. Gribbin's margins. I just want to wear a nice piece of clothing that fits me to the point that it makes me look better than what I can pick up in RTW. I am lucky to sew and I am blessed to know how to sew. No one's pulling this crap on me!

I really do think that the state of fashion for the masses has really gotten out of control at this point. Let's do everything we can to teach others our skills. Let's not support the manufacturing of garbage on the backs of others. And let's stop all this sloppy clothing that is so pervasive. If you are a newbie to sewing and not sure what good fit is other than being comfortable, I have a great resource for you. Here is a link to a standards book written by the Professional Association of Custom Clothiers. On page 22 is the beginning of their "Quality Standards for Fit". I think this should be on every sewist's bulletin board for reference. We take so much for granted and this information is so necessary to your development of quality sewing, garments that really look good on you.

********************************************

My two cameras have both gone on to camera heaven. I am just lost without a camera and have been researching repair or getting a new one. I may get a cheapy to get me through until I can afford a really nice DSLR like I used to have. In the meantime, I have a few subjects to get on my soapbox about, so even without pics, I can guarantee the blog won't be boring. I hope you enjoyed this post. 

So many of you have asked "when are you going to start your jacket?"  I have a lovely lavender and black wool boucle that I want to use for a Chanel jacket but right now the prospect of playing with dark wool really is not inviting. I have also wanted to make my next jacket out of a blue and white sort of boucle. We are talkiing medium to light blue, sort of like faded jeans. I could not find what I wanted through Linton. I have also searched some other vendors but no luck. Today I called Banksville and they say they don't have a lot of blues but will send me some samples. They are on their way and I can't wait to see them. I am not a hundred percent on the actual style of the jacket, either. I am thinking something with a collar and buttonholes. We'll see. I certainly was inspired by the jackets Claire showed us. The styles were so varied. I was really surprised by that. I also will try to build some shape into the jacket, the way Claire taught us. So I will keep you posted but for the moment I have a big pile of fabrics, great ones for summer, all pretreated and ready to go for summer garments. Since our season is rather short, that is my priority. Plus, I love to sew linens and nice cottons so I will keep you posted. Happy sewing...........Bunny

Sunday, August 25, 2013

I think she's got it!

A little better, ya think? What a litany of adjustments took place to get here!

First I petited the whole thing. This meant:
  • Take a half inch out of upper back at the yoke seam
  • Take the same half inch out of upper chest, appx where the notches are on the front armhole. You can see the fold on this muslin.
  • Take a half inch out of the sleeve cap.
  • Drop down the armscye at the underarm to correspond with the width removed in the bodice. Forget this part and you have one tight armhole!
Next was deal with the stinkin' sleeve and how it attaches to the bodice. There was a big blob of unnecessary fabric in the lower front area of the armscye seam. This was not ease. It was ugly.
  • First I took a half inch out of the underarm seam at the top tapering back to the seam at the waistline. 
  • That corresponded with folding out a full inch along the center  grain of the sleeve the full length. How did I come up with this figure? I went and measured my grey cashmere coat that I made. The sleeves are very roomy and comfortable and I knew way smaller than this sleeve on 2153. It was almost a 3 inch difference. Between what I could reasonably take out of the top of the underarm seam and the 3 inch difference I compromised at one inch. Now the sleeve head seam and the bodice armscye seam had an equal amount removed. 
  • Tried it on at this point and while it was a lot improved that big blob of fabric still existed in the front of the armscye. At this point I decided to just follow instinct. It is not always easy to follow instinct. I always regret not listening to my intuition sooner because for us ladies intuition is always right. Intuition told me to just scoop that nasty blob out. I did not alter the shape of the armhole on the bodice. What I did was scoop out a curve from the underarm seam to the first notch right on the sleeve itself in the front of the sleeve only. Bingo! That did it. Are the Pattern Police coming after me for this? I don't think so but we are all afraid of them when that intuition starts to kick in. Take your sirens and your big sharp scissors and go away you nasty PPs. The Big I (intuition) has won again! 
  • And last but not least, whenever you decrease length in a front zippering jacket like this one, make sure you add to the hem as your zipper won't fit otherwise. What a nightmare that would be after all this work!

Thanks, everyone, for all of the great suggestions regarding my headaches. I'm leaning heavily toward an allergy possibility but we'll see what the doc says. Thanks to you wonderful readers I have lots of info to research and confront him with. Thank you again. You are priceless!
*******************************************

Well, lo and behold, is that not the new issue of Threads? The one mailed to me personally in my own special manila envelope from Newtown, Connecticut itself? Sure is! Seems a hint I sent in was deemed print worthy and I am very flattered. Now I didn't get the B I G prize like the charming Kristine of Just Keep Sewing did not long ago but hey, it's recognition and I'll take it. Any questions on my hint, just let me know. A bit of expected editing was done and I am not sure it is as clear as I originally had it but that's OK. I'm here if you have any questions. What fun!

Coming up next, how I am dealing with the lining situation in a pattern that doesn't require one. ...Bunny

Saturday, August 24, 2013

Simp 2153, Muslin # 1

Well, I guess this nightmare picture says it all! How do you like the hat? I thought it was  great over compensation for a day of no makeup and bad hair. I picked it up in a compulsive moment last week in Lake Placid. I like it, wondered where I would wear it, and now I know - Muslin Display! Back to 2153.....

This pic gives you a better idea of the issues. The ease on this jacket  is 40 1/2 inches at the bust.  I plan for this to be a spring- fall jacket, going the most over a tee or shirt and jeans.It also meets with a zip at center front so that is why I have it a bit separated. I have only been close to a 40 1/2 inch bust in my ninth month of pregnancy so this has to be narrowed. But the really big issue is the horrendous sleeve. It is way too low and way too wide being almost 18 inches wide at the bicep. You combine that with a voluminous shiny fabric and we are talking nightmare on Elm Street. FWIW, this is sewn as out of the envelope in the smallest size, a 6.
 
That right shoulder dip rears it's ugly head with every garment, doesn't it? That's an easy fix with a shoulder pad. Here you can see all the width above the waist. I know I have to have extra ease in a jacket but this could be way  better than this. Sorry about the bunched up tee on my butt.  So now what do I do? Your suggestions and positive critique are very welcome. I'm thinking deal with that stinkin' sleeve first. How about first I take in under the arm as well as narrow up the sleeve width to match? Then I will raise the armscye as well. I'll also petite the upper chest and back and sleeve head area. After Muslin #2with all the petiting it will then be time for narrowing the shoulders and upper bodice. I have to also decide in which order to do all of this, hmmm,,,,,,,,

I've given a lot of thought to the lining process in this garment. I am going to flatline  it and do facings. This pattern required that I make a facing for the back neck as there is none provided. Instead the collar eats up the back bodice neckline. I've never liked that technique. I also may do some sort of binding on the facing as well. More to come on the lining process. 

*****************************************************************
If I am looking a bit worse for wear lately I have been dealing with the return of near daily migraines the likes of which I haven't seen in years. I will be seeing the Dr. about all this and may just need a prescription. Hopefully there is something new and improved since I took migraine meds like Imitrex and Relpax years ago.  I thought I was all through with this issue but apparently something is flipping the migraine trigger.  I do know one thing. If I can get myself in the Zone, as in creative endeavors where I just lose track of time, it greatly improves the situation. So I sew on........................Bunny


Saturday, June 8, 2013

The Sure-Fit Journey Begins

Today I started my Sure Fit Pants  journey. In case you have dropped off the sewing universe, Sure Fit design is discussed with great depth, happiness and critique both on the Stitcher's Guild Forum as well as Pattern Review.  It is well worth taking a look. Sure Fit, owned and proliferated by Glenda Sparling, maven of fit, is a very easy and very simple way to get a great fitting garment. You will see proof of that in those two links.  I chose to start with just the pants pattern. Who doesn't need improvement there?

The Kit came with all I needed as that was one of the many ordering options. I got a v. generous roll of vellum tracing paper, really nice stuff, a patented stylus, the "patterns", and lots of great info both in print and on DVD. The "Mix and Multiply" part came with its own DVD as well to help you stylize your sloper in many ways.

Last night I watched the DVD and must say Glenda knows how to do a very crisp easy to comprehend presentation. I watched it once and went over to the table and made my pattern when she told me to. Prior to this I took some simple measurements, some of which I found surprising. My full hip was 2 1/2 inches smaller than I thought and my waist one inch larger, (sigh). I guess that's a fair enough trade off. It's also the result of stripping down to my barest clothed minimum to get my results. When I measured my hips after, over some pants, it was a full inch larger. So take those clothes off when measuring!

It took not much time at all to get my sloper drawn with her method. Less than an hour and a half maybe and that included a bit of back and forth with the DVD. So this is ready to go now. I just need to dig up some fabric for my muslin and we will see how it goes. I am not sure that will come soon as another project is looming but I am looking forward to hopefully getting as great results as I have seen on many of the ladies who have tried this out. They sold me!!!  Let me know if you have any and/or what your experience is. I think we would all love to hear about it....Bunny

Sunday, April 1, 2012

Fit Update on the Circle Dress, Simp 2466

I brought the Circle Dress to Carly this past week and she loved it. I made a big mistake, however. I did not check Pattern Review before making up this pattern. Shame on me! It clearly has fit issues which I soon discovered with Carly's try on. The pattern looked big to me so I made a size 4 for my little munchkin who takes a five. Carly carries her weight in her chest and shoulders. This dress hung off the shoulders and the yoke/underarm area could have carried my own arm. Why didn't I notice this? Other reviewers had issues with the fit and I would definitely recommend reading the reviews on PR for this pattern before starting. How was I going to fix this? Well others described their retrofits but here is what I did:

First I addressed the armhole. I took a tuck on each side of the side seam, basically making a box pleat that was one inch wide. I hand stitched this together. If Carly ever needs more room this will be an easy rip out. It does affect the hang of the circle but not enough for the uninitiated to ever notice the issue.

Next, I made a strap just like the one that ties the back closure together. Make this long enough to have a bit of tail. Make two strips. Push the fabric flat at the elastic and stitch on the strap as above. The top will look like this when done:


Here you can see the adjusted dress:
That extra set of straps across the back keeps it all together and I think looks cute, no one wiser. I think the straps work well enough that you could automatically add them to the design without worry.

I know that you could also read the PR reviews and if you are mathematically inclined redraft the yoke and skirt. I would take out a good two inches from both front and back if doing it that way. Frankly, this seemed a much easier correct to me. She loved her circle dress and can't wait to get it back to wear.

*********************************************************************************

Thank you, thank you, thank you, everyone, for all your words of kindness and prayers. It was and is difficult but we know Danny is at peace and in a better place. He was honored with dignity, respect, and grace for the short life he led. For those of you coping with mental illness in your families my heart goes out to you. I know how difficult it can be. Blessings on all of you and thank you again. Lovingly,,,,Bunny

Friday, February 17, 2012

D&G continues...

I am trying to squeeze in one more post before I hit the road. Above is 8 yards of bias. It should be enough but I am crossing my fingers here. The only thing nastier than cutting silk charmeuse is cutting bias strips of silk charmeuse. I got it done but it was a tad fiddly. I used the  technique found in the tutorial "Bias, bagged". I literally have nothing left of the lining fabric. I am going to deal with my sleeves last just in case I am short on bias. I can cut them for stripping and use another lining in the sleeves. Who will know but us?
At this point all of the pieces, except the sleeves are quilted. I am going to bring them with me on my ride to tie off the threads, so many threads! " Idol hands are the devil's workshop" even in a car. At least my grandmother would have said so.
Often a princess seamed jacket has those seams front and back. There is usually a side panel  under the arm, connecting the fronts and back. But this jacket, Simp 2284, has some interesting details here. The back is a center seam back, no princess seams. But do you see how the side front extends into the back, past the center of the bottom of the armscye?The top arrow is the shoulder seam which sits right where it should. Its the side seam that is pushed to the back. Interesting detail but I like it and the way it affects the shape. I am liking this pattern more every day. It will definitely be committed to TNT oaktag status. ...Bunny

The Ray Pinafore, 2025's Epic Fail

  Happy New Year and welcome to my epic fail of 2026. I guess you have to have one, right? This is the Ray Pinafore from Paper Theory Patter...