Sewing Vloggers

Showing posts with label jewelry. Show all posts

Sunday, December 20, 2015

I've been making jewelry!


I have been making jewelry the past two weekends, that and wrapping a lot of gifts! I have just let my mind wander with all sorts of blingy little things  and fabrics I dyed years ago laid out in front of me. It's been kind of a "what can I do next?". , No rules, no copying something else, no instruction (yikes!) but a lot, lot of fun. While my skills are rudimentary, for the unknowing, I think they might like good.


The first piece is made with some wool I hand dyed some years back, sort of a tie dye effect and a wrapped stone.  I have just decided lately to cut into my hand dyeds. If you have ever dyed fabric you know the pleasure of just keeping them and reliving the serendipitous magic that sometimes happens in the dye bucket. I have decided their time has come and I will cut. This second one is made from rolled up jacquard ribbons . I really like this second one. It got lots of compliments when I wore it. 


This one is a piece of rayon velvet that was discharge dyed. It really revealed some amazing colors. It started out emerald green and because of the way it was bundled varying shades of the autumn color pallet emerged, great fun! Here it is wrapped with copper wire and assorted beads. 
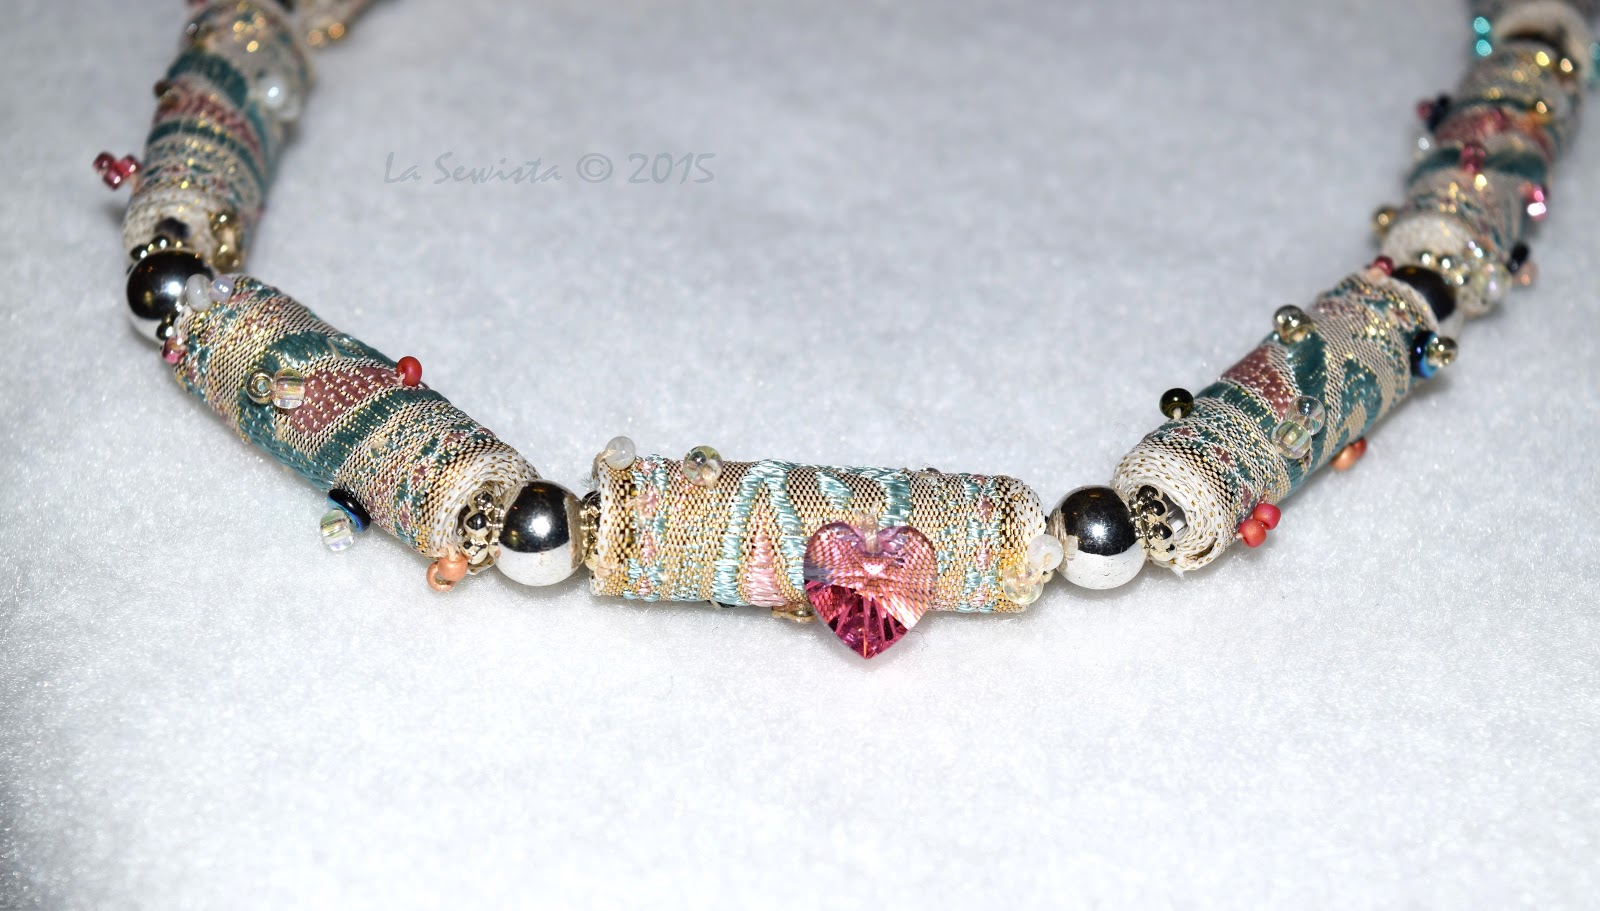


This one I love and really is prettier IRL. It looks perfect with a pink chiffon blouse I have. It is made with vintage ribbons from a dear friend and assorted beads. I showed a friend at work how to make the ribbon beads and she has just caught fire with the technique. We are getting together after the holidays for an afternoon of bead making. We both can't wait. If I can't find sewing friends, a beading friend will do just fine! 


This piece is made with washed and dryed in the machine silk velvet. Love the magic that happens to velvet when you do that. More silverplate wire and wrapped stone. 


I am wearing thest to work tomorrow. I usually don't wear dangles or very "strong" earrings but I will make these work. We will see what happens. Again, tiny pieces of hand dyed rayon velvet and copper wrapping and various tiny beads. 

This HDed bit of wool is left raw on the sides. It just seemed to work. It sits on a simple wire necklace. Nothin' shy about this one. 


More wrapping fun! I like the shape of these pieces, the slight curve. 


Here is a very similar necklace to the one above but this time I wrapped it with the silver wire I think it is so pretty with the gold velvet.


And last but not least, more wrapped ribbons, albeit much narrower, with beads and silver spacers. The necklace is tied to ribbons a close friend brought back to me from the Laura Ashley store in England. I talked to her just today and miss her lots. I am glad I found a place for the ribbons to be seen by more than just me. This necklace has a real summery vibe and I will probably save it until then. 
All of the pictures in this post were taken with my new camera. I spent nearly the entire day today learning its features and know I haven't even scratched the surface.  Please don't be too judgemental. I used their editing software and am not used to it at all yet. But it's the first day and there will be many others. I am looking forward to getting back to sewing after the holidays and sharing it all with you. I need to focus on using the macro mode to get better closeups. Be patient with me and we will get there. I've had one of these before and for a long time, but this camera is far more advanced and just newer. It has the wireless remote, the one thing I insisted on as well as wifi. It should be a great time of discovery and creativity. More to come......................Bunny


Monday, November 16, 2015

Fiber Beads!


With a little inspiration from Pinterest I decided to dip my hands into making beads from fibers, namely batik and vintage ribbons. These are vintage ribbons in the necklace above that were given to me by my  dear friend Ima. There used to be a ribbon factory in New Hampshire at one time and it had a retail outlet. This is where she got these and kindly gifted me with them many years later when she "broke  up" her sewing room.  Very similar ribbons can be purchased today at places like Joanns.


There are a couple of different techniques to wind the beads but in this necklace I used a clear straw as the center and proceeded from there. After that actual glass beads were stitched to the fiber beads. This was really fun, great "TV" work and fairly quick to do. I've worn this necklace a few times and received lots of compliments. I think it is the "bead on bead" effect that makes it special.


This necklace was made with batik quilting cotton, similar technique. I touched up the beads with a bit of silver paint pen. I think the fiber beads really need a bit of bling somewhere to work.

I hope to make a few more of these as Christmas gifts. My cadre of favorite women, those I joined in the King Arthur class, will wear them and appreciate them. They are special like that and really the only people I sew and create for. It is my pleasure to do so as it is always much appreciated.......Bunny

Monday, April 6, 2015

My first real weaving project, a Tapestry Cuff


I am finally finished my cuff. This was the first project we worked on in the weaving class I recently attended in Groton, MA. The weaving was all actually completed that day. We learned how to warp our looms for beading tapestry and beads and this cuff has numerous techniques in it, a veritable sampler of techniques.


This is actually a brass cuff. The fibers and beads have been woven on the loom and attached to the cuff. Ultrasuede is on the back. Not necessary, but I beaded the edges as our teachers samples were made that way. This took way longer to finish than it should have because I chose (blissful ignorance) the wrong size beads and these are size 15 and very very tiny. F O R E V E R it took!  But now I am glad I used them.

I would be the first to tell you it's far from perfect but if you can't see it from a galloping horse..............you know the rest! I will wear it proudly to work tomorrow and can't wait to hear the reaction from my good friends.

I am looking forward to my next project. The weaving is completed, just a tiny sampler, no beads. I am toying with inserting it in a clutch bag. We'll see. My mind is spinning with all sorts of creative ideas.

We will be leaving for Disney next Tuesday and are so excited to be leaving this cold gray climate. I have some major sewing and weaving plans to roll out as soon as I get back. I did manage to remake a pair of linen pants this weekend, not hemmed yet. The pants were really nice and part of a three piece ensemble. I wore the jacket and tank to pieces but the pants were always too voluminous. I took them all apart and recut them with my Sure Fit Sloper. They now fit really nicely, no big blobs of fabric behind my thighs.

Till I return from my trip...............Bunny


Sunday, March 1, 2015

Purging has stopped!


I've gone as far as I can with purging and cleaning. I wish I could totally finish that project but LOTS of snow on the ground is forcing me to hold on until I can hold a big yard sale. At least it's organized and staged for a sale when the time comes. I am so ready to be rid of so much! A lot has been given away but a lot can be sold so that is the next logical step. Movin' on..............

Above you see my first attempt at a beaded shibori cuff. While it reeks amateur, it looks pretty good with a black leotard top and some jeans and has garnered some really nice compliments. It has a lot going on.

 The silk charmeuse is one I have dyed myself. I didn't do any pleating treatment, just folded and stitched to a base of peltex before I started. The peltex had a drawing on it of the swirls and lines I envisioned.

This was a really fun project but very time consuming. That was only because I attacked this with all the newbie enthusiasm I could muster and a definite lack of skill and experience. That being said, I really like it and have worn it a few times. I can't wait to make another "cuff".


This is what I am playing with for my next cuff adventure. It will use another hand dyed by moi, some pleated ribbon and who knows what other beads and goodies. If nothing else it will be glorious to work with these colors and textures. This is work I do at night while putting in a bit of TV time. It doesn't supplant my machine time as I generally don't sew in the evenings. Learned that lesson the hard way!  My next machine project which I hope to get going on this afternoon will be using this:


This is authentic barkcloth that I have been gifted or picked up  at a yard sale, not sure which. The print is H U G E. I wanted to show off the print but did not want the basic tote bag. I found something  that I think will work. It has a contrasting band at the top of the bag. I auditioned a  lot of options for that and none worked. I needed something to work with the strong print, size and color of the barkcloth and everything I tried just looked weak. Then I found some heavy weight home dec linen. It has more texture but I will also add some quilting to balance it all off. Time to get cutting! ..................Bunny

Saturday, August 2, 2014

Let's tour the M'amm cave!


All  sorts of things happening in the cave today! It's a rainy Saturday and what better excuse to hunker down in the m'amm cave and have some fun. I have, for me, lots going on. First, what you see above are little bits and pieces that I am playing with to make into jewelry. I have really focused on this a lot lately and when I get something decent I will show you. I've been dyeing, smocking, beading, etc. on these. If nothing else, they have been great play and a wonderful respite at the end of the day. I always like to have a hand project and this little tote has all sorts of things to keep me busy while I watch a bit of TV at night.

I've been working on my friends dress and have decided on a separate lining but I have changed lining fabrics. I am now using a nude color instead of white and I think that will work better with the free hanging lining in case there  is a bit of peekaboo. I tell you, these fine knits, fine as in thin, are a bugger to get smooth and cut out. That was a major to do, but I got the dress all cut and will do the lining tomorrow. I have to give some thought to how I will connect the lining. With the cowl neck the facing of the cowl is caught in the shoulder seams. I just have to give it some thought.

It's my habit to work in a clean sewing space, but I really do sew so it can get  not so perfect and that's OK. FWIW,  I have no problem with those who have very messy sewing rooms. I understand that for many creatives, this is how they comfortably work. Myself, not so. I really have to have things in order before I can think creatively. Maybe it's an OCD thing, but whatever, it works for me. Every day that  I sew, I put everything away, fold things up. sweep the floor and then shut out the light. Next day I walk into my studio and I am ready to roar. Today I thought it might be fun to give a tour of my space, or the sewing part of it anyway, while I am actually on projects.

On the counter you can see my jacket project all cut and ready to go. It needs the lining cut. In the tote is everything for my friends dress, cut and folded and ready to sew.  My tablet and tiny speaker is cranking out the tunes. Today it was Mary Wells on Pandora. Love Mary Wells, really really love her. It's a great station. The tablet and tiny speaker are sitting on my new bead loom. Can't wait to get that all wired up!

The shelf is full of my favorite inspirations. The top shelf has jars of roving, laces, fabric paints, and cords. I will go row by row till we hit the counter. Under the top shelf are a few antique laces and eyelets. I have lots more in the cabinets below but I just love to look at these. Occasionally I will change the selection. Under the laces are antique canning jars filled with specialty threads like variegated flosses, metallic threads, pearl cottons, etc. On the shelf below are hand dyed woolens and odds and ends. Under that I have two rods, one holding foil (the type that goes on fabric), rolls of wigan, my favorite piping cord and fusible knit tapes. Below them are ribbons of all sorts. Under the ribbons are more jars filled with fabric markers, oil paints, shiva paint sticks, all sorts of embellishment goodies. To the left are my various rulers although I have a couple I keep always on the cutting table, my go-tos. There are rolls of tracing paper and that cup of water is for the iron.


To the right of all that is my sewing area. I have additional machines below in the cabinets. My window has a lovely view of the garden and is often visited by the local wildlife. The egg cups hold various types of pins. You do need more than one type of pin! There are brushes, markers, little tools. My inspiration board is on the right. I bring a bottle of seltzer down with me to drink while I sew but at the end of the day a glass of wine is in order. Today's choice is Pinot.  That little pill box by the serger holds all my machine needles in a lovely order with a different needle going in a different spot on the pill organizer. On another day I'll tour drawers and cabinets for you.


This shows my cutting area. Yup, it's the good old Joanns  cutting table which I really like. I've put a couple of organizers underneath. The one on the left holds ironing and marking tools. The one on the right is full of beading goodies. The shelf above is where I put patterns that just inspire me. I may or may not make them but I love to look at them. My cutters, rulers and glass weights are all on the table. That little white bowl holds pins. I love my lamp and keep my Mag Eyes and my tapes on it. It is perfectly handy to have those tapes right there while I am cutting and laying out or fitting on the dress form.

In an opposite corner are my magazines in boxes and all sorts of incidentals in the photo boxes. They hold zippers, findings, felted pieces, etc. There are a couple of patterns on top that I want to try. Lately I have been living barefoot every chance I can  so that explains the shoes. The broom is ready for the day's final sweep. My lining for the ikat jacket is hanging on the closet door.  And last but not least, my throne:

 My dear sewing friend Jerry did the monogram and I used a white matelasse bedspread for the fabric. I love how this chair came out and it is the pride and joy of my cave. The counters are normal counter height. So I don't get ergonomic nightmares,  the wicker box on the lower left holds my foot pedal about 9 inches off the ground.  So with the foot pedal raised and the chair adjusted I can sew for hours at a normal counter height with no problems.

I am lucky to have more space than I have shown. There is a large walk through closet and a good size room beyond. That holds fabrics and more. I'll save that for another day. Today I will stick with the pretties. Hope you enjoyed the tour of the end of a real sewing day ....Bunny

Sunday, April 22, 2012

Jewelry and Bags

Today consisted of much catching up type sewing. These smocked jewelry pieces have finally been worked out. I have worked on these off and on for a long time. Once done I would wear one for the day and that made me aware that they needed to be heavier, or needed a better backing, etc. It's been a journey just finding the proper glue but finally, this week, I got that worked out. So now they are finally  wearable without falling apart and hang much better. I will make more in the future for gifts and bartering but until now did not feel they were "good" enough. Now I'm happy.
This is off white dupioni silk that I dyed, smocked and turned into this piece of jewelry. There are metallic threads. It is actually hard by the time I am finished all the processes on it. The chain is a pretty black/copper.

Same applied to this one. It has a leather backing and my signature in gold on the back. Has sort of a Southwest vibe, doesn't it? I hope to dye some more pieces soon to make more jewelry. I have big dyeing plans but will wait till warm weather. I like to do as much as I can outside due to fumes, staining, etc.
***********************************************************************************

The pink and orange felted wool bag is finished. I would do things differently if I did it again but its usable and will be a cute nod to the color blocking trend. Time to put the wools away!
  I tried to needle felt the pink bow wool into the orange wool and it was just too much. I ended up triple zigzagging all of the edges instead and that worked fine. I tried hand stitching but it just did not look right. A peek at the lining was in yesterday's blog. I don't know if this is right or not but this is how I winged the lining, a bit different. When attaching handles to a lining it helps to work flat.

First I made and edgestitched straps. They were placed equidistant from the center of the handle and taped into position. Pins tighten them even further. See those big yellow heads?
                                                                                         Here you can see ONE side of the lining is sewn together so that the entire lining can be worked on flat. The top edge is folded under and the straps pinned in place. You MUST leave enough room for your edge stitching presser foot to fit between the top edge of the lining and the handles, a healthy half inch here. I then edge stitched the entire top edge of the lining to secure the straps in the right place. The open seam was then sewn shut and the lining finished like any tote bag. 

I think next on the agenda will be that shopping cart seat for the baby shower. Good thing my nieces don't read my blog!...Bunny

The Ray Pinafore, 2025's Epic Fail

  Happy New Year and welcome to my epic fail of 2026. I guess you have to have one, right? This is the Ray Pinafore from Paper Theory Patter...