Sewing Vloggers

Showing posts with label embellishment. Show all posts

Sunday, October 13, 2013

Tunic Time, Vogue 8924

Love this design. Generally most tunic proportions are really bad on me as I am so short. They seem to end at my exact middle, not a good look. But this one I made just a bit above knee length so a little better proportions. My hubby LOVES this outfit. He's always looking out for what I call "cute comfort".  He likes it when I am his idea of cute and my idea of comfortable. Works for me, too!  Here's all the deets;

Pattern: Vogue 8924, a Very Easy  Very Vogue and it is. The design went together really quickly and the way I made it used three pieces: a front, a back, and a pocket. Simple, simple, simple. I did view B.


 Fabric: This is some sort of jacquard from the local JAs that I picked up on clearance last year. It appears to be a cotton/poly blend and is a suiting weight, nothing particularly special but with this pattern it's day in the light had finally arrived. It is a bit "springy" but that's OK. I like that this will be worn with a turtleneck or crisp white shirt and leggings or tights.It is PERFECT for my work. I plan to make another really soon.  It is a definite positive/negative coloration between the front and back side. I used the more gray side for the tunic and the more black side for the pockets.

  
Construction:  This was so easy to make and would have been done long ago save my handwork on the back. All the edges were serged prior to construction, definitely worth the effort. This was quite ravel-y. I also chose to line the pockets. I just liked line pockets but once topstitched a teeny bit of the lining showed despite favoring the fashion fabric to the lining side. I think next one will just be turned and stitched, no lining. This has no zippers, no facings, and no set in sleeves, wahoo!

Once completed I thought it was likeable but rather dour. It also gave off a Japanese apron type of vibe to me so I decided to embellish the upper pleat area in the back with some pickstitching and a bullion and french knot motif. Rising sun? Aster? Mum? you decide but it took it from being too serious and I love the embellishment. Up until that point it was just another VEVVogue simple pattern.

 Bottom line: I highly recommend this pattern. It is a nearly instant gratification project with no fit issues. I used the size 4-6, extra small. The bust and hips on this pattern are about 50 inches in that size so keep that in mind particularly if you are smaller than me. I will cut the above fabric, for another much more drapey version. It is a poly blouse weight. I will also use the version with the sleeves and collar, I think. Back to the studio.
*****************************

The voting closes tomorrow at midnight for the Sew Stylish jacket contest. Whether I win or not I would just like to thank all of you who voted for me. I so appreciate your kindness and effort...........Bunny

Monday, November 28, 2011

Texturizing Fabric

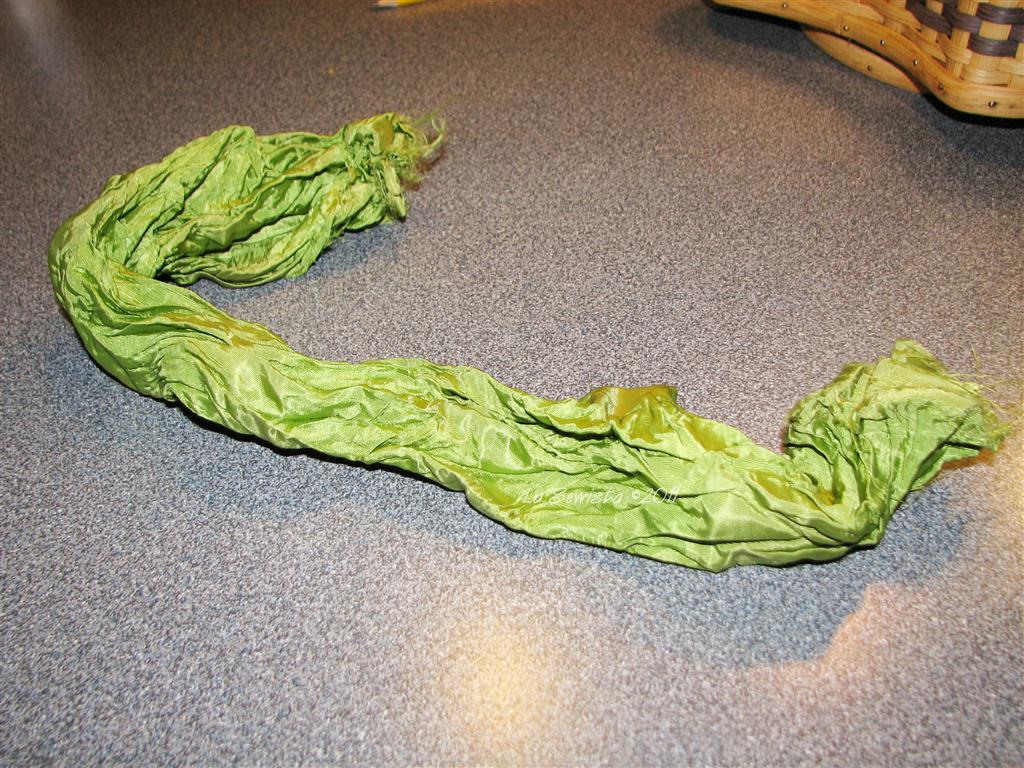
If you recall my inspiration garment, which you can see here, the green underskirt is textured. I have seen this kind of textured sheer at Joanns and it just reads cheap to me. Maybe in a different fabrication I would feel differently. I didn't want anything like this sheer but I did like the idea of some texture in the green underskirt.  My goal here was not a lot of depth to the texture but simply random lines in the taffeta. This is how I achieved that.
Here you can see the washed poly taff. Poly is good for this technique because the heat of the dryer will permanently texture poly. Natural fibers would lose any texture the minute they got wet.
The first step is to wet the fabric thoroughly.

Take the wet fabric and twist and wring, wring and twist until the coil actually turns back on itself.

Take your wet twisted coil and secure it tightly with elastics, string or whatever works. I don't like to use rubber elastics as I think the heat might losen them, not sure. Take this tied up coil and throw it in the dryer with 2-3  loads of laundry. Yes, it will sound like sneakers bouncing around. My small skirt piece was done after two loads. Pull your coil out and gently untie.


Carefully spread it just a bit. It should still feel a tad damp deep inside. Let it lay like this until completely dry.
When it is totally dry spread it out and it should look like this. Let dry more if necessary. Once completely dry, take the fabric and bring it to the ironing board.  This where it will be steam pressed into a "lined" flat textile. Depending on your project, you could use the fabric as you see it above or you could choose to press it flatter like I did. This is my end result, just what I wanted. I just hope it works in the finished dress. Fingers crossed....Bunny
Now I will gather it at the top and apply it to the lining. More tomorrow. This is going pretty quickly. The lining is complete. All that remains is stitching up the red skirt and the cream velvet bodice. MaƱana......Bunny

Friday, April 8, 2011

Raggy Fabric Flowers

These fabric flowers can be seen everywhere right now, on home dec, garments, handbags, etc. I made this one from the hip and made a second one to show you how. That will end up as a hair ornament for Sophie. There are subtle differences between the two which taught me the best way by the time I was done the second one. Here we go:
Spray starch your fabric if it is limp like this cotton. Draw a circle on your foundation fabric the size of the completed flower.
Cut out with pinking shears. Starting in the middle draw a spiral. This will not show when complete and need not be perfect. Give yourself a healthy 1/4 inch between rows.
Cut a bias strip or strips one inch wide. Stitch together as needed to give yourself about 20 inches. You can simply overlap the strips instead of accurate seaming. You are going for a "shabby chic" look here. Once the strips are cut and sewn iron them in half, BUT, favor one side by about an 1/8th of an inch. I did this with the first flower and it looks much better even with the backside being a different shade.
Now comes the only tricky part. This went swimmingly on the first flower but took three tries on the second. Let me save you the aggravation. It is really important to line up the strip as you see above. Take the folded edge and place it to the right. Put that fold on the beginning of the line at the center of the circle. Take a few anchor stitches. Get yourself out a shishkabob stick, stiletto, or a dental pick like you see here. With the folded edge on the pencil line, stitch the strip down. Every few stitches use the stilleto to force a pleat into the strip as you stitch. This is a bit futzy but the entire flower will only take you minutes to sew. You do not need perfection here. Continue around the spiral until you reach the end. You may or may not use all of your strip. Remember the bigger the flower, the longer the strip you need.
You will be left with a space in the center once it is all stitched. Wad up a piece of the strip, a couple of inches, and just tack it down in the center. You are just filling space here and it needn't look pretty. It will be covered with the floss stamens.
Pick out the color floss you want to use for the stamens. Wrap around two fingers till it looks like the above. Take the loop off your finger and place it in the center of the flower. Stitch it down back and forth a few times, the narrower the better. Once stitched down, cut the loops, trim shorter if needed, and fray out a bit. Take your pinkers and cut back the foundation to the last stitched line of the spiral. Trim  threads. You can do a few things here. Depending on the fabric, you can favor the folded edge not at all or a lot, for different effects. You can trim the edge with pinkers for a different effect. You can combine two fabrics to make your spiral strip, something I have seen in retail, like a linen and and organza of the same shade. These literally take minutes to make and I think are pretty cute and certainly on trend. Have fun!
  I like my first flower better with the favored edge and the straight edges. This will be cute in Sophie's hair, however.

***We will be leaving tomorrow for a trip to Cape Cod to deal with Ern's mom's health issues. She is 84 and experiencing severe dementia and the police found her roaming in the middle of the night last week in her  nightgown and socks at 1:30 in the morning. She was hospitalized with hypothermia and severe dementia and is moving into a nursing facility. The family is rallying around and much needs to be said and done. My heart goes out to any and all of you dealing with these issues. Sad to say we have prior experience with my own Mom when it comes to this. Till next week....Bunny

The Ray Pinafore, 2025's Epic Fail

  Happy New Year and welcome to my epic fail of 2026. I guess you have to have one, right? This is the Ray Pinafore from Paper Theory Patter...