Sewing Vloggers

Showing posts with label zippers. Show all posts

Saturday, October 7, 2023

McCalls 8406, the Bias Sequin Dress


Chalk up another one! A bias cut dress out of sequined fabric.  I have a lot to say about this project. First, it was perfect for the wedding. I had anxiety over whether I would be over/under dressed for the event.  It was j u s t right!  Second, it is hard to photograph this fabric. I took tons of pics and these two were the best. It just caught the light so weirdly in the photos and every time I moved in the slightest, the bias fabric had other ideas and movements. But in the end, it was perfect for the venue. Speaking of venue, the day was pouring buckets, foggy, just awful weather so the pics I planned on taking there just did not materialize. So let's get going on the sewing here!

Pattern

This is McCalls 8406.  Here is their description, "
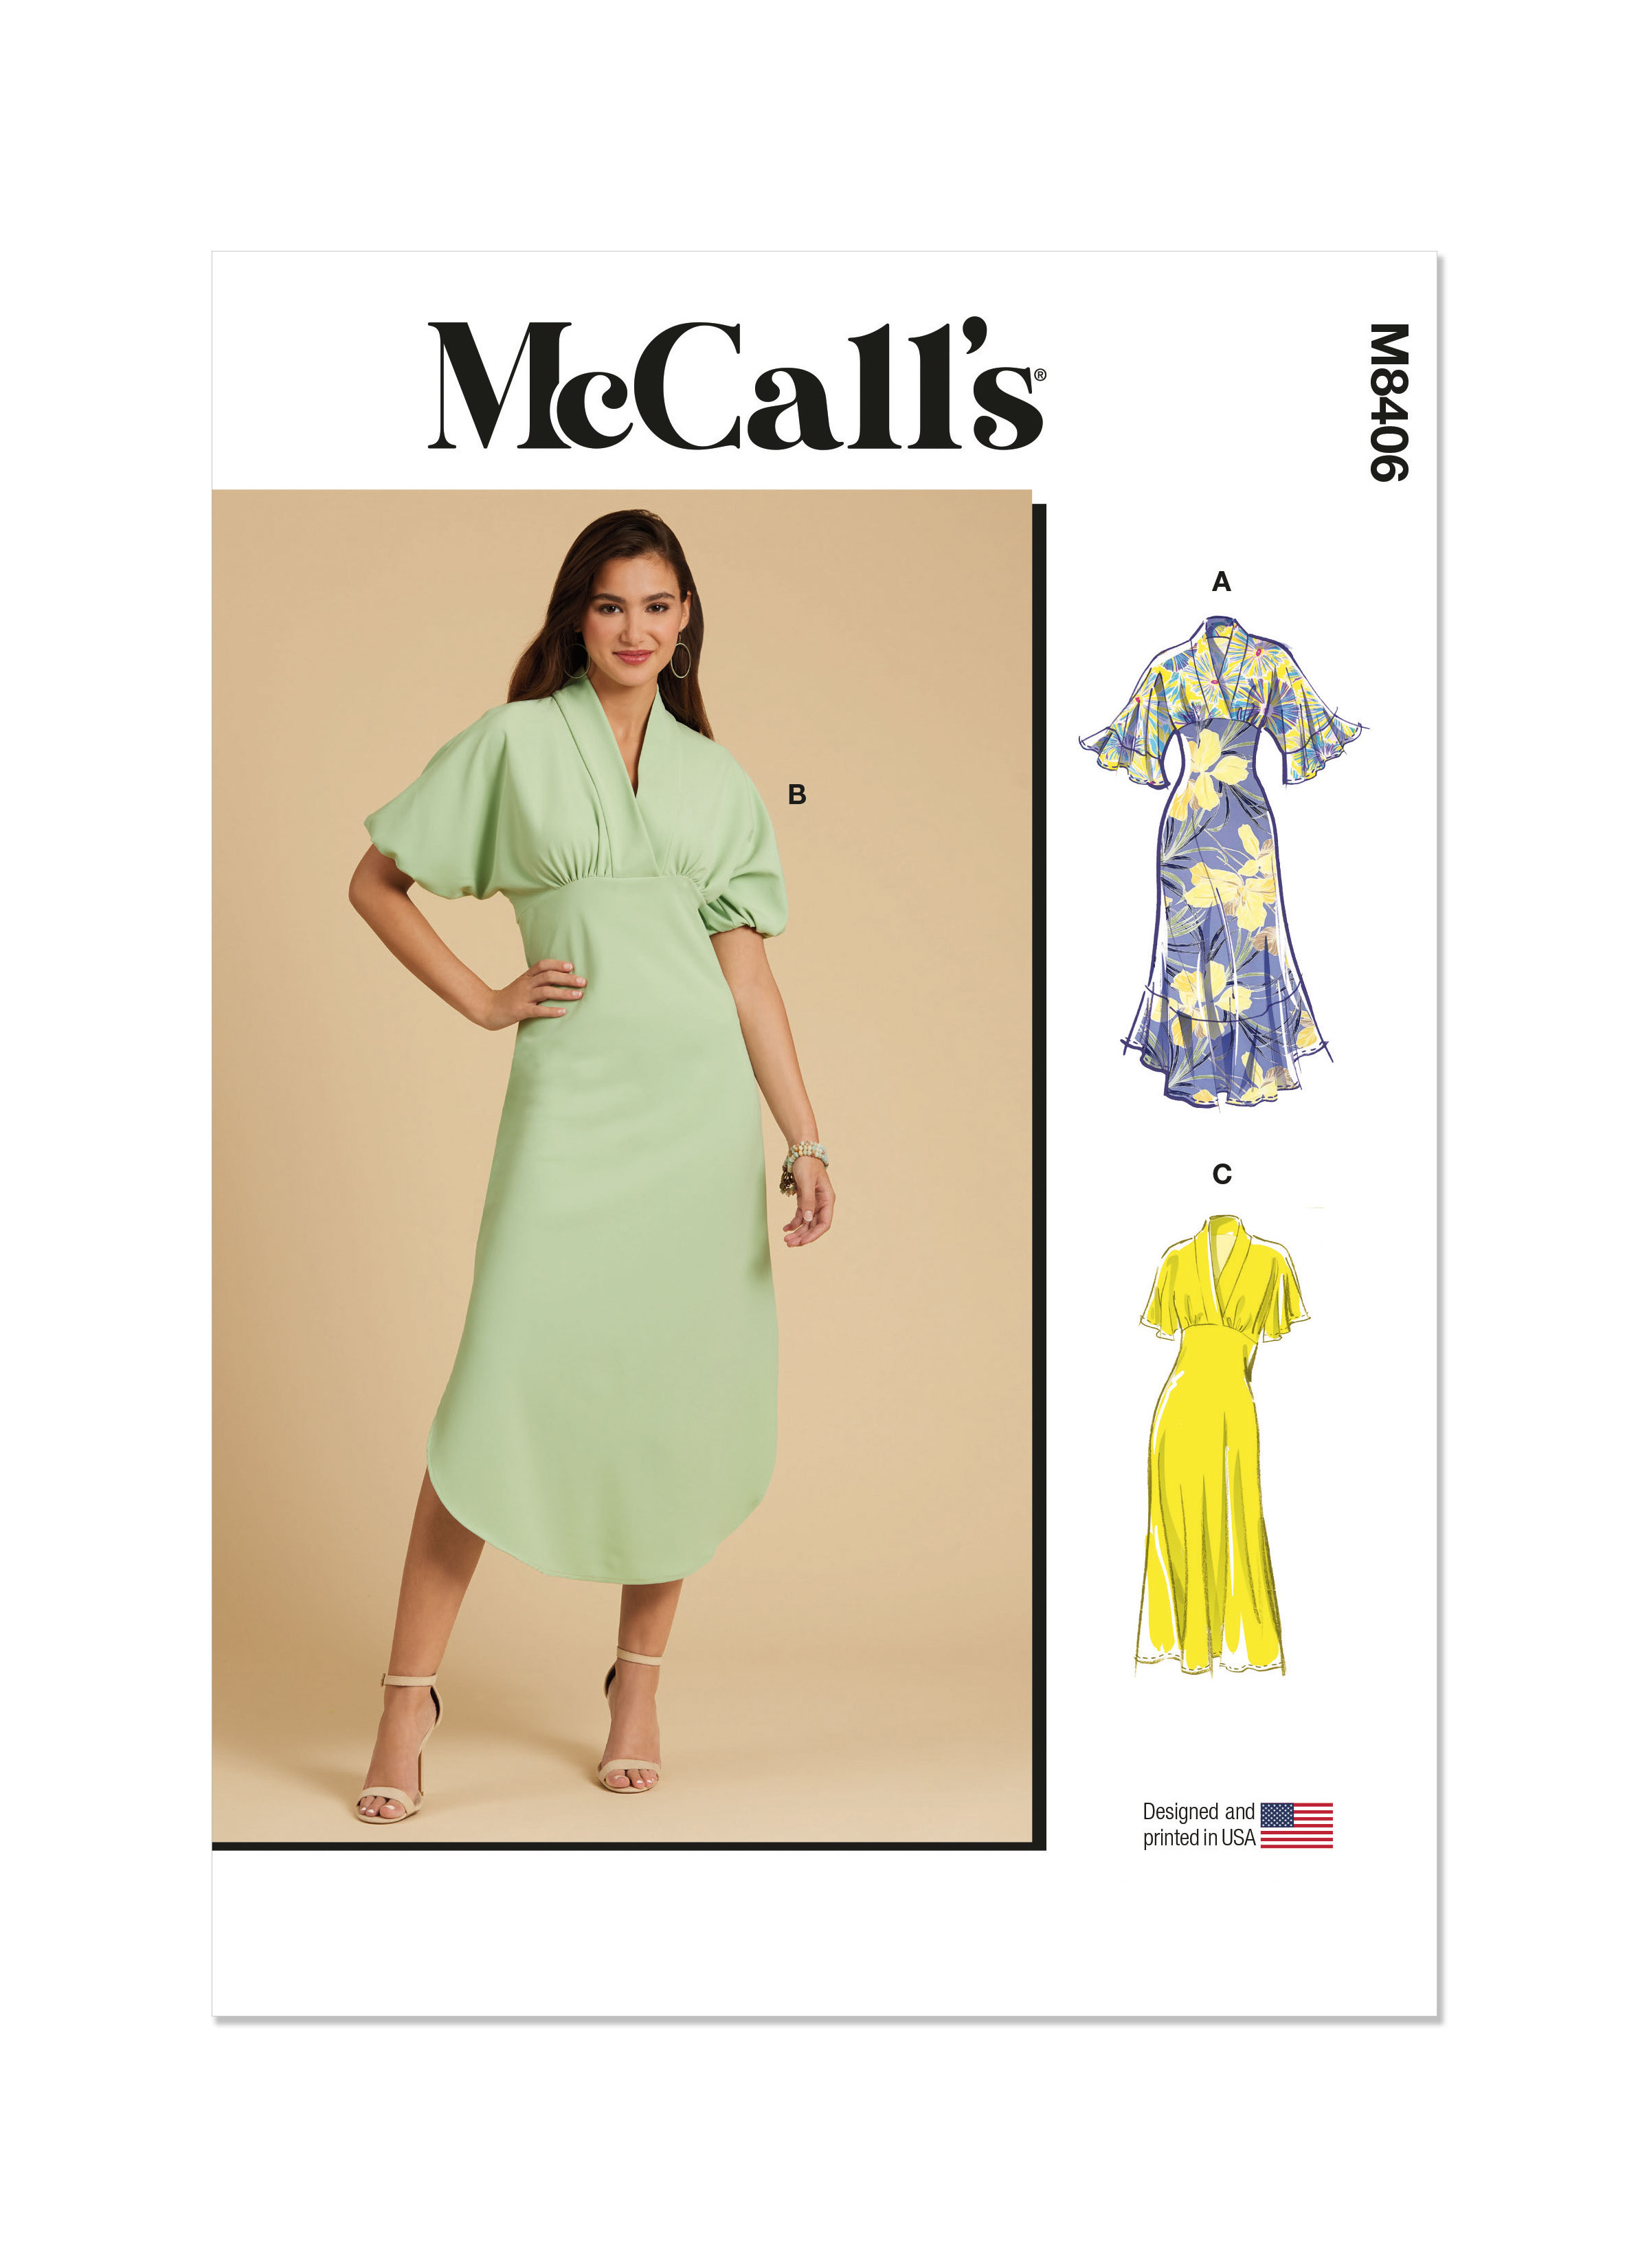
It is McCalls 8406. They describe it as "Empire waist dress with sleeve and hemline variations has shawl collar neckline, narrow hem, bias skirt and invisible side zipper." 

First, this dress needs a muslin created first.  There are fit challenges here despite looking quite simple. For me, I needed to discover if I could even pull off a bias skirt with my hips and I could. But previous experiences at a heavier weight were otherwise so I was not going into this with confidence. I found the bias cut flattering and my husband really liked the fit, too. Next, there is a lovely empire curved rise to the bodice that under the arm dips down on the back bodice, very pretty. However, I needed  a bit of Full Bust Adjustment and it is not easy on this pattern. The dolman sleeves are very deep but the bust fullness comes from those gathers below. I did a cheater FBA by adding a 3/8th inch ellipse curve in the gathered area below the bust.  You can see what I mean with the red lines below. 


This pattern is fairly simple and should be a breeze, but my fabric choices and vision definitely complicated things. I also wanted to do the fabric justice so used techniques to achieve a more couture finish. It took time and three muslins. More on the muslin  process is two posts back  here. 

Fabric


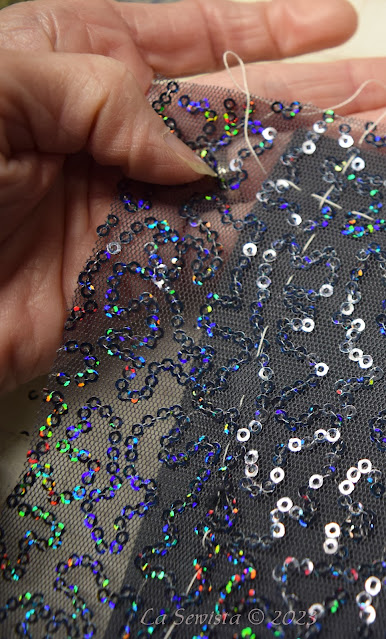
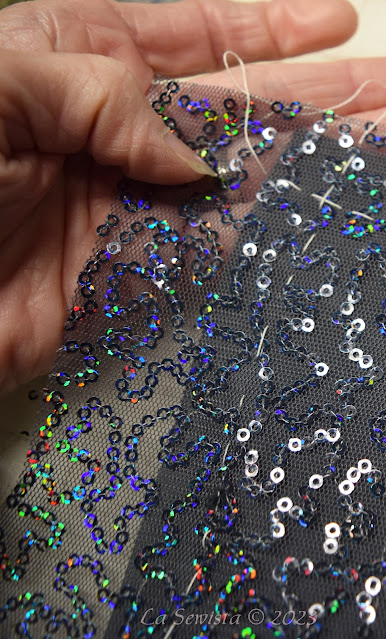
This was made with Ambiance lining and a sequin net fabric from Fabric Place Basement in Natick, Mass., the burbs of Boston. The sequins are tiny and trailing and on a net that is stronger than tulle and that does not stretch, unlike the mesh nets so prevalent right now. I learned a lot about sewing with sequins and you can read it in my last post here.

Construction

The dress consisted of two parts. The bodice was dolman sleeves and a bias folded collar band. Under the arm would be the start of an invisible zipper installation that would continue down from the waistline another 10 inches into the skirt The bodice was underlined with the Ambiance and all bodice seams were Hong Kong bound finished.  Each pattern section was block cut, thread traced, stay stitched next to the thread tracing and then finally cut out. This was to make sure there was no shifting while cutting  and no bubbles between the fabric layers. Lots of handwork and fussing! Using silk  thread for the basting made things easier.


I made a change in the collar construction. I have discovered, in more than one project, that a large BIAS band collar changes direction of grain in relation to the body as it wraps around. In the three muslins, I always had a large wrinkle on one side. I decided to split the neckline band in half at the back neckline and put a seam there and then reverse the grain of the band. This way the grains would mirror match as the came around the neck. Big wrinkle eliminated! The collar went in beautifully and all match points were spot on with this pattern.  I made no petite adjustments to this pattern other than length. 


On to part two, the skirt.  On the pattern you see an exaggerated shirt tail hem. I liked that. My lace had beautiful lace bordered selvedge edges. I carefully cut them off to attach to the hem of the skirt. But, first the lining. It was easy to sew but I made the skirt too large. The top was a size six and the skirt was a twelve and way too big. It had only two seams , each side. I went back and took it in to a size ten and it was just right. You can see the original stitching in the seam above. You can also see that with these seams being cut on true bias, there is absolutely no ravelling. I made the decision to do no further finish on them. It would only add bulk and time. I'd been at this for a while now and wanted to get it finished. I have seen numerous vintage cocktail dresses finished exactly this way, of similar fabric,  and was comfortable with my decision.  I was using a size ten microtex needle but it still left holes. I think a finer thread would have helped as well but none to be found in this color.

Back to the hem. When I originally made the muslin I knew I did not want a full length dress. Below knee was fine but the shirt tail was deep. I moved the hem up before cutting by five inches. I wanted to maintain the shape of the hem and slit look. You can see how I did that here in this post.   I then went on  to deal with the edge of the net hem. I spent an afternoon attaching the border lace, about an inch plus wide, by hand, in a very weak gather, just enough to make the curve of the hem. It was hand basted on then machine stitched.  Looked pretty enough, but, alas, I had to deal with it again later. 

Next was dealing with the zipper, my most challenging situation. I had to transition at the waistline seam from a traditional installation in the bodice to one in the lining that was only in the lining and hidden by the netting so  it would still be invisible. Now, I have seen and worked on these often in formal gowns, but there has always been a heavy fluff of gathered tulle or organza to hide the zip in the lining below the waist, easy peasy. I had no fluffy gathers. I wanted to maintain a smooth line from the waist to hem, all the while having access and hiding the zipper in just the lining layer. What's a sewist to do? 

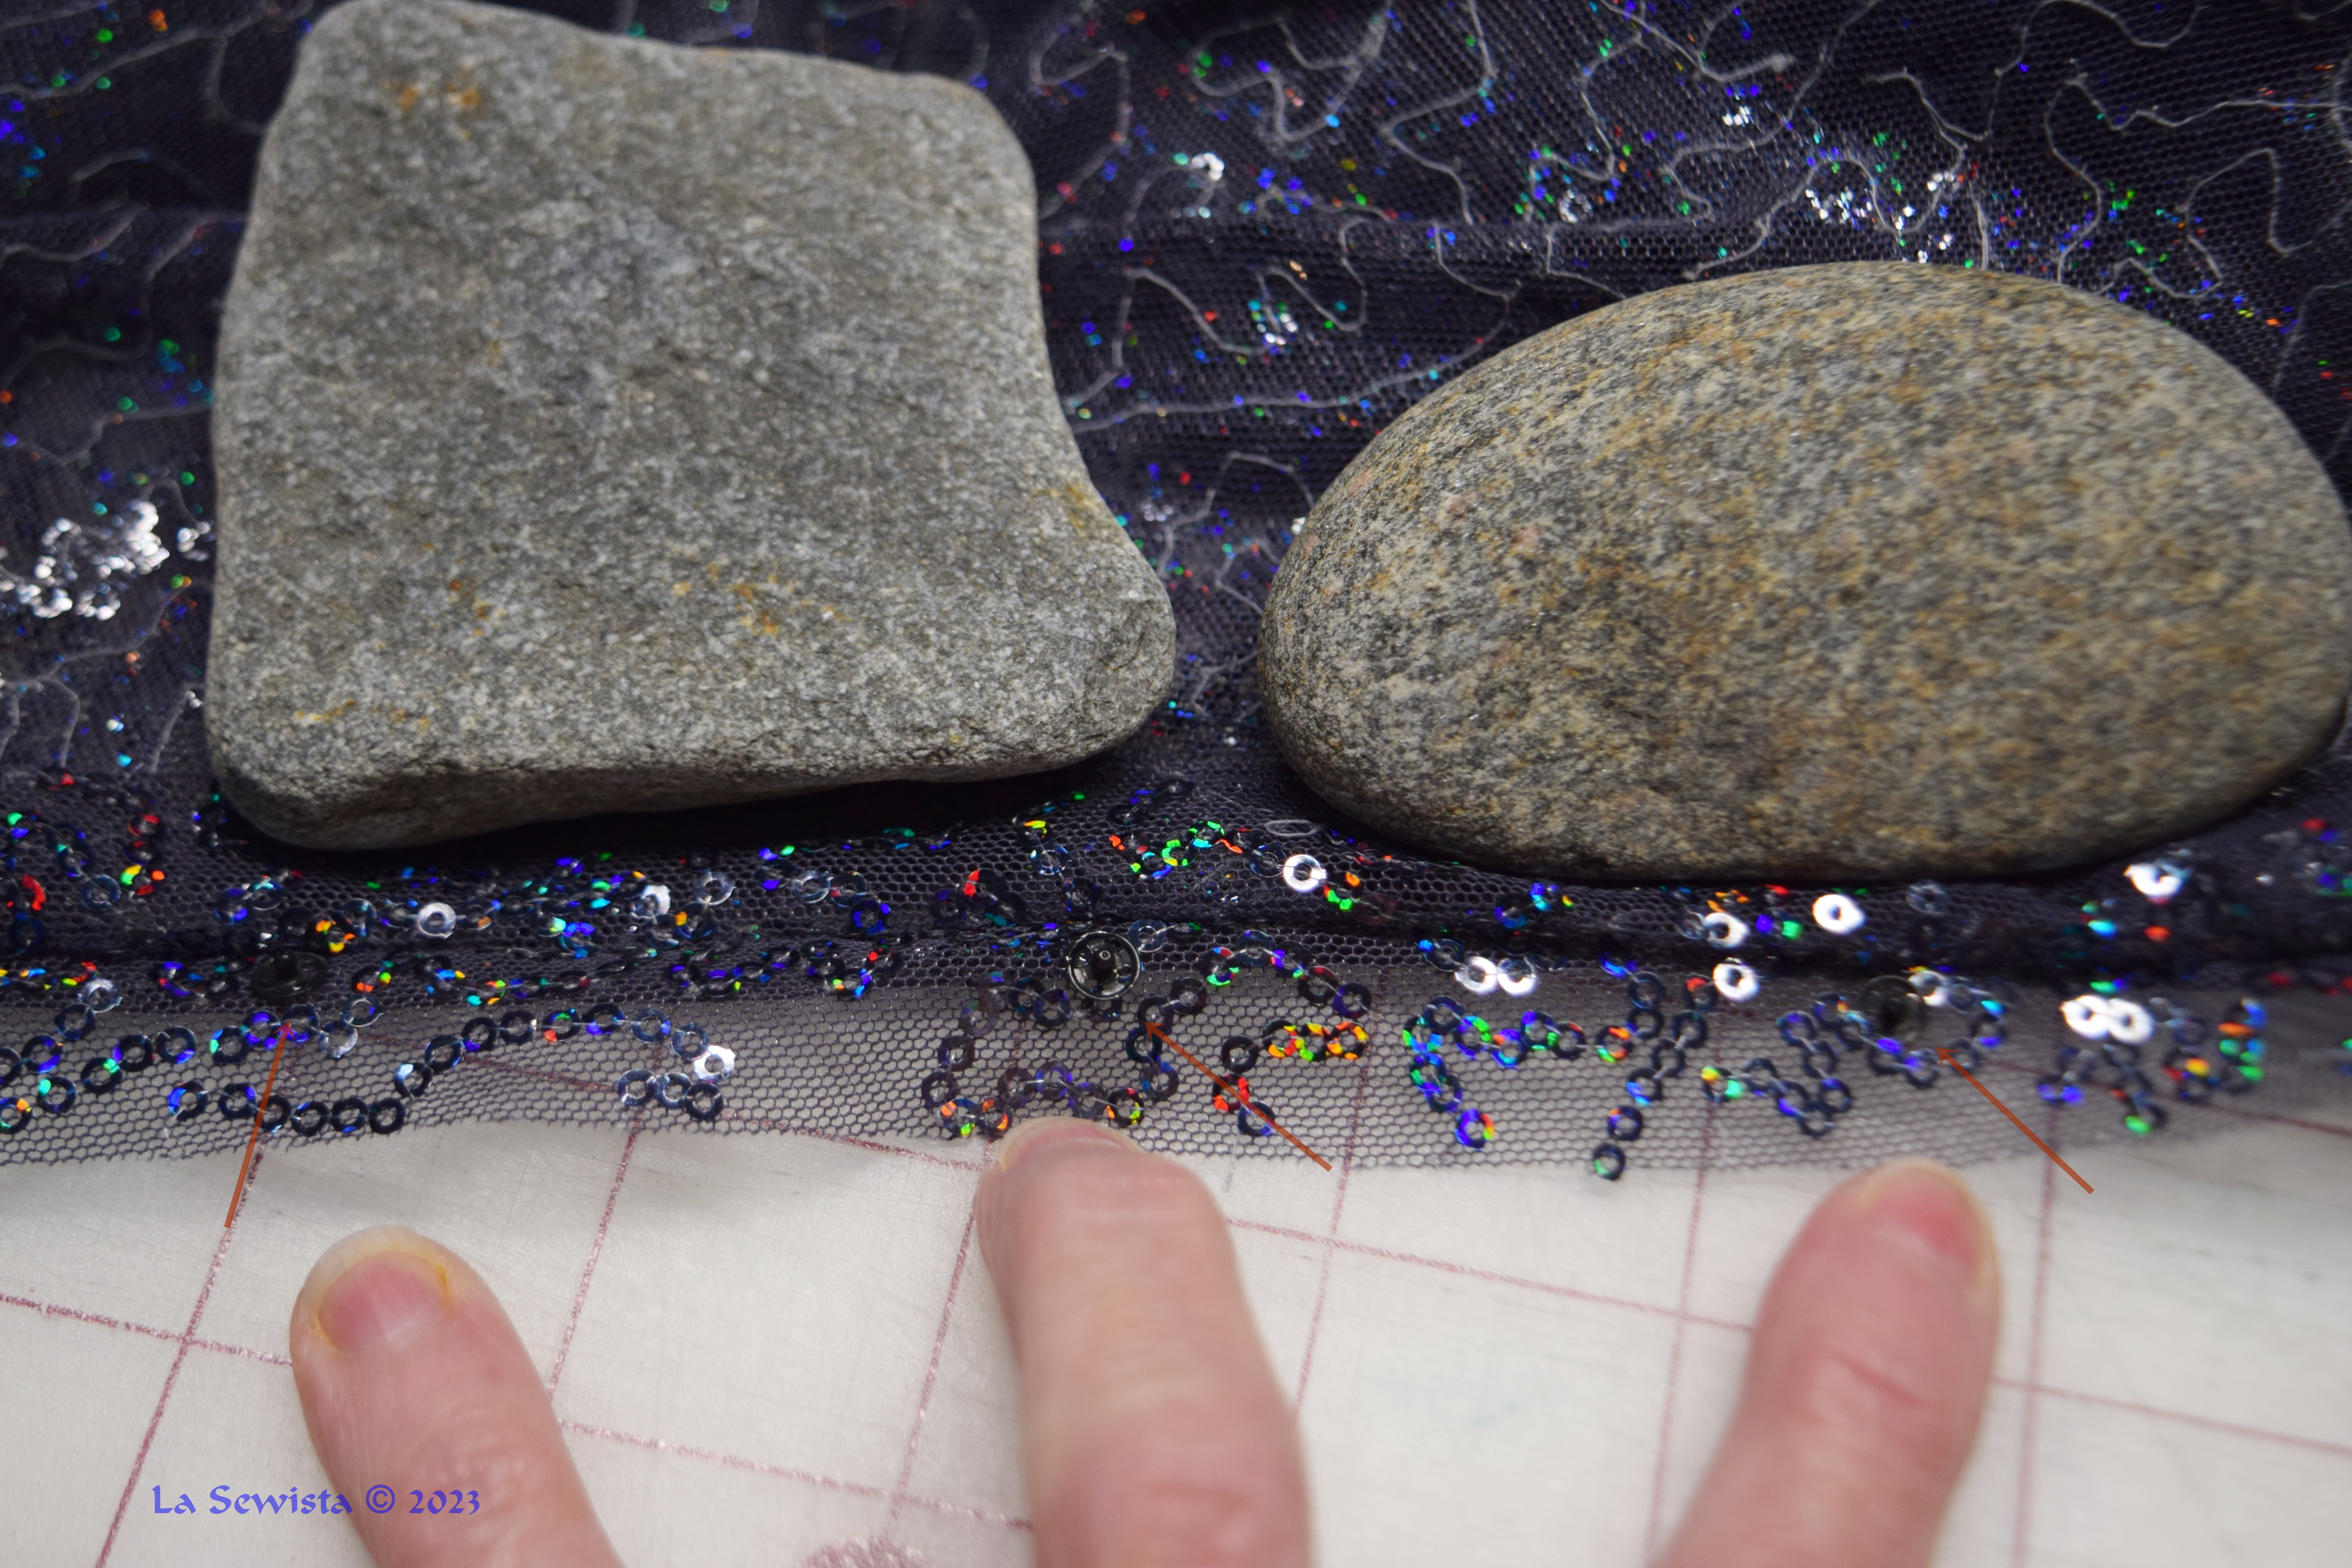
Very tiny snaps and Fabric Fusion adhesive to the rescue! I installed the invisible zip above the waist as per usual. I then folded the netting out of the way and continued to install the zip in the lining. I just placed my needle back in the zip area on the other side of the netting. Zip installed! Now to hide it.................I searched my notions and found some very tiny black snaps. I tested and found they totally hid in the netting. But they were so small I could not get them to cooperate with my fingers while sewing. Frustration! I used my forceps to hold them and a bit of fabric fusion to place them. I walked away for an hour. I came back and the snaps were stuck just enough for me to easily sew them on. 


First, I had cut my seam allowance on the net skirt extra wide to accomodate the zip. I then sewed it shut traditionally with regular stitch length in the seam and long basting stitches in the zipper area. The seam part was pressed open. The zipper part was pressed to the side to make sort of a placket. That is on the right in the picture. I cut a slit between the two. This netting does not ravel.That folded to the side seam will now become the placket and home to 5 teensy snaps.  


You will need to blow the above pic up to see what's going on. Red arrows point to the glue drying snaps. The rocks hold fabric out of the way. Once dry they were easy to stitch on. I then did this again on the other side with their matching snaps and then we were good to go. You can see it all transitioned smoothly, although it requires some serious bending to reach the little buggers and get them shut. 

I tried the dress on now that the zip was in. It flowed smoothly in that seam and I was pleased. I was not pleased with my dress. The length of the hem I had put all the lace on looked frumpy and the slightly ruffled lace edge made it look like lingerie.  Hubs totally agreed.  I shortened the skirt another 4 inches,  no lace ruffle edge and it looked much better. He agreed on that as well. I trust his judgement after all these years. But talk about adding more work. I had to shorten the lining too. 


I also discovered, as well suspected, that I needed shoulder pads, just some little skinny ones.  My shoulders seem to be drooping with age, a new development in that onward journey. The dolman sleeves really accentuated it. So I got to work. 


While I had 1/4 inch pads in my resources, I did not like how they shown thru the dress. I made my own. 
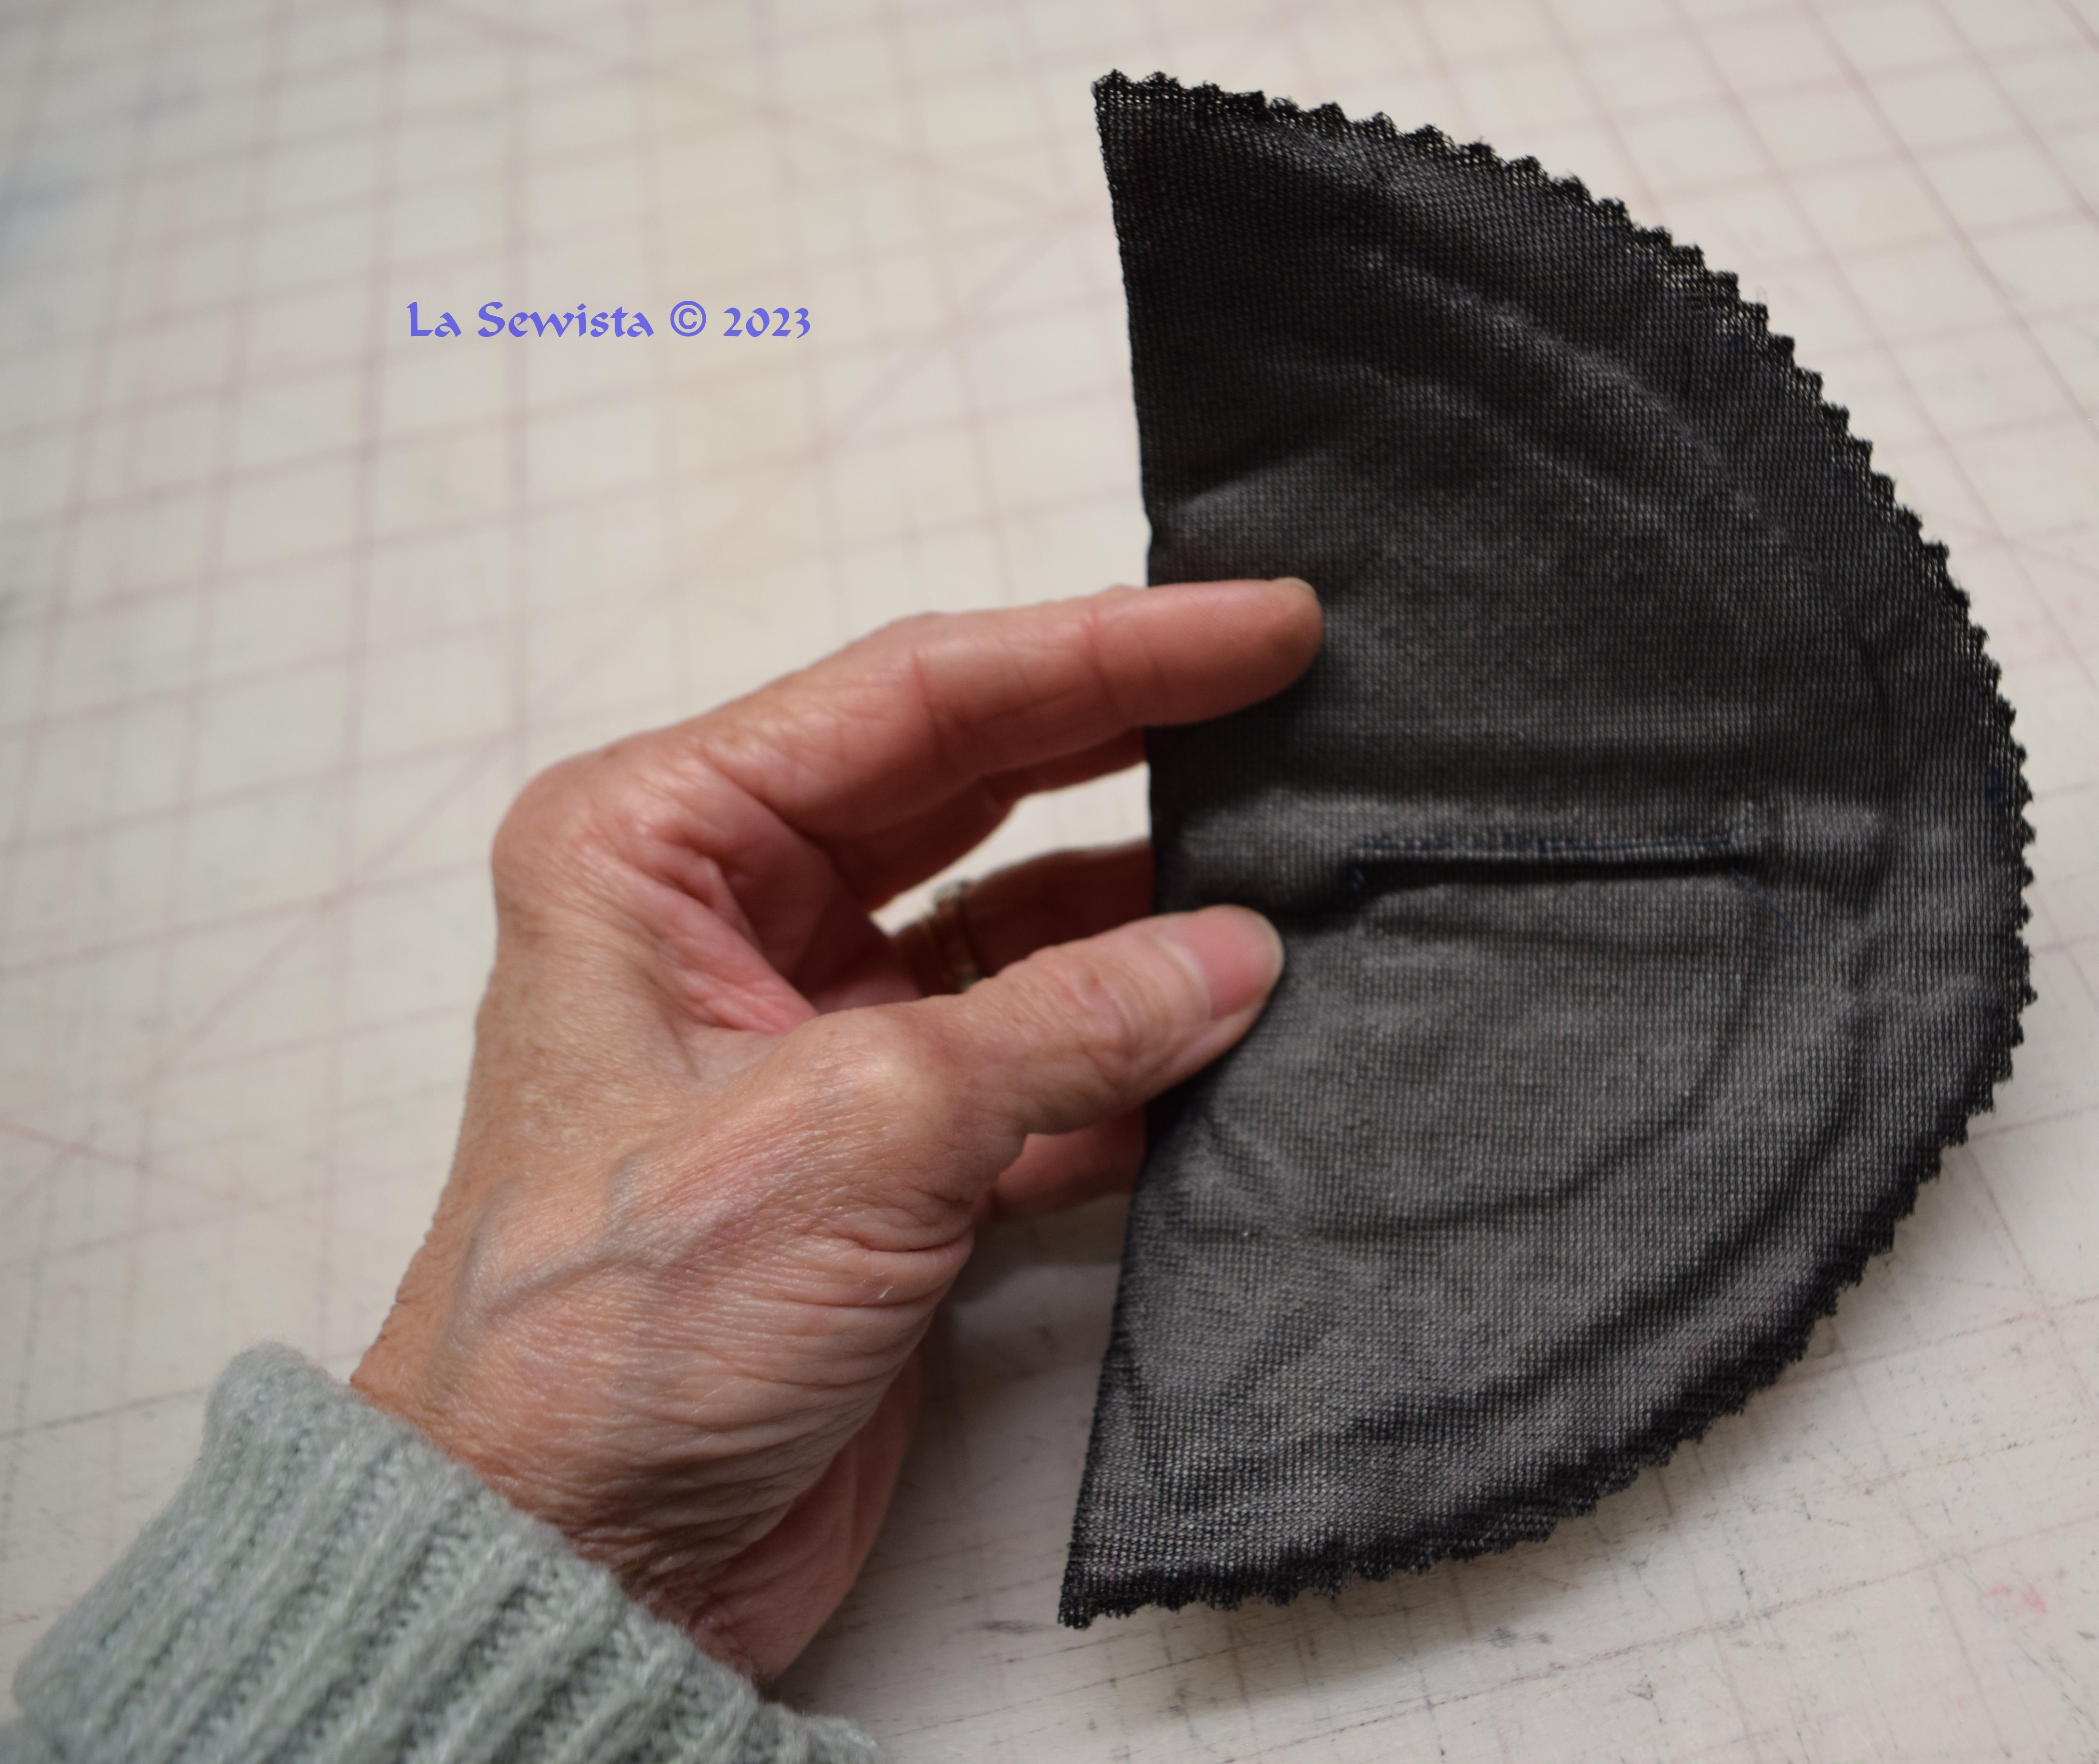


I measured the dress while wearing it to see how large to make these. I then laid out a layer of Fusi Knit tricot fusible interfacing. I cut a large shape and graduating smaller ones out of batting. I put a straight strip of batting, about an inch wide, across the pad. It did not extend all the way, just built up the middle. The Fusi Knit was then folded over and pressed to the batting sandwich. I then stitched very close to the pinked edge. I took a small tuck in the center of each pad to force the curve. I pinned them to my ham, gave them a good steaming and left them overnight. they made a definite positive difference on how this dress draped on my sloping shoulders. Don't be afraid of thin should pads!

In Conclusion:
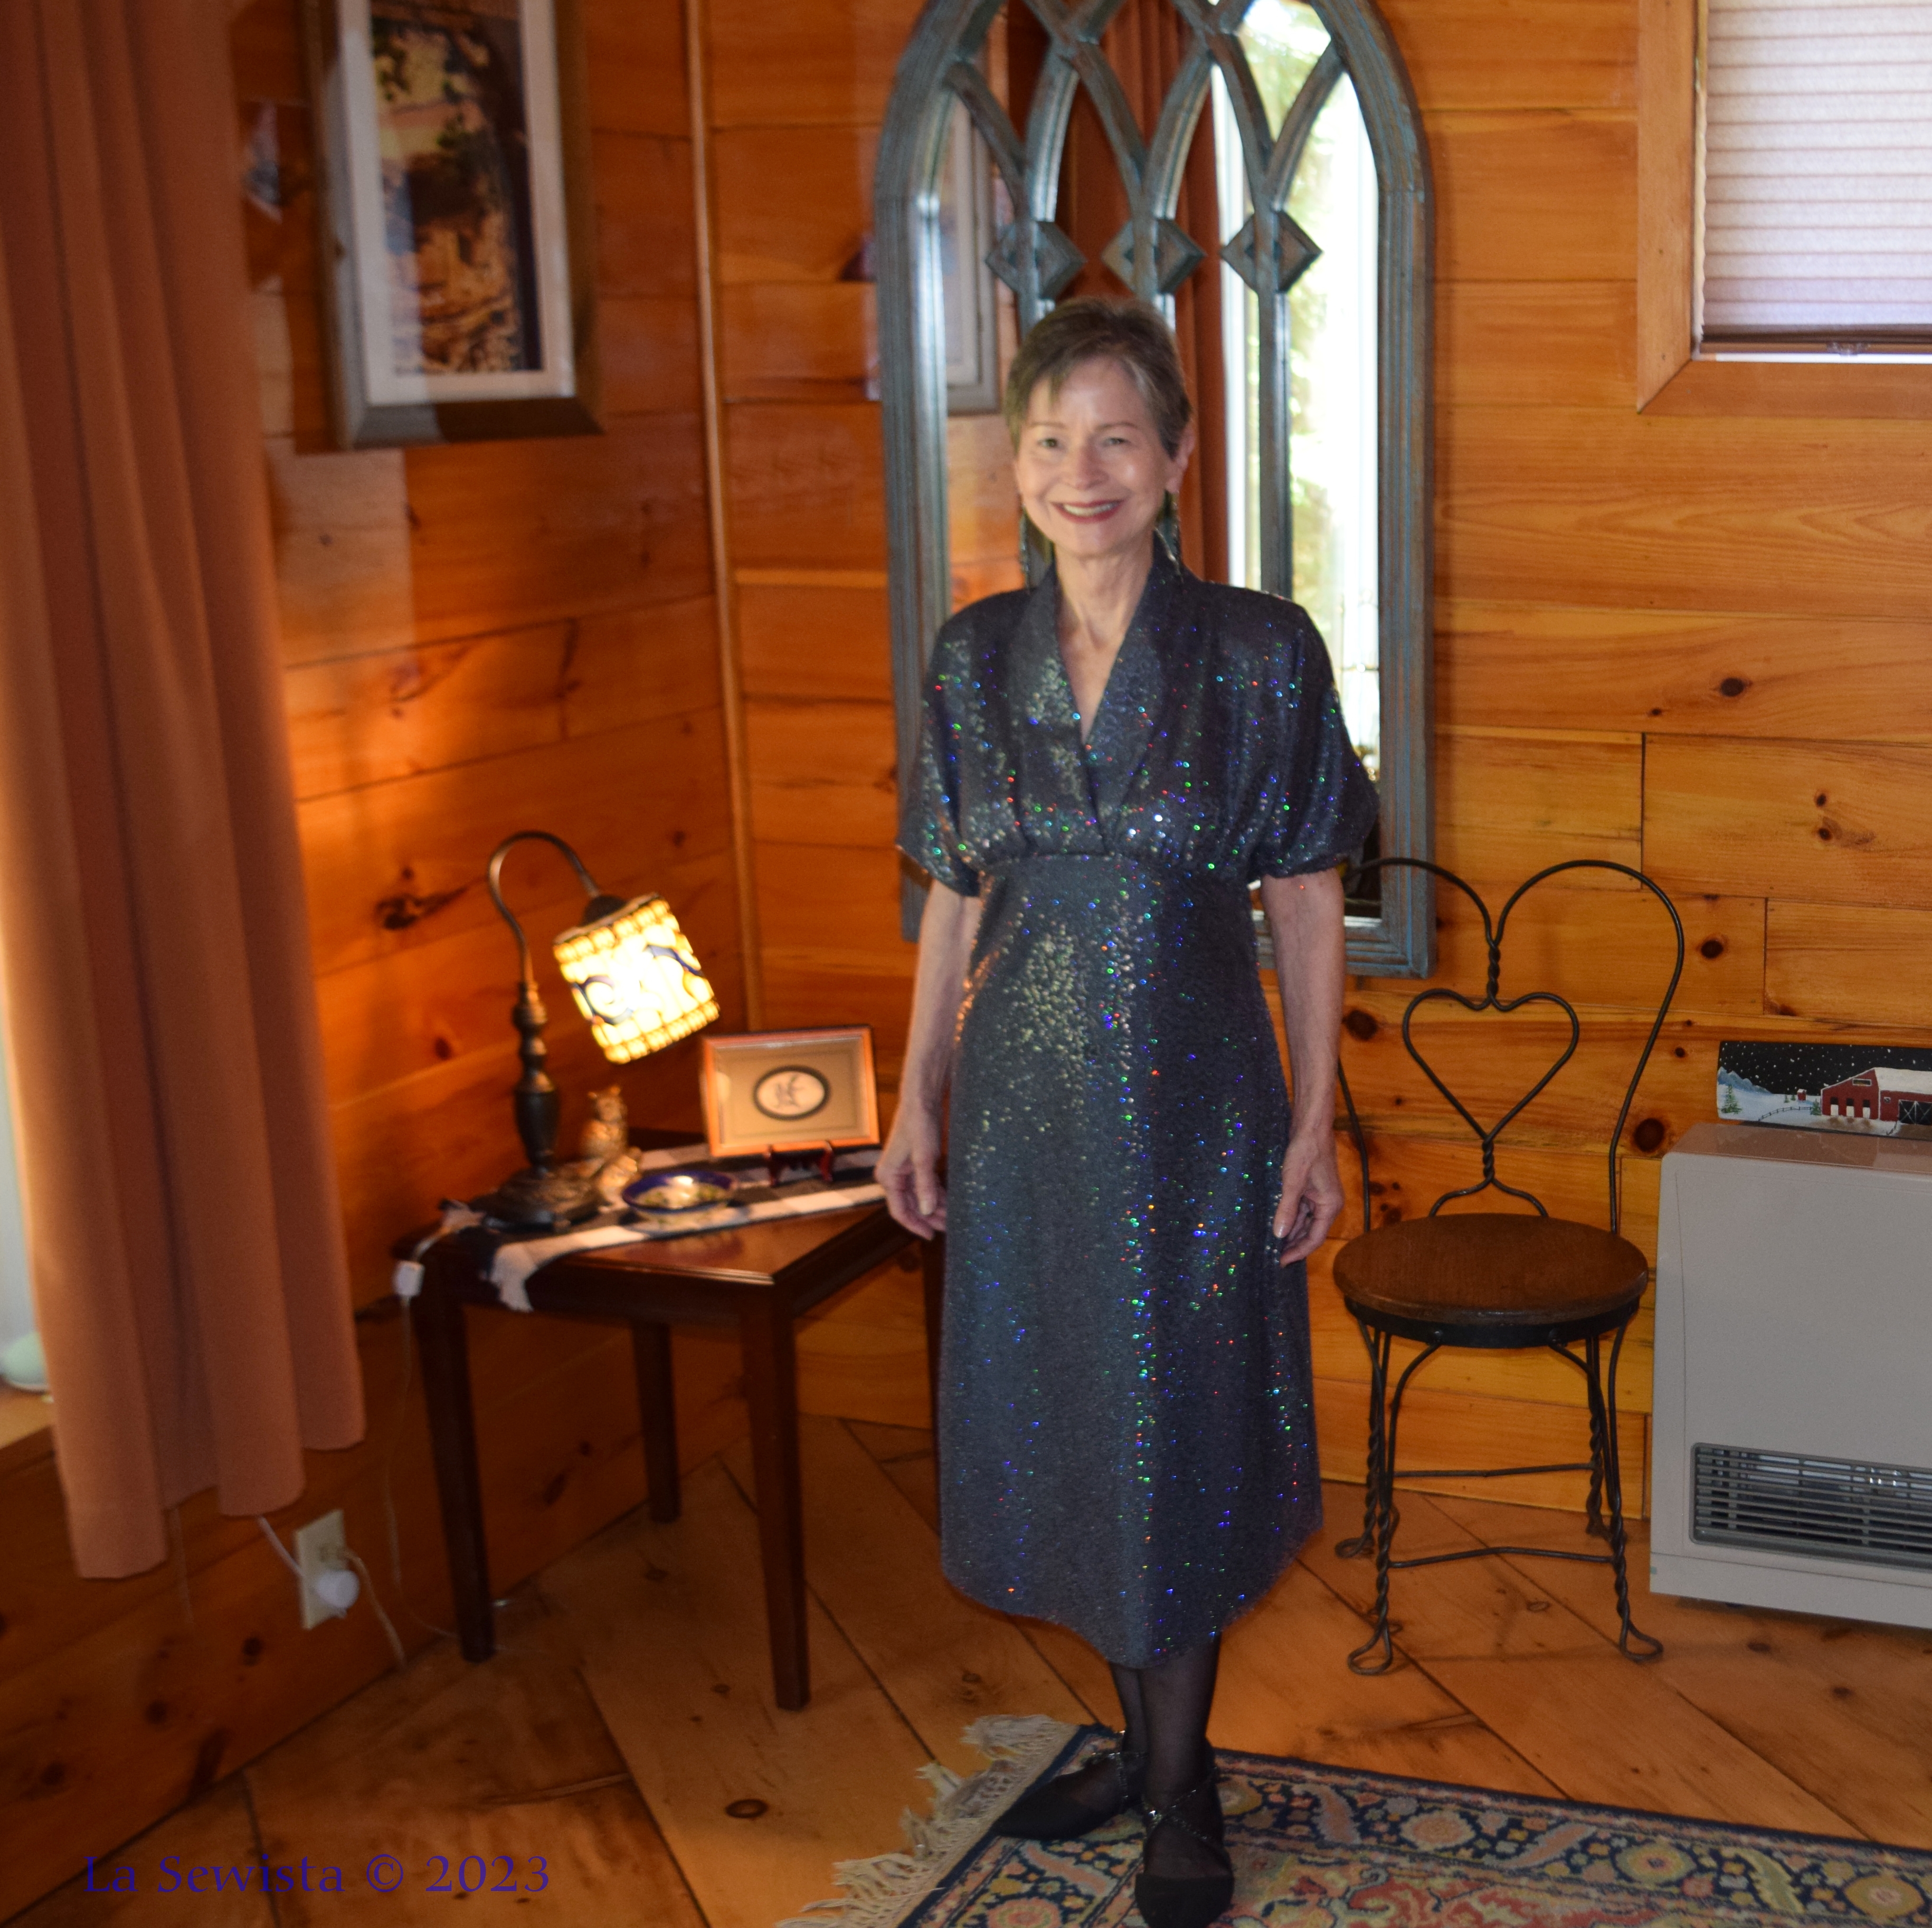


This dress was a lot of work. All of that is of my own making and choice. As far as the pattern, here I will share something that I have deliberately held until the end. I found this dress EXTREMELY difficult to get in and out of. I have very narrow shoulders. I used the size zipper recommended. I installed exactly where the dot was for that purpose. It barely got over my shoulders. I have a very narrow torso,  you all know that. I can't imagine how anyone else could get in and out of it. If I made another here are my suggestions: 
* Run that underarm zipper a good four inches into the lower sleeve seam.  I can't see any other way to make it work otherwise. 

* Consider making this dress out of a knit. Then you will get the stretch for getting it off and on. 

* Last of all,  add a center back seam to the neckline as I did, and run the invisible zip to the top as you do have a center back bodice seam to work with. I think this is the best option. 

I love the style of this dress and would consider making it again, possibly in a knit. I like the bias cut of the skirt. If I made it again I would had a triangular godet to the upper sleeve seam, begining at the outer shoulder edge, to make a fuller sleeve. I felt they could use more volume.  I definitely recommend the pattern but with these mentioned caveats. 

******************************************
 I am on to my next project, the Imby Flowy top.  I am starting with a muslin. While digging in my muslin fabric tote, I found this and decided to play with it for my Imby. More to come...........Happy Sewing..............Bunny


Sunday, May 1, 2016

Vogue 8823, the Cobalt Bling Bag is done!


Vogue 8823 c'est un fait accompli!  I really enjoyed this project on many levels. I got to add bling-y hardware to this bag. I stenciled the center section of the bag and I had the challenge of a new pattern and dealing with a new on line purveyor, at least for me, Emmaline Bags, NAYY by the way. So without further ado, here is the skinny of my newest bag.

Pattern:

This pattern is from Vogue and one of Marcy Tilton's latest designs. There are six distinct views to make with this pattern, three of which are very large, not a scale for petite's. But as Goldilocks says, View G was "juuuuuuuust right". My goal was a simple tote bag for summer. My last bag was extremely structured and this time around, for summer, I wanted something softer and more casual. I didn't use the heavy interfacing combo I usually use when I make bags but that is fine. I got what I was hoping for.

I had issues with this pattern. I thought the specified zipper installation was very cumbersome and decided to find a better way. What I did was detailed in my last post but basically I made up the top section of this three section bag separate. That way I was able to get the area to receive the zip under the presser foot comfortably and with little bulk. Then the top section was simply stitched to the bottom section after the zip was installed.

Another issue I encountered was the layout for View G on the strap pieces, 36 and 37. Let's just leave it at very confusing illustrations. Follow your gut and just cut what you need to get the job done. I had plenty of fabric to pull it off with what was specified.

My last issue with the pattern was the lack of a size being specified for the zipper that goes across the top of View G. In the notions requirements it says for that you need "one zipper (for size see sewing instructions)." Well I looked all over for the size and never did find it. Luckily my plan was to use a long zipper anyway with the tails tucked in and the metal zip ends inside the bag. Therefore I was able to be happy with my end result, but I could easily see someone being stymied about what size zip goes across the top of this bag.


Fabric:

For the bottom section and the straps I used a faux leather from Joann's, 100% poly. I found my best needle to go through this was a Microtex size 14. The leather is shaded and was quite thin and relatively easy to work with.


The top two sections of the bag were made from "bull denim", pretty heavy stuff I got a few years back to make slipcovers, about 12 yards. In keeping with my philosophy of "just cut it" I did and have no regrets. I can always buy more bull denim if I decide to do those slipcovers. The denim is a nice soft off white.  I stenciled the center section and left the top section plain.

The lining, which you can see here turned inside out, is fabric I used a couple of years back to make a spring jacket. It's an Ikat from somewhere, 100% cotton home dec print. I had enough for this lining left and felt it was a nice combination with the bag.

Interfacing is "soft". So contrary to what I usually used, I only interfaced the bag with fusible fleece. It has some body but really is quite soft. I do have to tell I have discovered something called Flex Foam which I am really excited about and will make another bag with it soon. I can't wait to try the FF out but the fleece worked fine for wanting a soft tote.  The bottom of the lining is fused with Peltex which really helped with shape of the bag bottom. You have to have some sort of base in a bag or whatever you throw in it will sag and show, so Peltex in the bottom!

This was sewn with regular Coats and Clark thread. I didn't use anything heavier for the topstitching as I get a bit paranoid about topstitching faux leather. Heavy threads or triple stitching can contribute to damaged seam lines so I kept it simple with the Coats.


Construction:

This is where it got fun! I wanted to try some new techniques here and that was fun. The bag is pretty straight forward. I've told you about the zipper issues. . Another diversion from the directions was NOT doing this: "Pin lining to front and back, having wrong sides together and edges even. Serge around edges." This was before stitching up any side seams or corners.  This would work if you were going to do the zipper the pattern way but it will still leave you with a relatively unfinished innard with serged seams, not really my style. I decided to do a drop in lining which really was easy. You can see it pinned in above and I just hand stitched it in.

For the stitching on the faux leather I rubbed the needle shaft and presser foot bottom with "Sewer's Aid", a silicone product. It worked great. Topstitching was 3.5 stitch length. Construction seams were 2.5.  I tried to press the faux business as little as possible but when I did it was with no steam, low temp and using my wooden clapper. Love that clapper and it did a great job here.

Details: 


The zipper goes across the top of this bag. The ends slip inside. If the straps were not on the side seams the zipper would be left out side of the bag. The ends of the zip need finishing. There are lots of lessons on the web about how to make little square covers for the ends and those can be nice. I wanted to try these metal zip "ends". What you see above is the back side of the zip end. The dressy side is all polished and shiny as shown in the previous post and above. The zip ends come with little teensy screws, barely bigger than a pencil lead. They are Phillips head screws but luckily I had a teensy Phillips head screwdriver in my resources and it was just the right fit. The zipper gets its ends stitched across the coil parts, like you would stop any sort of zipper. After that the zip is trimmed, not too close and the seam allowances folded/twisted narrow enough to slip them inside the end. The end is filled with a blop of glue, E6000 recommended, and the zip is shoved into the end. I used a flat screwdriver to push it in as far as I could and to neaten it all up. Once that was done the teensy screw was screwed in with the Phillips head. Done and left to dry!

I got my zip ends and all my hardware from Emmaline Bags. I have found their customer service to be wonderful. I can't wait to make up one of their bag patterns next. Highly recommend and again, no affiliation.


Next bit of bling is the sliders and the swivel hooks and the D rings. This is another issue about the pattern I didn't quite get. The small strap on the right, the one attached to the bag, is one inch wide when completed. It fit the specified D ring perfectly. The long bag strap finished at one and quarter inch wide. I checked and rechecked but followed the pattern. You can see how it did not fit nicely into the one inch wide D ring and slider specified. I can certainly live with this but would have preferred a nice flat strap. I did not have enough fabric to recut. One thing about the pic above. It really doesn't show you the highly polished shine these pieces have. Before I got the Emmaline hardware I ordered pieces from a vendor on Amazon. I was so disappointed with the quality. Anyone need fifty swivel hooks that look inferior? It's clear I can count on Emmaline's quality.


Another detail I like to add to my bags is a key fob. I used a bit of the leftover lining, wrapped it around the swivel hook and then finished the end with wrapping with DMC embroidery floss. It works great.

One side of the lining has a pleated pocket with a flat pocket on the right, the better to deal with one's cell. The pattern suggested ironing in the pleats. I stitched mine first 1/8th inch from the edge. I like the crispness this brings to the edges.


The other side of the lining has a conventional zipper pocket. You can see once again I used the triple zigzag around the zip and the entire pocket.

And last but not least:

 The nameplate! I love this touch. There are many other options for text available as well. It was easy to put in and there is a video from Janelle at Emmaline showing exactly how to install the plate. Glue is involved as well here. It is in there solid as a rock and dang, it sure takes it away from looking "home sewn".

In Conclusion:

This was a challenging project. I had to learn new skills, (installing hardware), overcome what to me were issues with the pattern and also to satisfy my creative vision I dealt with painting the fabric and dealing with faux leather. I really enjoyed it all. I would not recommend this pattern to an inexperienced bag maker but if you have a few under your belt and take it slow, it really won't be hard. I definitely recommend it to the experienced bag maker. I like all the style options available in the pattern too. I was so pleased with the final results that I signed up for the clutch bag class on Craftsy and am looking forward to making my first bag with a new product, for me anyway, Flex Foam! ...More to come, as always....................Bunny

Saturday, April 30, 2016

Vogue 8823,,,,That zipper!


Vogue 8823 instructs you to complete the outer bag, complete the lining, serge them both together and then add the zipper to the top. Can you see how there might be a bulk issue here when you hit the machine ? Doomed for failure, IMO. Well,maybe some can do it but if I can find an easier way without dealing with all the bulk at the machine, I will and I did. 

The bag consists of three divisions and is basically a tote. Wouldn't it be a lot easier to, number one, do a drop in lining, less bulk to deal with there, and number two, insert the zipper before lining into just the top band? Well yes, and it was! The top band was then added to the bottom section of the bag once the zip installation was complete. 

Above you can see the top band fused with fusible fleece and completed. The top edge is simply folded and the lining will be dropped in and stitched to it after zip time. The centers are marked. This will be a new type of bag zipper installation for me as the ends of the zipper are left loose like many I've seen on the Emmaline site. They are capped off with these zipper ends, more bling, which I think are pretty cool. 


The zipper is lined up and centered in between the top folds of the top section of the bag. I used Wonder Tape, one of my best sewing friends, to place things and a few security pins as well. It looks rather uneven but came out in the end.

ETA: I just wanted to share a pic from Mia's Creations of her use of the zip ends. Mine will be tucked in the bag. Mia has some incredible bags to drool over on her blog "Mia's Creations". Talk about perfection! She hasn't posted in a while but you can go for a hours looking and being inspired over her bag creations. Thanks, Maria.


The ends were marked where to end the stitching and I used the triple zigzag to sew in the zip, one of my fave techniques. I like the look and the strength that stitch provides. Now, picture sewing this in with the entire lined bag underneath. Really. Really, Vogue? They do have you open the zip and stitch it in that way. whoopee do. In the end this was easy peasy and I like it. Where the red arrow is the zip will be trimmed and set into the metal end caps then tucked in the bag, just something different that lets me use more bling! Also, once the zip was installed, it was folded out of the way and the edge of the bag was stitched with the triple zigzag. That gave an even matching line of stitching all around the band. All that needs to happen now is this top section gets attached to the rest of the bag. Then I will add the nameplate to this section, drop in the lining and done! Won't be long now......Bunny

Monday, April 25, 2016

Where's the Bling????

I keep calling it the Cobalt Bling bag but where is the bling? Well here you can see some of it. I can't do the last finishing until the remainder of the bling arrives in the mail, hopefully this week.  I will have a lot more to say about it when it arrives and gets installed on the bag. The bag will definitely be blinged out!


At this point the zipper hurdle has been overcome and it worked out well, more details coming. I just need to add the rest of the bling and stitch in the lining which is all complete. 

Here was a visitor to our garden this past Sunday. I think he was still a bit numb from the cold as he kept sticking out his little red tongue but moved quite slowly otherwise.  There are no poisonous snakes in the Adirondacks, or so I've been told!


.......................Bunny

Wednesday, January 20, 2016

Wednesday Words


"Sometimes in the fashion industry zips are used as a feature of a garment (especially when it comes to sportswear) but in the world of sleek futuristic couture nobody wants to know how you got into your garment.  At the recent Georgio Armani Prive collection the openings to the garments were neatly hidden into seams using invisible zips (sometimes called concealed zips)....the Cutting Class


Wednesday Words are quotes gleaned from the internet, blogs, books, newspapers and more. They are never my own words. They are not my opinions but merely comments written that made me go "hmmmmm,,,,,,,". Some may be provocative, some may not. Some may be my opinion, some may not. My goal is to start a conversation among followers of this blog and hopefully learn as we share our thoughts. I know you will do so respectfully and intelligently and  I thank you for that...Bunny


Sunday, November 29, 2015

M6532, the Taco Bag, Part One


First, thanks for the lively conversation regarding Liberty Tana Lawn. It's fun to share opinions, isn't it? It's what makes the world go round and the sewing blogosphere interesting, fun, and with a depth not found in other social media. Thanks all for you input.

I spent a good part of this afternoon putting the zipper in the top gusset of the bag. FWIW, I am doing this bag totally out of sequence. Why? The interfacing will make this bag fairly stiff and I want to turn the bag as little as possible to prevent cracking. Secondly, in the pattern the upper gusset is set into the inside corners  of the sides, all lined and interfaced. That is a recipe for disaster IMO. So the lining will be separate and I will use Shirley Adams' wonderful technique for doing inside corners that you can see here. Fingers crossed and I will let you know how it goes. Above you can see the completed zipper installation. I use upholstery zips a lot. I love their neutrality, large metal teeth and sturdiness. This one was the perfect highlight for this bag. Here's a little rundown of how I went about it.


When I make bags I do something I have really not seen mentioned by other bag makers, but very important to me. All interfacing is cut WITHOUT seam allowances and then fused. This eliminates huge amounts of bulk and gives a better finish to the seams. Remember, per Roberta Carr, "her" number one rule of sewing is to reduce bulk whenever possible! That's worked well for me. Above I am using old fashioned colored carbon paper and a serrated wheel to mark the seam line on the fusible fleece. That will be the cutting line for  the interfacing. The results:


Once the gusset was interfaced it was time to put in the zip. This involved sewing a rectangle and turning it, just like you do for bound buttonholes or welt pockets. Here is the lining I chose. Light colored linings are important to me in a bag. This one has the added feature of some glitter. It is a simple quilting cotton, not the best quality, and therefore heavy and with body, just fine for its intended use.


Here is the zip installed in it's "window".


This zipper will get a lot of use, another reason for the heavy upholstery zip. Because of that heavy use I don't like to do the usual row or two of topstitching. Instead I use the triple zigzag as you can see  more clearly in the first photo in the post. It's served me well. It's ok to not follow the pattern. Utilize your machine and all of it's wondrous abilities. With this fabric the stitches sunk right into the fabric.  This is what the zip looks like on the underside.


This was enough for today! Next will be getting the bottom of the bag together and doing those inset corners.

I've decided this may be a Christmas gift, or not. I am also working on some jewelry gifts for my favorite women. More on that later!......................................Bunny

Sunday, May 31, 2015

Vogue 8630, an underlined sheath with portrait collar


The dress is done. The hat arrived on time and was the perfect color. The wedding was so lovely. It does the heart good to see all the hope of the world in the eyes of a beautiful young couple choosing to spend forever together no matter what life sends their way. The venue was gorgeous with a large outdoor porch and gardens that made catching up with family a delight, not always the case when the amplifiers are going full blast with the dance music. And I did dance! Now to the dress details but thanks to Dd Audrey who took the photos in her lovely yard. I told her I needed to have a picture of the back and this is what she gave me:


Forget Mom, show the sewing! She has learned well! Above you can see the handpicked zip with the tiny tortoise shell beads and a fabric belt I made for the dress as well. Let's get down to the real nitty gritty.


Pattern:  This is a Very Easy Vogue pattern, V8630. I have always loved VEV patterns. They have minimal pieces and can usually be made in quick time, that is if you leave out all the extras this dress ended up with.  A couple of things I really like about the pattern were the curves in the lower back bodice and the upper back of the skirt, perfect for those with some swayback issues. I did not adjust this dress for my sway back at all and it hugged my SB curves just right.  I did find the bodice a bit short all around and lengthened it a half inch and will lengthen it a bit more if I make it again. Another great thing about this pattern is that it comes in various cup sizes. I used a C cup but the missing length was all around,not just the front. The pattern calls for a lining. I underlined it instead.

Fabric: This is a 100%  rayon designer fabric and I wish I could remember who the designer was. It was on the tube when I bought it a few years back at Fabric Fix, right before they closed. The fashion fabric has a linen type weave and it's a perfect dress weight, not too light. I fully expected it to fray like mad but it never did. The lining is 100% cotton but much nicer than muslin and heavier than batiste but not as heavy as a Kona cotton. I used cotton because I knew the wedding would be outside for a good part and it could possibly be a very hot day. It was! I used a poly silk charmeuse for the Hong Kong seams and bindings.

As mentioned in the beginning of this project. I interlined the skirt with large hole nylon net from Joanns, the kind of stuff you make those scrubbers with. It did a wonderful job of keeping the wrinkles out of the skirt and I would definitely use it again. Since all the seams are enclosed, scratchiness was never an issue. It was cut out of the hem and vent area. You wouldn't know the netting was in there if I hadn't told you. It worked! The collar is 100% heavy white linen and faced with white cotton as well. Interfacing is in the collar and I used a woven interfacing from Fashion Sewing Supply.  When this project was started I majorly stressed over matching the print which I soon discovered wasn't going to happen. I think my "sort of" matching looks fine, don't you? The goal was to keep the bulleye effect away. 

Construction:  I read through the pattern a few times before I started but really didn't follow it at all. The first issue was the underlining. The cotton and the FF  were stitched together as one. All seams were bound, including the hem edge and vent. No facings! Holes were bound with bias strips of charmeuse. 


The zipper a hand picked beaded zipper. This was done by first sewing the seam shut with a machine basting stitch. An adhesive measuring tape was then placed a quarter inch away from the seamline on the right side. This allowed me to accurately place the beads exactly every 3/8ths of an inch on both sides. I used a back stitch and the zipper is as sturdy as any if not more so. Once completed I removed the basting. The zip on this dress stops about three inches from the top of the dress and the end is hidden under the  collar. 


The edges of the zipper seam have the Hong Kong finish as well. I also covered the inside of the zip with a folded strip of bias charmeuse. I love this touch. I feel like a princess whose tender skin should never touch anything mechanical! I can dream, can't I?  The three unfolded edges are catchstitched to the underlining. 

The neckline and armholes were bound with bias, understitched and catchstitched to the lining. 


I added the vent to the construction. The pattern has a "slit" at the center back seam and the skirt definitely needs some accommodation for movement. Personally, I think slits at the back rear don't do a very good job, pull apart, and just look cheap and like someone  didn't try, my personal opinion. So added a vent to the skirt. the edges wre bound. The outside of the vent was secured with a tiny zigzag. I saw that touch on a garment and really liked it.

I also added a self fabric belt to the dress. My hat was the major accessory so a contrasting or thicker belt would have competed too much. I had to "make do" to make my belt but it came out really well. I will try to do a tute on it soon. I used drapery header to make it, fashon fabric and an antique buckle, all pretty low key.

You can't see it but with the dress I wore alligator pumps in dark brown. I packed a pair of coppery sandles in my bag and put them on for the serious dancing! I told you I danced!  There is no black in this fabric. It goes from snow white to the deepest chocolate brown. My hat is the same color dark brown. I picked it out at a store in Disney, Chapel Hats. They accommodated me with the info I needed and I ordered it on line when I got home. Unlike my Macy's bed set, this hat arrived in perfect shape. I will definitely use Chapel Hats again. DD bought one of their hats as well.


The wedding is over. I am craving another round of "event" sewing but for now will settle in on some projects that I have been dieing to get going. First off will be a tunic out of the rust dyed fabric. It is near done already and I can't wait to show you.............Bunny


Wednesday, May 13, 2015

A hand picked beaded zip!


I really enjoy this type of sewing. I get off on the small details that maybe just I know about, like Hong Kong seams and such. I certainly don't advertise such things when I wear a garment out. But it's like wearing the lacy, expensive bra underneath a denim work shirt, just makes me feel good inside. Detailed and sometimes secret, that's my favorite type of sewing!

The dress is close to completion and I am all over it to  get it done on time. I will take pics on my form and let my hobbyist photog daughter take the pics of me in it with her killer camera. That will be at the wedding next weekend. More to come...................Bunny

The Ray Pinafore, 2025's Epic Fail

  Happy New Year and welcome to my epic fail of 2026. I guess you have to have one, right? This is the Ray Pinafore from Paper Theory Patter...