
Before we begin, all of the photos you will see have been HIGHLY corrected for contrast due to the black color of the jacket. It literally soaks up any light available and any detail along with it. So everything other than the points I am trying to make with the pix may look a bit off and my apologies extended. Now-----
This was one epic drama to make, starting out being quite fun. I had this idea in my head for a long time and kept missing my sale opportunities on this Vogue pattern. I had a little bin of hand dyed fabrics begging for attention and I had this gorgeous piece of Pendleton wool for their backdrop. It glowed with loveliness, which doesn't transfer well with all of my contrast correction. Eventually everything came together. I checked the reviews on Pattern Review and all were fans with only one maker commenting about a "fiddly ...but doable" neckline issue. I proceeded. I'll say now, love my completed jacket.
Fabric:
The black jacket fabric is a beautiful Pendleton woolen that came with several others inherited from a sewing legacy of a dear friend or from a local yard sale, hard to remember which. We had a Pendleton fabric factory very close to where I live until a few years ago so these fabrics often show up on tag sale tables at pennies on the dollar. It is gorgeous fabric with the glow of 100% pure wool.
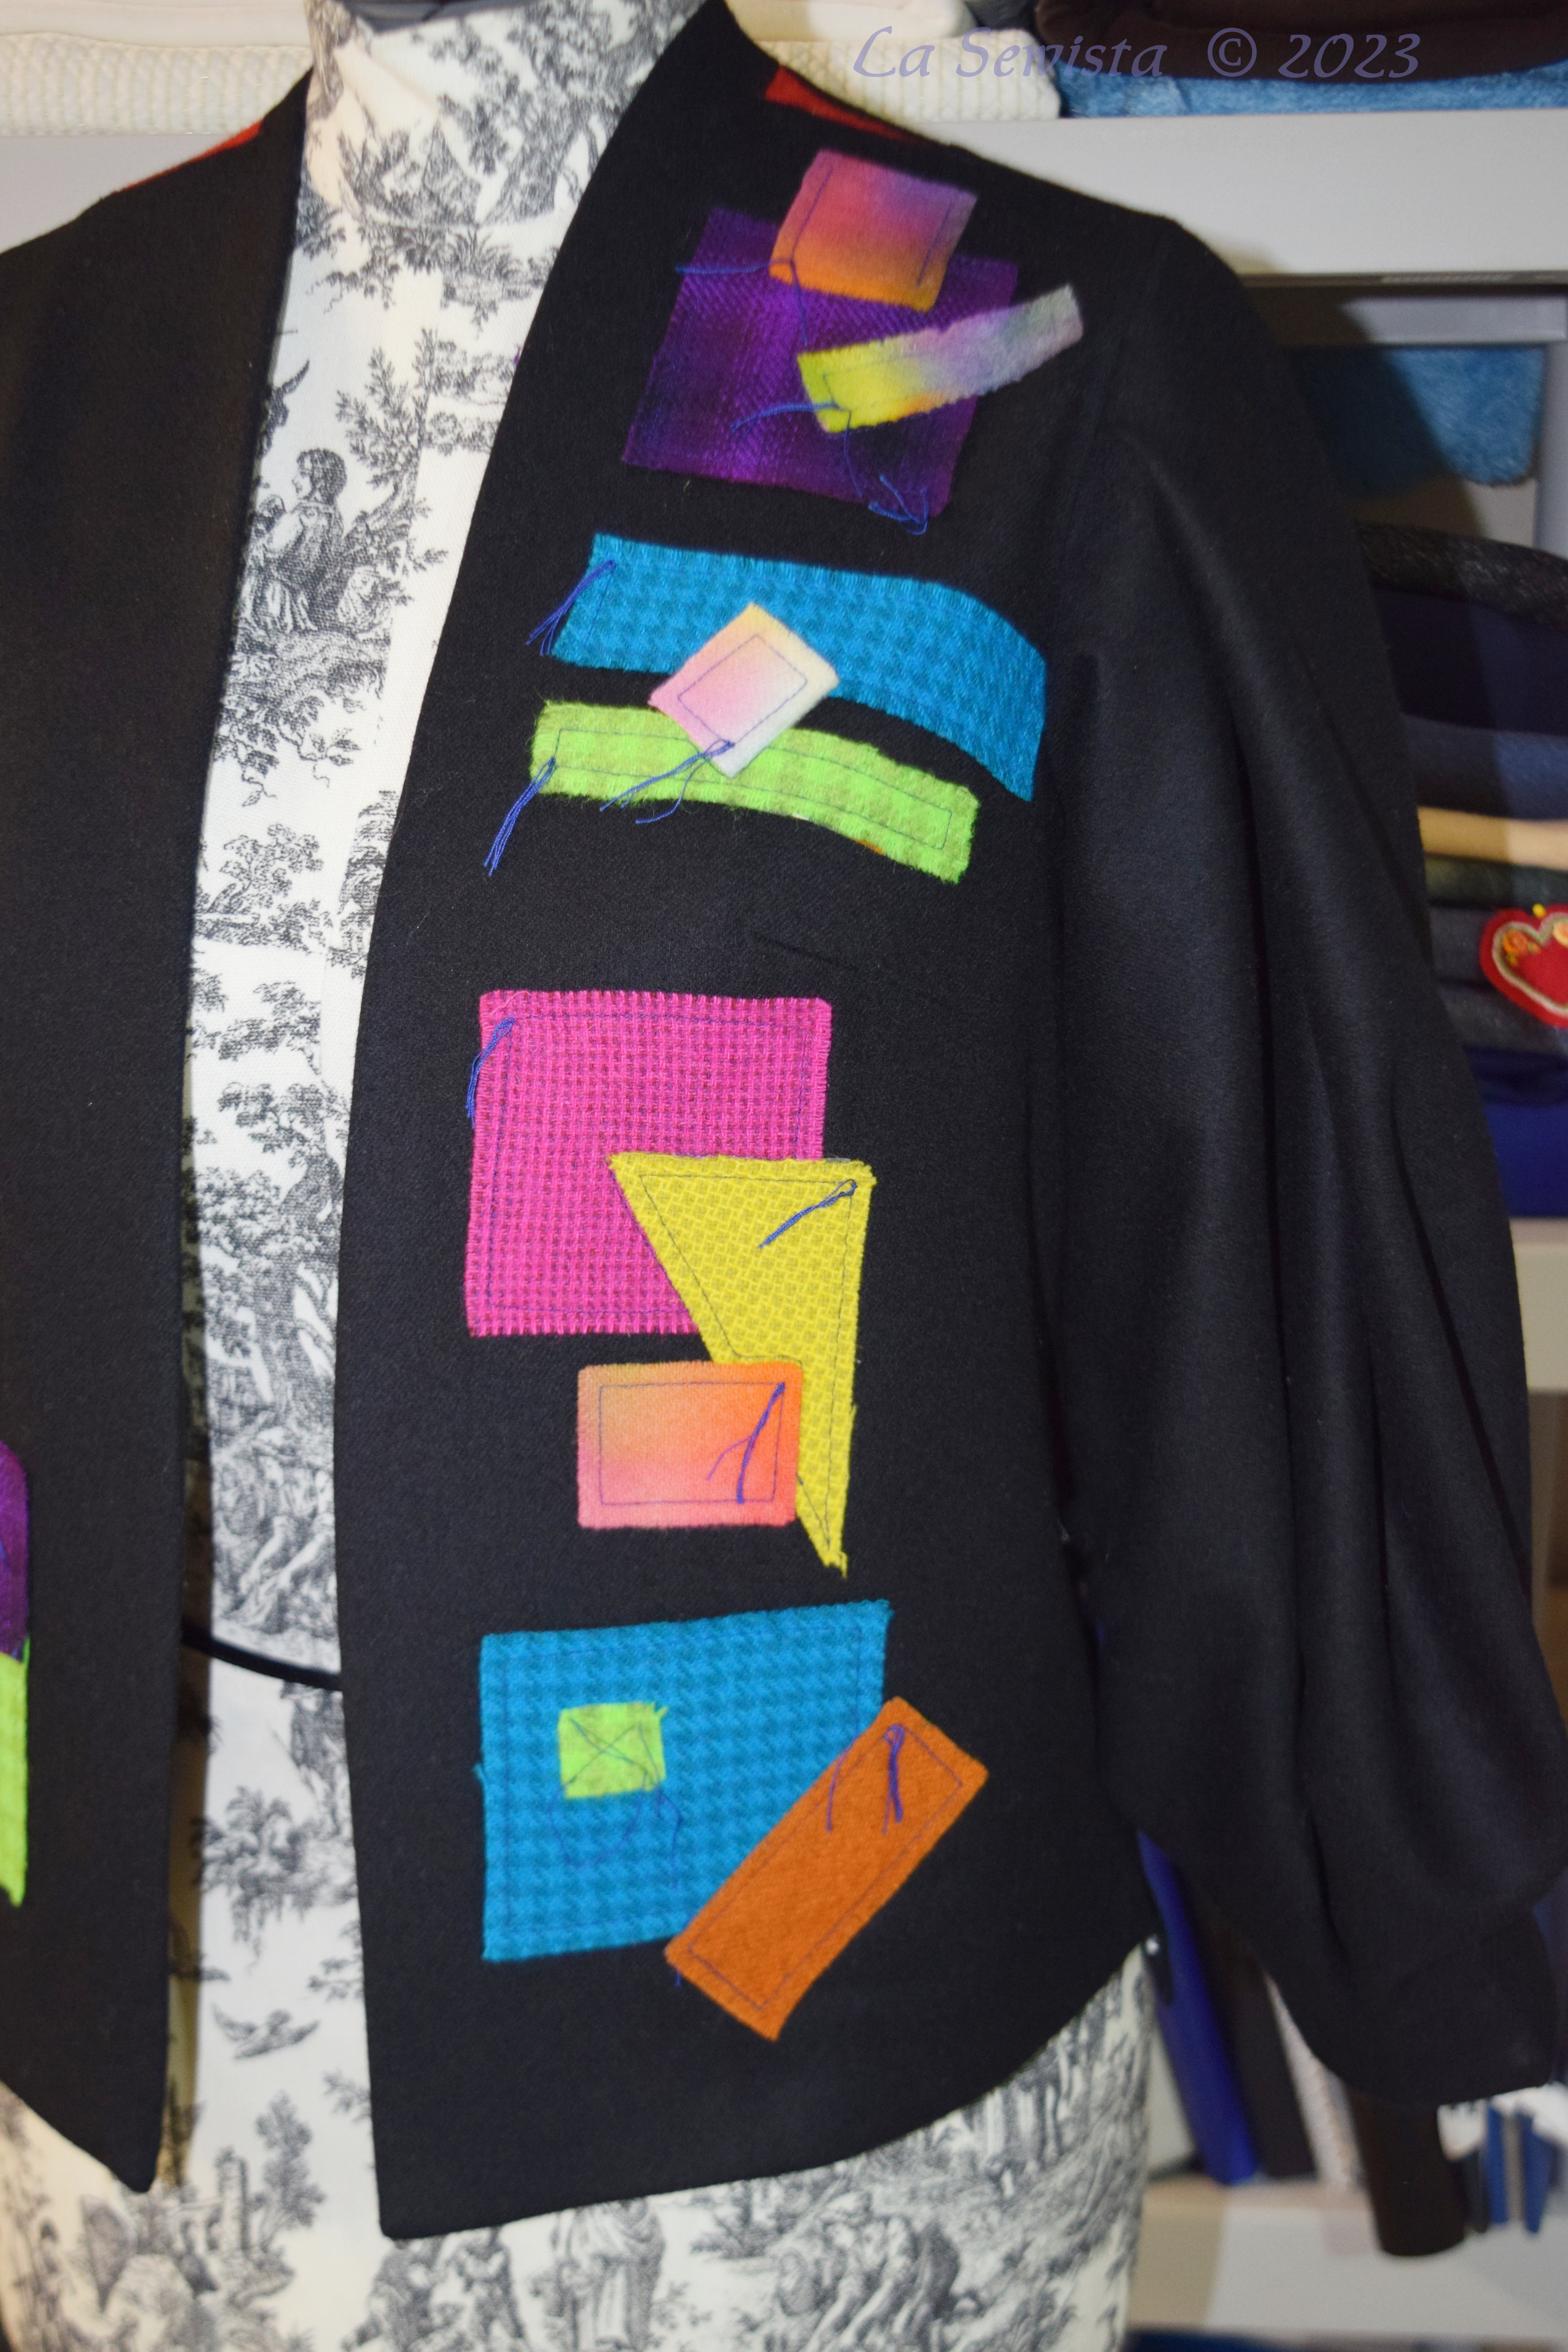
The small appliques are also all wool. The geometrics came from our LQS, local quilt shop and the others were hand dyed by me over the years. I appliqued them to the jacket by machine and left the threads hanging.
The jacket is lined with , I think, what I found in my lining bin and is maybe the Anti static lining from Joanns. I have had good luck with that and use it when I can't wait for Bemberg to come in or don't have enough in the stash.
The Hong Kong seams are made with your basic 1/4 inch gingham in black and white. I think it is probably a poly cotton blend. I haven't seen all cotton gingham in ages.
Pattern:

This pattern is Vogue 9338. The jacket is a blend of simplicity and complication. The bodice has no closure and is not lined. I am toying with adding thin ties to it but will make that decision after wearing it a bit. It has what I have been told is a "swan neckline". The bodice reaches up a bit up the neck which I think is flattering. It is not enough to turn and is not a shawl collar. It lengthens your look which for a petite is a great thing. The hemline is straight across but I chose to change that up with a slit and a one inch difference between front and back.
It is the sleeves that are magnificent here and quite different. I will go thru each part of the jacket in a moment and have a lot to say about the sleeves and collar. I have a lot to say about the pattern as well!!! Here we go!!!
Construction:
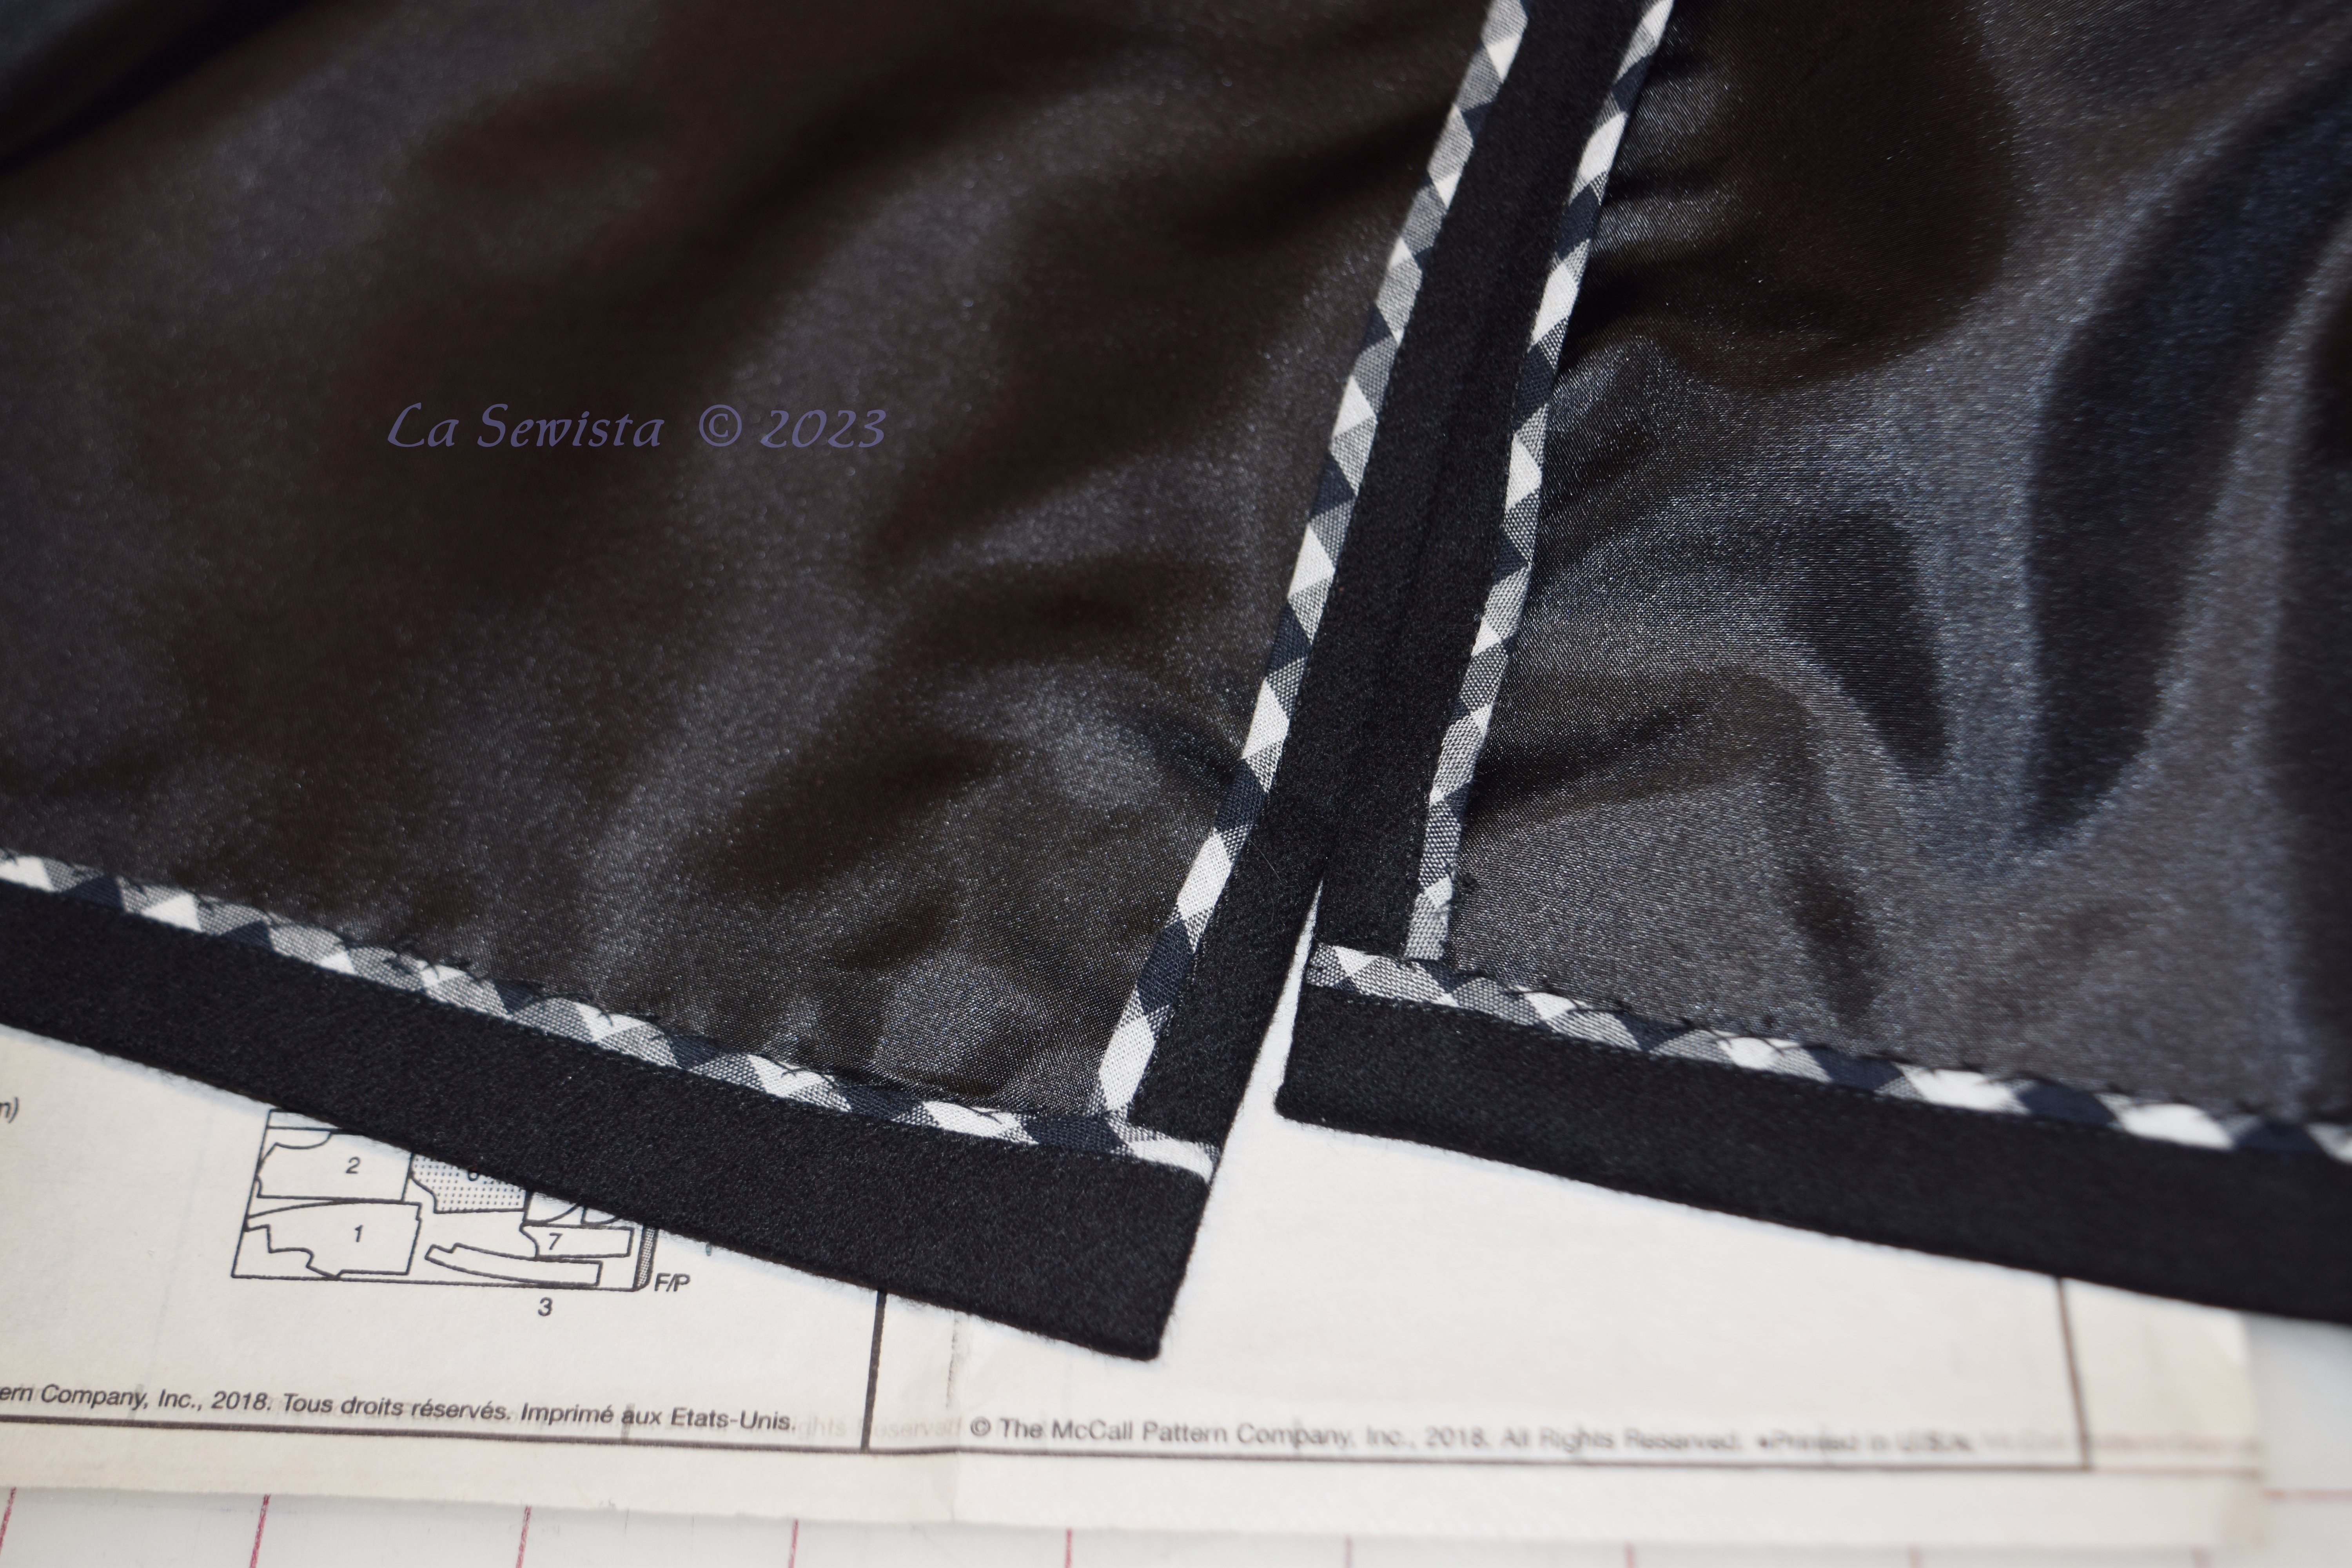
I decided to underline this bodice and treat the sleeves a bit differently as you will see. I cut the bodice fashion fabric and underlining layers and stitched the back bodice pieces together first. For the front bodice, I did not do that. Instead, I figured If I was going to applique all those pieces to the front I should do that first and that way they would be hidden under the underlining. Then I realized that while I was doing that I might as well do the two bust darts as well and hide them. Next bright idea was to add a pocket on the side opposite the appliques and put some appliques on that to balance it all out. I did all of that and then attached the underlining by stitching all the edges together like I did on the back bodice. I had everything nicely done and covered with the underlining, sweet! I added my Hong Kong seams to all and did my hems as well. You can see I made the front hem shorter and added a split, just for interest.
Now it was time to move to the.................................COLLAR.

I sewed the collar together at center back. This collar extends from the bodice front. I sewed the facing at center back. I then sewed the facing to the jacket. It all matched perfectly at notches and dots up to the shoulder seams as it should. Then I was left with these two short pieces, at that time connected by a center back seam, to make it around the back bodice. Let's see what I had.

Here you can see the collar coming from the bodice at left and the facing at right. They are the same size, good. From the shoulder seam to the center back seam measures 2 1/2 inches, a total of five inches. I proceeded to pin this to the back bodice. No way in hell did it fit. Well, Claire Shaeffer taught me how to steam wool and get it to fit almost anything and I did. I shrunk that back bodice edge until it fit my collar, stitched it in and tried it on. It forced the whole garment up into a weird configuration that doomed it for my town dump. I steamed. I pressed. Nothing made this work. I measured my pattern, I read the directions over and over. I checked sizes. Did I cut wrong? You name it. I wondered and thought. It was a Blivit, that ole joke about ten pounds of crap going in a five pound bag. Well I had 7 inches of wool going into a five inch strip of collar. Of course, I mightily thought when I had steamed and stitched it all in I had succeeded so had graded and trimmed the whole horror. Now I sat and cursed each ripped out stitch. I ripped them all out and walked away for several days. I can't remember when I have been this frustrated. That is when I started decluttering my studio. After a few days I returned.
I started by first opening the shoulder seam as it starts to rise up the neck for about an inch and a half. I inserted one of my bits of wool to make a gusset.

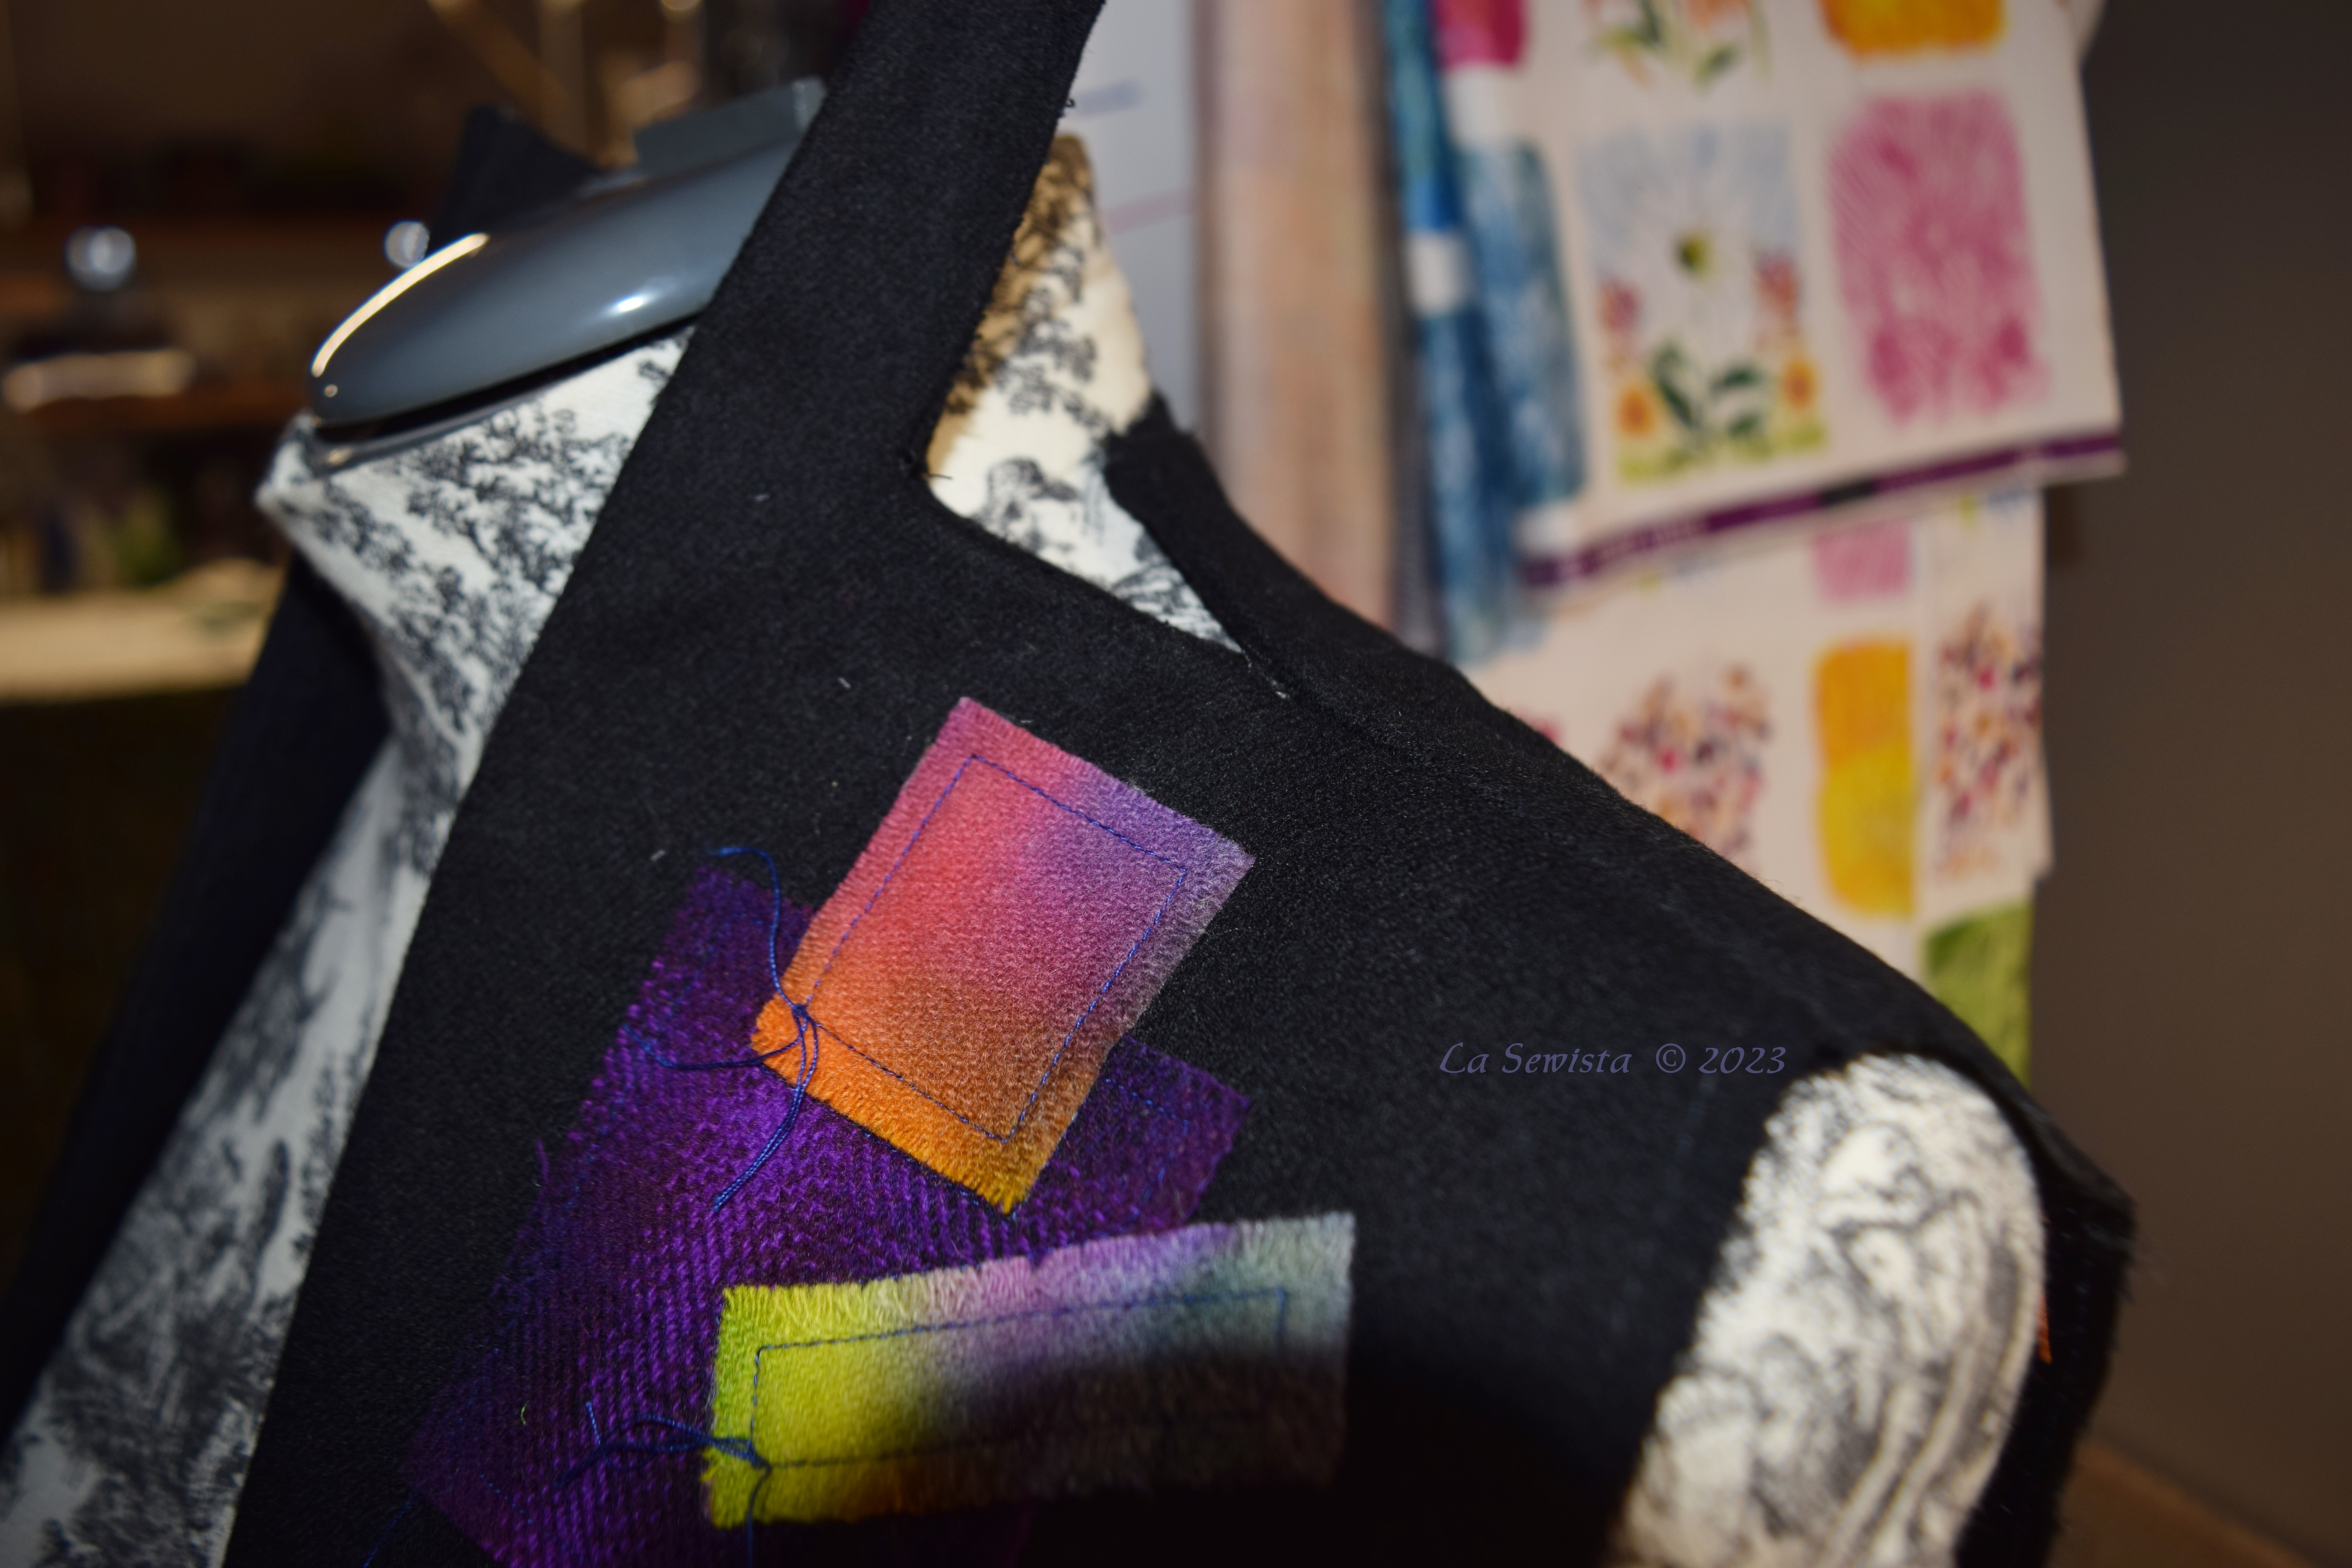
I stitched that in, first basting then by machine. Next I cut a strip of bias wool and fused woven interfacing to it and cut that to fill the remaining space of the collar/facing. I needed to equalize the density. I folded and pressed this where a seam would have been originally. It all fit nicely onced stitched into the jacket and trimmed. It even got the Hong Kong edge treatment. But, I did not like those seams showing on the back neckline outside. I decided to stick with the program and cover them with some appliques as well. I think in the end it worked out well enough. I was drained. On to the .....................Sleeves!

Sleeves

These sleeves are amazing and if they weren't in black you would really see just how amazing a lot better. Trust me here. I had a lot of fun with these. I have thoughts regarding my petite perspective as you will see.

Here is your unique sleeve. You can see it is just short of a yard wide at the bottom and a little less at the top. THERE IS NO GATHERING. All fullness is controlled with pleats. Keep in mind I am dealing with midweight wool here, nothing light about it. I made decisions based on that and also on what I saw in reviews. I chose to underline the sleeve only a bit over a third of the way of its length. This would provide ease in slipping on and off (it does) and not add to the bulk. In the sleeve cap those two lumps are ONE PLEAT that covers your shoulder seam completely. It provides a beautiful drape. HOWEVER, on this petite, after stitching, I realized it was an issue. I am very narrow of torso and shoulders and the fold of the giant pleat had nothing of my body to support some of its width and it stuck out weirdly. I checked reviews and everyone elses looked fine. ETA: If I made this again, I would do a petite adjustment by taking an inch out of each of those bumps with a wedge tapering to nothing at the cuff. I think that would eliminate the Judy Jetson triangle effect that happened due to my narrow shoulders and torso. 02/09/23.

This weird triangle of fabric stuck out from the armscye. It was much more prominent in real life and looking straight on it stuck out very weirdly, not like in the pic above which makes it seem flatter. Soooooo, what I did was open the seam where you see the red dashes and shove in that extra triangle of fabric until it all layed smooth.

I cut off the triangle and everything was fine. Did that on both sleeves. If you are very narrow shouldered and/or petite, be aware of this possiblity. That big tuck is gorgeous in the drape it creates. Next are the cuffs.

Above you can see my markings for the cuff area. What the pattern has you do is basically a french binding. It is a double folded piece of fabric, stitched to the edge of the pleated cuff, ALL turned to the inside and "slipstitched" down. These looked like rope on a couple that I saw and I was not going to deal with or have that bulk. With my fabric I would have bulk under the best of circumstances and suggest that a French fold binding would only work here with the thinnest of fabrics. Here is how I handled things.

I sewed a one layer strip of wool to my cuff area once all the pleats were stitched in. The seam was graded. I pressed them toward the facing. They were then understitched with a wide triple zigzag, the better to smoosh down all that bulk. The edge of the wool was pinked. I am thinking at all time, "keep the bulk down". This was then turned to the inside and carefully pressed. The edge was not turned under.

Then it was carefully catchstitched to the pleats, only going thru one layer. I think they are a beautiful design feature.

Is this Joseph's Technicolor Coat or is just my epic drama of light amongst the midwinter darkness? You be the judge. All I know is that I now love my coat of many colors and look very forward to starting some spring projects. I have one more simple ( oh, the famous last words ) winter project and then I am moving on! Happy Sewing...............Bunny


Wow! Your problem solving was nothing less than masterful! I am so impressed! The final jacket is stunning; would never have looked twice at that pattern but you really knocked it out of the park. Well done! Enjoy wearing it!
ReplyDeleteThanks, Lisa. I am nothing if not determined once I set my mind to something. I can honestly say I don'r remember walking away from a project like I did this one but I went back and figured it out. There is always a way. I really love the finished project. At the outset my goal was for a warm little jacket I could throw on with a pair of jeans,nothing too tailored, fussy or fancy and I think this fit the bill just right. Thanks for your lovely comment.
DeleteBunny, this jacket is spectacular! Thank you for all of the detail too, I was able to follow your explanation for everything. I am passing your post along to my sister who is petite, loves Vogue, jackets and piecing/dying, so I know she will enjoy reading about your adventure as well. Robin
ReplyDeleteThanks, so much, Robin.
DeleteEverything about this jacket is just perfection! It is so beautifully scaled to your petite body, the finishing is so elegant and the finagling you had to do on the back collar creates a little jewel of color on an other plain back. Your explanations were crystal clear and well illustrated. Thank you for sharing your couture workmanship.
ReplyDeleteYou are welcome and thanks for your lovely comments. One thing I failed to mention about this pattern that I really like is that it has a traditional shoulder cut. Everything out there today has a dropped shoulder. While I have sewed a few things with that dropped shoulder, I know it is not the best look for us petites and it was really nice to get the slimming look of a traditional shoulder placement. I think it was a great foil for the giant sleeve as opposed to the many out there with the dropped sleeve.
DeleteNice work on overcoming the collar woes. I know it was a near disaster, gotta say if it hadn't happened a plain black back would have been rather boring compared to the front. Also thanks for showing how you veered from the pattern instructions in order to deal with your heavier fabric.
ReplyDeleteWell done on saving that gorgeous fabric and jacket.
One thing I found quite amazing is the lack of variety Pendleton now makes for sale in their yardage. Just a few years ago I remember looking at the website and seeing fabric like I just used. It was running in the 40-50 per yard price. Now all they are selling are their blankets and a few plaids. There was a gray flannel at 40. p yd that appeared far lighter than my jacket fabric. I wonder what the reason is. Lack of interest? Supply chain issues? It made me glad for my supply which, as I said, shows up often around here in yard sales due to the factory that was close by. Lucky me! Thank you, Gail, for your comments.
Delete