The bumblebees are all done so the really fun time begins, sewing machine time! Several of you have let me know that you have this pattern and are anxious to get going on it but are waiting to see how I handle it. With that in mind I will share some details on what I have done differently with Daisy Kingdom 2464, a Simplicity pattern.
The only big difference in sewing this pattern, aside from normal fit adjustments, is how I handled the bodice. I decided to line the bodice for various reasons. First, due to the bumblebee embroidery I would like to cover the back side of my embroidery with a lining. Also, I like the way a lining will give a clean finished edge to the neckline and sleeves. So I studied this a bit to see how best to do the bodice lining. For those planning on making this pattern, here is what I did.
 *If you remember, I fused a block of linen for each side of the bodice. Edges were serged and the pattern outline was traced on to the fabric block. Above you can see that the bodice is stay stitched 1/4 inch away from the edge, all around\, while still in block form. Once all around was stay stitched, the bodice was cut out of the block on the traced lines. I found my quarter inch foot invaluable with this pattern. Keeping the bodice in block form as long as possible helps with preventing stretch of all the odd curved edges in this pattern piece.
 * Next the "bodice front trim" #7, was attached to the bottom front edge on each bodice piece.
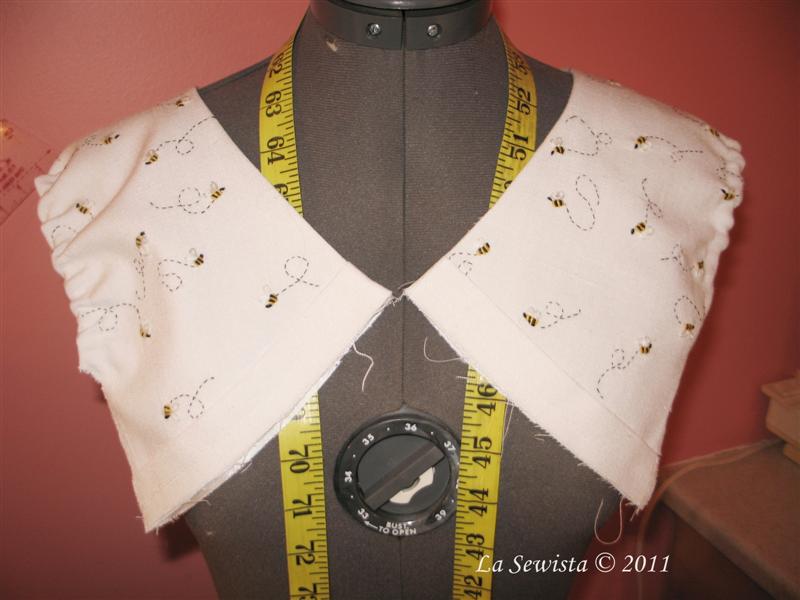
 * Next the tie was stitched and attached to the bodice back as per the pattern.
* Lay the lining on top now, right sides together. Sew across the short seam where the tied end is attached. Trim. Sew the neckline seam on the front up to the tie. Sew the back peek a boo seam edge from the bottom back waist to the tie end. Be very careful that you do not stitch the tie end into your seam. I found I had to roll it out of the way, burrito style. You now have the entire neckline, peek a boo hole, back bodice center edge stitched to the lining.
* Trim and grade. Press the trimmed seam toward the lining, using a seam stick if you have one. Put on your edge stitch foot and understitch as above on the lining side as far as you can up to the tie. You will be about an inch and half short of the tie.
* Press sewn edge flat, wrong sides together, favoring edges to the lining side. Now if you lay the bodice out flat, you may find the lining doesn't match in some places. It always amazes me how fabrics can stretch from just the most minimal of handling. Trim your lining to match the bodice.
* Turn right sides together again and stitch ONLY the sleeve edge of the other side, as you see below.
 Once done that, grade seams and press toward the lining, using a seam stick. Your bodice is pretty much lined now and pressed nice and flat. Stitch one half inch away from the edge all along the sleeve edge. This is making a casing for the elastic. Using a Fasturn or whatever method you are comfortable with, pull the elastic through the casing. Stitch at the top and bottom with a 1.5 stitch length to secure. I cut my elastic one inch shorter than the guide in the pattern to give it a bit more of a gather.
*Your bodice is complete now and you can proceed as the pattern directs from here to completion. Remember, what I have done here is to have a lined bodice, clean edges, and hidden embroidery backs.
* For the midriff I simply underlined with the same lining fabric and serged all the stitched edges. More on that later.

*****************************************************************************
 Part of the path around Meachum Lake in the Adirondacks....Bunny
The only big difference in sewing this pattern, aside from normal fit adjustments, is how I handled the bodice. I decided to line the bodice for various reasons. First, due to the bumblebee embroidery I would like to cover the back side of my embroidery with a lining. Also, I like the way a lining will give a clean finished edge to the neckline and sleeves. So I studied this a bit to see how best to do the bodice lining. For those planning on making this pattern, here is what I did.


* Lay the lining on top now, right sides together. Sew across the short seam where the tied end is attached. Trim. Sew the neckline seam on the front up to the tie. Sew the back peek a boo seam edge from the bottom back waist to the tie end. Be very careful that you do not stitch the tie end into your seam. I found I had to roll it out of the way, burrito style. You now have the entire neckline, peek a boo hole, back bodice center edge stitched to the lining.
* Trim and grade. Press the trimmed seam toward the lining, using a seam stick if you have one. Put on your edge stitch foot and understitch as above on the lining side as far as you can up to the tie. You will be about an inch and half short of the tie.
* Press sewn edge flat, wrong sides together, favoring edges to the lining side. Now if you lay the bodice out flat, you may find the lining doesn't match in some places. It always amazes me how fabrics can stretch from just the most minimal of handling. Trim your lining to match the bodice.
* Turn right sides together again and stitch ONLY the sleeve edge of the other side, as you see below.
Once done that, grade seams and press toward the lining, using a seam stick. Your bodice is pretty much lined now and pressed nice and flat. Stitch one half inch away from the edge all along the sleeve edge. This is making a casing for the elastic. Using a Fasturn or whatever method you are comfortable with, pull the elastic through the casing. Stitch at the top and bottom with a 1.5 stitch length to secure. I cut my elastic one inch shorter than the guide in the pattern to give it a bit more of a gather.*Your bodice is complete now and you can proceed as the pattern directs from here to completion. Remember, what I have done here is to have a lined bodice, clean edges, and hidden embroidery backs.
* For the midriff I simply underlined with the same lining fabric and serged all the stitched edges. More on that later.
*****************************************************************************


You are making me realize I need to get back to embroidering the bullion wrap dress for my three year old granddaughter. But I love this dress you are making and will go out and buy the pattern this weekend. Another advantage to lining the bodice is that it holds the gathers much better. This might look good with a smocked section for the insert.
ReplyDeleteHow is your recovery from you bureau encounter coming?
Πανέμορφο γίνεται! Ζήλεψα και θέλω κι εγώ να κεντήσω μελισσούλες σε ένα φόρεμα!
ReplyDeleteI'm doing great. My face is getting back to normal, still some nasty color but no swelling and I feel wonderful. Thanks for asking, Cynthia.
ReplyDeleteGreat explanations, Bunny! I not only learn the HOW of doing something but the WHY as well. You are a wonderful teacher & I SEW appreciate you taking the time to explain so clearly.
ReplyDeleteI'm glad you're doing better...
Gentle Hugs,
Rett
Bunny, I am looking forward to the next installment of the bumblebee dress-this is so pretty. Glad you are healing well.
ReplyDelete