Welcome to Next Level Sewing #2. What is more basic to sewing than thread? Yet using it well can definitely add a bit of polish to your garment. These are simple skills that you won't find in a pattern and if lucky will stumble upon on the internet. I've tried to gather them together here for a more cohesive lesson for you. If you have any questions or would like to share your experience please feel free to do so in the comments. There is a definite dirth of info on the web about thread.
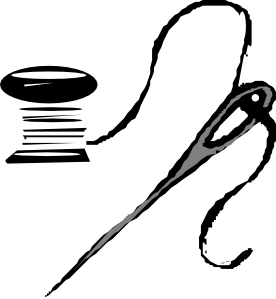
Thread from the spool. Whenever handstitching, always thread your needle the way it comes from the spool. Cutting a length of thread, letting it fall in a loopy situation on your work table, and then picking up any cut end is not a good habit. By feeding the leading cut end of the thread into your needle and knotting the end that is closest to the spool you eliminate aggravating knots and kinks. Thread is made with a twist. When you thread the needle with the end that is closest to the spool you are constantly fighting the natural twist and it is a battle between you and the thread's urge to get back in line with it's twist. Guess who's going to win?
Want to make your handsewing a bit couture? If your handstitching is for finishing, like a hemline or buttonhole, run your thread through a piece of beeswax. Beeswax is available from any of the chains. Then pass the thread under a warm iron to meld the wax into the thread. I would not use this technique for heirloom sewing of lightweight fabrics but it is wonderful for finishing hems on anything wool or more tailored like a jacket. When I iron the thread I do it over a few layers of scrap fabric. I don't want that wax to telegraph to the ironing board cover where it will later be released while ironing something else, not good. So do this over a towel or a few layers of cotton scraps.
Thanks to the late Anita Boucher who taught me this 25 years ago when she saw me thread my first needle for hand stitching a quilt! The end of twisting, knotting thread was glorious!
Knot those puppies! In the past few months I have seen two very well known sewing teachers topstitch a pocket and just snip the threads off at the corners when done. No, people, No! Once this garment is washed, and in both cases seen it was washable jeans and pants, I promise you those unknotted threads will pop out and fray. Then the pocket or whatever will come lose from it's stitching and in no time that garment you put all that effort into will look like Walmart's latest fast fashion after a run through the washing machine. Again, not good.

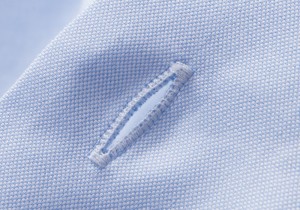
How to do this correctly? Simple. I always keep a pincushion next to the machine with a couple of crewel needles in it. Why crewel needles? They have big eyes and are quick and easy to thread. I don't want to futz with needle threading while at the machine so make it as easy as possible. When finished stitching a seam, one that is on that outside and will show, leave about 8 inches of thread before cutting. One thread, the bobbin thread, will already be on the back. The other is on the top and gets threaded with the crewel needle. Run that thread through to the back of the garment in a way that looks like another normal stitch . Once on the back do a square knot with the two threads. Square knot? Right over left, left over right. Clip the threads now. A more couture finish? Run the threads between the garment and come back up on the wrong side about an inch away. Clip them to keep the ends hidden. You now have your threads tied off and your beautiful topstitching will hold up to cleaning and look good for a long time. To make my point here I sewed up a simple pocket, a la quick, and on the right side I tied the topstitching threads to the back. On the left side I clipped them as I saw the two well known Craftsy Profs do, down to the quick. Then I put the pocket in the wash for one wash and one dry. Look how this came out after one washing. The stitches on the right that were tied to the back are solid and holding. The stitches on the left are a mess. This pocket is doomed to separate from the garment with a few more washes. This is what happened after one wash. You work too hard and put too much into your sewing to have it fall apart and look shabby like this.
Don't Backstitch. I know. This is against what you have been doing for maybe years. But backstitching, particularly at crossed seams, can add bulk and make for a not smooth seam intersection as well as uneven seams. Remember Couture Sewing Maven Roberta Carr's number one rule of sewing, "Reduce bulk whenever possible". Not backstitching reduces bulk. But my seams will fall apart!!! NO! See the next paragraph.

Dial down your stitch. OK, this takes a little getting used to but the results are worth it. I promise you, in no time you will be doing this without even thinking. When you get between a half inch and a 1/4 inch away from the end of a seam STOP. Same goes for starting seams. Dial down your stitch length to 1.5 or even 1 and continue stitching till you meet the edge. This will give you strong seams and will eliminate the bulk of backstitching. Cut your threads right at the edge. Once pressed, intersections will have a smoother appearance than those that are backstitched and seams will lie flatter. Have you ever seen backstitching in a retail garment? While I really don't think they do anything to strengthen stitches in manufacturing other than hand the piece off to the next stitcher in the process, we continue to bulk up our seams with all this unnecessary thread. So dial down that stitch length for a more professional look to your seams.
In the pic above you can see the difference this makes. This is a cotton chambray.Do you see how the backstitching has added bulk to the right seam and is not letting it lay flat? This has been pressed open just like the seam on the left. By dialing down, the stitch length the entire length of the seam is exactly the same width and presses beautifully. By backstitching, three rows of thread are making the width of the seam unequal and pressing flat not doable without bubbling. Yes, you could press the life out of this and probably bring it back to look a little better but it will return with each washing. You don't want to do that every time you iron, do you?
Thread fades, particularly cotton thread. All those lovely thread holders that hang on the wall next to your big window over the sewing machine? Not the best thing for your thread. It is best stored in a dark space, free from dust. You can get thread organizers that stack and fit into cabinets nicely. Mine are stored with each color in its own box and inside of a cabinet. Sewing in the basement? I did for years. Fluorescent lighting will fade your threads, particularly the silk ones. BTDT. It does a wicked number on silk and silk thread.
***************************
There is a surprising lack of information on threads on the web. There are many different kinds of threads, too.
The poly or poly blend threads most of us use to do our sewing are quite strong and have elasticity built in. They are great for knits because of that factor. But because of that elasticity, extra care has to be given to winding your bobbins. Wind your bobbins at a slightly slower speed. We are always in a rush to fill a bobbin, an aggravating interruption to our sewing. Slow down with the poly threads. At high speed the thread is stretched before being wound on the bobbin. Then when you go to sew you see the puckered pulled tight seams. That is because the thread is too taut on the bobbin. So wind the bobbin at a touch slower speed. Careful, too slow and your bobbin won't be tight enough and the next thing you know there is looping in the bobbin case.
Our newer computerized machines can be temperamental. They don't like thread lint so you need to clean your machine after each garment. Some machines definitely have a preference for their thread brand. At one time my machine would only be happy with Gutterman thread. Now it will use both Gutterman and Coats and Clark. Turns out C&C implemented some change that made my machine like it again. So experiment to see what works with your machine best. DON'T use cheap thread. It is made with very short staple fibers that will lint up your machine and can cause an expensive week or two at the machine spa. It's not worth it. Good newer thread only!!!
Cotton threads have a matte finish and offer a rich look for button holes and topstitching. Their bit of fuzziness helps fill in the spaces on machine buttonholes and can make a lovely finish. I've heard more than one expert suggest cotton thread for sewing silk blouses. I've done this and really like the way it works and looks. Cotton thread is not for the construction of much used children's clothing.
Silk threads are lustrous and extremely strong. They are what you use when doing basting that will then be pressed in as in a hem or other tailored applications Why? Because they do not leave indentations in the fabric when steamed. Heavy steaming is required in many steps of the tailoring process and regular sewing thread will leave indentations in the garment that are hard to remove. Regular silk sewing thread avoids this. You can get Gutterman silk threads for this at the chains. Silk buttonhole twist is what you want to use when going to the effort of hand buttonholes on couture garments like a Chanel style jacket.The next sentence is a bit controversial but I agree with it. Because it is so strong, the silk can actually cut threads in your garment fabric and is often recommended to NOT be used for actual construction. I would use a high quality cotton like Mettler silk finish thread on silk fabric, not silk thread.
Threads come in different sizes. The higher the number the finer the thread. For heirloom sewing size 80 and even a 100 threads are used. They disappear into the fabric when doing pinstitching and other heirloom treatments, so lovely. This allows the "holes" to be seen and not clumped up with thread. These are sometimes called "fine embroidery thread" but are not machine embroidery threads. That is a whole different animal that I know nothing about as I don't do machine embroidery.
Most regular threads are size 50, Machine embroidery threads tend to be size 30. Remember, the lower the number the thicker the thread. Remember though, other than for heirloom sewing, I haven't found the number to be particularly important to know. What you do need to know is that threads are marketed not by size but by use as in multi purpose, buttonhole twist, topstitching thread, quilting machine thread, etc, etc, etc. There is a thread for each type of sewing being done out there and it's not hard to find the correct thread without knowing a size. Just shop for thread by it's eventual use and fiber content. Heirloom sewing is the exception. Specific thread sizes are often recommended and are available from heirloom purveyors like Farmhouse Fabrics.
Basting threads are a wonderful thing to have on hand and not available in most stores. I thank Claire Shaeffer for introducing me to the wonders of skeined basting threads. They have a loose twist and a very soft finish. They won't leave indentations when pressing. They are also easy to remove and break easily so you don't have to bother picking up and putting down your scissors when all you want is a quick baste or are thread tracing. The soft thread is great for tailor tacks as they don't pop out like regular thread tacks can. This stuff is hard to find and is Japanese in origin. I bought mine through Claire's class. Susan Khalje sells it in her web store here. Spoil yourself and get some great basting thread.
I hope this post about thread has helped you improve your skills and knowledge. Join in the convo and let us know your tricks, experiences or questions. Till next Monday...............Bunny


Nice post,Bunny. Very informative.
ReplyDeleteWell what a useful post. While some of this is well known to me, lots of it wasn't, so I was very pleased to read it. I have never liked backstitching because it rarely fills exactly the same space and creates an issue with pressing. But using a smaller stitch is a cool idea. thanks Bunny.
ReplyDeleteThanks for putting so much work into these posts Bunny. I have been sewing for years, but still learnt something new! Regards Sue.
ReplyDeleteGreat post Bunny!
ReplyDeleteI do have one more tip regarding threads. Threads are either wound in a stacked fashion (one thread sitting on top of the other) or in a cross wound fashion (creating an "x" appearance). For fewer stitching problems, threads that are stacked should feed off the thread pin vertically while the cross wound thread should feed off the thread pin horizontally. Alternately, you can use a thread stand that sits behind your sewing machine for the cross wound thread and you'll get the same results. Sometimes stitch irregularity is caused by thread that is not feeding off the spool properly (this is common when doing more heirloom stitching).
Many machines will come with 2 thread pins for this very reason. :) For years I thought that the second pin was just for when you used a twin needle. LOL!
That's great information I wasn't aware of. Thanks so much. This is exactly what I was hoping these posts would be, a place to share what we know in a positive fashion. Thanks so much.
DeleteI've been sewing "all my life" but I still learned much from this post. Thanks.
ReplyDeleteThanks so much, Bunny, for an essential primer on thread. It appears to be a simple topic, but with a myriad of threads on the market, it can get confusing when trying to get things just perfect. One thing I don't need is to have the thread causing headaches during construction, and with the blizzard of choices, it can get confusing. I'd rather save my energy for battles on the fitting front, and your post moves me in that direction.
ReplyDeleteI had to laugh when I read the Craftsy instructor's advice to clip the thread without any kind of securing treatment. I took a class on decorative seaming and was shocked to see that the instructor didn't press the seams as sewn or open once she had completed a demonstration. I opted for a refund. Craftsy is great, but every once in awhile there's a blip. I am learning that with sewing. everything is cumulative. Every tiny step along the way can mean the difference between a bad day in Home Ec and fabulous.
You are so right. These nano lessons add up over the years and all contribute to making us the really good sewists we want to be. Lots of these "tools" take very little extra time but when combined with other skills learned over time greatly contribute to a professional looking garment made with skill. The excuse of being too busy or don't have time for whatever reason is no excuse as we are talking nano moments here. These are not time consuming efforts. They are simply habits waiting to get embedded in our sewing psyches. Just good habits.
DeleteA great post, Bunny!
ReplyDeleteQueries Conejita I am so pleased to read your tute on Thread. I also have been wondering which thread for this and which thread for that when I came across Superior Threads.com online and their DVD on threads. They offer a free DVD with a thread purchase which is a compilation of a thread seminar offered by Dr. Bob. This was so full of information and opened my eyes as no one had ever discussed thread in my sewing classes and books. I'm never too old to learn something new. This class may be for Newbies but I've gotten a lot out of it. Hasta luego
ReplyDeleteThat is a wonderful resource, Corina, and thanks so much for telling us about it. Off to check out their site. Luego, querida.
DeleteWow, I've been sewing nearly all my life and I learned a lot here!
ReplyDeleteWOW! So this weekend while catch stitching the hems of my latest pair of pants, I was ENORMOUSLY frustrated at the my thread twisting and catching and was going to post on PR today to ask why this was happening.
ReplyDeleteTHANK YOU!!! :-)
Talk about timely! Glad to help Mrs. Smith.
DeleteVery helpful -- thanks!
ReplyDeleteLove this "open your eyes" session on thread...backstitching is a no-no for sure but certainly used in factory gowns. I use your technique of tying to the back for many occasions and quite often use a surgeon's knot by going through the hole twice and then once if the thread is slippery as the first 2 passes hold it tighter for the 3rd and final pass back the other way. If you have ever worked on a gift wrap table you will appreciate this for holding ribbon in it's place...ha ha. Love your pocket photo...we will all remember that visual!!! Thank you so much!
ReplyDeleteWhat does BTDT stand for?
ReplyDeleteBeen there, done that!
DeleteThanks for passing on these tips, so useful even for beginners!--newbie in Toronto
ReplyDeleteI really want to Thank-you too Bunny. This is exactly what I've been looking for. Someone to teach me the little things that make the big difference. I would like to know how you tie a knot at the end of hand stitching. I normally do a small jab in and out and then wrap around the needle, like a French knot and if possible, loose the end somewhere behind, and snip . My mother taught me this method. I have tried to research and it appears that as long as it works for you, its good enough. But is it really??? I'm going to have to make some post it notes on my wall by the machine to renew these fabulous suggestions, to break some old habits, like back stitching, and I just love square knot - fabulous. Your the mentor I've been searching for all my life!!! Bravo on these terrific posts. :~ ) and from now on, I will be paying close attention as to which end I thread my needle....... awesome!
ReplyDeleteJoyce, that is exactly how the nuns taught me to do a knot when I was a young girl. I have picked up a couple of other methods over time. When I am sewing by hand on fine batistes I usually start with a tiny back stitch and a loop around it. The end thread is worked into the stitching. The idea is to have the back as lovely as the front with heirloom handwork. When I finish handsewing I usually do a loose back stitch, loop through it twice, pull snug and snip. I will run it underneath if I am able or work it into the previous stitches. Thanks for your excitement and support. Please pass this info to other newbies. It's all about passing on this fine craft.
DeleteExcellent thread advice. I'd like to add that dry air dries out your thread and ages them faster. A good rule of thumb is that, if you skin is dry, so are your threads. People keep thread in their refrigerators because of the higher humidity. I keep my threads in a plastic drawer that, while not airtight, does protect it from wild Colorado swings in humidity.
ReplyDeleteThat's great information. Thanks so much for sharing it with everyone and for taking part in our Monday series.
DeleteBunnie, I am loving this series. I have sewn all my life and have learned quite a bit just in the first two installments. Some points confirm things I already do but many give me new insight. I would love to see how you do that starting knot. I am never really satisfied with mine. I am obsessed with the inside looking good and that is always a sticking point. This series could be a book when you are done! Nancy F.
ReplyDeleteLike Nancy F., I have been sewing all my life and I'm learning so much from your series. Thanks!
ReplyDeleteWow, I've been sewing for 50 years and learned new stuff! I had no idea about threading as the thread comes off the spool. It sure explains a lot of my frustrating times. And I really didn't know about reducing stitch length instead of backstitching. We've been taught to do that since 7th grade home ec....and I just taught it to a new sewist last summer. I will have to make sure and correct that. I will also go searching for that special basting thread. I baste more than the average person, I think, and it sounds like a good investment to me. Thanks, Bunny!
ReplyDeleteThe only two sources I know for the skeined basting thread are Susan Khalje and Claire Shaeffer. I do know it comes from Japan. However, I've learned that there are other good basting threads that tailors like and that are available from Wawak. They are also soft and all cotton. The skeined threads appear to be thicker and softer, however. They are really nice to use.
DeleteThank you for this thorough, information-packed post on thread. It was a great review for me, and I learned a thing or two as well. That's the fun of this craft - I never stop learning!
ReplyDeleteIt is one of the joys of sewing. There is always more to learn and there are also so many different ways of doing things too.
DeleteLoving this series, Bunny! Thanks so much for sharing your knowledge! Regarding backstitching... I've been operating from the assumption that seams that cross do not need to be secured at the end as long as they won't slide apart during construction. For example, a leg seam that will end up within a hem seam doesn't need to have backstitching at the end since the seam will be crossed by another line of stitching. Yes? No? Eitherway, I'll have to play around with shortening those stitch lengths. I have a sense that an older machine with dials instead of a digital machine might have been a lot more convenient for that.
ReplyDeleteSpeaking of stitch length, are the numbers for things like stitch length standard between machines? Do they connotate some measure of how long the stitch is (i.e. 1.0 = 1mm per stitch) or are they completely arbitrary?
I'm sure you have a post on needles in mind already! :-)
Thanks again for these wonderful posts!
You are reading my mind, Kyleigh. My old Singer had the actual number of stitches per inch, aka SPI, on the dial. Most machines today will have a number from 0 to 4. .5 would be sixty SPI and 4 would be 6 SPI. Your machine may go higher than 4 giving you a nice basting stitch.
DeleteYou are right about the cross seams. It wouldn't be necessary to dial down.if the seam is crossed. But backstitching is such an ingrained habit that I think many of us would automatically do it and it's good to change habits and dial it down.
As far as the stitch length being arbitrary, I think it was more so in the past but today most new machines use that 1-4 or higher setting which is stitches per inch. Some do translate those numbers to millimeters as well, You'd have to check your manual to see which applies. I like the concept of SPI as my mind can grasp that a bit better than a translation to millimeters to inches.
Thank you so much for some very interesting information! I didn't know the subject was so complex! Just shows, you never stop learning.
ReplyDeleteI've just hand-stitched a lining into a dressing-gown and didn't know about using thread from the end of the spool to go with the twist, even after about 50 years of sewing! It explains a lot of thread misbehaviour.
Don't feel bad. I did it the wrong way for years as well.
DeleteBunny,
ReplyDeleteI always enjoy your posts and learn - or am reminded of - so much about sewing! Thank you for taking the time to share what you've learned. And check out "thesewingplace.com" for basting thread like Claire recommends. $3.50 a skein. A couple of other suppliers are on Google in case you can't get it from your regular source. Lynn
That is great information, Lynn. Thank you so much for letting us know. Price sounds good too. This is what is so wonderful about the sewing community, the way we share info with each other. Love that!
DeleteThanks from me, too, Lynn, for the source of basting thread. I ordered it yesterday and it is already on it's way!
DeleteThis is such a helpful and comprehensive post - thank you. I thought I would add that Gutermann do a thickish and fluffy tacking (basting) thread on a spool that is available in Europe but not, apparently, in the USA. I suspect that it is the nearest thing to the Japanese threads available here, as I can't identify a European source for those. I have found the Gutermann thread useful, but it is a bit pricey. And what those of us in Europe do have are silk threads from Empress Mills in Lancashire. I really like them for tacking almost anything, but especially wool and they are not so very expensive.
ReplyDeleteThank you for such a great informative post. I have been sewing on and off (mostly off) for years and learned a lot of new things. I'm intrigued by the idea of threading the needle with the end of thread furthest from the spool. I usually use the other end as it's just cut and easier to thread, and I do get lots of twists and catches if I cut my thread too long. But if you look at a piece of twisted thread, then flip it round, the twist goes the same way both ways round (clockwise both ways or anticlockwise both ends). So why would it make a difference which end you thread? Something directional in the manufacturing process? I wonder whether left-handed people get more twists (or untwists?) in their thread. Sophie
ReplyDeleteI was never very good at physics so understanding why this works is beyond me. All I know is that it helped me a lot once I started threading that way. Hope it does the same for you. The leftie question really makes my head spin. Perhaps someone else can explain the why's here. On this subject, I am not the one.
DeleteA great post! Thank you so much for the tip on threading the needle from the spool, it just saved me hours from frustration.
ReplyDeleteEleanna
Thank you Bunny! Yes this is a awesome post, with great sewing pertinence ... I didn't know most of what you have so clearly written and kindly pictured too. I intend to implement your teachings as I recommence sewing garments for myself, continue repairing my family's garments and other stitching for my home. With appreciation for your mentorship, Lynda (Toronto)
ReplyDeleteThank you for this great post! Sooo informative!!!! In addition to the silk thread for basting, I have found that rayon embroidery thread works for basting too and does not leave an impression and it's not as expensive as silk thread. However, it tends to be very slippery so it doesn't work for all fabrics.
ReplyDeleteThat's a great idea, Thomas. Thanks.
DeleteI use rayon embroidery thread for basting some things. I have some spools that my machine doesn't like and I save those for basting. It is hard to handle though so I don't use it for everything.
DeleteUseful post. You can't beat Japanese strand cotton for basting.
ReplyDeleteNot sure why my last post here didn't show, but I'd like to mention that when we thread a needle and tie off two threads, one of those threads is always going to be going in the "wrong direction" no matter which end we put through first. One half of the length goes up and through the needle, then the other half has to go back down in the opposite direction. Just thought this might be worth mentioning....if one only uses one thread (with a bit going through the needle and hanging free, not knotted), then it pays to thread the "right" way so we're not sewing against the grain (at least not most of it : ). Hope this makes some sense. So easy to do but hard for me to describe : ).
ReplyDeleteGreat post and series. I am really enjoying catching up
ReplyDeleteA tip I learned in one of my first sewing classes vis a vis tying off threads; when you have cut off the threads and have the bobbin thread through the back and main thread on top if you gently pull the bobbin thread at the back of your sewing a small loop of thread will pull up – this is some of the loose thread from the front. You can use this loop to pull the thread through from the front to the back using a needle, pin or stitch ripper (being careful to use the blunt side, not the cutting edge) to get enough through so you can grip the thread with your fingers and pull it all through to the back.
Great post and series. I am really enjoying catching up.
ReplyDeleteA tip I learned in one of my first sewing classes vis a vis tying off threads; when you have cut off the threads and have the bobbin thread through the back and main thread on top if you gently pull the bobbin thread at the back of your sewing a small loop of thread will pull up – this is some of the loose thread from the front. You can use this loop to pull the thread through from the front to the back using a needle, pin or stitch ripper (being careful to use the blunt side, not the cutting edge) to get enough through so you can grip the thread with your fingers and pull it all through to the back.
Bunny- I thought I was the only one who took my tails to the back of my project, tied a square knot, and buried the tails inside the lining before clipping!!! I learned square knots in medical school and saw the burying the tails technique used on skin suturing on the face and neck, where cosmesis while healing was part of the goal. I really thought I was the only one! How fun to find out it's actually "a thing"! -Jenn
ReplyDeleteRe: the thread twist when hand sewing- I'm lefthanded, should I reverse this advice and put my knot at the end farthest from the spool?
ReplyDeleteNo. The way the thread is twisted at the factory has nothing to do with your handedness. The cut end of thread has to thread the needle by whichever hand and the spool end of thread has to take the knot.
Deletebeautiful blog
ReplyDeleteGreat insights into embroidery designs and skills.
ReplyDeleteVery useful tips and suggestions.
ReplyDeleteBeautiful ideas to try.
ReplyDeleteDownload OnStream APK to access enhanced streaming features, optimized performance, and a clean interface designed for Android users.https://onstreamapks.org/
ReplyDelete