Sewing Vloggers

Showing posts with label Newbies. Show all posts

Sunday, February 8, 2015

Becoming a Discerning Tutorial Seeker, NLS #12


Over the past year one topic reappears in various forms on the sewing social media network. However, it is more of a characteristic of all social media. How do you know who you are talking to, reading, following, believing, admiring, and learning from?  Just who is at the other end of your keyboard or phone? In the sewing network it can take the form of highly experienced sewists and totally inexperienced sewists all equally eager and passionae about sharing their love of this craft and that will keep it alive and thriving for a long time. Over and over, however, I keep getting  asked the same question. How do I know that someone whose blog/vlog I follow and enjoy knows what they are doing if I don't know much myself? Should I consider this person an authority? How do I know if their technique is good technique?

I, like many, have thrown my hands in the air with the answer, "you don't know".  With the internet, anyone can claim to be an expert. Anyone can do a tutorial on sewing technique. Anyone can be "certified" and anyone can "certify" someone's patterns and skills, (big eye roll on that one!).  It's just the nature of this incredible internet. Sure, you can dig a bit and just maybe find their credentials, if there are any. You can do some age discrimination and assume the older the sewist the more they know and vice versa, which is so so wrong and so not necessarily true. . It's a real conundrum for the newer sewist looking for quality information and guidance.  This has bothered me for a long time as I really want our newer sewists to have the best information and guidance possible. Many new sewists are at a time in life when budget constraints prevent them from taking classes. Then I had to make the zippered pockets on my bag. ....Huh? Wha?

I have been sewing a long time but love that I can go on the web and research how to do something. I needed to put zippered pockets in the bag I am currently working on. Sure, I've done it many times but I am always up for a new technique. So I googled and pinterested and started reading loads of zipper pocket tutes before starting on my own. Never hurts to be well informed and I love to try new techniques.  As I wandered this landscape of thread and zips I found, as one often does on the web, good and bad info. But many years of sewing have made me able to tell the difference. My bench is deep. But newbies are sitting on the edge of that bench and trusting that the coach will give them the best play to get the job done.

Eureka moment! From all this researching I started to see a pattern developing  that could actually help anyone,   newbies in particular, to  know if their teacher/ tutorial maker knows what they are doing. Certain attributes kept reappearing, enough to see a pattern on the  tutorials. It was enough of a reappearing trend to pull some  points that will let someone know every time if they are dealing with a teacher who has the skills to teach  and provide  solid, quality sewing information. It's really a simple checklist and one to keep handy as you seek out technique on the web. Here we go.
courtesy yesterday's thimble


1. Check the pressing.
       In the tutorial instructions is the teacher/blogger telling you to press your seams, your garment, your edges as you sew and  when you finish?  There are tutes on the web for sewing details that lack any instruction to press the garment edges, seams and finished product. The results show pressing or lack thereof  to an experienced sewist but to an inexperienced one you just wouldn't know and would expect that the finished product is supposed to look the way it does with it's pointy edges and puffy seams. If there are no pressing references in the tute anywhere, this person  does not know how to sew, sorry, but true. Move on to another tutorial for the technique you are researching. All sewing details, collars, pockets, hems, and all seams have specific pressing needs as part of technique to make them look professional. Sewing is Pressing. Look for pressing instructions as part of the tutorial. Check out hems. Are they smooth, with no points or ridge lines from the hemming stitches? Are the sleeves all puffy and pleaty at the top instead of smoothly rolling off the shoulder if that is what the pattern dictates? Does the collar on a jacket lay flat against the chest or is it wrinkly and sticking out all over with puffy corner points? Look at the garment closely that is being shown in the tutorial. Look for directions to press in specific ways for that specific garment detail. Don't see them,,,,,move on to a tute that has those attributes. You are looking for a tutorial to teach you , not assume you know things already.


2. Use interfacing
     In my zipper pocket research, very few tutorials showed the use of interfacing.The best  looking pockets did! Interfacing is used in collars, cuffs, buttonholes, zippers, pretty much someplace, somewhere on each garment. If the tutor consistently does not use interfacing in constructing various types of garments, they don't know how to sew well enough to be teaching. Interfacing isn't necessarily fusibles and hair canvas.  Self fabric and silk organzas are just two other fine options, but, it is there and referred to. No interfacing references, find another tute. Knits are excluded here but they often use fusible tapes along the shoulders and/or neckline.  Knits have different rules but nearly any non knit garment has some type of interfacing somewhere. It's a rare destructured garment that doesn't.  Look for interfacing used in construction of wovens. This applies to children's wear as well as adult garments.

courtesy of craftsy.comt


3. Look for wonky
    Another glaring bit of evidence of skill that warrants your lack of  trust in the ability of the teacher is Wonkiness.  What's Wonkiness? Asymmetry is the big girl word but the ones we all understand are "just sloppy sewing." Back to my zipper research - there were tutes that had zippers messily placed on the diagonal across the pocket slot instead of lining up evenly across the zipper "hole" with just a little more effort.  There was uneven topstitching with one side being a quarter inch from the edge, another an eighth of an inch. There were pockets that on one side had the pocket bag sticking  nearly a quarter of an inch out in spots  and on the other it was neatly hidden as it should have been all around. This person is teaching you? Look for pockets that are not set equidistant on the garment, sizes don't match well, collar points  that don't match ,  buttons set way off center, etc. This button thing is a biggy. I've seen garments where not bothering to fit is simply overcome by moving the buttons over three inches and the buttonholes stay where they are.  Seriously, did you just feel one side off the bodice shrink 3 sizes? Buttons are not a fitting tool. Really look closely at the garment in the tutorial and others the teacher has made. Are things "even"/assymetrical? Do they match as the above pockets do so well? Are they mirror images across the garment if they need to be ie, pockets at the same level and size? Is the installation of the detail neat and symmetrical if need be? I have seen a BIG indie pattern maker, in their own pics, have sloppy pocket placement, one pocket being a healthy half inch higher than the other. Ugh.  Is there an effort to match prints and plaids? If not, this is not the tutorial or teacher for you. The sloppiest, and it was really awful, zipper pocket I saw was from a BIG handbag designer. She is great at design, not so good at construction and a newbie would easily assume that someone of her stature would know how to do a required technique for her product or hire someone who does. It seems, not necessarily. We are all blessed with different skills, hers is in design, which brings up another thought. If you are looking to be inspired,  look for great design and use of fabric and don't worry about technique. We all love inspirational blogs.  If you are looking to learn technique dig deep into the blog's bowels and check out how the details are handled.  If it looks wonky or sloppy, find another tutor. There are many ways to do the various tasks of sewing, none of which include sloppiness and unevenness. If the tutorial shows the finished product as uneven and not mirror imaged, they are not skilled enough to be teaching you. Move on. Again, this blogger may have other admirable skills but you are checking them out to see if they know enough about technique to teach you. 


4. Completed photos
my own completed bag, no tute

I was amazed in my zipper tute search at the amount of tutes that DID NOT show a photo of the completed result. Funny coincidence, these were the same tutorials that showed sloppy construction with no pressing. Did the blogger/vlogger know that the completed product was sub par and therefore did not show a picture of it? Pretty dishonest, IMO. Did they do this tute just to fill up blog space and maintain Adsense affiliate obligations at the expense of your knowledge? You have to wonder. Personally, I would at least rather see a finished picture of a bad execution than nothing. Really, these tutes are out there. If you are proud of your construction, you want it out there and will gladly put up pics. You have to wonder about someone's skills when they don't photograph the completed task. Look for a photo of the tutorial's completed project. You would be amazed at how many are missing. That's very telling, IMO.

When you are looking at completed photos of a garment in a tutorial, beware of hair pulled to the front and over the shoulder, including in children's designs. Beware odd positions, arms crossed, arms in the air, kids on a swing, adults twirling, all activities that hide detail and fit. If those are the only type of completed photos of the garment, beware. 


In summary, if you are trying to judge if a teacher or tutorial has the chops and can teach you good technique,  look for:


-Pressing instructed throughout the construction
 process, well pressed completed garment.  

- Symmetry of detail and construction, details are                           equidistant and mirror image when needed, no                             sloppiness. Prints and plaids match or at least 
  come close.

-Interfacing, even if self fabric or other, used in              construction with woven fabrics.  
                                              
 -Pictures of the completed task, preferably simple fronts, backs and sides.

It is easy to cast broad strokes here, I must admit, but this is based on what I have found in internet searches for various sewing techniques. But I do have a caveat of kindness here: like our bag designer, every sewist has different strengths. Appreciate those strengths. If someone is great at design, let them inspire you, copy them, use their designs but learn how to do the techniques from others. Understand that as you visit your sites. We all seem to find an eventual niche with our sewing. Some are great at sewing with knits, others at tailoring and others at creative design. The examples go on an on. No sewist is going to be great at everything. Appreciate each one for the gifts they bring but be discerning in who will teach you as you deserve the best and keep in mind these suggestions as in  your search for sewing knowledge and skills.

Even if they are not the usual type of blog/vlog you enjoy following, find one or two who  do employ the above rules and follow their them. Read along as they make their projects. You will start getting a more educated eye and pick up skill, if only by osmosis and that's fine. While you may not be at their skill level or even find their blogs/vlogs interesting, you will learn what to strive for in your own efforts.  Most blogs will have a links on their home pages and by clicking those you can find lots of other amazing sewists. They can be your go to for good info when needed. Look for a search engine on  blogs.vlogs, an email address and or a tutorial tab. Comment and ask questions. Most skilled sewists are more than happy to help you on the side through email when you need it. These social relationships are priceless to all of us but even more critical to the newer sewists among us. I hope these tips help you as you continue on the wonderful journey of sewing. Develop those cyber relationships for a solid resource as you gain your skills.


Happy Sewing!
Bunny

Edit: Apologies for photos taken from the web that are now removed and unavailable, not by me. 

Monday, January 5, 2015

Symmetry and Collars and Pockets, OH MY!

Symmetry - what exactly is it? It means an object is the same left or right of center or as the dictionary says "either side of a plane or line." What's that have to do with sewing? A lot.

In doing these lessons I try to think of subjects that will take a new or returning sewist to a higher  level of skill, one where their garments don't scream "I just made this." Collars can come out with their short sides different lengths.  Pockets can get placed unevenly on bodices and blue jeans. Unintentional asymmetry, not matching, is one of the lower rungs on the sewing skills ladder and easily fixable. So let's have a go.  Our goal here is to learn to make collars that have both sides perfectly matching. The same techniques can be applied to pockets or any other part of the garment that needs a mirror image either side of the center line.


This is my tried and true blouse pattern that I have made many times. I will be using it's collar for demonstration purposes.


First, iron that  pattern piece.Cut carefully.  As we go along think of 1/16th  of an inch being added each time. You will see by the time the collar is ready for insertion, there has been a lot of opportunity to muck it up.

If this is a Peter Pan collar with two separate sections, very popular in twee fashion today, do the same  as we go along but do it to each piece so the in the end all layers and edges match on both sides of center front. Actually, Peter Pan collars are more notorious for non matching shapes as it is easy to get into a mind set of working on each section as a separate piece. They need to be matched up each step of the way.
ETA:  Here's a pic of a Peter Pan Collar for clarity. They are usually separated in the back to accommodate the closure and therefore cut out with four sections, two for each side, lots of matching to do. They can go all around with a CF opening garment.


Cut out your fabric. Here is the next opportunity to pick up a sixteenth of an inch. You can see on my collar the right side only is about a sixteenth of an inch wider. I shaved that baby off with the rotary cutter and now all is matching again. Every stop of the process, recheck your collar for perfect matching, before and after sewing the seams.


The collar has now been interfaced and sewn. Ackkkk...what do I see? another sixteenth of an inch peeking out! When installing a collar we want the UNDER collar to be a sixteenth of an inch narrower so that it will pull the outer seam to the underneath once sewn. That's not the case here. My undercollar is longer! See it peeking out?  Another time to shave this puppy back to symmetry. That's the fourth opportunity for error!


The collar has been made even again so let's check it against the pattern piece. Well, looky there - the bottom collar is wavy. It's stretched out. Its the one with the interfacing here. I will steam this back into submission.  I often find the piece with the fused interfacing is the one that stretches out. You can see how important up and down pressing as opposed to back and forth ironing is. It makes a difference. 

Up until now we haven't checked our outside edges, the short sides, of the collar. Let's check that.


Hmmmmm.... seems I am off another sixteenth of an inch here. I am photographing at an angle so the points look uneven but they aren't. But the neck edges definitely don't match. This is probably the most critical test of the collar shape as once installed this is the part that will provide the front of your garment with two different lengths of collar and we don't want that! So aside from everything matching, it's important to fold that collar in half and check those short sides as well. I shaved this off to make it even. Do you see how many opportunities we have had to make this collar an uneven hot mess?

Not having to do with symmetry but on the subject of collars, now that all is symmetrical and sewn and ready to install, I will shave off the undercollar about a sixteenth of an inch starting about two inches from the ends.  On heavier fabrics, like for jackets, it would be an eighth of an inch. The seams will be matched when sewn to the garment or better yet basted together.  This will pull the top collar slightly under and prevent any peeking out of the seam or under collar to the public side. Patterns that offer separate upper and under collar pieces have taken this already into consideration.


We now have a collar with a lovely roll, no under collar peaking out, no seam lines showing at the edges and ready to be installed in the garment.

The same care needs to go into pockets or any thing on a garment that needs critical matching.  Also, under the tutorial tab, is another method for matching pockets you might find helpful. After a while you will do this OCD checking of cloth against pattern pieces and each other without thinking and your garments will have a much more professional look. Let me know how it works out for you.

One more thing, about stay stitching. Sacre Bleu! I rarely stay stitch, Years ago I took a class from Diane Hoik, reputed to be the best dressmaker in New Hampshire and former textiles professor at UNH. She told us she never stay stitches and and we shouldn't either. Couture sewists don't stay stitch either. They use steam to keep things in the right shape. Ms. Hoik's argument was that we handle our pieces of the garment roughly and too much and if we didn't they wouldn't stretch out. Her words were that the act of stay stitching alone was enough to stretch any bias edge so she didn't do it. We watched as she was teaching us something about this particular garment and I swear she carried the pieces so carefully and always flat, if at all possible. They hardly moved either. I've picked up her habit and it has worked for me for the most part and I know other good sewists who agree and most who don't. I say do what works for you. That is always the bottom line. But it might be worth a try to go the non stay stitching route for a bit just to see how it works out.

Please feel free to add your thoughts and experiences.

Till next Monday on Next Level Sewing............Bunny

Monday, December 15, 2014

NLS #10, Pressing Matters

Pressing matters, that subject head has certainly been used before in the sew blogging community but it's true. Pressing really matters a lot. It is probably the most important thing you will do to contribute to a professionally sewn garment. And notice, the word is "pressing", not ironing.

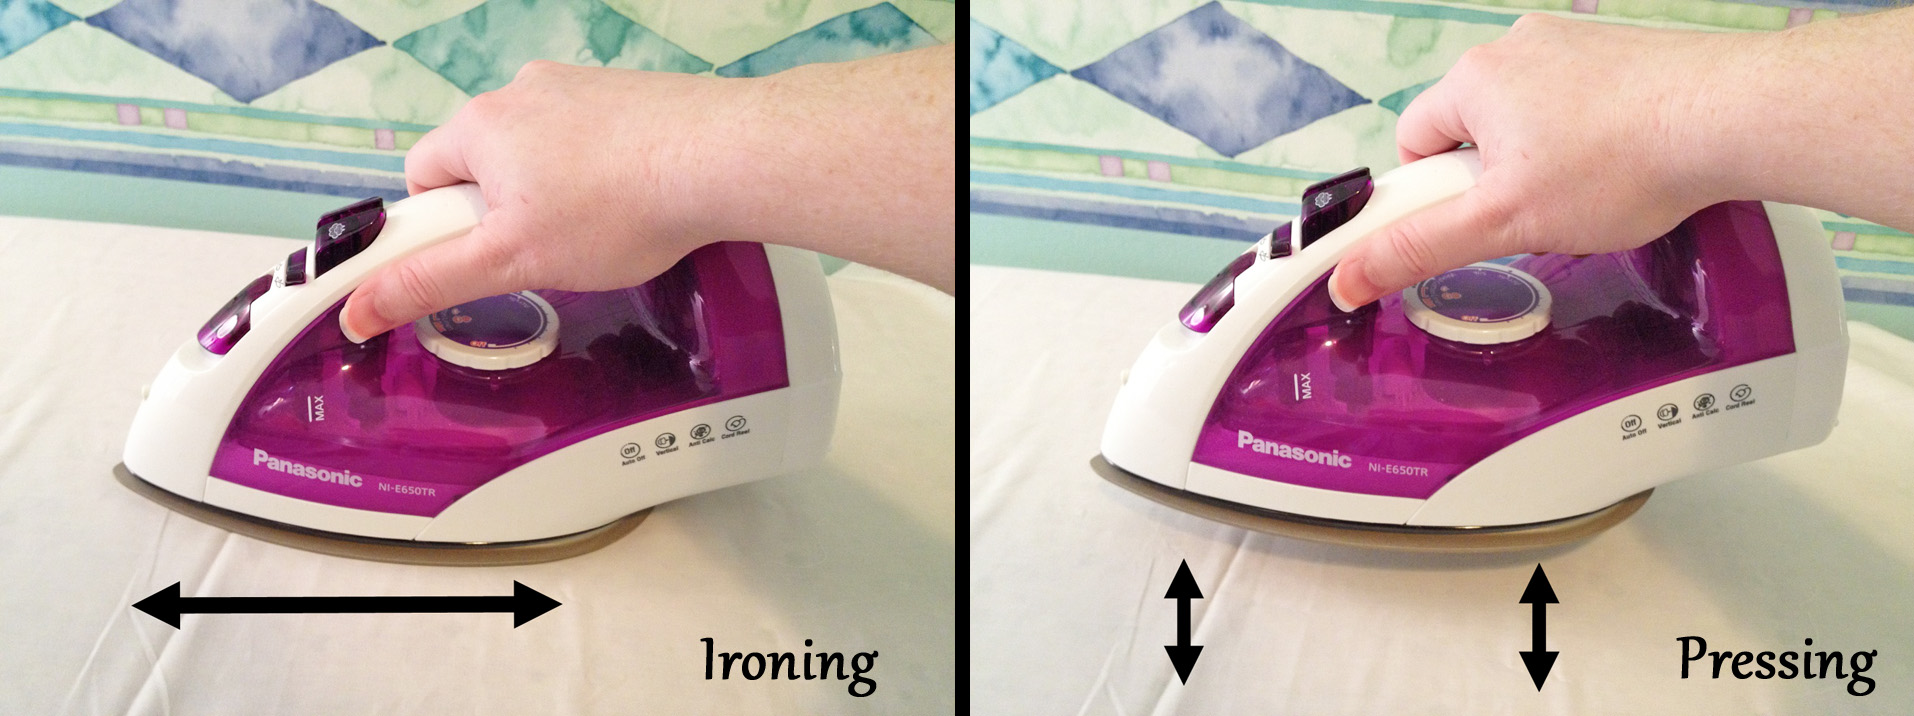
Ironing is moving the iron horizontally back and forth over your garment or fabric to smooth out the wrinkles. Pressing action consists of pressing your iron down on the garment, hopefully with a press cloth in  between, then lifting directly up. There is NO horizontal movement.

June Tailor Press Board from sews.com


The more you sew, the more aware you will be of proper pressing. Your new habit will spur you to do it better each time and to help you get the best "evidence of effort", to quote Roberta Carr, there are tools out there to help you gain quality results. These tools pretty much have been around for generations and are time tested and worth the investment. If you see yourself getting into any tailoring efforts, they are necessary. They make the process easier. 

Above is the June Tailor Press Board,aka, tailoring board. It is available at smaller vendors like  Heirlooms Forever as well as places like Nancy's Notions and Amazon. Most of what I will mention is available from these vendors so won't link further on. 

OK, this press board is quite impressive with all it's points,  angles and curves. Why would you press a seam on a board like this? For one, the edges of the seam allowances hang off the edge you are using on the board and thus prevent show through ridges on the public side of the garment. Look at this thing and imagine pressing open hip curves, princess seams, tiny sleeves on heirloom children's garments, etc. An the point  is priceless. A point presser  like this can allow you to press open graded seams on collars to give you a beautiful point when turned. I also like to trim down my points while the collar, cuff, whatever is on the point of the board. It makes it much easier and less prone to accidental cutting. I know Santa's coming but if you don't want to spring the fifty-sixty dollars for this sweet toy, use what I use:

This tool is a point presser/clapper. I like how it has a really sharp point. The larger bottom is used to literally clap/slap/pound your garment details into submission. It is great for taming welt pockets and bound buttonholes and other details with various thicknesses. Over pounding can make your seams transmit to the public side of the garment. You can get around that by having a very well padded surface underneath like a doubled up towel. Other times you want that clapper to bang the fabric into total flatness and submission like on the edge of an edgestitched  blouseweight. With practice you will learn what to have underneath your fabric before you pound. To prevent shine, always use a press cloth between the clapper and the garment. I use this a LOT. It's indispensable for collar making, IMO. 

Then there is the lowly ham and the not so lowly ham:

Courtery stitchnerdcustomshop.com


courtesy bblackandsons.com


Hams are absolutely essential to sewing. All those curved seams, ie, princess seams, are pressed to perfection on a ham. It is probably  best known for setting the shape into a collar which you wrap around the ham like a neck. The collar is securely pinned and heavily steamed while on the ham, no touching. I mean heavy steam. Then you can leave it overnight to dry before installing in your jacket or coat.  I use the basic plaid ham but would I ever love one of those custom hams from Stitch Nerd. Wowsa!

( google hassling me on photo, I'll try later.)

Complimenting the ham is the seam roll, something I love but did without for a long time. My sub was a rolled up thick magazine which worked fairly well. Seam rolls are great for getting into pant legs and sleeves that are already stitched up. 

There are items around the home or that you can DIY that will help your pressing a lot. There are wooden dowels for pressing long seams without ridges. Porch railings work the best as they have the curved surface on top and a flat area below preventing rolling. I use my dowel quite a bit. 


Above is my treasured dawber, made from a tight roll of cashmere, and a cheap paintbrush. These are great for dipping in water and placing the water drops in the well of the seam on the wrong side to press open. This is done on fabrics that you don't want to overpress like cashmere or fine heavy wool coatings, suitings too. A word about cashmere: it is very sensitive to pressing, scorching and getting overpressed and damaged quite easily. I like to iron it as little as possible and use my daubers a lot to tame the details. An iron with a good point helps a lot here as well. You just place that iron tip in the well of the seam after it has been daubed with water. Once again, over a presscloth. 

And speaking of press cloths, favorites are silk organza as it allows you to see the garment underneath and takes high heat.  Poly organza will melt in this situation. I also have handy some old well worn men's handkerchiefs. You can buy them by the pack  at the box stores and they make great press cloths. 

My favorite pressing tool of all, partly because June Tailor doesn't make them anymore:


You can see my June Tailor Pressing Mitt is well worn. I literally place it inside an installed sleeve and steam from the outside. It does a great job of getting rid of any puckers in the sleeve head. I also like to use it to shape sleeves in tailoring like you see here:

For more on how I use this tool to mold sleeves you can check out this link.    Stitch Nerd does make these but I think with a little creativity you can probably make your own. 

I haven't gotten into technique much here  and that is because others have done it all so much better than me. Ann Steeves of Gorgeous Fabrics ( and they are  gorgeous) was so moved by the lack of pressing seen in the sewing community that she did a very funny and educational video on how and why to press. Check out her Pressinatrix Video.  It truly is the best out there.  (Scroll down.) And when she says to iron the seam as sewn to meld the seams, BELIEVE HER. There is a well known sewing instructor out there who says it is not necessary. Ann will show you the proof why she is wrong. Check out this blogpost of hers for proof. Another great pressing video is from Nancy Zieman and can be found here. 

As Roberta Carr said, "Sewing is Pressing". Quality results are not achieved without pressing. I think my new motto is "effort in, evidence shown", to paraphrase Roberta once again. Please share you tips and techniques to help others with their learning curve on pressing skills. I greatly appreciate all your experiences, no matter how unique. What works for you?

*******************

Next Level Sewing will take a break over the holidays and will return on January 5th. Hope you have a glorious and wonderful holiday with your families. Maybe Santa will see this post and get a few hints for your sewing basket!..........Bunny

Monday, December 8, 2014

Who's got the button? Guest Blogger Claudine of Rolling in Cloth!

It is my great pleasure to have teaching us tonight, Claudine from Rolling in Cloth. She is an amazing seamstress, fabric dyer and painter and has a very creative fashion view point that wonderfully surfaces in her garments. I was thrilled when she contacted me to do a guest post on Next Level Sewing. She feels strongly about our newer sewists getting quality information and generously shares her knowledge tonight. We often think of the lowly button as an afterthought when it comes to technique but Claudine shows us the right way to install buttons and some new tricks to make them look good and last long. I learned a technique totally new to me and I think you will too.  Let's begin!

************************************************

When Bunny started this Next Level Sewing series, I thought it was a fantastic idea, and wanted to be somehow involved.  It can be hard to know where to go online to get good information that is not linked to product sales.  I asked Bunny if I could take over for a week and do a post of my own, and she graciously accepted my offer.  For those who don't know me, I normally blog at Rolling in Cloth.


Aren't buttons great? There’s such a variety available, and it feels so good to find just the right one for a project. They’re my favorite thing to buy as a souvenir when visiting a city. Then when I use the button that I purchased, I can think about my trip again. There’s a huge variety of buttons available, some of which are pictured above. The top left buttons are metal; top right are plastic; bottom left are fabric-covered buttons; and bottom right are natural and dyed shell. 


You know how to sew on a button. Obviously, you do. Even people who “don’t know how to sew” know how to do it. But, as with a lot of things, there is a right way and it may not be as obvious as you might think.
The picture above shows a well-sewn-on shirt button. The top view picture does not tell you much, since most buttons look passable from the top. When you turn it over, you see a few small stitches on the wrong side and no loose threads. From the side, you can see a thread shank that lifts the button slightly, allowing room for the buttonhole to rest under the button. The following video will go over my method for sewing this button on.


There are loads of different kinds of buttons. Most buttons have 2 or 4 holes to pass the thread through. Other buttons have a shank for attaching to the garment. The video above shows how to sew on a shirt button with 2 holes. You would need to extrapolate a bit to use these directions for a shank button or a 4-hole button, but the process is very similar. The main difference when sewing on a shank button is that you will sew it directly to the fabric. You won’t need to add the thread shank.


Use whatever thread you prefer. I like to use cotton thread for most applications. One exception is the button on the waistband of trousers, where I use the strongest thread that I have. Lately, I have been using artificial sinew that I bought from Dharma Trading to sew on trouser buttons.


Jackets (like in the photo above) can have backer buttons. Backer buttons add stability and durability if you are working with an unstable fabric. Make sure you match the number of holes in the backer button to the number of holes in the functional button, and sew them on simultaneously. I used backer buttons on the jacket above because the tweed fabric is very unstable, and I was afraid that the buttons would tear right off. I used whatever buttons I had around for backer buttons, but you can buy buttons that are specifically designed as backer buttons. They are very flat and are made of clear plastic.


Backer buttons
If you have a shank button that is non-functional (such as on a double-breasted jacket), you can sink the shank in a hole in the fabric made with an awl, then sew the shank button to a backer button very tightly through the hole. This will keep the button more flush with the garment fabric and keep the button from drooping. In the picture above, you can see that the button on the left is resting on top of the fabric, making it droop slightly and move around more. The one on the right is sunk into the fabric, causing the button to lay flatter. Honestly, I have never done this on a garment outside of school, but I have a couple of coats with drooping decorative shank buttons that I wish I had done this with.
On the subject of double-breasted jackets, sew the decorative button on the right side and the functional button on the wrong side separately. This will keep the decorative button in place if you lose the functional one.


Heavy or unusually shaped buttons are often non-functional. Generally, you would sew the button on the right side of the garment, then sew a snap underneath the button to keep the garment closed.


And lastly, when using a 4-hole button, never, ever sew it on with the threads crossed. Crossing the threads is not a design decision. It is poor technique.
 

***************
Thank you so much, Claudine. You made us realize how important it is to sew a button on correctly. Your method of making a hole with an awl to seat the shank button is brilliant. It is a new technique for me and I would guess many. It is so wonderful that you have shared with our newbies and all our sewing sisters your methods.  Isn't her video great? She has the patient voice of a great teacher. I think I speak for all when I say I have a new appreciation for sewing on buttons and I thank you immensely for that. 

If you have any questions feel free to put them in the comments and Claudine will answer them as she can. She is looking forward to it. Thanks again, Claudine.....Bunny

Monday, November 24, 2014

NLS #8 Dartarama! Learning About Darts

We've done much preparatory talk here. I think it's time to get into construction and often the first thing the pattern tells you to do is make your darts.


I am using a basic bust dart for our example. Remember, darts release fullness so the fabric will smoothly cover any mound of flesh. To quote just one sewing expert, Roberta Carr, "Darts that end right at the apex remove intended fullness and ease."  In other words, running the tip of a dart to the area of the highest mound of flesh removes the fullness you needed to cover the mound with no wrinkles of fabric. (It also looks uncomfortable and downright awful.)

Darts have two "legs". Darts can be in all sorts of places but 99% of the time those dart legs should be the same length.  An exception is the French dart which has a deep slant from the lower side seam to the apex. The area that the dart folds up is called the takeup.  The bigger the mound of flesh to cover, the deeper  the "takeup". So if you are using one of those larger cup patterns, the darts will have more "takeup" as the cup sizes enlarge.

Marking the dart? I like drawing in the fold line. It makes it easier to match the sewing line. Then there is the Nancy Zieman method of clipping the dart legs and matching those up to get started. I often do that as well. Fold the dart on the center fold line and pin.
I put the pin in right on the line and make sure it matches, coming out on the line on the other side.

There are different ways to stitch a dart, including a method that uses the bobbin thread only and starts at the tip! But I will stick with this more conventional method for today. Start at the side seam with tiny stitches, 1.5 or 20 spi,  to secure the seam. Then change up to your regular stitch length and stitch the seam.
 A half inch from the end stop and change your stitch length back to 1.5. I raised the presser foot so you could see what I mean here. Stitch the last few stitches right on the edge of the fold and then off the fabric. Raise the presser foot. Here is where my method differs from others.


Lift the presser foot, Pull your fabric backwards ( like you are removing the garment from the presser foot) for about an inch. Then pull it forward for about a 1/4 inch. This puts slack in the thread. Lower your presser foot.


Now take 2 or 3 of the small stitches. You are done. Remove the piece from the machine and snip your threads, which isn't done yet in the photo above. This give you a very secure dart tip. The bit of slack in the last thread move prevents any bubbling. Putting the ending stitch in the takeup of the dart prevents any chance of the threads coming undone in the wash.


Now it's time to press your dart. Press as stitched being careful not to press a crease beyond the tip of the dart. Then press the dart to the side. For bust darts, press toward the waistline. For waistline or hip darts, press toward center front or center back. Do this on the back with a piece of paper or oaktag under the dart fabric to prevent show through ridges on the front. Turn over and press over a ham to build in the shape of the dart. Let cool on the ham before removing.

Some fabrics will press and mold easier than others.  Wools shape beautifully.  "Harder" fabrics like the linen above   need to have those last few stitches on the line of the dart seam right on the fold to make sure the dart doesn't bubble up at the tip. On really deep darts which are often the case for the larger cup patterns, the darts can be trimmed to five eights of an inch, not trimming the final inch of the dart. In that case the dart is pressed open. Since the edges are bias there should be no ravelling.

ETA: Just remembered something important.  When sewing your dart you are going to do  something different from the pattern. If you sew your dart leg, continuing out in a straight line to the cut edge, you will be making the area of the seam allowance smaller than it should be. Instead, sew to the side seam or waist stitching line. At that point start stitching in a bit so that the stitching line mirrors what is below the waistline seam. This way your  seam allowance won't be tighter and smaller at the edge than at the actual stitching line. Hope this is clear.


This is my mock waistline dart. If both ends of the dart end in a point, as in a sheath dress, I sew the dart in two steps. Start at the peak which is the widest part of the dart and sew to the tip as just shown in the bust dart. Go back to that same spot  and then sew down to the other tip. Sometimes these darts end not in a point at the waistline in which case you can start stitching at the cut edge, stopping and pivoting at the peak (the widest part of the dart). With a heavy fabric I would cut the dart open ending about an inch short of the tip and press it open. But in most cases of waistline darts, the fabric is not that heavy and the dart is pressed toward center front.


You will see a definite curve to your waist darts from the right side. So the dart does not "pull" oddly or feel uncomfortable, slash the dart ON THE BIAS at the widest part, before pressing. By cutting the slash on the bias you will prevent ravelling. That could easily happen as waist darts are usually on the straight of grain.

Just a comment here on my current jacket project. One thing I found odd about the pattern was the waistline dart. It was WAY to the left of the bust apex of anyone. I did some research and waistline darts, if single darts, should always be  below the bust mound. Putting it to the side, like that pattern did, releases fabric in the wrong place. The exception to this would a design with two waistline darts. In that case each dart is equidistant  from the apex on the left and right. So once you have established the location of your personal apex on the pattern, check that any single waistline darts end directly below, not to the side. Again, the waist dart should never, never go to the apex point. Can you tell how much that aggravates me?  To move the waist dart to the proper location, simply draw a box around it. Cut the box out and move it over and tape.

Hip darts are interesting.  A full buttocks, like that of my younger days, really fits better with two darts. If you only have one and have booty, measure the takeup at the waistline seam. If it is one inch, draw in two  half inch darts instead.
 If you have generous booty AND a high padded hip, one dart is parallel to the center back and the other is parallel to the side seam.


 If your booty is "regular" size and your pattern has one or two darts, make them both parallel to the center back.  If your booty is a bit non existent but you have a padded high hip, both darts should be parallel to the side seam.


 If  you don't have much of a waist but would like to give that illusion, move the top of the darts over at an angle as shown above. Make sure the darts still point to the fullness. Jeans use this trick.

Darts can give you great fit and also provide a bit of illusion as you can tell from the last paragraph. The easiest way to change the dart angle? I like to trace the dart on another piece of paper and cut it out exactly on the stitching lines. You will have a narrow triangle of paper, somewhat of an arrow shape. Match up the tip of your arrow with the  tip on the pattern and just shift the arrow to where you want it. Trace around the arrow on to the pattern piece and you are good to go.


Darts can have shape and that will   enhance your fit as well. If you are swayback, like myself, you can curve  the rear darts by sewing the dart in a curve that curves outward an eighth of an inch at the center of the dart. This is like a concave shape and the dart leg curves out toward the garment. This will cup your swayback shape better. If you have a tummy directly below the waist or a high padded hip, shape your dart inwards in a curve about an eight of an inch at the center of the dart, a  convex shape. In this case the curve is toward the center of the dart.  Adding that 1/8th inch in either of these cases will help the dart fit better without cupping or wrinkling. The shaping seams counter intuitive but it works. With two darts across the front or back, it will give you a half inch of additional room just where you need it on your tummy.

Some patterns have shoulder darts. If you don't like this look, just run a gathering stitch and ease in the area instead. You can use steam to help shape the ease with no wrinkles. If your pattern has no shoulder dart and you have prominent shoulder blades, take a curved ruler and at the center of the shoulder seam go out 1/8th inch, ending at the regular seam at shoulder and neckline. Then ease in your back shoulder seam to fit the front. This is similar to the "cheater" bust adjustment often used in knits.

Looking forward to your comments. I do hope this dart info will help on your quest toward great fit. Fit is accomplished in bits and pieces. Put darts in your fit toolbox and your garments will not have that look of inexperienced sewing. Till the next time............Bunny

Monday, November 17, 2014

NLS #7, What notions do I really need?


Here you are, just learning to sew, or maybe you are returning after having put sewing aside for several years.  What do you really need for notions to get yourself started? Well, I don't think you need that much. That big pile of measuring tools you see sheds a pall on my honesty but it's true. I think when starting out on anything new it is wise to get comfortable with a few simple tools and add from there as projects get more complicated and require more complicated tools to help you out. You don't need a ton of notions to start out. Get a few basics and add as your designs require. 

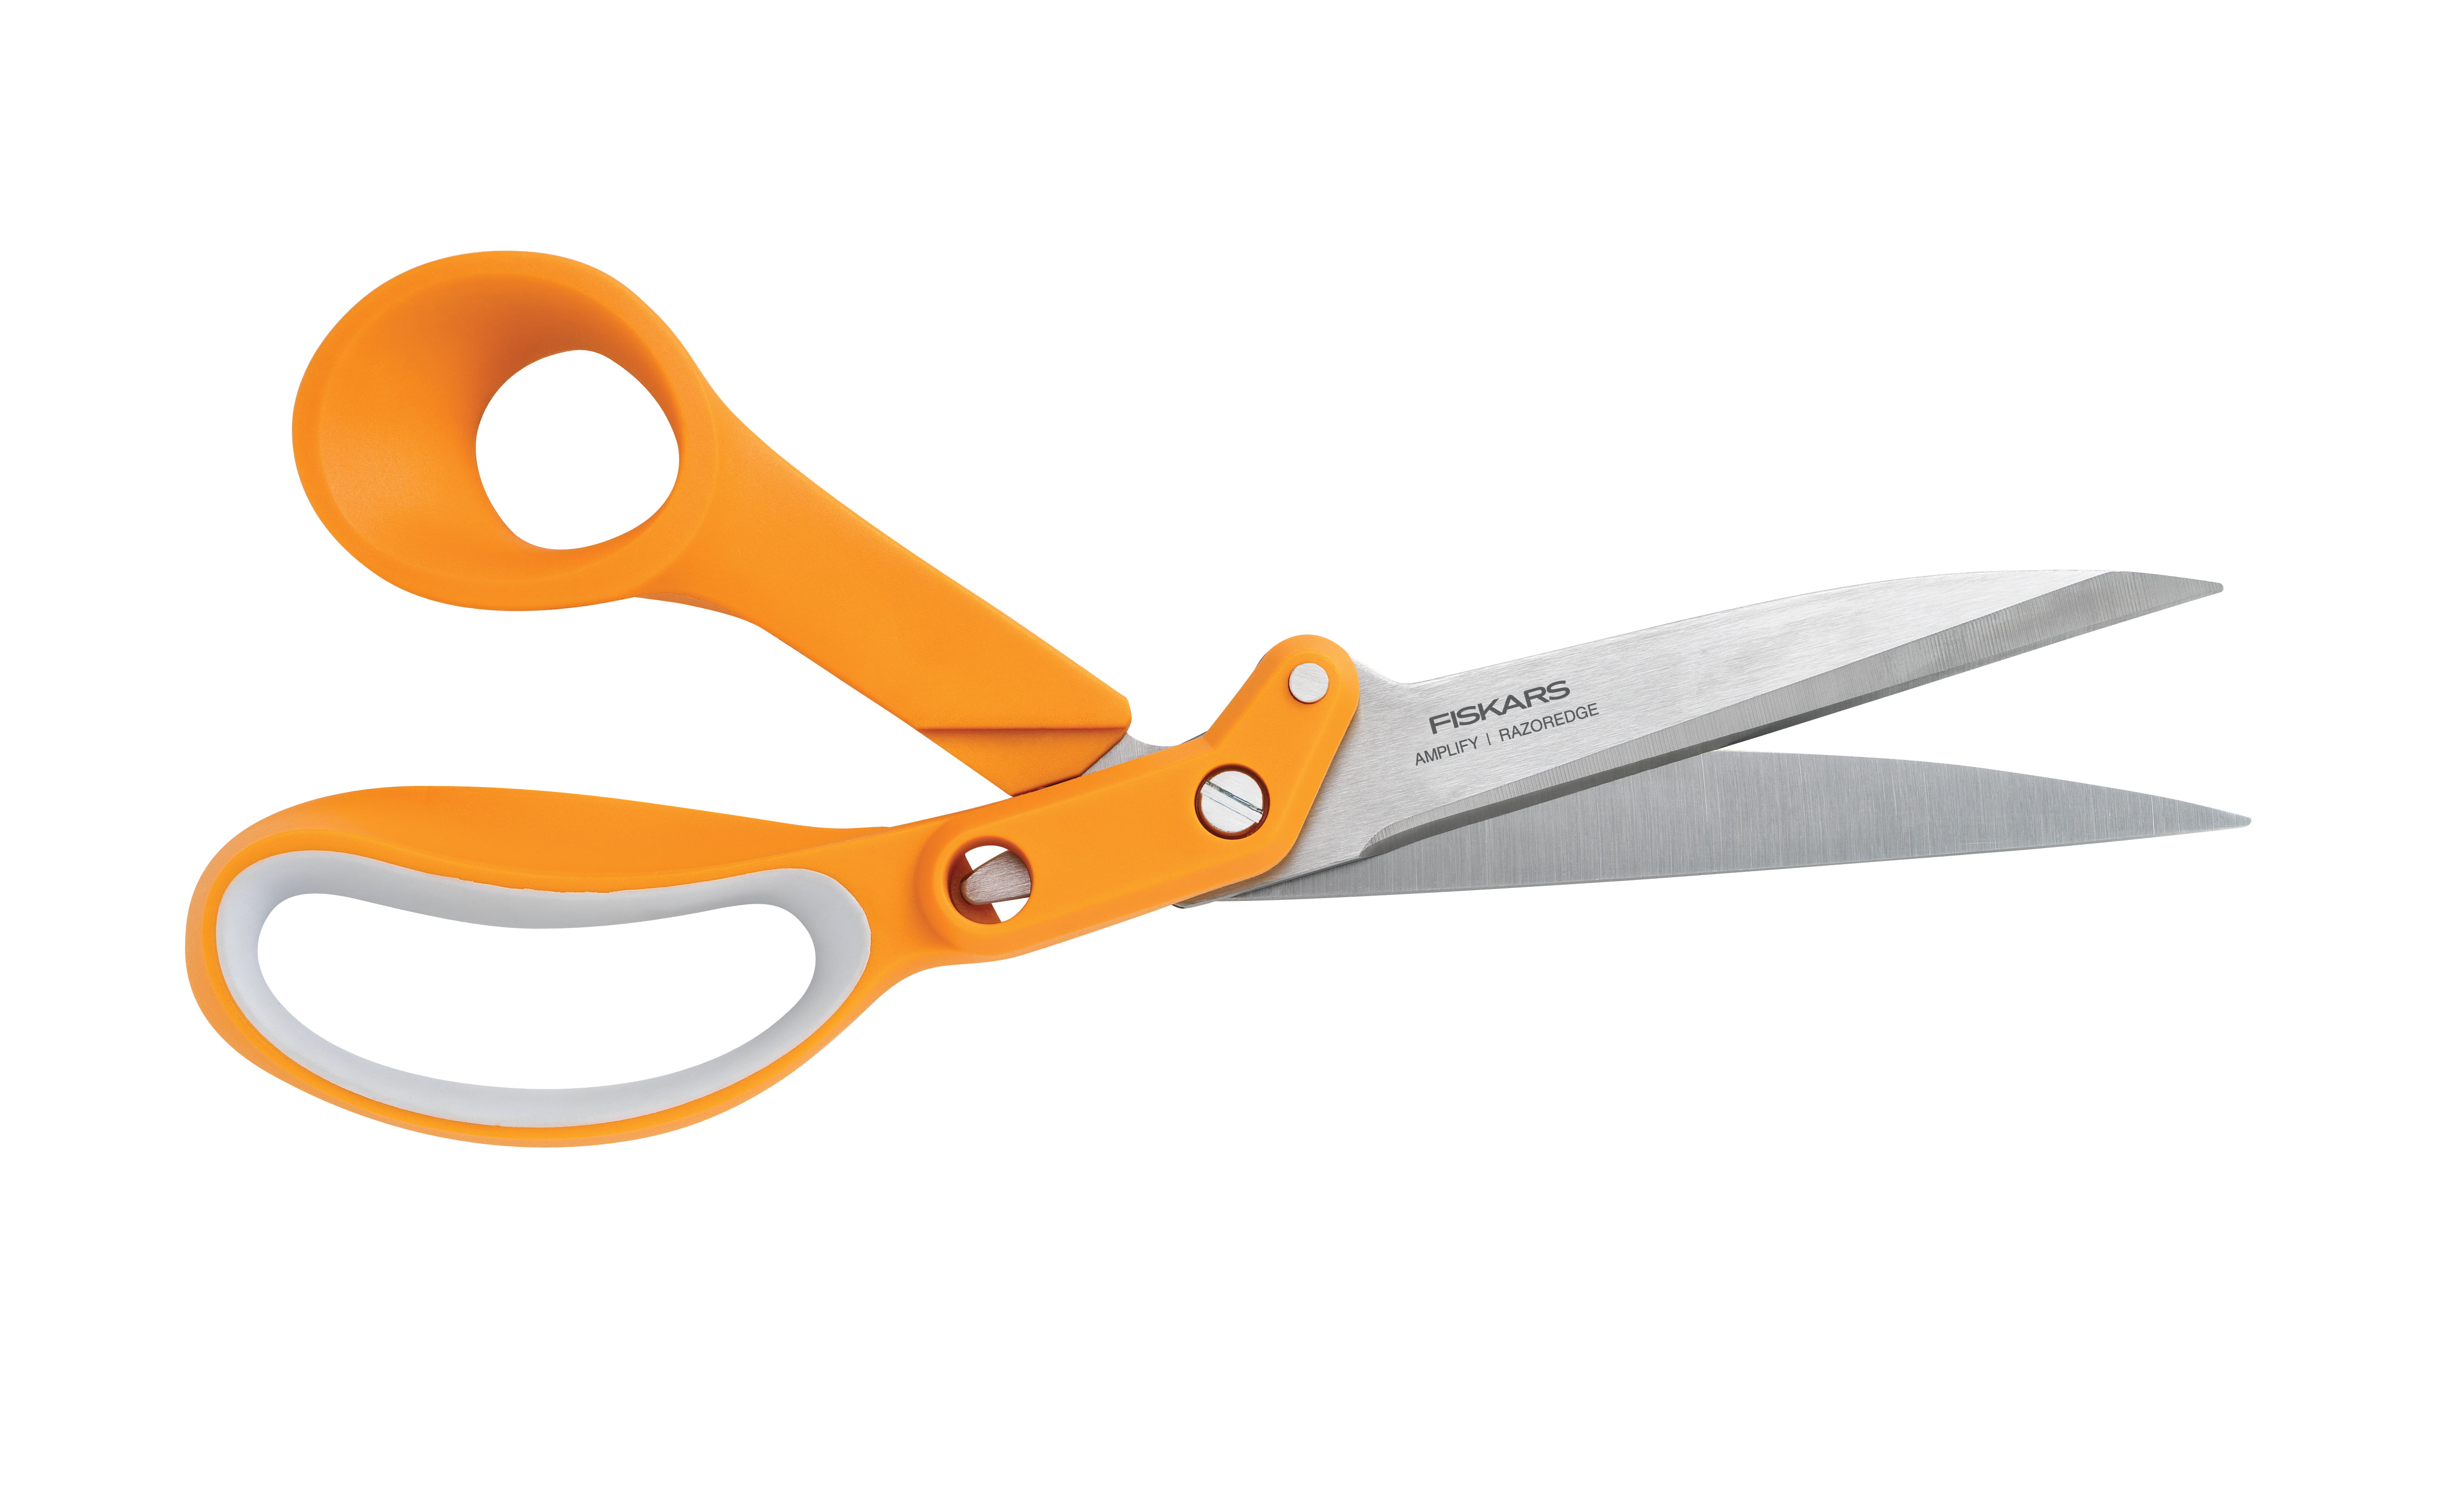
We've already discussed threads and needles and pins, so what's next? Let's start with cutting tools. At one time you would be advised what scissors to buy but today there are also cutting options that include rotary cutters and their mandatory mats and rulers. I don't think you need a rotary cutter to start. I firmly believe in laying a foundation and growing from there as time and skills accrue. So start with a good pair of shears.  Many moons ago I worked in a fabric store that carried really high quality shears. When the decision was made to discontinue the top of the line models I was able to pick them up at bargain basement prices. My scissor collection boasts TOL scissors by Wiss and Marks and Gingher that are wonderful. But truly, if you look in most scissor drawers, the pair that you see most often, gets the most use, and seems to hold is sharpness interminably are those orange handled shears from Fiskars.


An 8 inch pair won't set you back too much and they will last you a long while between sharpenings. These are basics. They are also lightweight and easy to spot in the notions drawer. If you are going to use your scissors in a class put a wine charm around the handle so you don't lose them to someone who thinks they are their's. Just about everyone has a pair of these in the drawer and they should serve you well. There are lots of other types of scissors but one pair of shears and two other suggestions I have are all you really need.  Scissors can run from five inches to ten inches long but the eight inch shears are the most versatile, IMO. 

Here are some of the different kinds of scissors that you might like as your sewing skills mature and you start sewing with more challenging fabrics;

Knife edge scissors:  These are  your basic shears as you see above. They are sometimes designed so the side that your hand goes in, as opposed to your thumb, is in line with the blade. This makes cutting our your fabric easier as the scissors can be held parallel  and next to the table while cutting. and therefore not lifting the fabric. Scissors that have the blades centered between the thumb and hand openings tend to lift the fabric as you cut and can easily give you inaccurate cutting despite the best intentions otherwise.  Look for the blades set up like you see above in the Fiskars so that one blade can be laid against the cutting surface as you cut. Many scissors come with blade covers which is nice for travelling back and forth to class, safer too! Other manufacturers are  are Kai,   Marks/Mundail   (vintage)  and Wiss. 


Embroidery scissors:  Embroidery Scissors are very sharp usually four inch blade scissors. This is the second pair of scissors of the three I think are must haves for new sewists. These are your life savers. Why? Because they unsew. You will use these time and time again to rip out your sewing mistakes. The sharper and pointier the better as they can slip under the stitches. You have to be careful with these as one slip and it is easy to mistakenly cut your good fabric. It has happened to all of us, you go to cut a buttonhole open and you put a gash across the front of your bodice on a nearly complete garment. Know you are not alone and will get over the pain in time. In the meantime, also know that you need a good pair of sharp embroidery scissors. I have several types but find I really prefer my little Fiskars.   Mary Corbet, esteemed embroideress, has a great blogpost on her embroidery scissors and all the different types which you can enjoy here. 

Paper Scissors,  Kitchen Scissors or any old junk scissors:  These can be any type of old scissors that you will relegate to all the scissor chores needed by the rest of the family. Your good scissors - HIDE THEM! Better yet, get some cheapies for the rest of the family. At one time the chains had bins of dollar pairs of scissors. Today we have Dollar stores.  I have lots of those dollar scissors hanging around for hubby to use. A good pair of Kitchen Shears is indispensable for heavy duty cutting that your fabric scissors would just faint over. Just know, the third type of must have scissors for any sewist are these, the junk drawer scissors. Make them easily accessible and you will be able to keep your precious sharpsters to your self, well hidden. ; )

Nice but not necessary


Serrated scissors:  Above is a pair of Gingher Serrated scissors. Most scissor companies make serrated scissors. Why? They make it much easier and accurate to cut fine difficult fabrics like chiffons, organzas and silks. Those little serrated edges, which you can't see here grab the fabric better and prevent it from slipping away while cutting. Get these when you get to the point of sewing a lot of silks and sheer fabrics. They are nice. 


Pelican Billed Scissors:  These are also called applique scissors. These are used to cut things that really need extra care. For example, you have done a hem on a chiffon fabric that is first folded up a half inch. Then the folded edge is zigzagged or roll edged in the serger. You now have to cut off that excess piece of chiffon right up to the zigzagged hem without cutting the skirt. These scissors will lift the chiffon and make for safer cutting. These are also great for cutting right up to the edge of machine applique and getting rid of those pokies.  The straight leg of the scissor is VERY SHARP AND POINTED. Don't use these to cut threads on the machine. Cutting threads repeatedly in the same spot will dull them over time and they won't work as well. This I personally know. Heirloom sewists use these a lot in their delicate work. These are a bit pricey but watch those coupons and deals from the chains and places like Nancy's Notions. 

There are also scissors out there that are more ergonomic and if you are dealing with something like carpal tunnel syndrome, that may be your way to go. They come under names like the Softouch  or Comfort Grip . They often don't look like traditional scissors but if they work for you and let you cut without  pain, who cares? 


Rotary cutters:  Frankly, as a brand new garment sewist, I would hold off on the rotary cutter until you have mastered cutting accurate even lines with your scissors when cutting out your patterns. Remember to trim the pattern first before pining it to the fabric and cutting it out. But if you do have some experience under your belt and are ready to handle what can be an extremely dangerous implement, go for it. 

Rotary cutters are more expensive. First you need the cutter. I like the smaller size for small curve cutting and the 45 mil size for the rest of my cutting. But you can do it all with the 45 mil cutter with practice. To use the cutter, you need the mat and if you are cutting out garments, you need a BIG mat which will go on a big cutting table.  I have used Olfa's, Fiskars, and whatever this plastic thing is that you can pick up at Joanns on sale now and then. I don't know if I bear down too hard. I  use only nice sharp blades. But I do a number on cutting mats and you can't imagine how many I have purchased over the years. Right now I am happy with the white plastic type mat from the chains, my second one of it's kind! 


Third, you need the rulers. As a newbie, do you need all of these shown above? Not really. Some are leftovers from my long forgotten quilting days. You do need a good straight edge and I love the large  5x24 Olfa ruler that has a lip to sit on the edge of the cutting mat. It really helps keep things lined up while cutting. As you get a little more discerning with your rotary cutter, I would add a Hip curve  and a Crotch curve if you can find them. I got mine at a fitting seminar I attended some thirty years ago and I would be lost without them. The crotch curve ruler just nestles perfectly into the curves of , well, crotches, armholes and necklines. A French curve will do similar. The hip curve is used for those longer, smoother curves you find on pants or skirts.  I use my triangle ruler a lot too. It is great for establishing lengthen/shorten lines at right angles to the grainline. Do you see how the cost of this rotary business is adding up? Just be forewarned about the expense.  It is fine to use scissors and never touch a rotary cutter and be an excellent sewist. Whatever works for you. What works for me is the rotary cutter at this point in time as I like it's speed and accuracy. 

Also know that a rotary cutter is a dangerous instrument. I cut off a good hunk of my finger tip and across my nail one time. Never felt a thing. That blade just zipped right through it all and the next thing you know the blood was spouting everywhere. I almost went to the ER, but managed to stick it back together. I have heard some really bad horror stories. I don't think I would use an RC if there were little ones in the house, just too dangerous IMO. I have learned that every single time you run the blade of the cutter down the fabric, you finish that run by immediately closing the blade. Realign things and open the blade again only right before you start cutting. At first it will feel odd and you  are opening and closing the blade constantly, but you shouldn't lose a finger. NEVER, EVER leave an opened blade on the table or anywhere, EVEN IF YOU ARE ALONE. Get into the habit of constantly closing that blade the second the cutting stops. If you are  at a class and see someone else leave a blade open, read them the riot act. Tell them I said so if you have to. Rotary cutters are not to be messed with in any way. Annnnnddd....you can sew as well as you want without one. 

A final update, 3/23/19, on scissors and about their sharpening. It has gotten harder and harder to find a good scissor sharpener. Gingher offers sharpening, for their products only, by their in house experts for a reasonable price and you can find out more about that here. I never could find a good scissor sharpener in the 13 years I lived in New York. Since moving back to New Hampshire, a new friend who hunts a lot hooked me up with the local gun and hunt shop. Hunters NEED SHARP KNIVES. These people are hooked up with excellent scissor and knife sharpeners. I now bring my scissors to the local gun shop and he sends them to his sharpener. I have them back within a week and they are the best sharpening job I have ever had on these precious tools. My pinkers never cut that good when new and if you can sharpen pinkers, you are good! So if you need scissors sharpened, look up your local hunting resource and give them a call. They were very very reasonably priced as well. Do I like going into gun shops? No, but I'll do it for my pinkers!

More notions:


Within the blue outline here you can see a rod holding all sorts of goodies. What do you, as a new sewist,  need of these? The three rolls to the left are wigan. You definitely won't use that until you get into serious tailoring of jackets, coats, etc. But next in line, black and white, are fusible tricot tapes. I use these a lot for knit sewing. They help stabilize the hems on knit garments and give a really nice look to the finished hem. You can find them online but if you go to the chain store and in the quilting department you will find "fusible batting tape". It is the same thing and often on sale. I like keeping this on hand and stock up when on sale. This adds a nice finish to the hems of  simple knit garments that many newbies enjoy sewing. So I would have this in the cupboard. That skinny roll with the red bull clip is "Wonder Tape". I would be lost without it and as a newbie it will help you immensely. It is a double sided tape that will wash out. It is great for holding zippers, buttons, trims, hems, all in place as you sew. It's a definite must have. If you've been sewing in your zippers with pins you will see a major improvement by using Wondertape. After that are rolls of real grosgrain ribbon. The real stuff is used in couture techniques so you hold off on that until your sewing heads in that direction. 


It's nice to have a drawer, but it could be a simple cutlery tray, next to the sewing machine. I am right handed so the drawer is on my right. I keep my most used sewing notions in there and they are always at the ready. No need to waste time looking for things. Set yourself up with this configuration and it will add to your efficiency sewing. It also decreases that frustration when you have to go hunting for something. 

Guard your tools. They are precious, not for play or  cutting chicken bones. They are an investment. They allow you to work more professionally. And above all, they are yours and no one else's.
*********************************

I am happy to say that Claudine of Rolling in Cloth will be a guest blogger  on our series within the next couple of weeks. Claudine is a spectacular ( no exaggeration) knitter, sewist, fabric dyer and all around sewing goddess. She is also very good at making sewing videos and has a really well done video as part of her contribution to NLS.  I know you will agree with me on this. 

When I started this series, Claudine immediately contacted me to do a guest post which hadn't been solicited. Seems she is passionate about passing along this art and feels very strongly that newer sewists should have the best information possible. With that in mind, she has put in a lot of work to provide you with a quality post and video. Stay tuned as I know you will enjoy it. If anyone else cares to do this at any time, just let me know. We are all motivated by just passing along these skills to all of our newbie and returning sewing sisters and seeing the craft continue.  Thank you,Claudine.

************************
Just a reminder here, I don't know everything. But, I am all about passing on what I do know. I am totally aware there are many ways and opinions about sewing techniques. I welcome your input on your methods so feel free to comment about them in the comment section of the posts. So many generous commenters have added so much to our skills and understanding of each topic. I thank you all and hope you will continue to share your experiences and skills. Thanks so much......Bunny


The Ray Pinafore, 2025's Epic Fail

  Happy New Year and welcome to my epic fail of 2026. I guess you have to have one, right? This is the Ray Pinafore from Paper Theory Patter...