
First I'll make some comments on the construction and then go onto the pattern.
Here are some hints gleaned from Fabric Savvy by Sandra Betzina and some from my own experience.
* These suckers ravel. MAKE SURE you serge before proceeding to any part of the construction. I didn't with this because I forgot the necessity of it all. You really need to do this.

* Use a #10 Microtex needle.
* "Taut sew" pulling the fabric taut as it flows under the presser foot.
* Use your single hole presser foot. My 1/4 inch quilting foot is my single hole foot.

* Use French seams and bind the armscye.
* For your hem you can topstitch, not particularly that great looking in fine thread, do a double needle, what I would do in hindsight, or hand stitch. Use a regular whip stitch if hand hemming. I did the sleeves in a catch stitch, my usual, but the whip stitich I tried on the hem looked much better. I swear I never picked up more than two threads with each stitch. The stitching shows and there is no way to get around it. A good press with that point presser really helps though.
* Use silk pins, aka, fine pins. I only used my yellow heads to secure the pleats.
On to the pattern, McCalls 5469:
* I cut off a good 6 inches from the length of the top. For one, that length would have my body cut right in half, not a good luck when you are 5 ft tall, or for anyone for that matter. You can see I lost a lot of the border but that's OK.. I knew that was a big possiblity.
* This pattern is very easy, but this fabric will cause you to fiddle a lot and take more time.

* I also would place the ribbon and the stitching it hides higher up, maybe 3/4s of an inch from the edge. I am very narrow in the upper chest and the advised location of the ribbon just pulls funny above my boobs. I will live with it but next time, higher up.
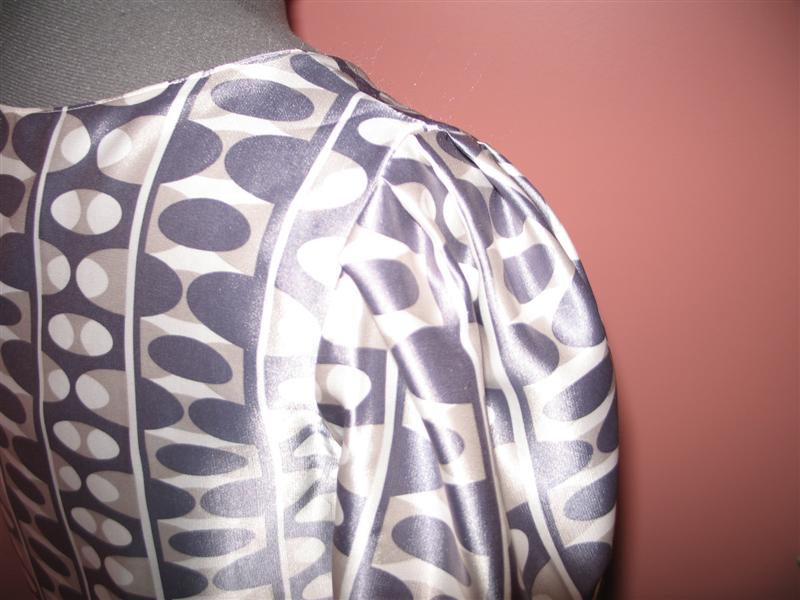
* Do you see how the stripes are distorted? I flat pattern measured and am very narrow on top, front and back so did not think their would be any fit issues. Clearly there are. Raising the ribbon stitching would help that as well as a wider bodice. I suggest that if you need to do this to this easy pattern, just adjust your pleats so there is more fabric in the neckline. Make sure you adjust the facing piece as well. This did go over my head easily.

* The entire time I sewed this top I just KNEW that the neckline would be too big and low. It isn't I always take out a half inch between shoulder and apex and didn't this time. No decollete here.
* I wanted fuller sleeves than the pattern. It looked too narrow to me. I added 6 inches to the width and raised the cap one inch. To echo the pleats in the bodice I pleated the sleeve caps.
I would definitely sew this again, possibly in another cheapy pseudo silky. I think it is a fun look and will go with black work pants as well as jeans. I recommend it with the suggestions made above. So don't feel guilty about giving in to the sirens of pseudo silk. They can be pretty rewarding if attention is paid.....Bunny


I love your fabric! That print was perfect for this shirt! I have also succumbed to the lure of silky polys. The last one I sewed was so slithery I could hardly cut it out. So I sprayed the whole thing with starch and then washed it after the shirt was done.
ReplyDeleteMy dear, it is so beautiful!!!
ReplyDeleteI love it! Thanks for the tips.
ReplyDeleteThe top looks great on you! It also looks very comfortable. The fabric worked so well for this style. I can see why you were seduced by it. Thanks for the tips!!
ReplyDeleteThese are some wonderful tips for working with slippery fabrics, Bunny! Thanks for sharing your wealth of knowledge.
ReplyDeleteI like the top very much on you, especially those fluttery sleeves. Great pattern to the fabric, too. I can see why you fell for it. :-)
What a really cute top!
ReplyDeleteGreat top, Bunny! The fabric is beautiful, I would've succumbed too! You have the patience of a saint, which I find inspirational. Thanks for all the tips!
ReplyDeleteGreat top - well worth all of your efforts!
ReplyDeleteYour top is gorgeous. It looks beautiful on you.
ReplyDeleteI like how you used the border print. the border looks like an appliqued strip. Poly/silkie equals yikes and hair pulling!
ReplyDeleteLovely top. Thanks for all the tips.
ReplyDeleteVery nicely done and useful tips. I'm also a big fan of pseudo silk. See my peacock blouse. But I've got to say after sewing the real thing for my last garment, there is nothing to compare with the real thing.
ReplyDeleteVery nicely done, considering the fabric qualities. I look at these, pet them, and then move on. I just know the nightmares that can ensue if I try to work with them. That said, when I do work with them, I starch them really well and that tends to tame the slipperiness (is that a word?) of the poly silky. The starch washes out in the end and everyone is happier.
ReplyDeleteHow did I miss this cute little top! It is sooooo pretty! And thanks for all of the tips on how to make this fabric work...I will remember the ironing one with the point/clapper.
ReplyDeleteGreat post! Love that top! Thanks for the tips on sewing with poly silkies. I have never tried it before and have a couple in the stash that I couldn't resist. :)
ReplyDeleteBeautiful, just perfect! I believe I have a similar fabric in my stash, your tips will be very helpful!
ReplyDelete