
I am going to be direct in this blogpost. It is about feminine hygiene products and will involve discussion of those products in all their variations. There will be frank commentary about our bodies and it's needs. My readers are welcome to comment and be as frank as they are comfortable with as well. So let's get started. Should anyone care to, feel free to move on.
My Mission
My goal is to make a simple, soft mini-pad, aka, panty liner, that would be so confortable that I wouldn't notice I was wearing it. I wanted to replace the retail pads I have been buying for some time as I disliked the thought of them being used every day, like pampers, and filling landfills. I was also looking for a thriftier alternative to replace constantly having to buy another package of pads. I wanted something totally able to wash and dry and that would not fall apart in that process. It had to be natural fibers, for me anyway, as well.
I did not want to make period pads although that can easily be extrapolated from this process. There is also tons of info on the web to help with that need. I wanted something well made but that wouldn't take a lot of time to construct and out of natural fibers.
Supplies
You will need:
- Sewing machine that can do zig zag or triple zigzag, an edge stitching foot is nice as well as walking foot capabilities but not necessary
- Scissors, rotary cutter or craft knife. Pinkers are optional.
- Oaktag for making your template
- Markers to draw on your fabric
- Fabrics and thread, more on fabrics in a moment
- Iron
- Ruler to measure and use with rotary cutter if using

Fabrics
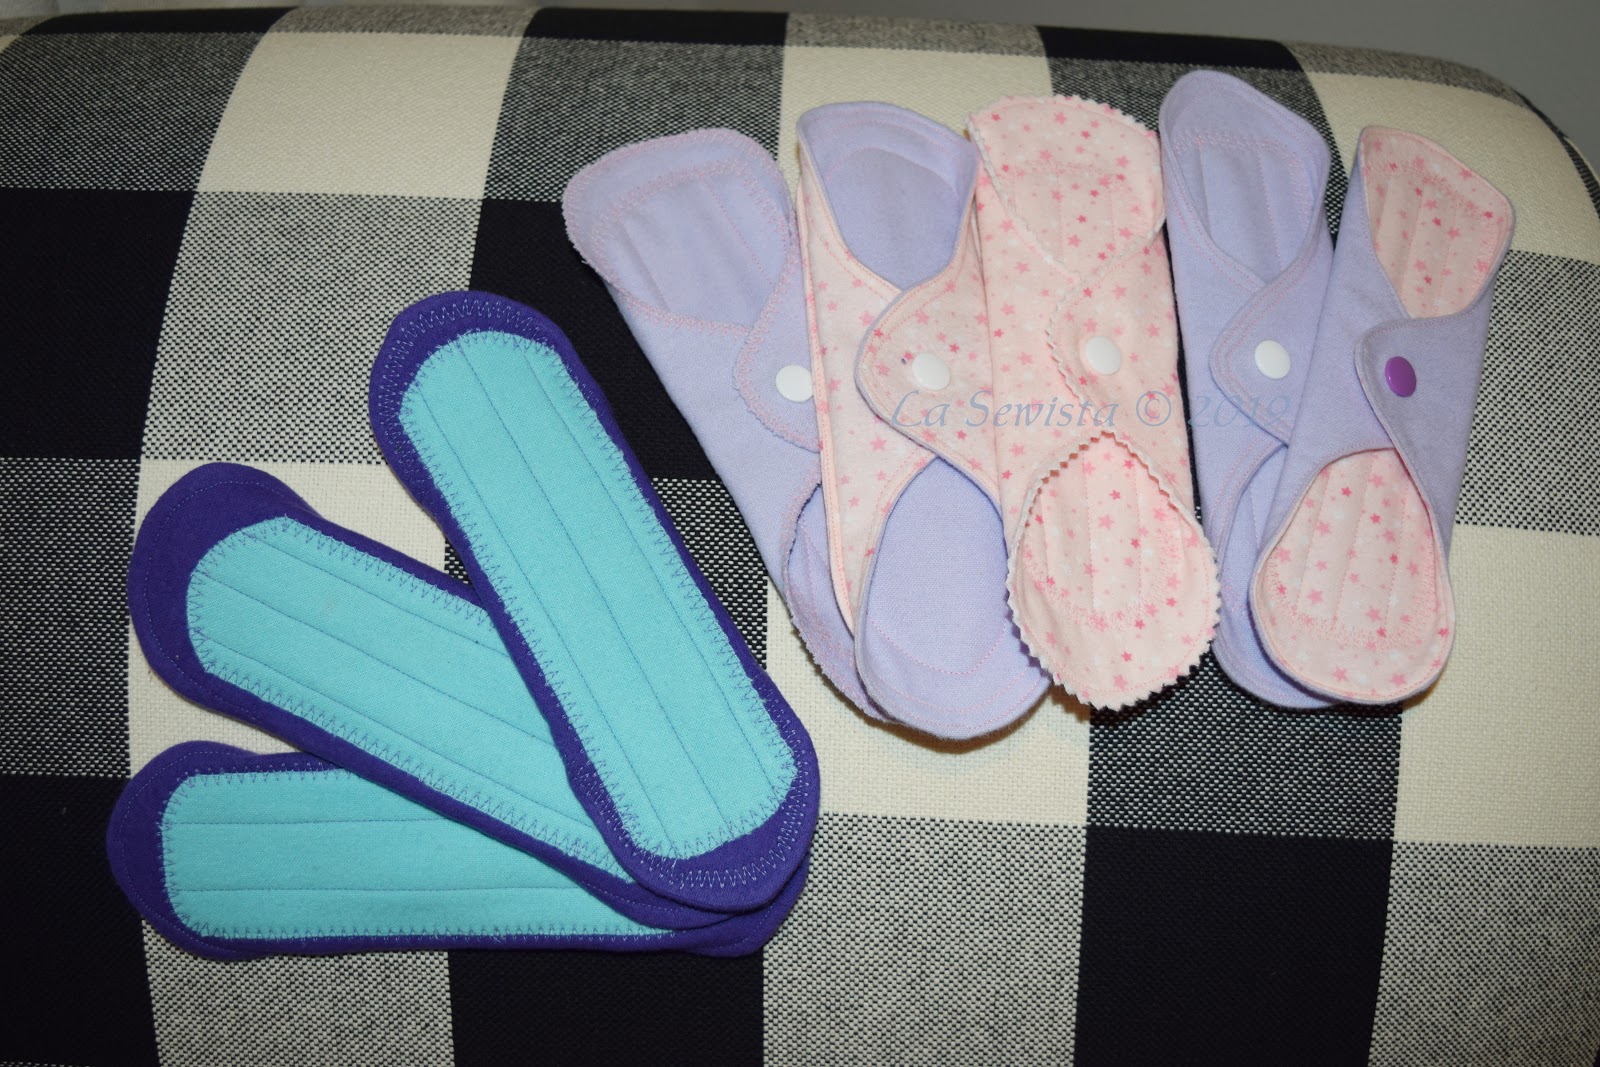
Before I go any further let's have a bit of vocabulary so we are all on the same page. If you look at the #1 picture further up you can see the pad consists of two parts. I am going to call them the BASE and the PAD. The Base is the large winged section and the Pad is the strip down the middle.
Before I go any further let's have a bit of vocabulary so we are all on the same page. If you look at the #1 picture further up you can see the pad consists of two parts. I am going to call them the BASE and the PAD. The Base is the large winged section and the Pad is the strip down the middle.
This is where it really gets interesting as there are so many options. I am focusing in here on a "light"pad. If you have had twins in your thirties like my daughter or gravity has prolapsed your organs, like myself, or need something for the last day or two of your period, this is the level of pad I am making. These pads shown are made out of 100% well washed cotton flannel. I like it because it is very soft, very washable and easy to sew. There are two layers in the Base and two layers in the Pad. #1 above also has a layer of Warm and Natural quilt batting inside the Pad as well. Many really like the wicking capabilities and feel of bamboo knits and bamboo fleeces, both of which run a fair dollar amount more than Joann's Snuggle flannel bought on sale. I may give this a try but I am finding the flannel fulfilling my needs just fine. I have seen some sewists use Minky, a total poly, and that, to me, would be hot and not absorbent, but they like the way it feels on their "area". Others use quilt cotton which frankly is a bit harsh in my opinion. Even others use Polar Fleece for the actual bottom outside Base layer. Too hot, IMO. Another suggestion, should you go the period pad route is to use a black flannel for the top layer. Not too friendly mentally but a heck of a lot easier to maintain in the laundry. A lot of makers use the black flannel. Not sure that is my cup of tea. Also remember that you get to decide how many layers of fabric you want your pad to have. Mine have a total of four. I suggest some experimentation before you commit to cutting out a dozen of these.

There is also something called PUL. It stands for Polyurethane Laminate. If you know someone who makes their own baby diapers, this is what is used to keep the pee inside and not on your lap. It has two sides, one cloth and matte and the other shiney and plastic-y. The shiney side is against your body. The matte side faces out, looking at your feet. Some pad makers use PUL as the actual back outside layer of their pads and this certainly would be wise for period pads. It is very thin and must be covered with absorbent layers of other fabric. It does not absorb. For my own mini pad needs I would back the center strip (more later) with a layer of PUL if you feel you need it. For now I am seeing how I am doing with just layers of flannel and so far so good. My needs are mostly discharge from a vaginal moisturizer prescribed. Just know it's out there and used to prevent leakage to the outside world. I've been told you can get it from Joanns and have seen it on Amazon. One of my dear sewing friends, an amazing heirloom sewist who has made many a gorgeous baby diaper, gifted me with this huge bag of PUL scraps. Thank you so much, Kathy. Here is a blatant plug to her Etsy shop in return. Her heirloom children's patterns are the best. Now we will return to regular programming! So know that PUL is out there. I haven't used it yet and seem OK. Another fabric used a lot in pad making is 100% cotton fleece, aka, Warm and Natural quilt batting. I made my first pad, per instructions, with a layer of Warm and Natural and 2 more layers of flannel. It is the #1 pad you see above. I found it a bit bulky for my daily needs but it would be a great combo for a light period pad with some PUL in the back.
More on Notions
Oaktag or heavy card stock that you can accurately cut is needed to make your templates for cutting. Also, if you have an 18 mil rotary cutter, this will help A LOT. They are hard to find in retail but I got mine on Amazon some time ago. They are still available there. If you don't have one a good craft knife will suffice to cut your template. For thread, any cotton poly will do and there is no need for any special needle. I had a size 12 Microtex in the machine already and went with that just fine. I used a Frixion Pen to mark on light fabrics and a Chacoliner to mark on the dark fabric. I ironed as I went along.
Let's get started!
Your pattern

Sorry for the mispelling on the template.
This is your pattern/template. It is 8 inches long and 3 inches wide. The wings are 6 inches wide. I am five feet tall and 107 pounds on most days. If you feel you need more area, simple extend the length of the base. I based this size on a purchased pad I use. Make what works for you.

Your Base template is cut out on the stitching lines. There are no seam allowances added to the template. This is because you will be tracing (not cutting) around the template for the base pieces right on the edge and that edge is the stitching line.
I found it best to draw my base first on 1/4 inch graph paper and then cutting it out. I could then fold it on the grid lines to find the center and make sure the curves and everything matched. Then I used that to draw the Base on the oaktag. I cut out the Base template from the oaktag with a 18 mil rotary cutter on that stitching line. You could use a 45 mil as well.
You won't need a template for the Pad section.
Cutting Out

Here is one yard of flannel folded so selvedges are on the left and fold on the right. This gives you two layers of flannel on top of each other. You will be able to lay three templates across. You need to leave space in between and feel free to make it as much as you can. This space will become your seam allowance. Draw around the template three times on the crosswise grain for three Bases. ROUGH CUT your Bases out. When you get to the stitching part the extra leftover outside of the seamline will make it easier to sew. You will be stitching right on the line you drew.

To cut the Pad, simply cut a two inch wide strip by whatever length you would like. I did 6 1/2 inches but may go to 7 next time. Even off your ends. This is a double layer of flannel. Take the strip and fold it in half along the length. Grab it at the end and pinch so you can cut a curve with your scissors where you see the dotted lines above. The one above is not folded in half but it's easier to get a good cut when it is.
If using PUL, you have the choice of making it a full layer inside of the Base or a layer inside of the Pad strip, your choice. Think of your personal needs. Is it half a thimbleful or an occasional gush that you are seeking to hold back? This is the advantage of making your own pads, totally custom. This may take some experimentation until you get to the perfect pad for your needs but worth it.
A bit about the shape of the pad: Sewing the curves on this pad is the hardest part of the entire project. It is not easy to get topstitching accuracy going in and out of these small curves. There are two solutions. #1- No one will see this but you, ever, so don't sweat perfection in topstitching here. #2 - There is a pad pattern out there with no curves, having corners at the top and sharp angled wings and if you are interested it is called the "Cher" pattern and can be seen HERE . I chose #1. Only my hiney, washing machine and I will know my stitching imperfections and so what! It functions. If these were for someone else, whole different story.
Since there is a lot to this tutorial I have decided to break it down into two parts. The next part will get into the sewing and closures. I hope you have some flannel and oak tag on hand to give this a try. Any questions? Till then,,,,,,,,,,,,,Bunny.


Great post! Good tips. I’ve been making my own for 15 years, have made several mistakes, and am still tweaking what works best for me. One thing I found with using the PUL for the base was that it actually would direct fluid outward and onto clothing. That batch of pads was ditched quickly. Not sure what I did wrong with that. Maybe it needed more absorbency on top of the PUL layer. Also made one whole batch on which I hammered the (metal) snaps too hard and not one of the snaps worked when I was done! (I still used that set for years because they would still stay put just fine. I have not made the base and the pad separate like you show (I encased the pad inside the base), but I like this way better. Fabric pads are soooo much more comfortable and less waste.
ReplyDeleteThanks for sharing your experience with us. I think I am going to make a couple with PUL just to see how they work for me. It really is a journey, isn't it? One of the things I like about the Kam snaps is that they can be removed without damaging the pad or other item they are installed on. I'll have more about that. I did put in a couple wrong and had to remove them. I'me a bit more vigilant now.
DeleteI love making useful, high-quality things and this fits the bill. Thank you for developing this pattern and process. I look forward to the next installment.
ReplyDeleteMantram Nursing Academy offers online PPMET Nursing entrance coaching designed for success. Our experienced instructors provide structured lessons, regular mock exams, and personalized attention to help you excel. We focus on building confidence, exam strategies, and in-depth subject knowledge. Enroll today and prepare effectively for your nursing entrance exam!
ReplyDeleteOnline PPMET Nursing Entrance Coaching