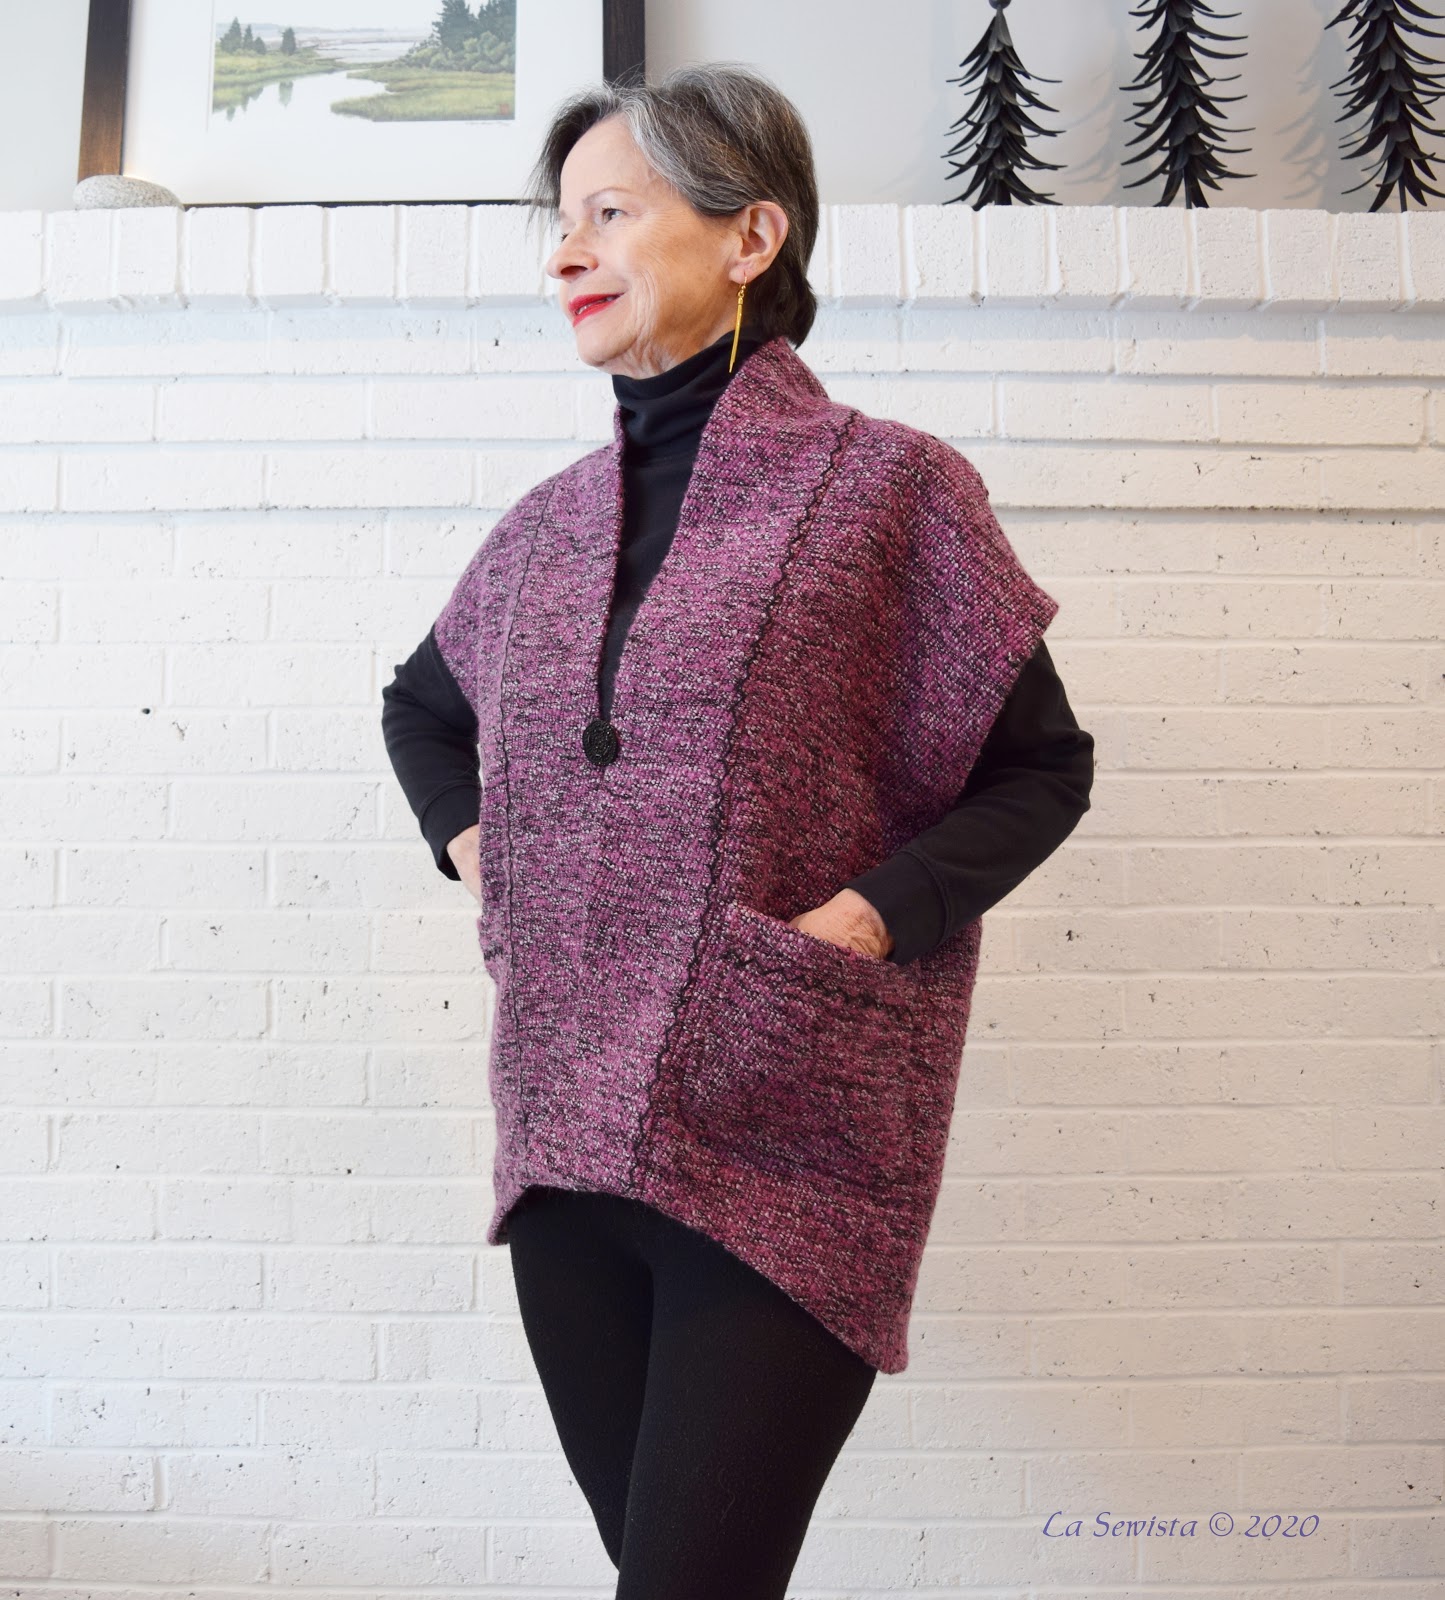
Do you like show tunes? My Fair Lady? Think "I'm in love, I'm in love, I'm in love with a wonderful vest!" I thought this came out with everything I want a vest to be, sophisticated, comfy cuddly, great fabric, and a bit unique without being to artsy fartsy . The entire time I was working on the linen jacket I just made with New Look 6397, for the trip that may never happen, I kept eyeing this vest, View D, on that pattern. I knew I had a bunch of wool boucle left from making Vogue 1642. Could there possibly be enough? It ate away at me the whole time I was sewing linen. Above is the result of my obsession and I love it, LOVE IT.

I have to tell you, this is the most I have been dressed up in a couple weeks. I am sure you are dealing with the same. It felt good. I do hope there is more to come and soon. I will be using some abbreviations in this post and here they are. The first use will be written out.
HKS - Honk Kong seams
SAs - Seam allowances
CS - Catch Stitch
FS - Fell Stitch

I knew I had a fair amount of wool boucle left over from my sweater top, Vogue 1642. Would it be enough? This fabric had a lot of texture and I did some piecing that never even showed by matching those diagonal lines of loops and a bit of careful sewing in between. I wanted to underline the vest and do Hong Kong seams throughout. Let me pick out my HKS fabric and then I will go buy the lining. I like my HKS to have some interest, either a vivid print or high contrast or such. I dug around and found two 60 inch pieces of this very beautiful sheer. I have no idea what it is or where it came from. It was too drapey to be organza or organdy and too bouncy to be chiffon or georgette, but wow it was gorgeous. It was just plain taupe on the wrong side but when the light hit it right it had foiled brush strokes of all sorts of colors. Well, that would be the HKS. I went out to JAs, a while after I was mandated home due to Covid19 , and bought some anti static lining. I know it wasn't Bemberg but I wanted to get started right away and had used this lining fabric before with fairly positive results.
Once home, I realized my two pieces of sheer were really quite big. Do I dare think I can get a complete lining out of those two strips? and the HKS? With only the addition of a center back seam in the lining it was easy peasy. By by cheap stuff that I really didn't want anyway. The entire vest would be underlined with the sheer and the HKS would be the sheer as well. Thrills all around!
Pattern:
 Above you can see View D. My only modification was to eliminate the roll of the shawl collar and have the collar band instead just be flat and plain. That works better with my skinny neck. In my previous adventure with this pattern I cut the width of the collar band down an inch as a petite adjustment. Here I went for it. I did not do any changes or alterations whatsoever to the pattern this time. The collar width is as the pattern specifies and even the length of the vest is as dictated. I am so not a hi lo person for hems but this was not too exaggerated and I actually really like where the length falls front and back. It hides my booty in the back and adds length to my legs in the front. Maybe a convert here? So, no adjustments anywhere and I love it.
Construction:

You know how sewists will tell you they hate putting in buttonholes or they hate cutting out or whatever...... I don't hate anything about sewing but I do live in mortal fear of one thing. I am deathly fearful of the hem that gets pulled up by a lining and does not hang nice and flat. I have seen beautifully made suits and at the end they are hemmed and that lining just comes up short and pulls and the hem curls under and it is awful. My biggest sewing fear, really. I was extra careful this wasn't going to happen here. Each piece had a layer of sheer for the underlining and I knew there was no room for error or it would pull the soft boucle and give me night terrors.

First I had to play with my fabric to get a piece large enough for the back bodice which was pretty wide. I was able to do a French seam down the middle and it all fit on fine. HOWEVER. this fabric was very challenging. It did not have the big bounce back of poly organzas but it was a little bouncy. It was also a lot slippery, not a good combo. I also wanted to get some ease into the pieces so there would not be that nasty pull up on the hem. That would need horizontal as well as vertical ease. I did this by first seaming the center back of the lining. Then I pressed and laid the fabric on grain on top of the cut back bodice. I pinned and pushed, sort of shoving the fabric towards the center of the piece and forcing ease into the garment. That is why as you look at it the lining looks so wavy.
After I was happy with the fabric I "shoved" in I pinned it all over the edges and center back. After that I diagonal basted everything down. It seems like there was a lot of ease from these maneuvers but much disappeared as I worked on the garment and just the right amount of ease seemed to be left. I proceeded to treat the front bodice pieces the same, shoved, pinned and basted. It was very easy to put together after this. Newbies, take note. It took me DECADES to see the value of hand basting. It saves time, really. I'd rather be basting than using a seam ripper any day! Now I use the technique all the time.
On this garment I decided to do the HKS as I went along. Here are some specific details from the construction.

The HKS were definitely a challenge here but they were a must do with this very ravel prone fabric. They were miserable to pull off. The bouncy sheer just would not agree to wrap around the edge, never mind wrap nicely. I was getting frustrated. Then I decided to ignore tradition and try a zigzag stitch and it worked. It looked awesome and for some reason held down the sheer nicely as I went along. I did it right on top of the sheer and not into wool. I had wide SAs behind that were caught into the stitching and it gave a really nice tight finish. I will definitely use this zigzag HKS technique again, particularly for unruly thin fabrics that don't want to cooperate with wrapping around.

One of the things I love about this vest was the ease of finishing. Look at the brilliance of the armhole finish. I did something just a bit different from the pattern because of the HKS. While the side seam was raw and completely open I did the HKS from hem to hem, all the way around, over the shoulder seam. The hem was still raw. The pattern then has you sew up the side seam from hem to the armhole and simply press in the edge around the armhole and hem, so very easy and such a clean finish. I used a fell stitch to finish my armhole edges and the seam underneath is free.
Like in the linen jacket I veered on the collar band also. I pressed in the edges of the collar band that would be on the lining side. I stitched my collar band to the FRONT of the bodice and turned it in. The seams were graded and and the inner side of the band was fell stitched down as you see above, a much cleaner, professional look, and frankly easier, IMO, than the pattern instructions. I did put a lot of handwork in here, but I considered it TV work and I enjoyed doing it. Much of this could have been topstitched and would have looked good on other fabrics.

I love this pic because it shows the fell stitch collar, the HKS, the beautiful lining, the antique jet button, and the catch stitch embroidery.

When I was all done I found the vest "well made" but not very exciting. It just all sort of blended together on the outside and needed an accent of sorts. I experimented with a few embroidery stitches. The nubby texture of the wool really conflicted with my efforts but a catch stitch with heavy embroidery thread worked best. I put it on the hem bands of the pockets and around one edge of the collar band, just enough.


I still felt the vest needed some sort of focal point. I had not planned on a button but this antique jet lovely, a gift from a dear departed friend, was just the ticket. The photos don't do it justice. It really sparkles and is the perfect accent. For now I simply connected the two sides of the collar band with a safety pin underneath. If I decide to keep it there, I will make it more permanent. It really is lovely.
In Conclusion:

I think I managed to "Eke Out" this vest. I do absolute love it. It is all a winter vest should be, in my opinion. The pattern is so easy, so versatile and I can't recommend it enough.
Once home, I realized my two pieces of sheer were really quite big. Do I dare think I can get a complete lining out of those two strips? and the HKS? With only the addition of a center back seam in the lining it was easy peasy. By by cheap stuff that I really didn't want anyway. The entire vest would be underlined with the sheer and the HKS would be the sheer as well. Thrills all around!
Pattern:
Construction:

You know how sewists will tell you they hate putting in buttonholes or they hate cutting out or whatever...... I don't hate anything about sewing but I do live in mortal fear of one thing. I am deathly fearful of the hem that gets pulled up by a lining and does not hang nice and flat. I have seen beautifully made suits and at the end they are hemmed and that lining just comes up short and pulls and the hem curls under and it is awful. My biggest sewing fear, really. I was extra careful this wasn't going to happen here. Each piece had a layer of sheer for the underlining and I knew there was no room for error or it would pull the soft boucle and give me night terrors.

After I was happy with the fabric I "shoved" in I pinned it all over the edges and center back. After that I diagonal basted everything down. It seems like there was a lot of ease from these maneuvers but much disappeared as I worked on the garment and just the right amount of ease seemed to be left. I proceeded to treat the front bodice pieces the same, shoved, pinned and basted. It was very easy to put together after this. Newbies, take note. It took me DECADES to see the value of hand basting. It saves time, really. I'd rather be basting than using a seam ripper any day! Now I use the technique all the time.
On this garment I decided to do the HKS as I went along. Here are some specific details from the construction.

The HKS were definitely a challenge here but they were a must do with this very ravel prone fabric. They were miserable to pull off. The bouncy sheer just would not agree to wrap around the edge, never mind wrap nicely. I was getting frustrated. Then I decided to ignore tradition and try a zigzag stitch and it worked. It looked awesome and for some reason held down the sheer nicely as I went along. I did it right on top of the sheer and not into wool. I had wide SAs behind that were caught into the stitching and it gave a really nice tight finish. I will definitely use this zigzag HKS technique again, particularly for unruly thin fabrics that don't want to cooperate with wrapping around.

One of the things I love about this vest was the ease of finishing. Look at the brilliance of the armhole finish. I did something just a bit different from the pattern because of the HKS. While the side seam was raw and completely open I did the HKS from hem to hem, all the way around, over the shoulder seam. The hem was still raw. The pattern then has you sew up the side seam from hem to the armhole and simply press in the edge around the armhole and hem, so very easy and such a clean finish. I used a fell stitch to finish my armhole edges and the seam underneath is free.
Like in the linen jacket I veered on the collar band also. I pressed in the edges of the collar band that would be on the lining side. I stitched my collar band to the FRONT of the bodice and turned it in. The seams were graded and and the inner side of the band was fell stitched down as you see above, a much cleaner, professional look, and frankly easier, IMO, than the pattern instructions. I did put a lot of handwork in here, but I considered it TV work and I enjoyed doing it. Much of this could have been topstitched and would have looked good on other fabrics.

I love this pic because it shows the fell stitch collar, the HKS, the beautiful lining, the antique jet button, and the catch stitch embroidery.

When I was all done I found the vest "well made" but not very exciting. It just all sort of blended together on the outside and needed an accent of sorts. I experimented with a few embroidery stitches. The nubby texture of the wool really conflicted with my efforts but a catch stitch with heavy embroidery thread worked best. I put it on the hem bands of the pockets and around one edge of the collar band, just enough.


I still felt the vest needed some sort of focal point. I had not planned on a button but this antique jet lovely, a gift from a dear departed friend, was just the ticket. The photos don't do it justice. It really sparkles and is the perfect accent. For now I simply connected the two sides of the collar band with a safety pin underneath. If I decide to keep it there, I will make it more permanent. It really is lovely.
In Conclusion:

leftovers!
************
I hope you are all well in this time of challenge. Once in a while I may write some thoughts on my own experiences as the feelings are strong. I understand if you care to scroll by or share your own. There will be lots more sewing posts as I am now officially off till May 4th. I wish you all the best, stay safe and be well.................Bunny


Your details are wonderful.
ReplyDeleteThanks, Pat. I don't mind them on such a simple design. Simple designs, great fabric, detail, all make for a satisfying sew.
DeleteFantastic vest, and I also loved the previous jacket. I have sewn all winter for a trip that will not happen. I have only left our lovely Canada once in my 62 years for a quick trip to the USA. This year we had planned a once in a lifetime European trip in May. It has been cancelled, so now I am the best dressed, work from home person on the block, sigh... Oh well. It took 40 years to convince my husband to go, now he is spooked about travel again. Enough whining, we have it better than most here at home, but it was such a disappointment. Take care, Bunny
ReplyDeleteBarb
I so feel this loss. Our daughters and all of their children and ourselves had planned a once in a lifetime trip of our choice to celebrate our 50th anniversary. We chose the Azores. Sigh......From what I see sewists will be the best dressed around this summer when hopefully we are back out again. Take care and thanks.
DeleteBunny I bought the exact same fabric used for your underlining and HK seam finish a couple years ago at Joanns. It's been sitting in my "collection" and I pull it out every now and them to look at its beautiful shine. Your vest makes me consider it for a similar garment. Maybe next Fall I'll use it as we're already reaching high 80s temps here in Texas. Thanks for this inspiring and informative post. Karen
ReplyDeleteYou're welcome, Karen.
DeleteThe fabric, the color, oh so nice. And the catch stitch is just the right amount of detail. Yea!
ReplyDeleteThanks.
DeleteAnother beautiful make! I've had this pattern for a while and just recently found that it's been re-issued under another number, unfortunately I don't remember the number. Hopefully I'll get it made for fall as it's already getting pretty toasty here in AL.
ReplyDeleteCorrection on my post. I believe the current pattern is the re-issue since the date on mine is 2016, I believe.
DeleteThis would be great out of some linen too.
DeleteHi! I love the vest so much that I jumped on Ebay to buy a pattern! And the details on finishing will help me so much! Now I have a random question! I love the little trees behind you!! Did you make them? I would really love to have a tutorial if you did!! Thank you! j
ReplyDeleteThose trees are a memory of our time living in the Adirondacks in upstate NY. We got them in Lake Placid, a place not far from our home that we used to visit a lot. They are actually candle sticks. Glad you liked them. They are metal. The painting is by a well known artist on Cape Cod, Arthur Moniz, and is a picture of Ned's Point, a place my husband used to go fishing with his dad as a little boy. I got it for him as a birthday gift a few years back. It's a special place for both of us. Thanks for your interest.
DeleteI love the combination of fabrics you used on the vest! And I agree, it would have been too plain without the added decorative stitching.
ReplyDeleteThanks, Gail. I nicknamed it the "wooly mammoth" while working on it. One it got a bit of decoration, that just disappeared.
Delete