

This fabric is a Sevenberry Japanese fabric distributed by Kaufman. It is called Nora Homespun. I have learned that Sevenberry fabrics can be twills, canvas, quilting cottons, barkcloth, you name it. I came across a description of this particular one as canvas. If it is I would say it is a light canvas. It does not have the feel of a quilting cotton or canvas to me. It is very linen feeling but is 100% cotton. It washed and draped nicely and released its wrinkles easily. I go into this fabric in more detail on this post here where I discuss more fully the unique underlining process. The pants were underlined completely with 100% polyester stretch mesh in black. I picked that up at my local chain for 5.99 a 60 inch wide yard. The mesh has worked out wonderfully. I have worn these all cotton pants all day and there is not a sharp wrinkle anywhere, despite sitting at my machine and computer for quite some time. The mesh has holes and therefore breathes. It was a great combo for underlining with the Sevenberry fabric. I highly recommend underlining pants with poly stretch mesh. It is comfortable and does a great job of keeping wrinkles at bay, breathing, and assisting with the drape. This I learned from Linda Lee as well.
Fit:
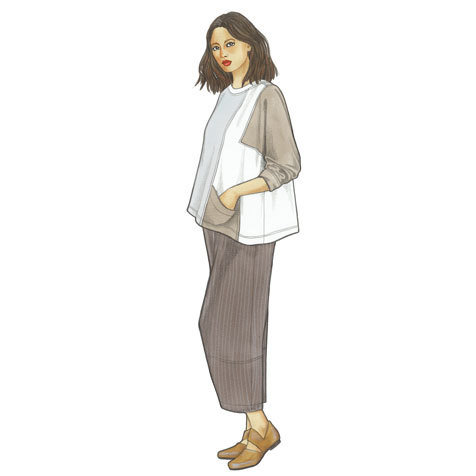
This is where it gets interesting. I chose the smallest size, XS. It is a 42.5 inch finished hip width. My hips are 37 inches. My two previous pair were quite voluminous but frankly, I found them very comfortable and liked them that way. Then, my sister came to visit, super sewist that she is, and she tried mine on. They fit her more snugly and looked awesome. She is taller and heavier than I am and the more fitted pant look fabulous on her. I decided that my next pair would have some of the volume removed. I did a few things to this pair to "petite" it more and to make it fit my particular body a bit closer. I am happy with the results. You do need to know that the more voluminous pairs feel awesome. So is it a problem? Not really, but I like the idea of a look that is closer to the body and actually having the fuller and the more fitted options to choose from when I make these up. I can see using the more fitted version for heavier wovens and the more voluminous, gathered version for a lightweight rayon or thin knit which is what the pattern is spec'd for. Here is how I went about it.
PETITING:

I reduced the length of the tucks, a bit hard to see here, by one inch.
I used a 3/8th inch seam allowance where the pant legs connect to the lantern shapes.
These two moves gave me an ankle length version that I am delighted with for my five feet tall bod. I found the longer tucks of the original design released their fullness too far down and close to the crotch.
REDUCING VOLUME:

These are the original pants with the 42.5 hips. My fingers are pinching out some of the ease. I love these pants. They have a flat front and an elastic waist elsewhere. I did the following to reduce volume.
* There are side panels. In the seam that meets the front with the side panel I reduced it a half inch starting at the waist and tapering to nothing at the knees.
* I added another half inch tuck to each side of the pant front as shown in the pic above therefore taking out 2 more inches but just at the waist. This helped remove some of the bulk of the elastic waist.

* For the back I added a half inch dart on each side of the back, ending at the fullest part of my bum as shown in the green arrows. At every step of these alterations I kept checking to make sure the elastic waist easily got over my bum.

I think you can see these alterations made a big difference in the fit. I believe the folds on the right are simply a need for the elastic waist to be arranged a bit. Pardon the camera angle as well. I aimed it right at my bum so you could see everything which really looks like I am sticking it out at you all. So sorry about that.

Here's a repeat pic. I think you can agree, these look pretty good with less volume. Now, consider that this pattern is meant for knits. I am using rather dense wovens for mine and I feel these accommodations make them work better. I have seen them made on Lee's videos in very lightweight knits and their fullness is gorgeous and the drape wonderful and flattering so I am totally confident that if I made them in a lovely rayon I would use the original fit. At least now I have two options for this pattern should I decide to make it in a more heavy woven or in a lighter knit or rayon type fabric. These pants are so comfortable, stylish, and I LOVE them!...Bunny


Thank you for explaining so well in your blog. The pants look fab on you!!
ReplyDeleteAll the best.
Thank you.
DeleteI have used this pattern as well. The pants are drafted for woven and the top is drafted for knits. I used linen for my pants. I like your fabric. Where do you get that line?
ReplyDeleteThe fabric came from my local quilt shop, a wonderfully curated shop, quite large. A couple years ago they started carrying more and more fashion fabrics, particularly Japanese fabrics as that is what they specialize in. I've never seen so many gorgeous Japanese garment fabrics in one place, some very pricey and so beautiful. This week when I visited they had a new arrival of 100% cotton jersey, wonderful quality, that I have been wanting so long for tees and turtlenecks but have hesitated to buy sight unseen online. It was decently priced as well. I will go back and buy that for sure. Thanks for the correction on the suggested fabrics. I may have been confused as well from something I heard on her FB program. Either way I always appreciate a good correction! The store is Quilted Threads in Henniker, NH.
DeleteBTW I did make the top in a woven and it works except that it's a bit tight in the arms but I can get it over my head!
DeleteThat is great to know. Thanks. It does look roomy but I like the style and am always up for a bit of fabric collage.
DeleteI've made 2 pairs of these, both in woven cottons, and love 'em. When you wrote that the pattern was designed for knits only, I did a doublo take and had to check to see if I'd misread something. According to the SW site, suttaible fabrics for the pants are listed as "Light to mid-weight Cotton, Linen, Rayon, Polyester, Silk, and Knits." (The top is for knits only, though...)
ReplyDeleteThanks, EmmyJay. Tobie set me straight. I am wondering if either of you underlined yours.
DeleteGreat details.
ReplyDeleteThanks, Pat.
DeleteI found this interesting as I’ve been shopping around for semi fitted elastic waist pants patterns.
ReplyDeleteHope it helps you.
DeleteFabulous! I like them with less volume and they would be much more flattering on my taller and heavier body with less ease. I think that I will be buying this pattern. I still don't think that the top is for me, but the pants are very interesting. Both pairs look good on you, but you are tiny and I do like the smaller pair better.
ReplyDeleteThanks, Nancy. I think you would look great in these, particularly the less volume version. With your pants making skills I know you could make them work. My sis is 5"4 and probably about 135-145 and they looked great on her in the XS size. We decided she needed just a 1/4 inch added at the upper hip only. She didn't adjust anything else. She loves them and did the cropped version.
DeleteFirst, you look fabulous in the new Picassos. Thank you for explaining how you reduced the volume, i too, find them too big for wovens. This was very helpful and is very much appreciated
ReplyDeleteYou are welcome. Just make sure you keep checking that there is enough ease to go over your hips pleasantly as you add each change.
Delete