Sounds like a title from Dr. Suess! Alas, it is just what I did during my blogging hiatus. Sewing continued in that time and as it always has been, proved to be a great solace. Here is what you missed. There are two repeats and one new design so I won't get too deep into the weeds.
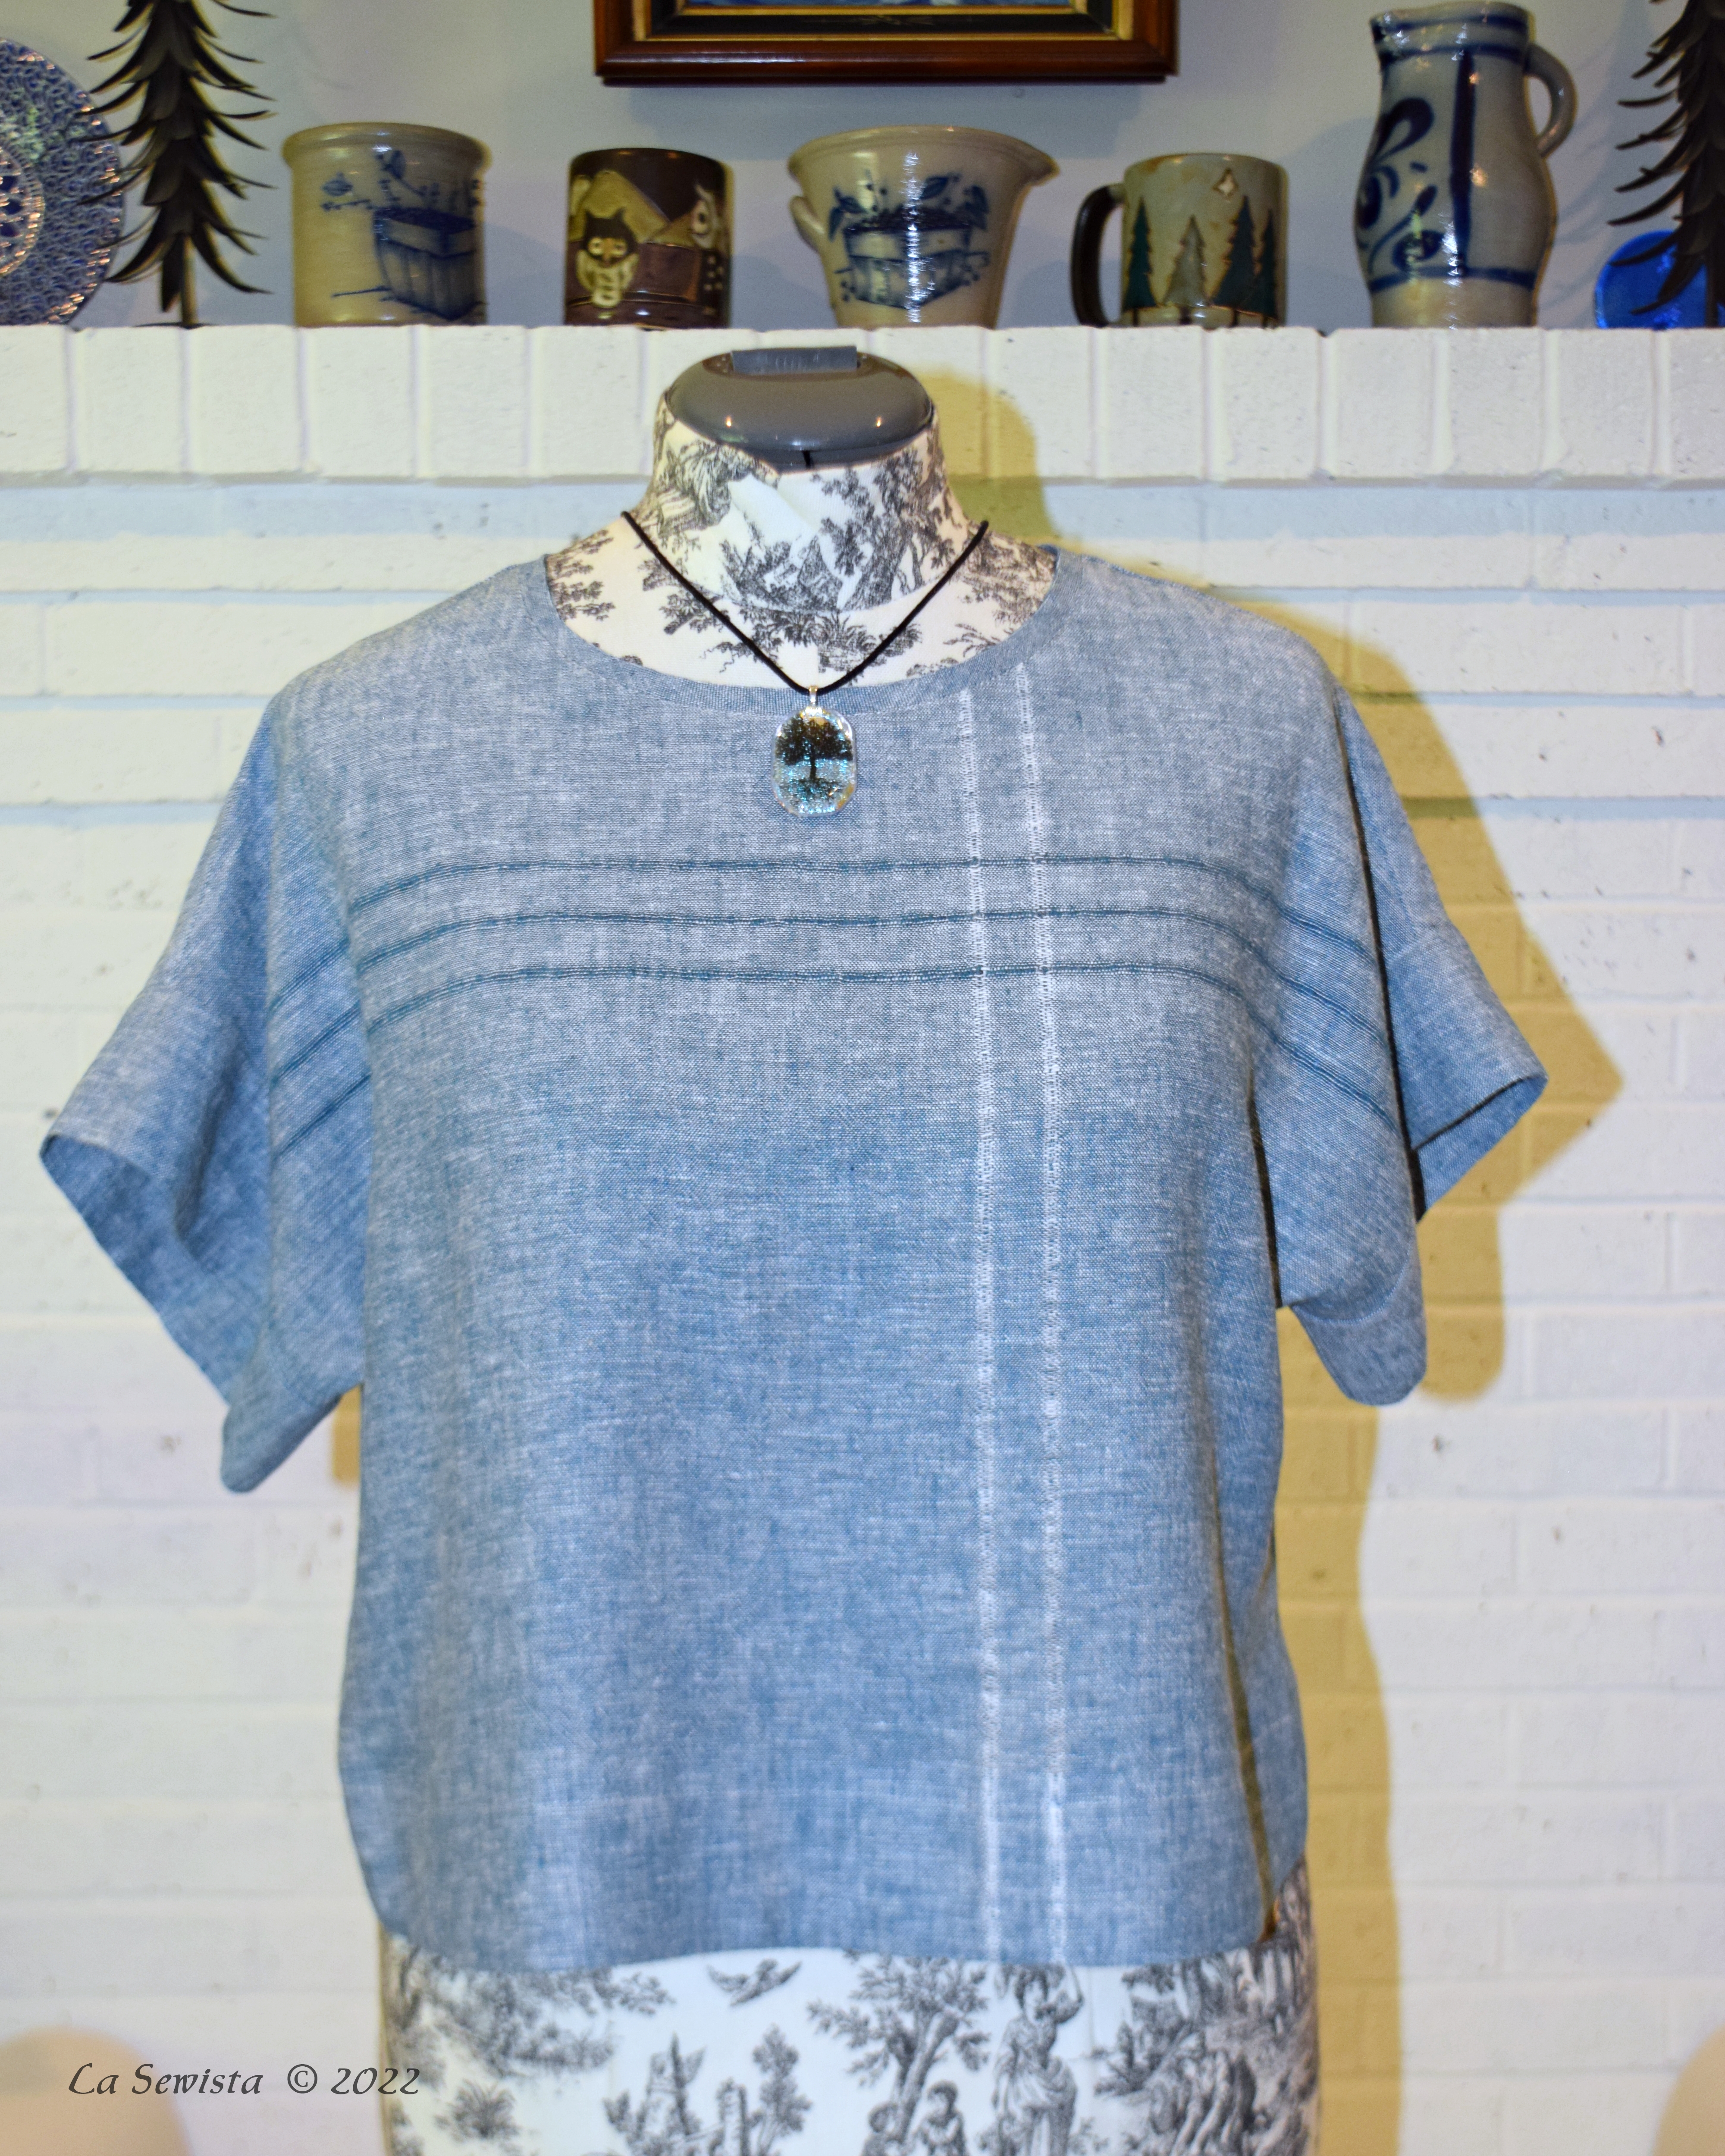
Here we go with another Eureka Tee from the Sewing Workshop. This one is made from yarn dyed Brussels Washer linen by Kaufman in the smallest size. It is, I believe, my fourth iteration. As far as fit, my sis says I need to make it narrower. I'm OK with the wider style of it all but will try a narrower fit next time around just to see what happens. I have a muslin and may just baste out some width. What you see above has been worn and washed a couple of time as I am finding it a great summer top.


I decided to embellish this simple top by pulling the threads. I knew that the warp and weft were different colors and this could be interesting. The thread pulling was easy and I pulled five threads to get the effect of one row as you see directly above. If you look at the rows in the pic above this one, the smaller pic, you will see the thread pulling looks quite different. The washing had an effect on the look of the pulled threads and actually all the fabric. It didn't appear to shrink but it got "crepe-y". I'm ok with it but just be aware that if you want to keep the crisp look of the pulled threads you can either further hem stitch them or hand wash this fabric. Either way, I think it is a nice feature on a simple top that begs for detail.

Construction on this was as suggested in the pattern: machine stitched, pressed to the side and serged for a finish. Further details on my original Eureka tee can found here: The Eureka Top
*****************

Next is my attempt to jump on the ditsy print bandwagon with second make of a sixties sort of tunic. This busy print makes it very difficult to see the details of the design. This is Butterick 5861, OOP, a classic tunic. The fabric is 100% rayon in a crepe type finish, what was called "crepon" back in the day. It is well starched in these pictures as it was extremely slippery to work with and I had to give it a couple of coats to make it a pleasant sewing experience. It has not been washed out yet so it all looks a bit "puffy."

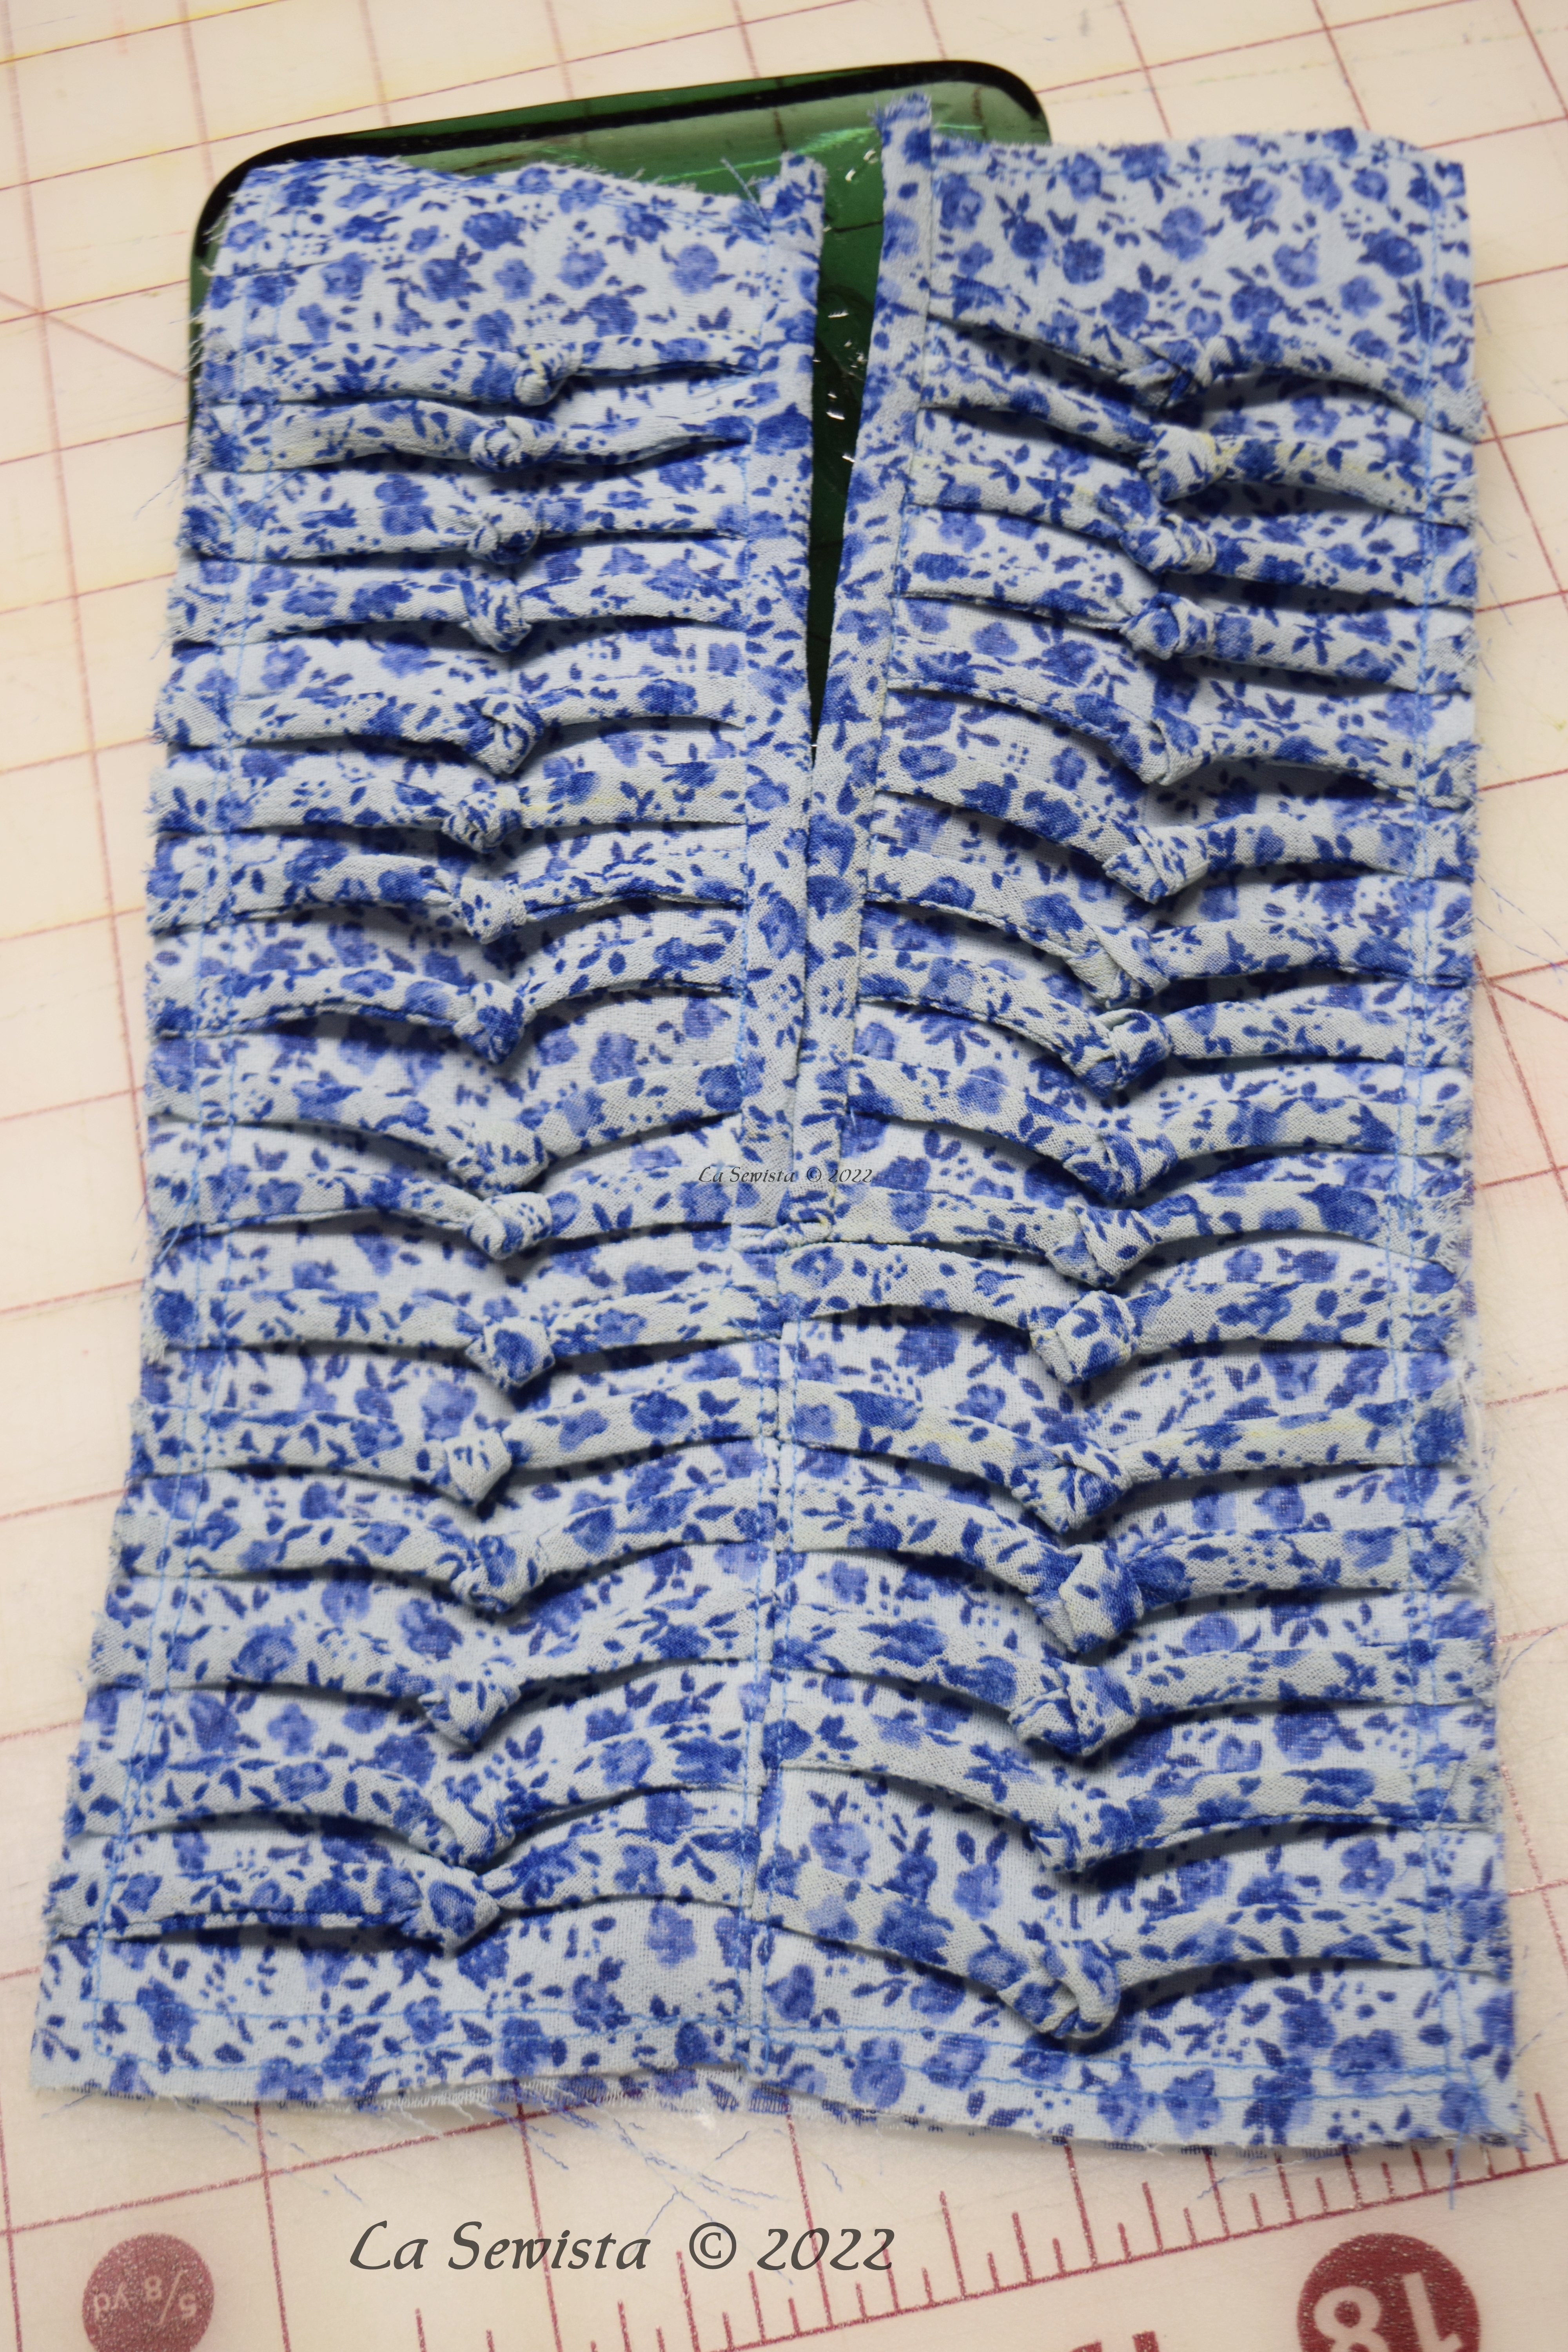
You can see there is detail on the shoulder yokes and on the bib type inset at center front. I decided to do my own thing there which in hindsight was great looking but a total waste of time. You just can't see it among the tiny, busy print. It was fun and challenging getting it done, however.
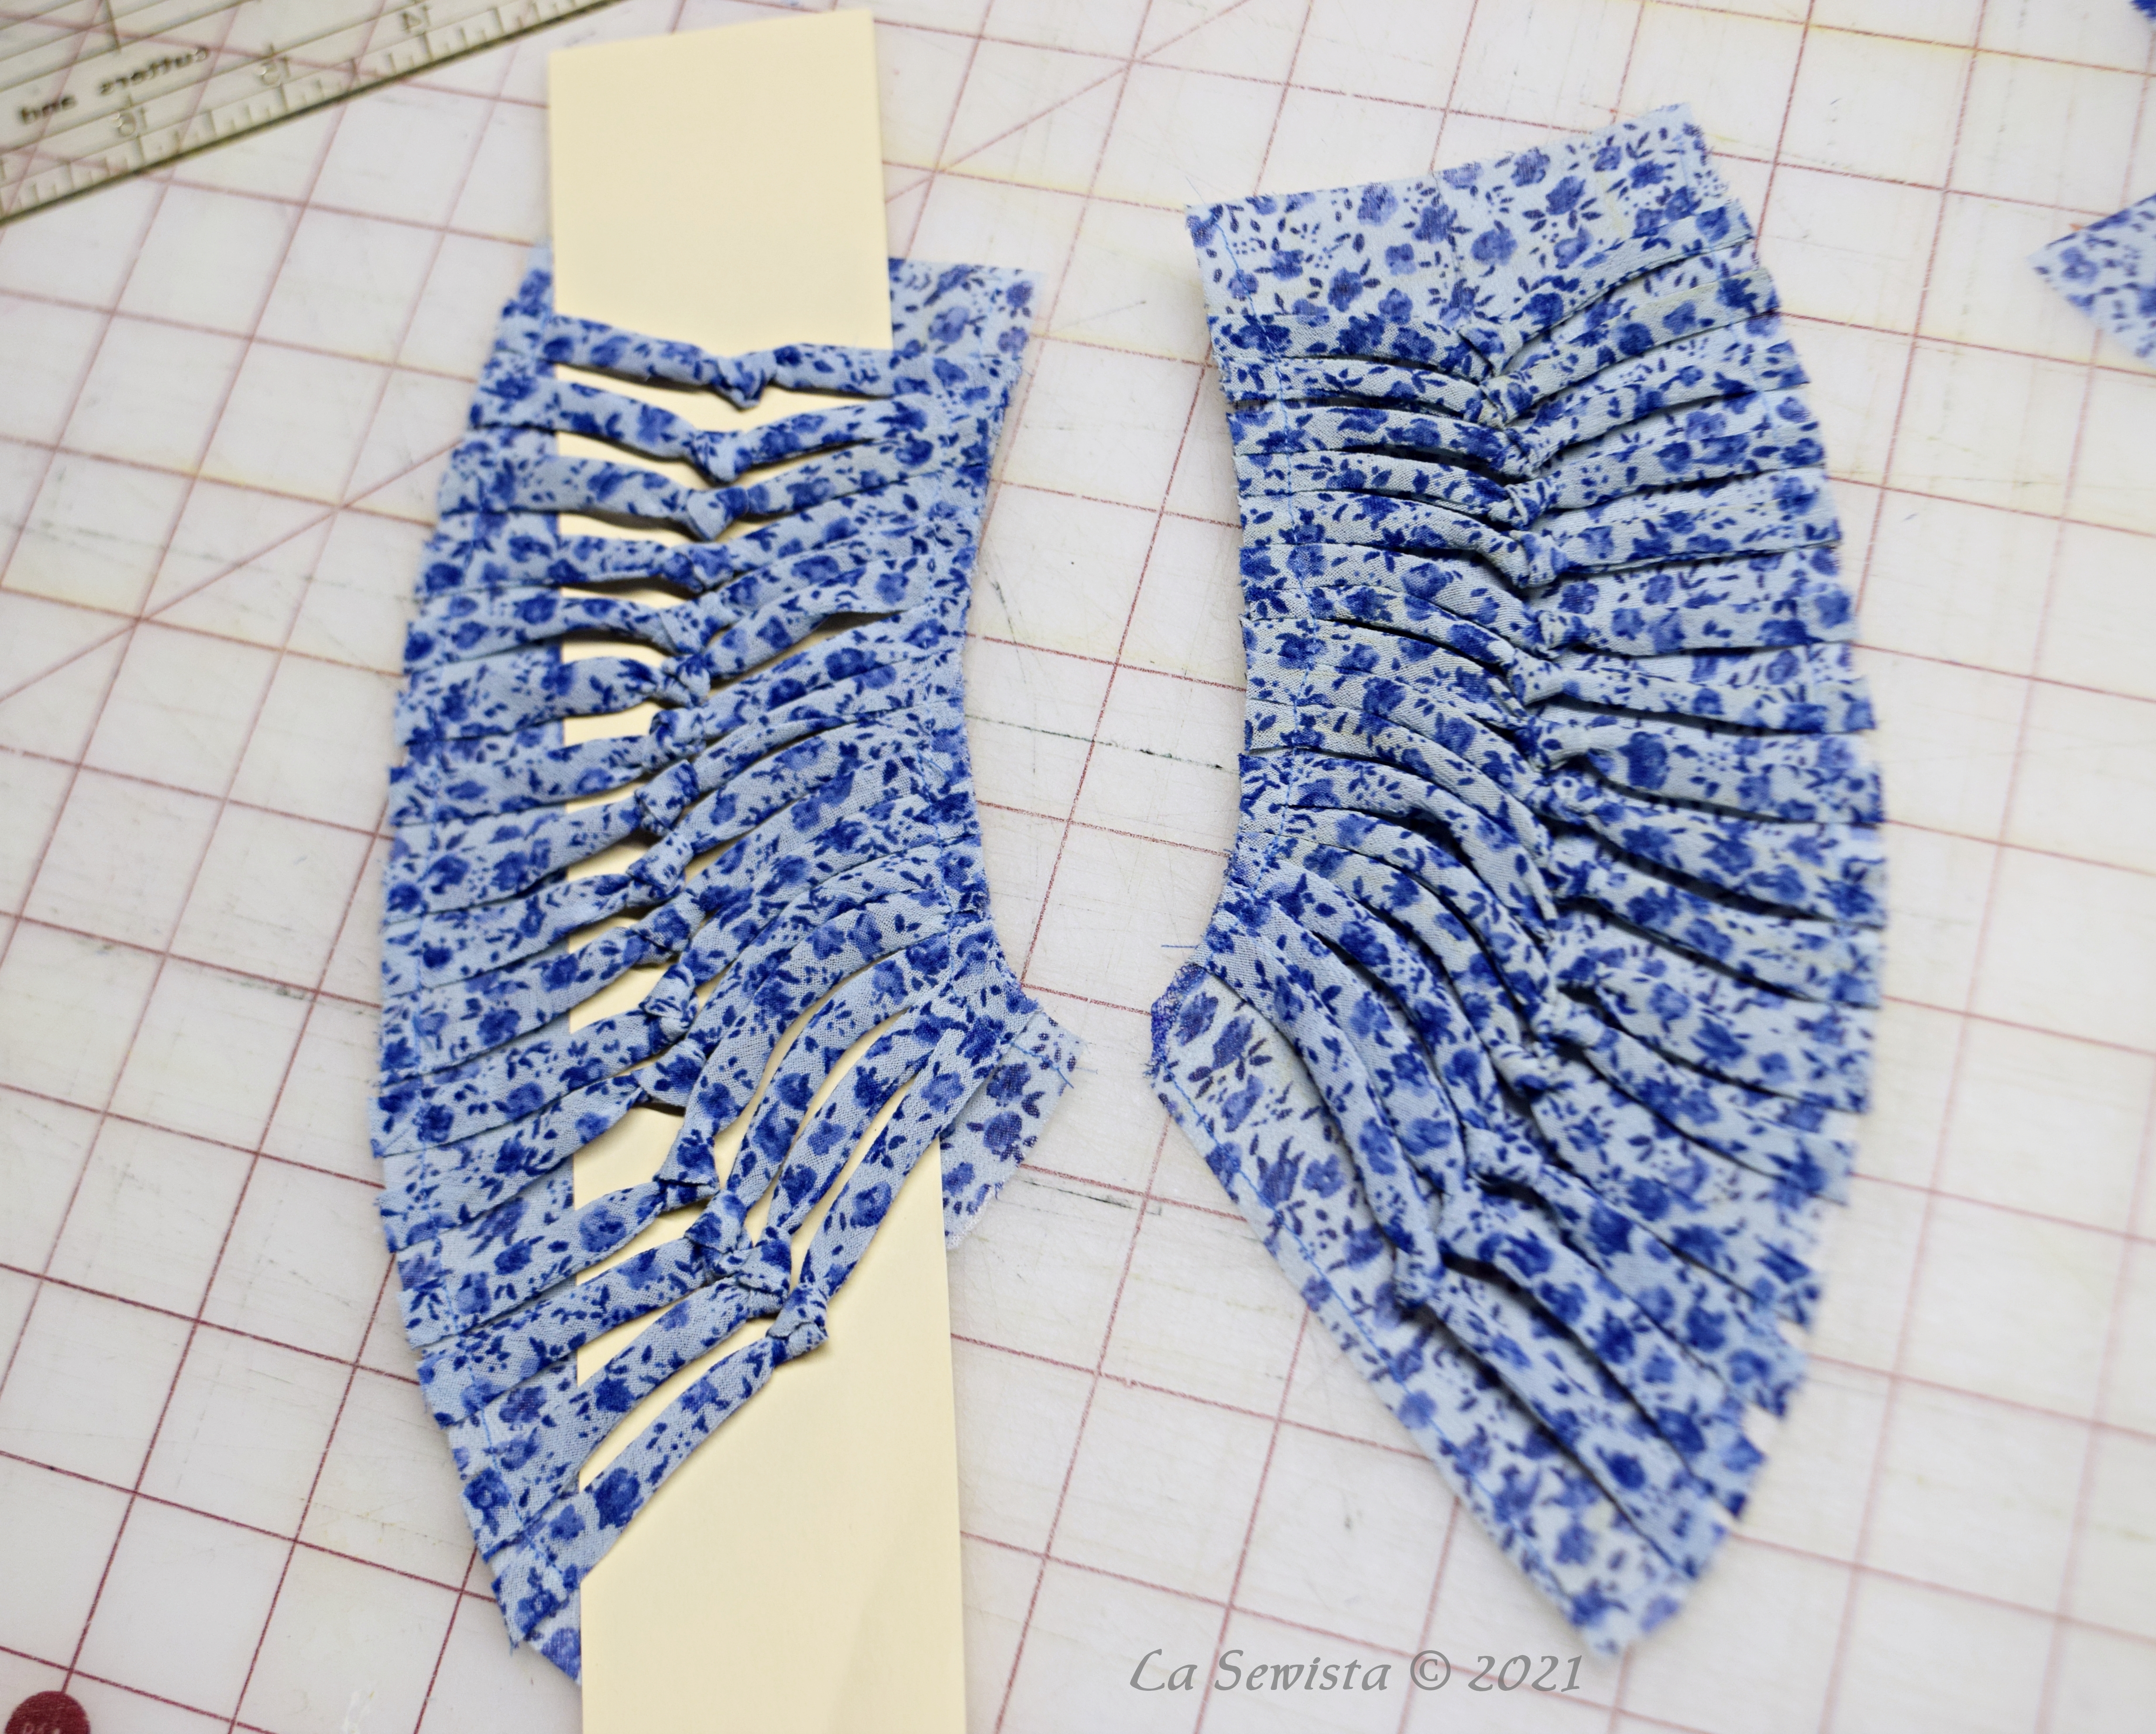
Instead of plain bias strips the pattern recommended, I chose to make little knots in the center of each strip. I made bias tubes, knotted them, and cut so the centers matched up when places on the garment section, which here are the shoulder yokes. Here is the bib inset:
It was very tricky binding the opening of this. I veered off the reservation to figure it out but it came out ok.


It is bias cut, wraps around obi style and has a couple beads on the end to weight it down.

The cuffs easily fit over my hands but don't look big so I did not elasticate them.
To see my original effort on this tunic click here. It is quite different. I feel on this one I put too much work into to it for the fabric that it is. It will look ok with some jeans. In the end, I did enjoy the study in embellishment.
************************

Last but not least, the one item made specifically for our vacation. In its short life it has already flown the friendly skies, covered my head as I avoided poisonous jelly fish in the North Atlantic, been mushed into a crowded knapsack and protected the once cancerous skin on my skull. It has been a real work horse once home as well and I am wearing it everywhere. I LOVE my bucket hat.

No pattern here! Everything I looked at just wasn't quite right, whether a pattern or retail. Brim too wide, too narrow, etc etc etc. Just when I gave up, a few days before leaving on vakay, I was in a local retailer and I saw this gaudy little number above. It has the shape I was looking for, one that fit my petite head. I tried it on, score! I bought. It might look cute with my periwinkle linen dress and I could use it to make my own bucket as well.

I proceeded with a stash of oaktag, my padded smocking board and some heavy yelllow headed pins to copy each section of the hat. Pattern ready !
 |
I inspected the guts of the original hat and after interfacing my khaki twill, tried to proceed in a logical order to duplicate its construction. I self lined the hat with more twill. The original used a cotton lining.

Row upon row of topstitching on the brim!

In the end, I think I got it. I plan to make more for winter, warmer fabrics instead, maybe with ear flaps! I will make a hat with a wider brim as well.
This has been a long post. Thanks, if you have managed to work thru to the end. It is what I worked on while not blogging. I thought of you all during that time and knew I would eventually get back to you all and let you know what I was up to. I have lots of plans for future projects and the queue is long. More to come!

Dear Bunny
ReplyDeleteI'm not sure how to go about the comments, but this is Cathy and I'm delighted you are well.
Thanks, Cathy. I'm doing well and improving. It takes time but I am moving in a positive direction. Thanks for your thoughts.
DeleteWelcome back! I learn so much from you.
ReplyDeleteThank you, so sweet.
DeleteI alway enjoy seeing your sewing projects. Pulled threadwork is such a great idea for a simple, but elegant embellishment on cross dyed fabric. That Butterick pattern is in my stash. I love the bohemian style. The knotted cord details may not show up from far away, but they are the type of interesting detail it is fun to discover when admiring the tunic up close.
ReplyDeleteThanks, Audrey.
DeleteThe pulled threads on the Eureka top is GENIUS! It looks SO high end! I never woulda thought of that...
ReplyDeleteI started doing those as a child, nun taught. Back then we were learning hem stitching by hand. I love yarn dyed fabrics and they are perfect for this effect.
DeleteDid not see the pulled threads until you mentioned it (and the close up). That was so creative And I agree with Lisa, it looks very high end. Just beautifully done. Jean
ReplyDeleteI know you’re not crazy about Merchant & Mills, but they have a free, yes free! downloadable PDF bucket hat. I’ve made several of them and in the last iteration made the brim wider. Was helpful to have pieces that fit together and some instructions right from the beginning.
ReplyDeleteGood to know, thank you.
DeleteGood Morning, Bunny, It was so good to read you this morning. Pulling threads in the top is a unique thought…love it! And, wouldn’t it be fun to have matching hats for out tops? As I get older, my scraggly hair has more hat days than not!🥹. Enjoy the day, and, let us have more of you.
ReplyDeleteSo nice to have you back. I always enjoy your sewing tips and tricks.
ReplyDeleteGorgeous linen top, Bunny! And the hat is great too. As for tunics, I learned lesson so many years ago when pregnant with twins from a maternity-store saleswoman who told me to avoid long tunic tops that ended below the belly. She had me wear styles that stopped just above my my belly button. The proportion was so much better, I wasn't cut in half. I adopted that proportion for loose tops ever since.
ReplyDeleteShe, and you, are so right. They literally cut me in half but I caved to the nostalgia. I am really loving the current cropped top length as it is a great proportion on me. Thanks for you comments, Duchesse.
DeleteI'm so glad you're back! I've been making lots of bucket hats too, especially for the grands!
ReplyDeleteThank heavens Bunny's blog is back!
ReplyDeleteI am always so excited to see your name in my in box---you make my sewing mojo come back to life.
Have you ever shown us how you get such a lovely flat binding on the neck edge of your Eureka top? I use a bias strip with a 1/4" seam but still have a bit of "ruffling" on my inner edge.
Thank you for your generous heart!
Lisa, San Francisco Bay Area
Well, I don't follow the directions in the pattern. I found them a bit confusing, at least verbally, in the directions, and I found myself futzing a lot with my first version. The next versions I did my own thing. I will say, the strip given for the pattern piece fits perfectly in the woven neckline but I did mine differently. As often is the case, a bit hard to describe here but I think on my next Eureka, and more are coming, I will do a blog post on how I do mine. Thanks for asking.
DeleteTo work as a nurse in Australia from India, several requirements must be fulfilled to ensure a smooth transition and eligibility for practice. Firstly, applicants must hold a valid nursing degree from a recognized institution and be registered with the Indian Nursing Council. Proficiency in English is a crucial requirement, typically evidenced by an IELTS score ranging from 7.0 to 7.5. Additionally, candidates need to register with the Australian Health Practitioner Regulation Agency (AHPRA), meeting their stringent assessment standards for qualifications and work experience. Securing a work-permitting visa, such as a Skilled Migration Visa, is essential. Furthermore, applicants must undergo mandatory health checks and provide proof of good character, often through police clearances. Ongoing registration necessitates continuous professional development and adherence to Australian nursing standards. By meeting these criteria, Indian nurses can explore rewarding career opportunities within Australia's healthcare system.
ReplyDeletehttps://dynamichealthstaff.com/nursing-jobs-in-australia-for-indian-nurses
Dr. Deepak Jha is a leading expert in breast cancer care, known for his profound knowledge and empathetic patient approach. With a career marked by numerous successful treatments, he is adept in both traditional and innovative medical practices. Dr. Jha specializes in early detection methods, which significantly enhance patient outcomes, and employs the latest therapeutic techniques. His research contributions have advanced the field of oncology, providing new insights and treatment options. Patients admire his compassionate care and clear communication, which foster trust and comfort during difficult times. Additionally, Dr. Jha’s work with interdisciplinary teams exemplifies his holistic care philosophy. Through his unwavering dedication, Dr. Jha remains a beacon of hope and healing in breast cancer treatment.
ReplyDeletehttps://www.breastoncosurgery.com/know-the-doctor/profile
Neuroendocrine cancer treatment in Ahmedabad is spearheaded by a team of highly skilled specialists dedicated to providing comprehensive care. The treatment approach integrates advanced diagnostic methods, including PET scans and biopsy procedures, to accurately identify neuroendocrine tumors. Patients benefit from cutting-edge therapeutic strategies such as targeted therapy, peptide receptor radionuclide therapy (PRRT), and minimally invasive surgical techniques. The oncology experts in Ahmedabad are committed to developing personalized treatment plans that address the unique medical and emotional needs of each patient. State-of-the-art facilities ensure that patients receive the highest standard of care. Continuous research and participation in clinical trials contribute to evolving and improving treatment protocols. The focus on patient education and support throughout the treatment journey emphasizes a holistic approach to care.
ReplyDeletehttps://drvirajlavingia.com/services/neuroendocrine-cancer-specialist-in-ahmedabad
Dr. Anjali Nair is a distinguished breast cancer specialist in Mumbai, recognized for her outstanding proficiency and innovative treatment methodologies. With extensive experience in managing complex breast cancer cases, Dr. Nair formulates individualized treatment plans tailored to each patient's unique needs. She utilizes cutting-edge technology and minimally invasive techniques to maximize treatment efficacy and precision. Actively involved in clinical research, Dr. Nair contributes to the latest advancements in breast cancer therapies. Her compassionate and clear communication instills confidence and support in her patients throughout their treatment journey. Dr. Nair's unwavering dedication to superior patient care establishes her as a leading figure in breast cancer treatment in Mumbai.
ReplyDeletehttps://drnitanair.com/contact/contact-dr-nita-nair-mumbai
Dr. Shona Nag is a distinguished breast cancer surgeon based in Pune, India, with over 20 years of dedicated experience. She is lauded for her patient-centric approach that emphasizes early detection and personalized treatment plans tailored to individual needs. Dr. Nag integrates advanced technologies and innovative therapies to ensure optimal outcomes for her patients. Apart from her clinical prowess, she significantly contributes to breast cancer research and education. Her expertise is frequently sought after at national and international medical conferences. Dr. Nag's holistic and compassionate care has earned her deep respect from peers and patients alike. Her unwavering commitment to advancing breast cancer treatment makes her a trusted name in the field.
ReplyDeletehttps://www.drshonanagbreastcancer.in/understanding-cancer/what-is-cancer-can-cancer-be-cured
Low cost website design in Delhi enables businesses to gain an edge in the digital marketplace without straining their financial resources. Agencies in the region provide affordable yet high-quality services, focusing on creating visually appealing and functional websites that cater to diverse industries. With expertise in responsive design, these agencies ensure optimal website performance across all devices. Additionally, essential features such as search engine optimization and e-commerce capabilities are often included, making the offers comprehensive. By leveraging local market insights, designers can craft tailored solutions that resonate with the target audience. Flexible pricing models allow startups and small businesses to select packages that suit their budgets. Overall, Delhi's low-cost website design solutions empower companies to build a strong online presence and foster significant customer engagement in a competitive landscape. This approach not only aids in brand visibility but also contributes to long-term business growth.
ReplyDeletehttps://olycoder.com/low-cost-website-design
Minoxidil is a well-regarded topical treatment for male pattern baldness commonly used in Australia. Available in both 5% and 2% formulations, it works by improving blood flow to the scalp and activating shrunken hair follicles. Regular application twice a day is essential to achieving best results, typically becoming noticeable after several months. A key advantage is its availability over-the-counter, offering men an accessible and non-surgical option for managing hair loss. It's generally well-tolerated, though some users might experience slight scalp irritation. Consulting with a healthcare professional can help optimize the treatment plan. As a practical first step in hair restoration, Minoxidil offers an effective approach for regaining confidence and combating hair thinning.
ReplyDeletehttps://generichealth.com.au/minoxidil-hair-loss/
Advocate Rajkumar Solanki is acclaimed as the best divorce lawyer in Delhi, celebrated for his expert handling of complex family law cases. With a client-centered approach, he provides customized legal solutions tailored to individual needs and circumstances. His exceptional negotiation skills are dedicated to achieving amicable resolutions, ensuring conflict is minimized. Equally adept in court, Advocate Solanki fiercely represents his clients when settlements are unattainable. Transparent communication defines his practice, keeping clients informed every step of the way. His empathetic support aids clients in navigating the emotional intricacies of divorce. Committed to safeguarding clients' rights, he aims for favorable outcomes that contribute to new beginnings. His professionalism and unwavering dedication solidify his esteemed reputation in the legal field.
ReplyDeletehttps://bestdivorcelawyerindelhi.com/