
Meet my new scarf. It is a summer scarf and is an upcycle project as well as a fabric painting adventure. When I have a garment in my closet that no longer works for me but the fabric is gorgeous and I really think I could re-use it one day I do not donate it. I donate a lot but occasionally keep the fabric treasures. I am saving myself from rebuying the same type of fabric and garment in the future and all of the ecological ramifications that entails. Besides, I loved the fabric and had a good amount worth keeping. In this case it was a blouse I made maybe 15 years or so ago out of the most lovely white, delicate handkerchief linen. I did a few heirloom stitches on it, wore it a fair amount and then it just, by design, look too out of style to work any more. Sleeves were too narrow, collar too pointy, justs lots of details whose time came and went. I put so much work into and just kept it in the closet for a long time. Then I started a process that I keep up to this day with such treasures. When I decide they can no longer serve me but I can't give up the glorious fabric, I carefully take the garment apart, remove all the details. iron all the sections flat and keep them folded together. They will then go on the shelf with like minded fabric types to be pulled out for some upcycling. I do use these treasures and fairly often. I don't wait for the magic garment, instead if a small piece for perhaps a yoke is what I need, I grab it and cut away. No saving for garment greatness here as these treasures have seen their glory already.

The other day while look in my tote of white "play" scraps I came upon a group of pieces from the former hanky linen blouse, gorgeous fabric. What on earth could I do with it? How much was actually there? Well I had two big bodices, sleeves and other smaller pieces. I could do something. I have been wanting to do some fabric painting related to inspiration from my trip in the Azores. I was and still am so inspired by the colors and the landscape there and this fine linen would be perfect to play with. I decided I would piece it together into a long scarf and paint it. I would love to use the periwinkles, white, lavenders and even deep plums and blues of their amazing hydrangeas as they have been inspiring me ever since I laid eyes on their countless numbers.

Above is some of my play. You are looking at heavier pant weight linen on the left and some vintage cotton laces on the right. I used a simple technique where the textiles were wet, wrung out and placed in a ziploc bag. Acrylic ink was drizzled haphazardly into the bag, shut tight, and then mushed together for a minute or two. I then just left the bag out in the sun while I played with other paint biz. After about an hour I hung it out to dry in the sun. Yes, they are mottled and what I wanted.
Let's go back and look at the scarf, same technique. The products used were acrlic inks and something called Dyna Flow which is basically the same, I think. They are both the consistency of water. They are EXTREMELY saturated color so the pigments must be shaken as using. I love this product as it is so versatile. It can perform as a dye beautifully but also as a watercolor effect, fabric paint with all sorts of techniques. Really fun stuff, lots on you tube, Dick Blick and Dharma Trading for lessons. The hanky linen, white, was still in pieces and was wet, wrung out to near dry, and in a double plastic grocery bag. It was spread out to about 9 inches but basically all scrunched up. I literally poured the Periwinkle and some of the Prussian Blue directly on to the mound of wet linen. I left about half still white. Then I took a jar of orange DynaFlow and poured bits of that on, not much, but enough to give things a kick. Orange and blue are complimentary so it should have worked and I think it did. I tied up the bag and then mushed it all up. Then I left the bag in the sun for about half an hour. After that I rinsed it out and was amazed at how the color stuck, very pleased. I then hung it out to dry i the sun. Once all was dry the pieces were heat set with an iron. The next day I washed them on delicate in a lingerie bag and there was no dye loss whatsoever. Did the happy dance and got ready to put it all together.
Let's go back and look at the scarf, same technique. The products used were acrlic inks and something called Dyna Flow which is basically the same, I think. They are both the consistency of water. They are EXTREMELY saturated color so the pigments must be shaken as using. I love this product as it is so versatile. It can perform as a dye beautifully but also as a watercolor effect, fabric paint with all sorts of techniques. Really fun stuff, lots on you tube, Dick Blick and Dharma Trading for lessons. The hanky linen, white, was still in pieces and was wet, wrung out to near dry, and in a double plastic grocery bag. It was spread out to about 9 inches but basically all scrunched up. I literally poured the Periwinkle and some of the Prussian Blue directly on to the mound of wet linen. I left about half still white. Then I took a jar of orange DynaFlow and poured bits of that on, not much, but enough to give things a kick. Orange and blue are complimentary so it should have worked and I think it did. I tied up the bag and then mushed it all up. Then I left the bag in the sun for about half an hour. After that I rinsed it out and was amazed at how the color stuck, very pleased. I then hung it out to dry i the sun. Once all was dry the pieces were heat set with an iron. The next day I washed them on delicate in a lingerie bag and there was no dye loss whatsoever. Did the happy dance and got ready to put it all together.

If you are wondering how I went with the seaming, well, I just went with it. I tried a few options like french seams, etc, but decide on a simple double stitch and pinked edge for the underneath. I was hoping to wash it and that would fluff the edges which it did and it looks fine to me as they are very narrow. There are few seams. This pic below gives you a good idea of the complimentary orange color with that sky blue. So glad I did that.

The scarf is 15 x 70 inches long, my favorite size. For the outside edges I did the Kenneth King hem on the long sides but didn't like the plain-ness of it all . I decided to zigzag on top of that and I liked that much better. Above is the only busy intersection of seams on the scarf. For thread there was no winner, just too many colors to pick from. The dark actually looked best. Fringing took me 20 minutes TV time to fringe a half inch on each side.

All in all, this was a great project. I got to work with some beautiful fabric. I got to fabric paint, which is so much fun. You never know what you will get and I got to do some recycling as well. Great project all around. I am going to a concert in Maine this weekend and hope to wear this with my periwinkle linen cocoon dress.
I've started another vacation inspiration. I have to get these in before summer leaves along with my summery ideas. I am now painting birch trees on another Eureka top. It's been fun but I have to figure out a way to do it sitting down. I have lot more trees to do!....Bunny
ETA: Sewing is an ongoing education and in my continuing search for sewing information I found, of course after I made my scarf, that there is a specific art form, indigenous to Korea, and quite beautiful, for making wall hangings, scarves, curtains, etc that have the look of my scarve. A special hand technique called Jogakbo is used and quite lovely. If you do a search on youtube you can see a lot. Next time-I will try Jogakbo and look forward to it. Here is a link and photo to a basic lesson in how to do Jogakbo. I love this sewing journey we are all on. I believe those who love to sew are always learning and open to new methods. There are no right or wrongs, just moving along in our journey....Bunny
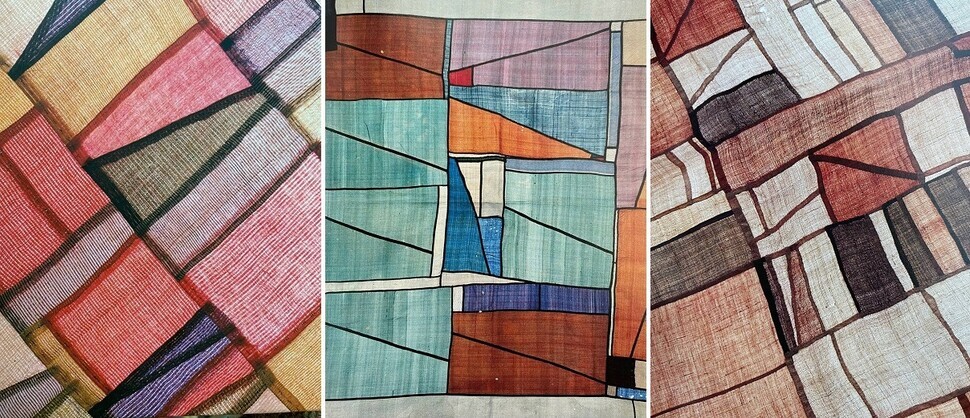
courtesy book, "Such a Beautiful Color" by Heo Dong-Hwa , founder of the Museum of Korean Embroidery.


No comments:
Post a Comment
Engaging commentary: