Sewing Vloggers

Showing posts with label Sewing Workshop. Show all posts

Thursday, July 21, 2022

Two tops and a hat!!

 Sounds like a title from Dr. Suess! Alas, it is just what I did during my blogging hiatus.  Sewing continued in that time and as it always has been, proved to be a great solace. Here is what you missed. There are two repeats and one new design so I won't get too deep into the weeds. 
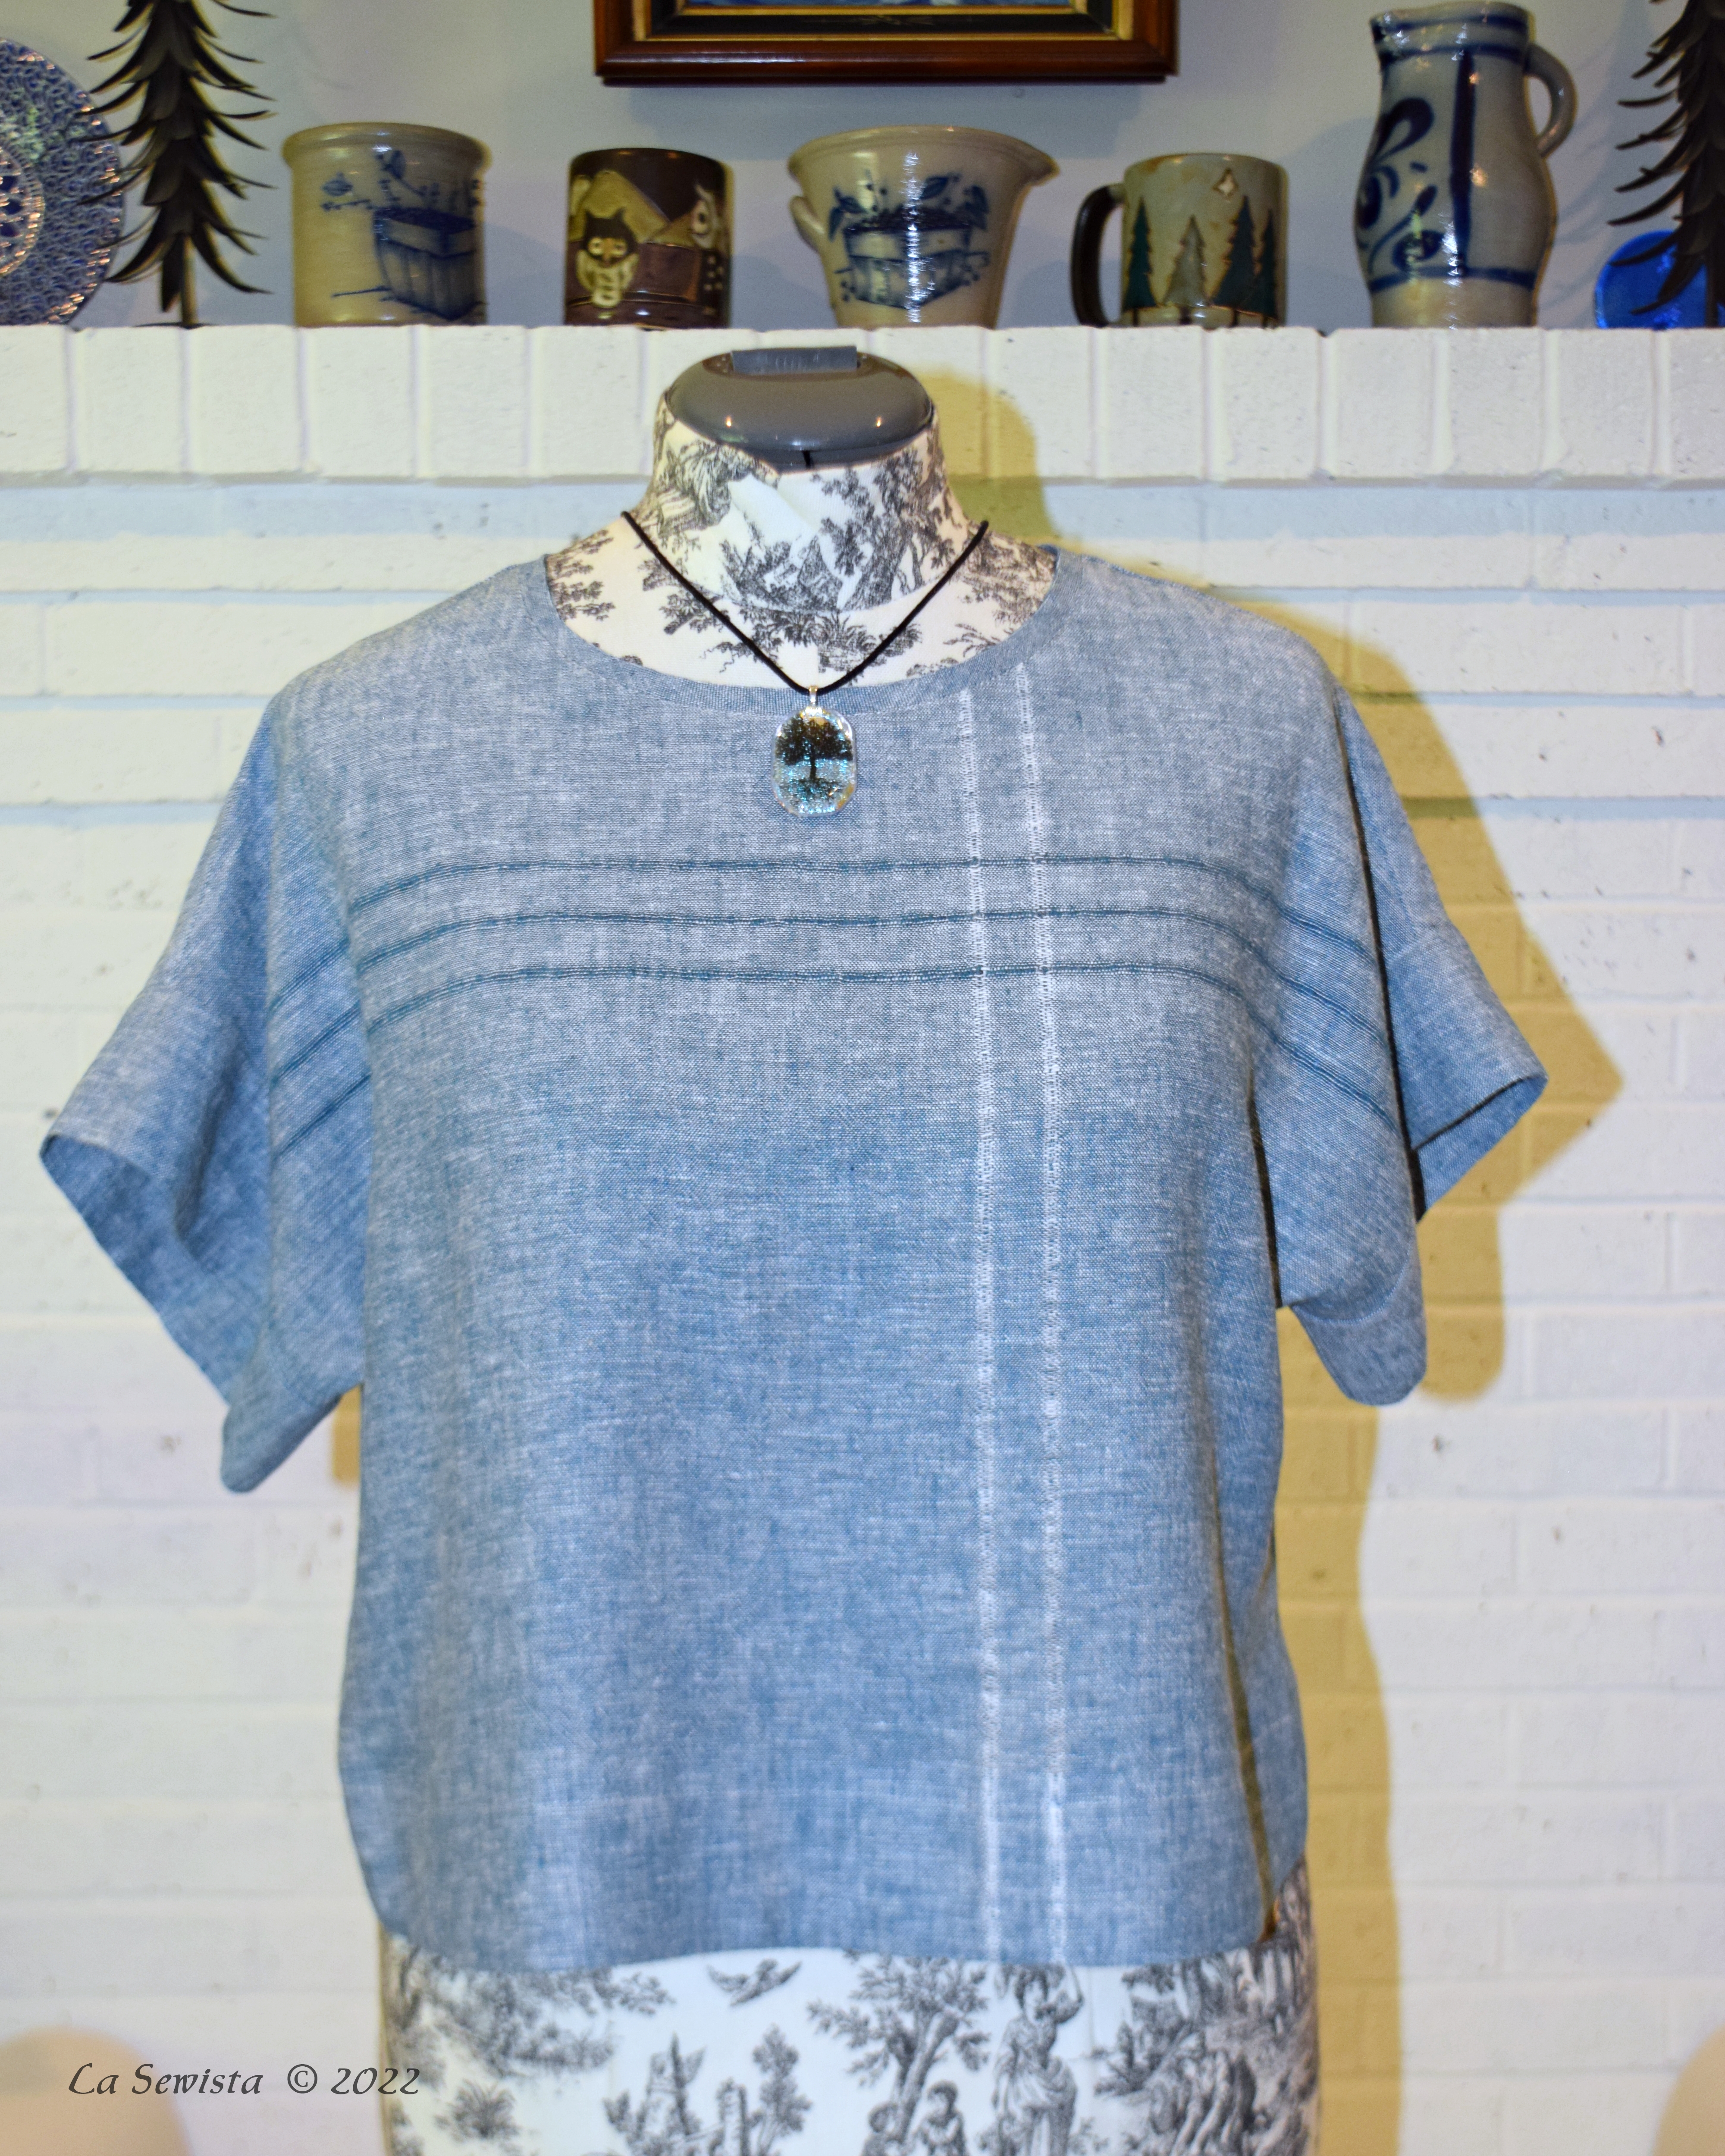

 Here we go with another Eureka Tee from the Sewing Workshop. This one is made from yarn dyed Brussels Washer linen by Kaufman in the smallest size. It is, I believe, my fourth iteration. As far as fit, my sis says I need to make it narrower. I'm OK with the wider style of it all but will try a narrower fit next time around just to see what happens. I have a muslin and may just baste out some width.  What you see above has been worn and washed a couple of time as I am finding it a great summer top. 


 I decided to embellish this simple top by pulling the threads. I knew that the warp and weft were different colors and this could be interesting. The thread pulling was easy and I pulled five threads to get the effect of one row as you see directly above. If you look at the rows in the pic above this one, the smaller pic, you will see the thread pulling looks quite different. The washing had an effect on the look of the pulled threads and actually all the fabric. It didn't appear to shrink but it got "crepe-y". I'm ok with it but just be aware that if you want to keep the crisp look of the pulled threads you can either further hem stitch them  or hand wash this fabric.  Either way, I think it is a nice feature on a simple top that begs for detail. 


Construction on this was as suggested in the pattern: machine stitched, pressed to the side and serged for a finish.  Further details on my original Eureka tee can found here: The Eureka Top

*****************


Next is my attempt to jump on the ditsy print bandwagon with second make of a sixties sort of tunic. This busy print makes it very difficult to see the details of the design. This is Butterick 5861, OOP, a classic tunic.  The fabric is 100% rayon in a crepe type finish, what was called "crepon" back in the day. It is well starched  in these pictures as it was extremely slippery to work with and I had to give it a couple of coats to make it a pleasant sewing experience. It has not been washed out yet so it all looks a bit "puffy."


You can see there is detail on the shoulder yokes and on the bib type inset at center front. I decided to do my own thing there which in hindsight was great looking but a total waste of time. You just can't see it among the tiny, busy print. It was fun and challenging getting it done, however. 
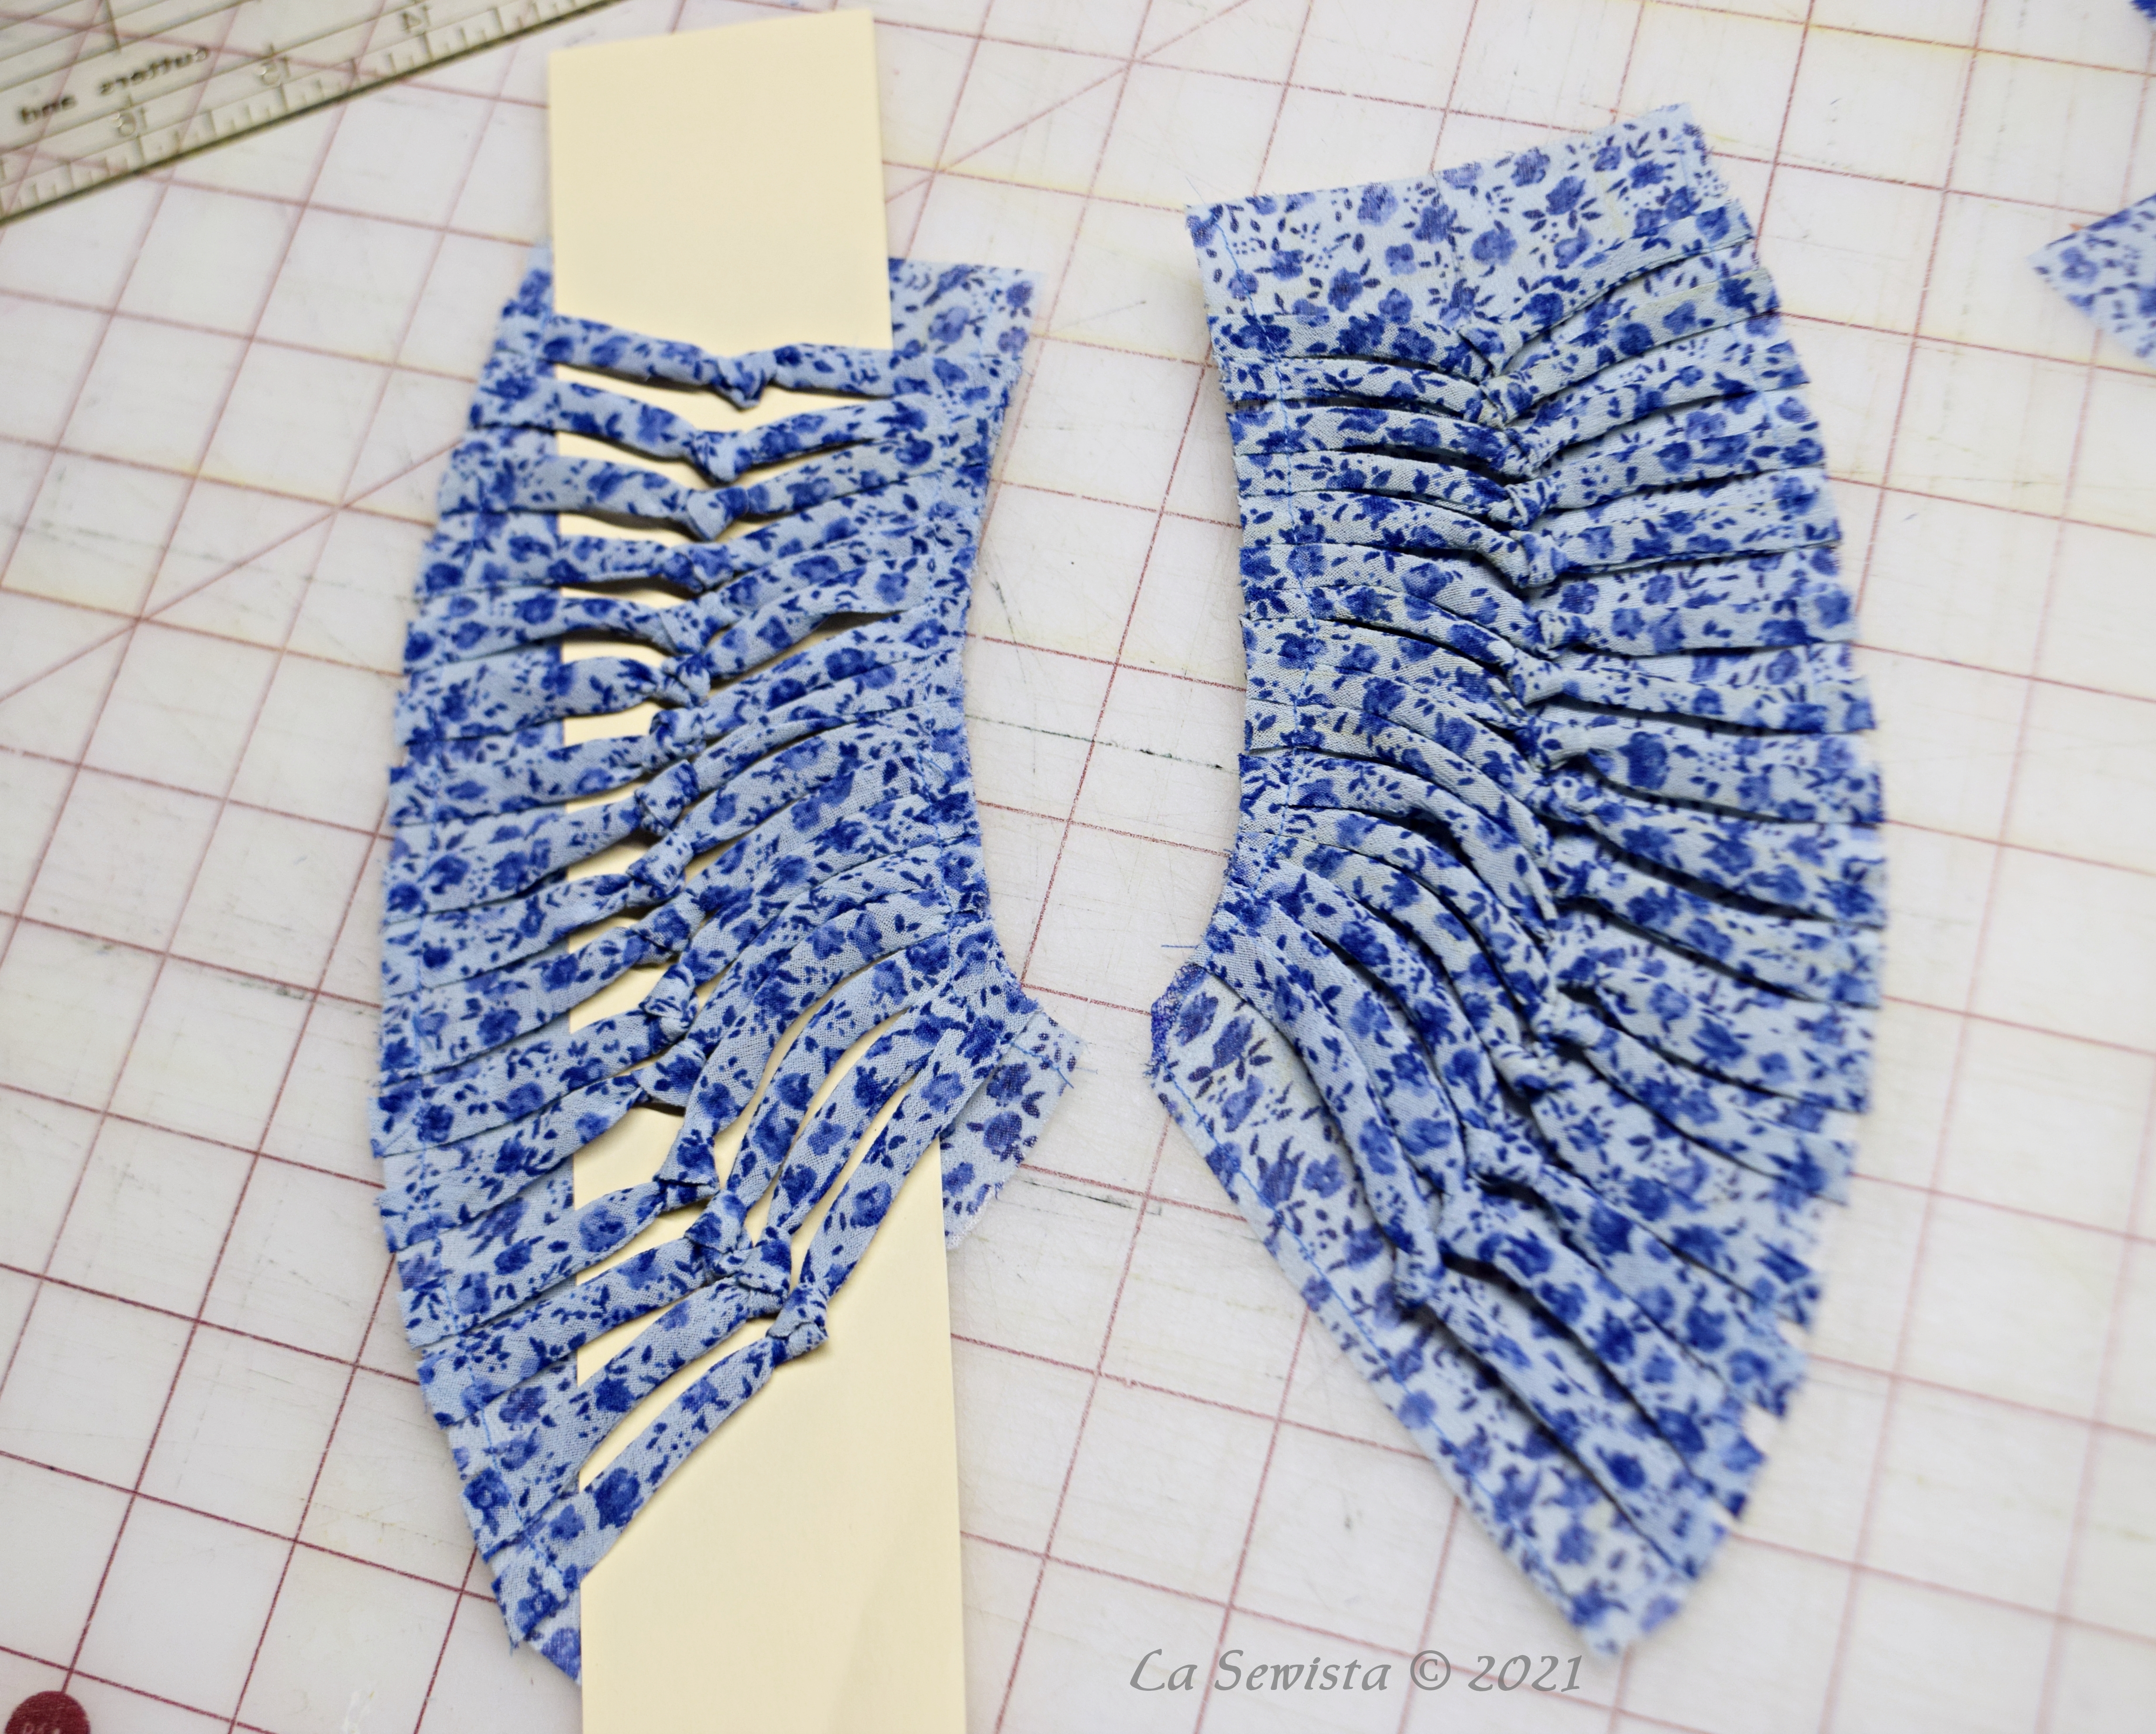
 

 Instead of plain bias strips the pattern recommended, I chose to make little knots in the center of each strip. I made bias tubes, knotted them, and cut so the centers matched up when places on the garment section, which here are the shoulder yokes.  Here is the bib inset:
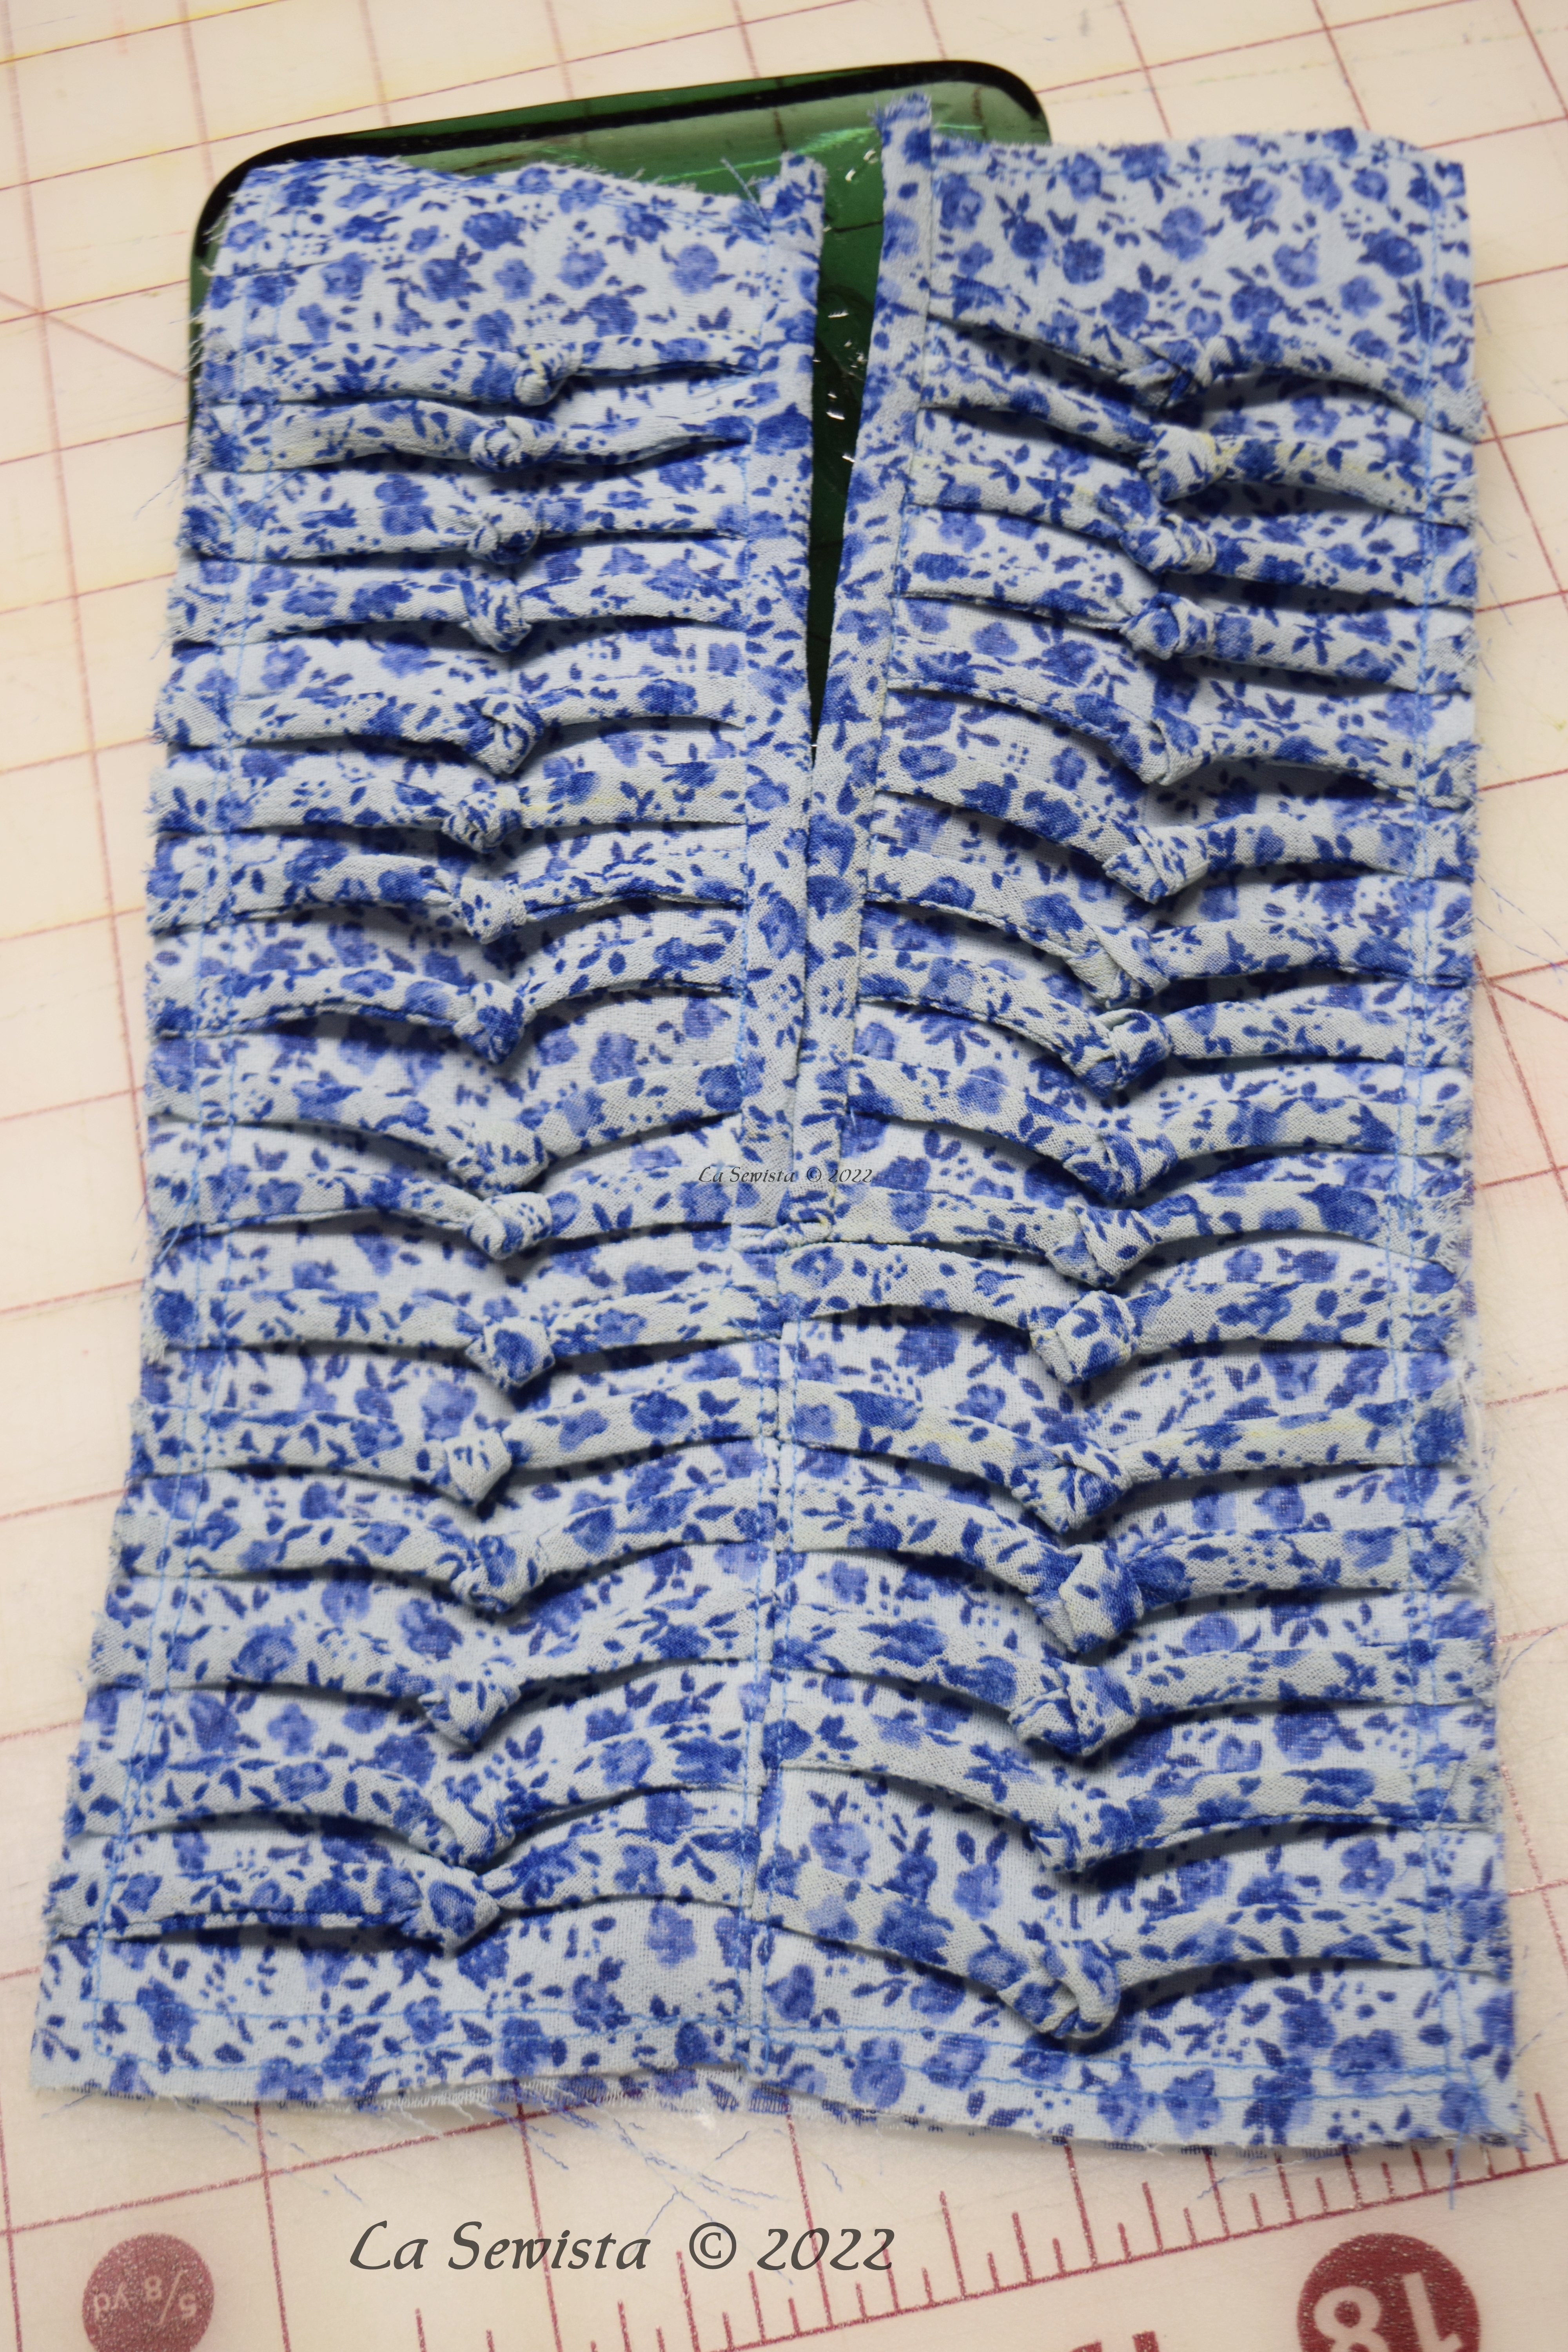

It was very tricky binding the opening of this. I veered off the reservation to figure it out but it came out ok. 


Tunics cut me in half but if I wear a sash or belt they can work and bring the eye to my waist. I made a small wrap type sash for this top. 


It is bias cut, wraps around obi style and has a couple beads on the end to weight it down. 


The cuffs easily fit over my hands but don't look big so I did not elasticate them. 

To see my original effort on this tunic click here. It is quite different. I feel on this one I put too much work into to it for the fabric that it is. It will look ok with some jeans. In the end, I did enjoy the study in embellishment. 

************************


Last but not least, the one item made specifically for our vacation. In its short life it has already flown the friendly skies, covered my head as I avoided poisonous jelly fish in the North Atlantic, been mushed into a crowded knapsack and  protected the once cancerous skin on my skull. It has been a real work horse once home as well and I am wearing it everywhere.  I LOVE my bucket hat. 


No pattern here! Everything I looked at just wasn't quite right, whether a pattern or retail. Brim too wide, too narrow, etc etc etc.  Just when I gave up, a few days before leaving on vakay, I was in a local retailer and I saw this gaudy little number above. It has the shape I was looking for, one that fit my petite head. I tried it on, score! I bought. It might look cute with my periwinkle linen dress and I could use it to make my own bucket as well. 


I proceeded with a stash of oaktag, my padded smocking board and some heavy yelllow headed pins to copy each section of the hat. Pattern ready !


I inspected the guts of the original hat and after interfacing my khaki twill, tried to proceed in a logical order to duplicate its construction.  I self lined the hat with more twill. The original used a cotton lining. 


Row upon row of topstitching on the brim!


In the end, I think I got it. I plan to make more for winter, warmer fabrics instead, maybe with ear flaps! I will make a hat with a wider brim as well. 

This has been a long post. Thanks, if you have managed to work thru to the end. It is what I worked on while not blogging. I thought of you all during that time and knew I would eventually get back to you all and let you know what I was up to. I have lots of plans for future projects and the queue is long. More to come!


Saturday, March 12, 2022

A Tale of Three Tops


In the week and a half that followed the making of the batik Eureka top I made two more, each quite different from the first and each with it's own story. Bear with me as I go thru their individual dramas here. I won't be focusing too much on construction as you got that on the first batik version and can read all about that here.  Instead, I will tell their stories. 

Far right:

This is a knit version of the Eureka top. 


 First, pardon the horrific lighting on this photo. Now, more importantly, pardon the fact that I even made this top. Here is my story. I was in Joanns walking the aisles hot with triumph on the little Eureka top and itching to make another. I thought I'd try a knit as that is what the top was originally designed for. The knits all looked rather blah.  As they hung together, draped on their boards, this one, with its gray background and blobs of color called out to me more than the others. This was the one.  Those blobs were interesting, colorful, and the gray background would go perfectly with fabric I had at home for some matching cargo pants. Let's go to the cutting table. Done, on to home. 


I washed the fabric and set it aside for the moment and dealt with other distractions.  Was the fiber poly or rayon or a blend? It was a very thin knit and very very drapey. The knit section is all mixed up so it could be anything and I forgot what the bolt said. I got my receipt and looked up the sku on their website and was mortified. It was part of a whole collection of prints called various names but all together as "African Print Fabric." They were called Kente fabric, Ethnic fabric  and Global fabric.  Seems my sideways blobs were the continent of Africa. I never felt so stupid in my life but more importantly I had this awful gut feeling that this fabric was not mine to sew.  Hubs walked by it later and I asked him what it looked like and he said " a continent", which one,  " Africa".  OK.  So I thought and thought. I know I did not want to appropriate that fabric for myself and apologize for my ignorance to all my sewing sisters. They did have similar fabrics in the store, which I found on a later visit, but this bolt was in a totally different area with the knits. Here's what I decided. I am going to make this and figure it out as I do.  I'll comment a bit on the making and wearing first. 

Above you can see I used the selvedge to make the collar binding which is a french fold binding to the front of the garment. It took a bit of fuss to  get things to lay just right but not too hard. 


I also utilized the selvedge to add a small pocket on one side. You can also see here the sleeve cuffs.  I ditch stitched them at the top and bottom as I did on the batik but they insisted on drooping open and looked awful. I tamed them into submission with a bit of  Steam A Seam Lite mid cuff and it hangs nicely now.  As I am making this my mind is coming up with various ideas of the best and final use of this garment. 


The hem was stitched on the edge as well as in inch further up.  I gave this garment my best efforts. 

Not far from my home is an organization that specifically helps women in need for various reasons. One of the groups they help are new refugees. They take donations of clothing and I have often donated there as opposed to Good Will and SA as I see it go directly to these women in need. I know for a fact that they are helping out a large group of Somalian women and their children, refugees. I will donate my top there, along with some other summer clothing. It makes me feel good to see it go to one of them. When I did hiring at the axle factory years ago, I dealt with Lutheran services and many "Lost Boys" and other refugees from war ravaged areas of Africa.  The women would come for interviews in their beautiful ethnic garb and wore the most magnificent large smiles. I always remember their smiles. How they could muster them after what they had been thru......any way, I will donate this shirt and a bit more to the organization that helps this community and I feel good about that. 

************************


My third Eureka based top, but this one is quite different.  I have been ooo-ing and ah-ing over the Sewing Workshop Gardenia Dress for some time.  I went on a great fabric buying trip last week and wanted to check yardage and details on that pattern in case I actually did get to make it. The more I looked at the pattern the more the Gardenia dress looked like the Eureka top with a few changes. Could I knock it off? Do I dare try? WTHeck and get out of the way!  I studied the details and measurements. I definitely didn't get it exactly but close enough to have a cute top called whatever. When I was all done I compared and I did get a few things wrong but dang, I think I got a pretty cute top out of the attempt. 


First I lowered the neckline by about a half inch in the front to the shoulder seam. I then redrew the pattern front and then divided it into two pieces with that division being about 2 inches to the right of center front. Each piece  had 2 1/4 inches of fabric added to it. This became seamed together and made into a big tuck. I stitched my tuck down like a zipper fly which you can see if you look closely. It is included in the neckline binding. The Gardenia does not have big binding like this and it is not secured down.  This gives it a lighter look than my top. 


On one side of the garment, my left, there are  four tiny tucks between that large tuck and the side seam. Inserted into the big tuck and the side seam is a bias tube that pulls and gathers the excess fabric. I had to open this side of the top with wedges to extend it out about 3 more inches. At the hip, the Gardenia is 8 inches bigger than the Eureka.  I made those tucks and wedges from about an inch below the apex down to the hem. . The tucks are a fat 1/8th inch and about 4 1/2 inches long. You can barely see them in the pic. There is a lot of comfortable volume here but controlled by this tie.  I LOVE this top. I am going to redraw the tissue neatly today and plan on making more. It is not quite the Gardenia, but it is a nice top and could be a dress if need be. Most of all, I had a blast making this pattern work. It was a really enjoyable after noon of brain work, looking at the pic and transferring it from my brain to a new tissue. 

ETA: The fabric is Brussels Washer Linen from Kaufman. It is 55% linen, 45% rayon, easy to sew, easy to wash and maintain. 


I can't thank you enough if you have made it to the end of this blogpost. Like I said, lots of story here. I am now moving on to a batch of undies for myself and than I am going to start on some summer pants. I have lots of fabric to play with and McCalls 8099 which looks great on those I have seen it on. Fingers crossed!.

Tuesday, January 18, 2022

The Memphis Muslin


It's muslin time around here. That means no hair, just a little lipstick and my wooly warm  socks. I am focused on getting the muslin of the Sewing Workshop Memphis Dress completed and above you have a front view. This has really been a lot of fun.  

First of all, this pattern is just a delight. it is so clearly written and illustrated and every dot and notch matches up perfectly and is right where it is supposed to be. No mysteries anywhere.   

I made the decision to sew up this dress EXACTLY as it came from the envelope in a size XS. For my muslin I used a 30 year old 100% cotton percale sheet that I just was tired of and threw in the muslin bin, my excuse to buy new sheets. It is a very high thread count which meant it would not ease well at all but was very similar in weight to the fabric I will be using for the final garment. 


That will be the above, two vintage linen plaids and one contemporary linen/cotton blend that matches the texture and weight of the plaids perfectly.  They are soft and pretty light weight, perfect for my purpose.  All three will be in the Memphis dress. 

My purpose? This will be the third summer we attempt to go on our celebration vacation of our 50th wedding anniversary. This trip is a gift from our children and the trip will include our children, sons in law, and all grand children as well. We will be splitting our time in half at two different islands in the Azores, a place I've always wanted to visit and I got to pick the destination as we are also celebrating my milestone birthday. We are all excited and hopefully some variant will not arrive on the scene and put a stop to things as it has already done before. I really think my Memphis dress will be light, breezy and perfect for some island relaxation. The fabric is so aged and washed  that it has that wonderful soft patina of vintage linen that requires no fuss. It will be light enough to be delightful in the  island breezes. 

I was slumping through my sewing activity a couple of weeks ago in no mood to keep pushing out winter clothing to wear to no destinations as I already had tons in the closet and  it dawned on me I had better start sewing for our vacation. It got me all energized again and this is the start of my wardrobe. Armed with patterns and a lot of Essex linen  I am raring to go. Slump removed!!!


I spent yesterday cutting out and sewing the dress, all pretty easy peasy. It is a flat layout with each piece, other than the sleeves, being cut singly. Once I started sewing and fitting, you can see I made notes on my instructions for the real thing and muslin corrections.  It looks like a bit of origami but all fell into place so easily that it is nothing to fear. This is not a case of "I don't need to read the directions" so don't go there. You HAVE to read and follow these directions but they are easy and perfect. 


Since I wasn't really sure how this would fit me at all I did a tissue tracing of the pattern leaving it in tact for other sizes. I traced the XS. If you look closely at the at the first photo you will see there is enough room for my bust, the shoulders are too wide and the neckline gapes with largesse. I believe I may have to adjust the ease on the sleeve cap as well. I will see how the narrowing of the shoulders affects things first. This is the issue with every pattern I make but this is the smallest size.  When I go to cut the real deal I will slide the shoulders in and pivot out so I don't change the shape of the armscye. 

I have already cut the front neckline larger.  I can now get my head through! It slid on easily.  I have found the armscye a bit tight but it is also quite high. I know lifting the armscye allows for more movement so I am not sure what to do here. I will play with the muslin.  Since the pattern basically falls from the bust, that is it on fitting. Get a good bust and upper chest fit on this and you are done. 


Plain side.


Side with drape. 


Back view. 

This garment can have the drape just fall flat in a triangle sort of look like above or if made in a knit with some weight, it can drape with lovely curves on the side which I tried to emulate here. 


If you look at this pic, you will see a blue strip of fabric pinned to the armhole. All I did was take a strip of selvedge and pin it to the inside of the drape and bring it up to the armscye and pin it there. It made the curves! I may do this to the final version. We will see how my vintage linen reacts to this idea. 


Thanks for bearing with my self judgement and any of your thoughts will be appreciated.  I will be shortening the hem band, It is drowning me as you can tell. It will probably be half that width. I will play with my shoulders and sleeve caps before I cut any thing out. That is not a perspiration stain on the dress above. Cameras sometimes pickup th weirdest shadows. 

The next biggest challenge, which I have mulled over and over,  is how to divide up the fabrics in the various spaces on the dress. Just not sure yet.  Hope you have something you are enjoying and pulling you out of these awful winter doldrums. Think summer!!! It helps.............Bunny


The Ray Pinafore, 2025's Epic Fail

  Happy New Year and welcome to my epic fail of 2026. I guess you have to have one, right? This is the Ray Pinafore from Paper Theory Patter...