Sewing Vloggers

Showing posts with label fitting. Show all posts

Tuesday, January 18, 2022

The Memphis Muslin


It's muslin time around here. That means no hair, just a little lipstick and my wooly warm  socks. I am focused on getting the muslin of the Sewing Workshop Memphis Dress completed and above you have a front view. This has really been a lot of fun.  

First of all, this pattern is just a delight. it is so clearly written and illustrated and every dot and notch matches up perfectly and is right where it is supposed to be. No mysteries anywhere.   

I made the decision to sew up this dress EXACTLY as it came from the envelope in a size XS. For my muslin I used a 30 year old 100% cotton percale sheet that I just was tired of and threw in the muslin bin, my excuse to buy new sheets. It is a very high thread count which meant it would not ease well at all but was very similar in weight to the fabric I will be using for the final garment. 


That will be the above, two vintage linen plaids and one contemporary linen/cotton blend that matches the texture and weight of the plaids perfectly.  They are soft and pretty light weight, perfect for my purpose.  All three will be in the Memphis dress. 

My purpose? This will be the third summer we attempt to go on our celebration vacation of our 50th wedding anniversary. This trip is a gift from our children and the trip will include our children, sons in law, and all grand children as well. We will be splitting our time in half at two different islands in the Azores, a place I've always wanted to visit and I got to pick the destination as we are also celebrating my milestone birthday. We are all excited and hopefully some variant will not arrive on the scene and put a stop to things as it has already done before. I really think my Memphis dress will be light, breezy and perfect for some island relaxation. The fabric is so aged and washed  that it has that wonderful soft patina of vintage linen that requires no fuss. It will be light enough to be delightful in the  island breezes. 

I was slumping through my sewing activity a couple of weeks ago in no mood to keep pushing out winter clothing to wear to no destinations as I already had tons in the closet and  it dawned on me I had better start sewing for our vacation. It got me all energized again and this is the start of my wardrobe. Armed with patterns and a lot of Essex linen  I am raring to go. Slump removed!!!


I spent yesterday cutting out and sewing the dress, all pretty easy peasy. It is a flat layout with each piece, other than the sleeves, being cut singly. Once I started sewing and fitting, you can see I made notes on my instructions for the real thing and muslin corrections.  It looks like a bit of origami but all fell into place so easily that it is nothing to fear. This is not a case of "I don't need to read the directions" so don't go there. You HAVE to read and follow these directions but they are easy and perfect. 


Since I wasn't really sure how this would fit me at all I did a tissue tracing of the pattern leaving it in tact for other sizes. I traced the XS. If you look closely at the at the first photo you will see there is enough room for my bust, the shoulders are too wide and the neckline gapes with largesse. I believe I may have to adjust the ease on the sleeve cap as well. I will see how the narrowing of the shoulders affects things first. This is the issue with every pattern I make but this is the smallest size.  When I go to cut the real deal I will slide the shoulders in and pivot out so I don't change the shape of the armscye. 

I have already cut the front neckline larger.  I can now get my head through! It slid on easily.  I have found the armscye a bit tight but it is also quite high. I know lifting the armscye allows for more movement so I am not sure what to do here. I will play with the muslin.  Since the pattern basically falls from the bust, that is it on fitting. Get a good bust and upper chest fit on this and you are done. 


Plain side.


Side with drape. 


Back view. 

This garment can have the drape just fall flat in a triangle sort of look like above or if made in a knit with some weight, it can drape with lovely curves on the side which I tried to emulate here. 


If you look at this pic, you will see a blue strip of fabric pinned to the armhole. All I did was take a strip of selvedge and pin it to the inside of the drape and bring it up to the armscye and pin it there. It made the curves! I may do this to the final version. We will see how my vintage linen reacts to this idea. 


Thanks for bearing with my self judgement and any of your thoughts will be appreciated.  I will be shortening the hem band, It is drowning me as you can tell. It will probably be half that width. I will play with my shoulders and sleeve caps before I cut any thing out. That is not a perspiration stain on the dress above. Cameras sometimes pickup th weirdest shadows. 

The next biggest challenge, which I have mulled over and over,  is how to divide up the fabrics in the various spaces on the dress. Just not sure yet.  Hope you have something you are enjoying and pulling you out of these awful winter doldrums. Think summer!!! It helps.............Bunny


Sunday, January 24, 2016

vogue 9162, Some serious petite-ing!

 Work has begun on a new white shirt. I really liked this design by Katherine Brenne for Vogue, 9162. I like the tailored hi-lo hem as the higher front gives more leg length for me and the back covers my bum. Something about those curved hi-lo hems just doesn't appeal to me, however.  As I often advise. I took a close look at the pattern photo. Look with me here. The mandarin type collar is very deep, something that may be out of proportion to my petiteness.  The same goes for the pocket. These are intentionally large details but I think they still are not the right size for someone five feet tall and not too wide. The armscye seam is barely above the elbow.  Then there was the issue of width. I know this is supposed to be a wide bodice but I just wasn't feeling sure about it all. .  Time to flat pattern measure!

This top is 63 inches wide in the extra small size, sorry, just way to much for me. It was clear this pattern would require some major "petite-ing" to work on my frame. 


When I sew I always start with the smaller details. I took one quarter inch off every edge all around the pocket. That meant that the facing wouldn't fit. I had a brain fog moment or maybe just over thought, but something told me not to do the same with the pocket facing. Yikes, would the edges, the curve, not fit if I did?  Rather than spend time with this math moment, I cut back the vertical edges the same 1/4 inch and folded out the remaining 1/4 inch across the facing, perpendicular to the grain. It works. 

Next was dealing with that deep collar. 

Again, I folded out a quarter inch across the center of the collar, perpendicular to the grain.  Once that was made permanent by fusing a strip of leftover interfacing to the back, it was time to cut. 


In my wild enthusiasm here, I took a pic of me truing the seam for the largest size but you get the idea. The edge was trued. The seam allowance attaching to the neckline was not altered in any way.  Now for that amplified bodice! 

Nowhere on the pattern is offered finished measurements. Really, Vogue? Is it assumed that this is so stinkin' big that it doesn't matter? Well, it does matter. I am making the extra small. It is for a 29 1/2 inch bust.  I haven't seen that measurement since I was prepubescent, way pre pubie. I went ahead and measured the width. There are no pleats in the back. The bodice width at the waistline and hem is 63 (yikes!) inches and that is for the XS!. I do think I can let a bit of that go.

Four inches were taken out of the back bodice, two on each side. Then two inches were taken out of the bodice left and right, two different pattern pieces, so a minus of 8 inches total. This leaves a bodice width of 55 inches. I will live with that as this is a BIG shirt and the bodice should be wide. But when the bodice is wider than I am tall, well that's a problem. Once the width was folded out vertically the shoulder seams needed to be trued as shown in the pic above.

When all is said and done, will this swamp me? Will it look totally out of proportion? Will the ninth planet remain hidden behind the sun? I don't know the answers but we will find out soon enough, at least on the first two questions! Talk to Neil Degrasse about the third question.

*******************************

I found this little number in the clearance area at Joanns. Imagine, a bound buttonhole tool! I haven't read the directions yet but am anxious to give it a try. Has anyone ever used one of these?...Bunny

Monday, October 27, 2014

NLS #4, Pattern Talk , updated 3/21/2019

Let's start with the actual pattern envelope. There is so much to be gleaned from this little package. The front of the pattern will give you the Pattern number, which can belong to more than one company or even be used more than once by the same pattern company! For whatever reason the numbers seem to be recycled which a google image search clearly shows as well. If the pattern is a designer pattern, like the one below, their name will be on the front. Different versions of the garment are shown, each having it's own letter designation. Some are drawn. Others are photos. The letter is important for following the cutting layouts and instructions inside the envelope.  But here is what I really want to impress on you. Before sinking money into a pattern purchase, look at the photos REALLY CLOSELY.   Notice below view B is no where near as full as the other views, but the other three views show lots of volume in the sides and back. Do you want the voluminous look or the more shape hugging look? 
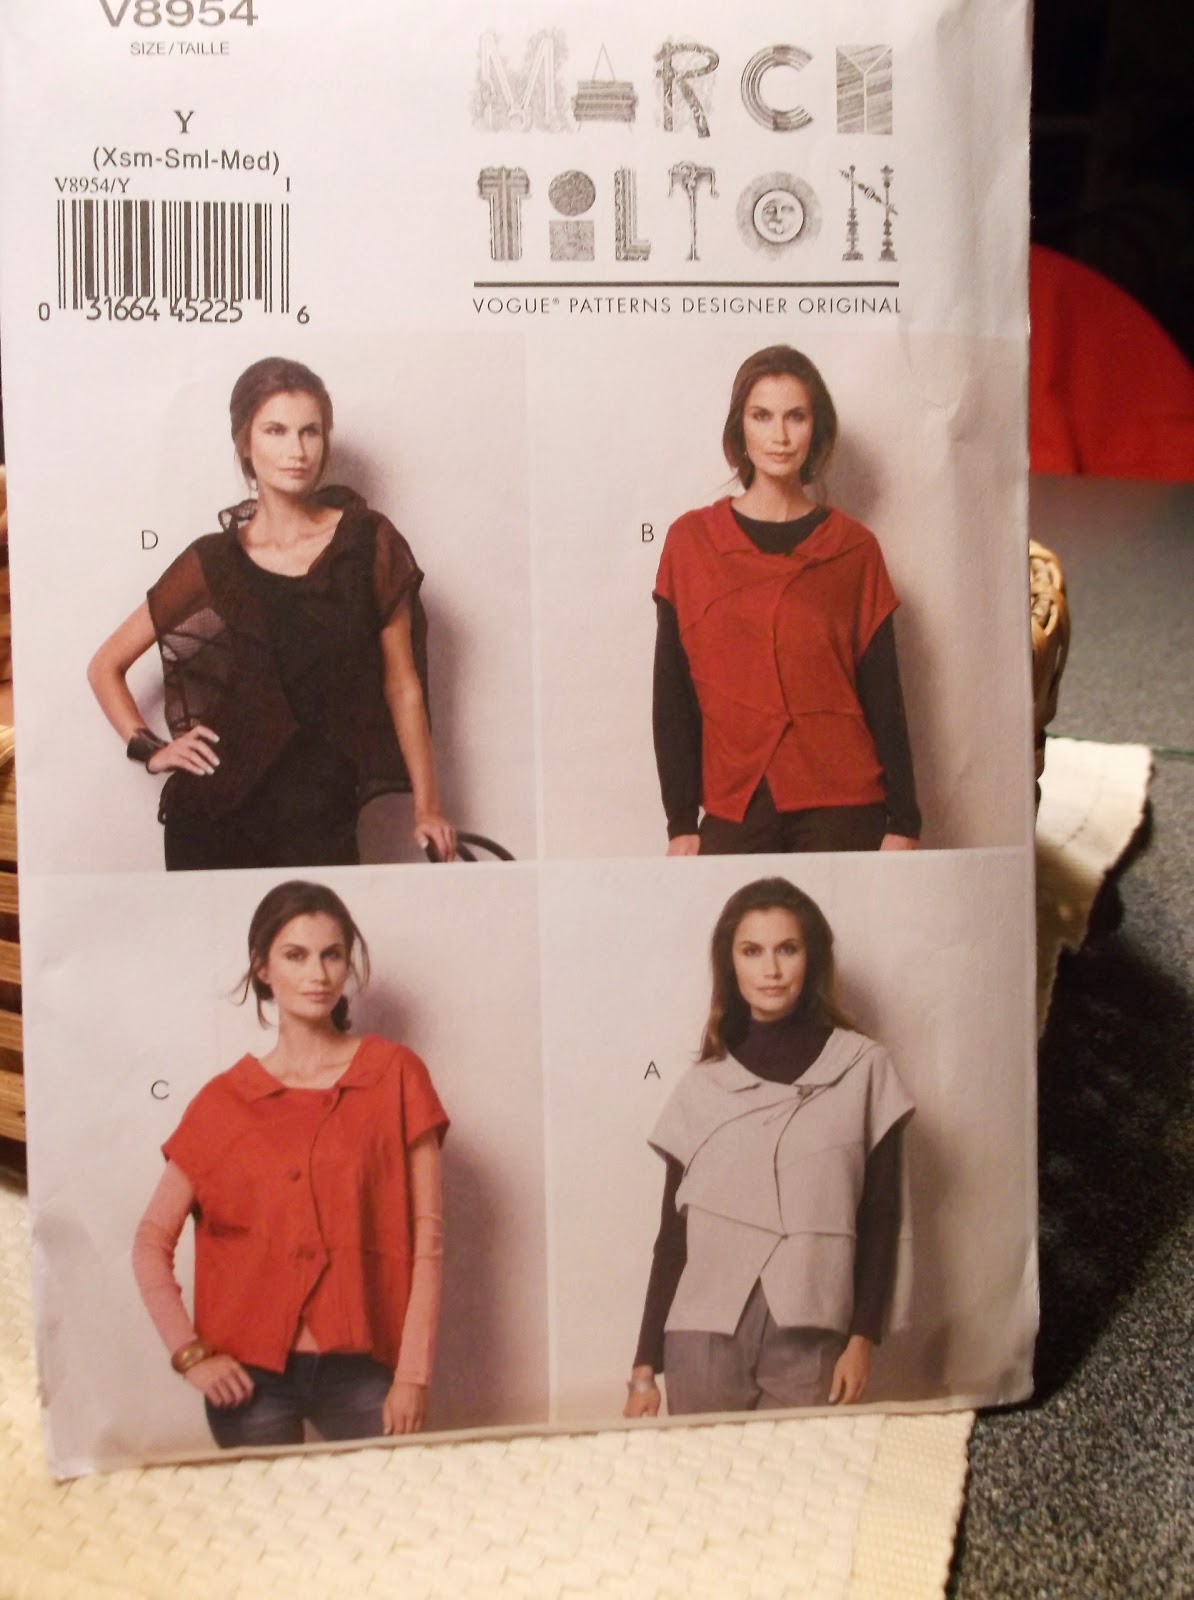
This is when you have to flip over the pattern and look closely at the technical drawing, also known as line art or schematic. Are they all the same volume and maybe the collar or closure is what's different? The tech drawings will give you much more information than any model pic on the front. The front picture gives you clues. The tech drawing gives you reality.


We can see all these vests have the same volume in their technical drawings and it is the way the photo is styled that makes them look different! Or is it Photoshop, or maybe even clamps at the back of View B? The line drawing also shows the separate pieces that are necessary to make this garment. and their seamlines. It's hard to see  that in the photo. Beware photos with print fabrics!

Pull your pattern out of the drawer, if your store lets you, and really look closely at both the photos and line drawings to see what  you are getting. I don't hesitate to pull the directions out of the package to make sure I see what I am getting. 


This is the Donna Karan dress I recently made into a jumper for myself. I did not look at the pattern closely enough. The bodice on this dress has issues that are clearly visible but I was so taken with the design I did not see them. Love is blind and it applies to patterns and their buyers too.

The little black arrow is pointing to the diagonal wrinkles. This woman has no bust to make those wrinkles.  My garment didn't get the diagonal wrinkles until I wore it a few times. The bodice is cut on the bias. There is huge volume in the lined skirt and therefore heavy and pulling weight on those bias straps. This could have easily been solved with some fusible interfacing to counterbalance the bias and weight making those wrinkles. There are no instructions in the pattern to interface this area. Do you see how on the left side of the dress here hair is covering them up? Beware of hair being pulled around to the front and over the shoulders to hide fit issues. Children's patterns are particularly notorious for this. Read these pictures and lines!  ( I still love my jumper!) Look for gaping, wrinkles, questionable hair placement, arm folding,   how low sleeveless armholes are, etc.... Really analyze the photos. Last year I took a class in photoshop. I will never trust a photo again!

The models used are generally stick thin, beautiful women. They are "selling the sizzle". We need to see beyond the sizzle and ask, is this a really good design and will it work on my own body? If the model looks "hippy" in the photo and hips are your styling concern, you can bet the farm it will look even more hippy on a real woman with glorious hips.  (Feel free to call your own wide hips glorious as I do mine.) We all need to be more objective in our pattern purchases. If it's for kids, how are the sleeves hanging? Is the crotch dragging? Where is the shoulder line? Buyers beware. 

Some garments on pattern envelopes do not fit the model well at all and it shows.  Do you love the pattern enough and have the skills to make the pattern work with alterations? If so go for it.  If you are a bit squeamish about your skill set, look very closely at the fit on the perfect body of the model. If it has issues with her, it will definitely have issues with a real woman and move on.  Don't buy it unless you are up to a challenge and then, make a muslin first!


According to McCalls Pattern's blog, this post,   you are seeing the actual designer garment in the photo on the cover of any of their designer patterns. 


On the back of the pattern you will always find a description of the garment. It almost always starts with something like "loose-fitting" or "fitted" or some other words of how the garment fits the wearer. If  this is confusing, and it is mysterious for sure, in the back of the pattern catalogs and on the websites of the Big Four you can find "ease" charts which well tell you exactly what that description means in inches of ease in the garment. I highly recommend you check that out when pattern shopping.  These ease charts are specific to the pattern company so don't cross reference them. This ease business is critical to the fit of the garment. If I am making what is described as a "semi-fitted" jacket, that means there will be 4 3/8 to 5 3/4 inches of extra room in the bust area of the jacket. That does not include any additional ease added in by the designer for his/her design. So my 37 inch bust can have a jacket that is over 42 inches wide in the bust. Do you see where this is going? So if I bought a pattern by my bust size (don't do that, nuther story, nuther post), this thing would be huge!!! In my many years of sewing I have found that 95% of fit complaints about the Big Four result in a misunderstanding of Fit Ease, Design Ease and Pattern Description words. I highly suggest Nancy Zieman's books on fitting, any of them and there is information on her site as well on getting the proper size Big Four pattern. I've never run into the issues others have with "huge" patterns from the Big Four since learning how to buy the proper size from Zieman. 


There are suggestions for fabrics on the back of the pattern. A few years back I had reason to get involved with customer service at I think Simplicity.  They answered my question about my pattern and then we had a nice discussion. I learned from that conversation that the first fabric listed on the pattern is the one the designer used to make the original garment as well as the fabric that is used in the photo on the front of the envelope.  Suggested fabrics are really important to follow. Two things always stand out to me as the sign of an inexperienced sewist, lack of  ironing and the wrong fabric for the pattern design. Read the fabrics listed, ask the store clerk for help or look at the more detailed fabric descriptions on line. Don't stray from the suggested fabrics until you have at least worked the design out in the specified fabrics.  Getting fabric to work with the pattern is one of the toughest things to do in sewing and it can take years to acquire that skill. Let the pattern help you. Follow it's suggestions. 

Notions are listed on the back of the patterns of the Big Four, not necessarily on all the Indies. It's nice to come home with everything you need to start your project so this list is worth looking at. On this Sandra Betzina pattern I am currently working on the pattern actually tells me  what to get for notions, specifically.  


Not all patterns get this specific with the notions list but I like how Betzina's patterns do. 

Also on most patterns are finished garment measurements. I can't tell enough how important this is. If you are not the standard 5'6", B-cup body that the pattern has been sized for,  you can now look at the finished garment measurements, measure the pattern pieces as they are laid out flat and compare to your own. This is where that amount of ease and the word description of the fit gets meaning. You will learn what will need adjustment. 

     *************************

Let's discuss differences in patterns. There are the Big Four: Simplicity, Vogue, McCalls, Butterick.  (As of 2019, Simplicity is now owned by BMV, therefore, now the Big Five)  My understanding is the Big Four all use the same sloper based on measurements taken many years ago from many women across the country. The book "Overdressed" gets into exactly this. If you know the alterations you need to make to get a garment to fit you well, you can usually do them to any of the Big Four and get the same results. Nancy Zieman says there is no difference in their slopers and I have read that elsewhere as well. I know many sewists feel there is. My personal experience agrees that there is none. I can do the same alterations for my shape to all of them and get the same results. 

There are also Indie patterns, as in Independent, not associated with the Big Four. Indie patterns run the gamut from very professional designs by trained and educated pattern makers to the most basic design for a child that a SAHM mom has had success with and now markets through her blog.  Here are some of the differences I see:

* Big Four patterns can often, in the U.S., be purchased for as little as 99 cents on a regular basis. PDF and paper Indie patterns can run from some promotional freebies out there on the web  to 32.00., like one I saw the other day, a wide variation. 

* Big Four patterns are almost always on thin tissue paper which some use to fit directly on the body. Marfy and Sandra Betzina patterns, part of the Vogue family, are the exception, using better quality papers. Indie patterns, depending on the designer,  are often available only in PDF format which you download, tape together and either trace or cut out. Some Indies  put out paper patterns as well. PDFs are generally less expensive than paper patterns. 

*Big Four patterns subscribe to the same measurements for their slopers. If you learn to fit one, you can fit them all, and I can personally attest to that. Many will tell you that only Vogue fits, or they only have to adjust such and such on Simplicity but I really think it is more the nature of the design, not the sloper that they all share. (See my thoughts above on ease and fit wordds.)  Many are introducing patterns with different bodice pieces for different cup sizes, Hoorah! Indie patterns are often geared to a specific body shape, which I think is wonderful, as well. Some are designed for C cup bra wearers. Some are designed for the "Petite Plus"  or the "pear" and so on. There are many variations you can seek out for your specific fitting challenges with the Indies. Just be aware of these differences. If you are slim hipped and buying a pattern designed specifically for a "pear" you will have to make adjustments. 

*Big Four pattern companies have access to the big name designers. Cynthia Rowley is one of my favorites but there are so many. You can literally follow the runway shows and see the designs come out in patterns not too much later.  Indies are designed by themselves, so there is a wide range of ability and experience and name recognition. Many designs are redundant, just think tee shirts and pencil skirts! However the Indie world has great industry trained and educated designers providing us with designs that are innovative, flattering and well drafted as well.

* Big Four patterns have those technical drawings. Some Indies have them, some don't. I know many Indie aficionados who will not buy them any more unless there is a technical drawing, front and back!

* Big Four patterns aren't hand holders and may not give all the instruction a newbie sewist may need. But most of the Big Four have patterns specifically aimed at the beginning sewist now, so those are worth checking out. This is when a great sewing book comes into play. I've made a few Very Easy Very Vogues and liked them. Do you know why they have that name? It is because of the limited number of pattern pieces. They are not necessarily easy as they can have welt pockets, plackets, etc, but just a few pieces.  Some of the indie patterns are really good at the hand holding type instructions and assume the sewist needs every bit of instruction along the way. Not all are like this but I think those that are are really filling a niche and I applaud them. 

* I would advise any and all to check out the pattern they are interested in on Pattern Review, be it Indie or Big Four.  PR has over 450,000 sewing members and I would venture most have done a review at least once.  They have every pattern company imaginable on the site. Search out the opinions. If five people have made a pattern and each one had the shoulders hang too low, well, watch out for those shoulders! It's a fabulous resource!

* The Big Four all have websites and Facebook pages. Many of the Indies have sites and FB pages as well but quite a few of the children's designs are marketed through blogs as opposed to a separate business site so may be more difficult to find. 
***************************

About sizing: Pattern sizing has absolutely nothing to do with ready to wear clothing sizes, ever! 

This is the most important thing you need to know about a pattern. Big Five patterns are made for a 5'6" tall woman who wears a B cup bra. You don't wear a B cup? Fully expect that any pattern won't fit well until you learn to do a Full  or Smaller Bust Adjustment for your cup size. It won't fit, I tell ya, until you do. 

Not 5'6"? Big Four patterns all have adjustment lines in the bodice and skirts and pants legs to lengthen or shorten and even lines to "petite" the pattern. It won't fit correctly until you make these adjustments. Some of you know I am petite and in my tutorials are lessons on petiting a pattern. I also run through this with each garment I make and post on the blog.

Sewing is Fitting. I read somewhere that there is only one woman in a thousand who has the same figure as Barbie. I would venture that the odds are even higher in reality. But I think the odds of anyone buying a pattern, cutting it out and sewing it as printed and having it fit perfectly are just as high as the Barbie odds. If you want to sew, fully, fully expect to make alterations to get your garment to fit. Sewing is Fitting. 

There is sooooo much more about Patterns that I want to share so I may do another chapter of this next week. I think we need to get into the actual tissue and that could be fun. I have a few tricks regarding that part. This post has been pretty much expository, but it sets the groundwork for what is to come with using patterns and sewing. Below the pic I have printed some lingo you may find when dealing with patterns.........Bunny

photo courtesy asewingjournal.com

Some lingo:

the Big Four---this is the term for the four major pattern companies in the US. They are McCall's, Butterick, Vogue and Simplicity. Today McCall's,  Butterick and Vogue are one company and Simplicity is its own separate company. (Now the Big Five with Simplicity under the umbrella.)

BMV---Butterick, McCalls and Vogue, again, the same company

McVoguerick---same as above.

KS----Kwik Sew patterns, reknown for their great knit and undie patterns

Simplicity---. The Simplicity Creative Group owns New Look patterns as well as other needlework related companies. They are currently owned by the Vogue/McCall family.

Burda---European pattern company. Their paper patterns are available in the US at the chains. Those have seam allowances included. They are also available in their magazine, without seam allowances.

Burda magazine---Published in several languages in Europe, including English,and available here. There are many patterns in each issue. The patterns are "nested" with all sizes and styles on a few sheets that must be traced in the proper size to make the pattern. Direction assume you know certain techniques and they are therefore not mentioned. Directions are chancey and patterns have no seam allowances included.

Marfy - Hand cut designer patterns from Italy that are fabulous and come with NO directions. They are under the Vogue umbrella and are famously drafted well.

Indies----These are pattern companies unaffiliated with the previously  mentioned companies. There are many and more new Indies every day, Indies as in "independent".

OOPs---These are Out Of Print patterns. You may be able to pick them up from Ebay or Etsy but often they are still available on the pattern company's website.

Technical drawings--- These are the line drawings on the back and inside of the patterns of the big four. They show the details/seams  without the distraction of fabric prints or body posing by the model. They are found on all of the Big Four patterns  but only some of the Indies. I find them critical to making my decision to buying and making the pattern. They are sometimes called "line art" or "schematics".

Views---These are the garments shown on the front of the pattern envelope.They have letter designations and each vary somewhat from the other. These letters need to be matched up to the  fabric amount needed on the back of the patterns for the style chosen In order to have the right amount of yardage


Monday, June 2, 2014

The dumbing down of FIT


Just when you thought it couldn't get worse..........This past Wednesday's Wall Street Journal had a really interesting article on the sizing in clothing today.  Here are a few quotes:

"..."Alpha sizing", the industry term for a simplified apparel-sizing system where two numerical sizes, like 6 and 8 are combined to form an alpha size like Small or S."

It seems the "relaxed" styles, aka sloppy, that are trending right now have been contributing to this phenomenon. Items with stretch built in (everything?) also are more likely to come in alpha sizes. But the Journal also notes that more traditional items like bras, blazers and pants are getting "Alphasized" ( my word ) as well.

How does alpha sizing affect you?  Here's another Journal quote, "The difference between a Small and Medium might be 2 inches, 2 1/2 inches, or for some brands, even 3 inches. By contrast, the difference between each numeric size, from 0-10, s typically 1 inch."  Now add that fact to this one: "Women typically have a size the they feel is their size. More than half will walk away without buying if their size doesn't fit rather than try a larger size." See where we are going here? Isn't it always about the bottom line, the almighty dollar?

So, here I am in Macy's looking at jackets. I usually take a 4 or 6. But all I am finding is Small or S. Dang, the shoulders hang off, the jacket just does not fit like my size 4 or 6. What no Extra Small? Mediums are way too big. Now I walk away. But that is me and more than likely you, too. We know what good fit is. We don't' always achieve it but we get a lot closer than what is in RTW, and now you know one of the reasons. But what about those who don't sew? That is where vanity steps in and the manufacturer wins. Back to the store, but let's make believe I don't sew. I just need a summer jacket. I always take a size 4 or 6. Hmmm, all they have are Smalls and Mediums. I try them on. The Medium is huge. The Small is kinda big too. But it's a Small. It must be the right fit. A 4 or 6 is Small. I look around. Most of the people I see are pretty casually dressed. They look good, as in good enough. My jacket looks good  as in good enough and it is a Small so it must be the right size. I plunk down my plastic and am out of there with a new jacket. Now I will contribute to the slovenly masses walking the streets without a clue about fit. I think you are getting my view point here.

Why is this happening, other than the fact the most of the public has no clue what decent fit is anymore?  Back to our WSJ article here. "If I only have to build four sizes instead of eight, my supply chain is going to be much more efficient", says Ed Gribbin, president of a company called Alvanon. More efficiency, more profit! Once again good fashion is hijacked for margin. Chiching!

Here's another illuminating fact per the Journal. There is a lack of consistency in this alpha sizing.  "Not all brands combine the same two numbers for their alpha sizes." It seems that in women's wear a small is a size 6 and 8 for 2/3rds of manufacturers. For the remaining third of manufacturers a small is a size 4 and 6. I  think at this point, as I am standing in my imaginary Macy's I start to spin and shriek. WTF size do I wear???

OK, back to sewing. We have the power and don't ever underestimate that. First, I feel really good that no one is pulling this crap on me. I'll make my own jacket, thank you very much. I feel good that I am not contributing to the already disgusting margins being made by clothing manufacturers on the backs of the poor and desperate. I don't want to contribute to Mr. Gribbin's margins. I just want to wear a nice piece of clothing that fits me to the point that it makes me look better than what I can pick up in RTW. I am lucky to sew and I am blessed to know how to sew. No one's pulling this crap on me!

I really do think that the state of fashion for the masses has really gotten out of control at this point. Let's do everything we can to teach others our skills. Let's not support the manufacturing of garbage on the backs of others. And let's stop all this sloppy clothing that is so pervasive. If you are a newbie to sewing and not sure what good fit is other than being comfortable, I have a great resource for you. Here is a link to a standards book written by the Professional Association of Custom Clothiers. On page 22 is the beginning of their "Quality Standards for Fit". I think this should be on every sewist's bulletin board for reference. We take so much for granted and this information is so necessary to your development of quality sewing, garments that really look good on you.

********************************************

My two cameras have both gone on to camera heaven. I am just lost without a camera and have been researching repair or getting a new one. I may get a cheapy to get me through until I can afford a really nice DSLR like I used to have. In the meantime, I have a few subjects to get on my soapbox about, so even without pics, I can guarantee the blog won't be boring. I hope you enjoyed this post. 

So many of you have asked "when are you going to start your jacket?"  I have a lovely lavender and black wool boucle that I want to use for a Chanel jacket but right now the prospect of playing with dark wool really is not inviting. I have also wanted to make my next jacket out of a blue and white sort of boucle. We are talkiing medium to light blue, sort of like faded jeans. I could not find what I wanted through Linton. I have also searched some other vendors but no luck. Today I called Banksville and they say they don't have a lot of blues but will send me some samples. They are on their way and I can't wait to see them. I am not a hundred percent on the actual style of the jacket, either. I am thinking something with a collar and buttonholes. We'll see. I certainly was inspired by the jackets Claire showed us. The styles were so varied. I was really surprised by that. I also will try to build some shape into the jacket, the way Claire taught us. So I will keep you posted but for the moment I have a big pile of fabrics, great ones for summer, all pretreated and ready to go for summer garments. Since our season is rather short, that is my priority. Plus, I love to sew linens and nice cottons so I will keep you posted. Happy sewing...........Bunny

Saturday, April 5, 2014

V1175, DK jumper #3

The shell is complete and all that is left is the lining which I hope to finish tomorrow. I will try to answer the issue of how I fit the bodice here. But first some things to be aware of. This pattern is amazing. Most bias edges meet straight grain edges. While that will keep the bias under control once it is sewn together, it doesn't help before that.

I have barely touched this pattern piece and look how this bias angle has grown. It's a good habit to place the pattern on your pieces before stitching them together but it is critical with this design. Another suggestion is to use a natural fiber to make this dress. I can't imagine dealing with all this bias and a synthetic fabric at the same time. This angle above is the hem edge so I just cut it to match the pattern, again! But other pieces I steamed back into the proper length after checking them and before stitching. That won't work well  with synthetics. The armscyes and neckline edges were stayed with thin selvedge from the lining. I didn't do that for the other pieces because they  met up against straight grain pieces which will hold them in shape once sewn.
All of those pleats in the front were marked by simply folding back the pattern and using the tailor's chalk that disappears with ironing. It worked great

I've have a request to show how I adjusted  the bodice. First, the front:


You can see how I pivoted out from the shoulder seam a half inch at the underarm. Then I pivoted back to nothing at the bottom. I also added height to the front neckline, starting with nothing at the shoulder seam and raising the center front a half inch. What this did was give me the ability to add another pleat with that extra half inch at CF, a way to add more shape for a C cup. Now for the back:


You can see once again how I pivoted out from the shoulder to the underarm and then back in at the bottom. Because of linen's ability to be steamed and stretched, as well as the bias, there was no problem fitting in the additional length on this seam. Every thing pressed out with the seams looking like they were the exact same size to begin with.

I got the shell finished tonight and have not tried it on yet. It's just too late. I have my fingers crossed  that it fits and we will find out in the morning when I do a try on.  In the meantime, I am hoping for a good night's sleep and a fresh start with the lining bright and early in the morning! More to come.......Bunny

ETA: I tried it on this  morning and it seems to fit much better and I am pleased. I want to add that the same adjustments need to happen to the lining. I did this by simply laying the adjusted bodice pieces on top and matching up the notches. For the center front this meant moving the fold placement over a bit to accommodate the additional width on the bodice front. The lining fits with very little extra ease in the skirt so I morphed that out from a 12 at the hem cutting back to the original cutting line at the underarm. This gave me the extra I needed in the hips for the lining. 

The Ray Pinafore, 2025's Epic Fail

  Happy New Year and welcome to my epic fail of 2026. I guess you have to have one, right? This is the Ray Pinafore from Paper Theory Patter...