We've done much preparatory talk here. I think it's time to get into construction and often the first thing the pattern tells you to do is make your darts.

I am using a basic bust dart for our example. Remember, darts release fullness so the fabric will smoothly cover any mound of flesh. To quote just one sewing expert, Roberta Carr, "Darts that end right at the apex remove intended fullness and ease." In other words, running the tip of a dart to the area of the highest mound of flesh removes the fullness you needed to cover the mound with no wrinkles of fabric. (It also looks uncomfortable and downright awful.)
Darts have two "legs". Darts can be in all sorts of places but 99% of the time those dart legs should be the same length. An exception is the French dart which has a deep slant from the lower side seam to the apex. The area that the dart folds up is called the takeup. The bigger the mound of flesh to cover, the deeper the "takeup". So if you are using one of those larger cup patterns, the darts will have more "takeup" as the cup sizes enlarge.
Marking the dart? I like drawing in the fold line. It makes it easier to match the sewing line. Then there is the Nancy Zieman method of clipping the dart legs and matching those up to get started. I often do that as well. Fold the dart on the center fold line and pin.
 I put the pin in right on the line and make sure it matches, coming out on the line on the other side.
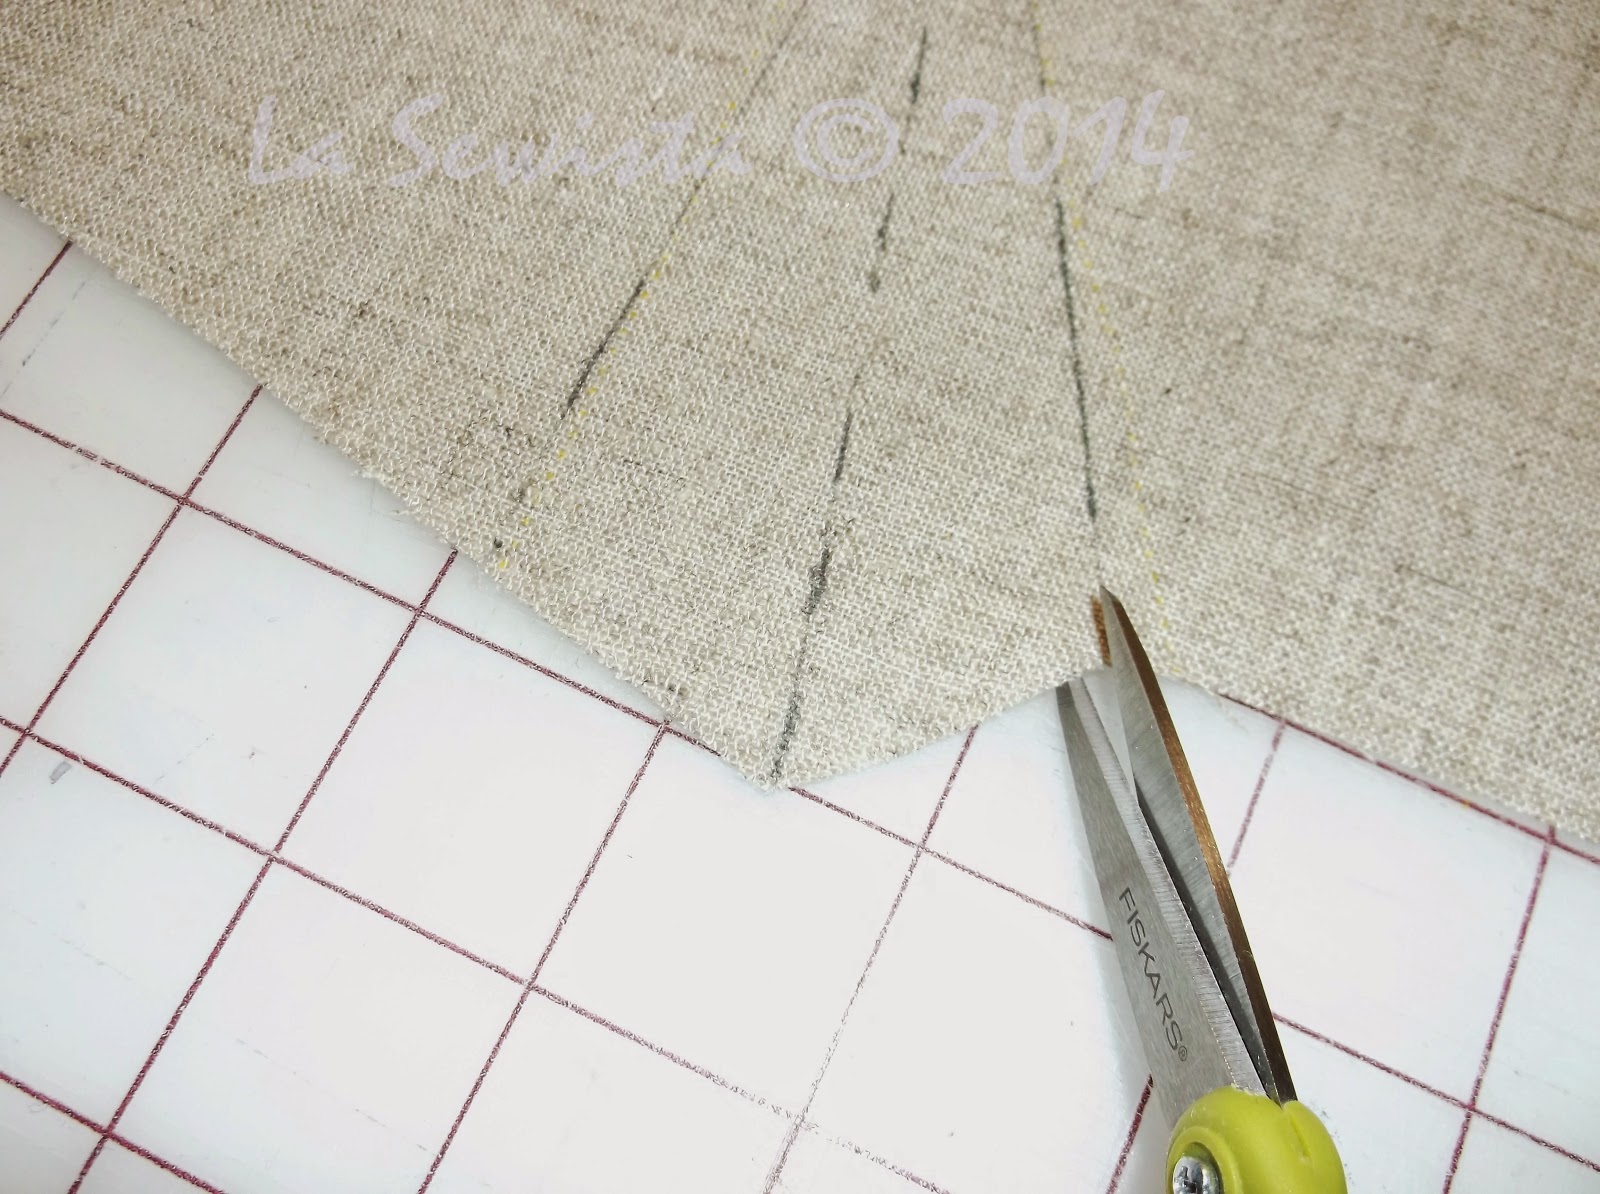
There are different ways to stitch a dart, including a method that uses the bobbin thread only and starts at the tip! But I will stick with this more conventional method for today. Start at the side seam with tiny stitches, 1.5 or 20 spi, to secure the seam. Then change up to your regular stitch length and stitch the seam.
 A half inch from the end stop and change your stitch length back to 1.5. I raised the presser foot so you could see what I mean here. Stitch the last few stitches right on the edge of the fold and then off the fabric. Raise the presser foot. Here is where my method differs from others.

Lift the presser foot, Pull your fabric backwards ( like you are removing the garment from the presser foot) for about an inch. Then pull it forward for about a 1/4 inch. This puts slack in the thread. Lower your presser foot.

Now take 2 or 3 of the small stitches. You are done. Remove the piece from the machine and snip your threads, which isn't done yet in the photo above. This give you a very secure dart tip. The bit of slack in the last thread move prevents any bubbling. Putting the ending stitch in the takeup of the dart prevents any chance of the threads coming undone in the wash.

Now it's time to press your dart. Press as stitched being careful not to press a crease beyond the tip of the dart. Then press the dart to the side. For bust darts, press toward the waistline. For waistline or hip darts, press toward center front or center back. Do this on the back with a piece of paper or oaktag under the dart fabric to prevent show through ridges on the front. Turn over and press over a ham to build in the shape of the dart. Let cool on the ham before removing.

Some fabrics will press and mold easier than others. Wools shape beautifully. "Harder" fabrics like the linen above need to have those last few stitches on the line of the dart seam right on the fold to make sure the dart doesn't bubble up at the tip. On really deep darts which are often the case for the larger cup patterns, the darts can be trimmed to five eights of an inch, not trimming the final inch of the dart. In that case the dart is pressed open. Since the edges are bias there should be no ravelling.
ETA: Just remembered something important. When sewing your dart you are going to do something different from the pattern. If you sew your dart leg, continuing out in a straight line to the cut edge, you will be making the area of the seam allowance smaller than it should be. Instead, sew to the side seam or waist stitching line. At that point start stitching in a bit so that the stitching line mirrors what is below the waistline seam. This way your seam allowance won't be tighter and smaller at the edge than at the actual stitching line. Hope this is clear.

This is my mock waistline dart. If both ends of the dart end in a point, as in a sheath dress, I sew the dart in two steps. Start at the peak which is the widest part of the dart and sew to the tip as just shown in the bust dart. Go back to that same spot and then sew down to the other tip. Sometimes these darts end not in a point at the waistline in which case you can start stitching at the cut edge, stopping and pivoting at the peak (the widest part of the dart). With a heavy fabric I would cut the dart open ending about an inch short of the tip and press it open. But in most cases of waistline darts, the fabric is not that heavy and the dart is pressed toward center front.

You will see a definite curve to your waist darts from the right side. So the dart does not "pull" oddly or feel uncomfortable, slash the dart ON THE BIAS at the widest part, before pressing. By cutting the slash on the bias you will prevent ravelling. That could easily happen as waist darts are usually on the straight of grain.
Just a comment here on my current jacket project. One thing I found odd about the pattern was the waistline dart. It was WAY to the left of the bust apex of anyone. I did some research and waistline darts, if single darts, should always be below the bust mound. Putting it to the side, like that pattern did, releases fabric in the wrong place. The exception to this would a design with two waistline darts. In that case each dart is equidistant from the apex on the left and right. So once you have established the location of your personal apex on the pattern, check that any single waistline darts end directly below, not to the side. Again, the waist dart should never, never go to the apex point. Can you tell how much that aggravates me? To move the waist dart to the proper location, simply draw a box around it. Cut the box out and move it over and tape.
Hip darts are interesting. A full buttocks, like that of my younger days, really fits better with two darts. If you only have one and have booty, measure the takeup at the waistline seam. If it is one inch, draw in two half inch darts instead.
 If you have generous booty AND a high padded hip, one dart is parallel to the center back and the other is parallel to the side seam.
If your booty is "regular" size and your pattern has one or two darts, make them both parallel to the center back. If your booty is a bit non existent but you have a padded high hip, both darts should be parallel to the side seam.

If you don't have much of a waist but would like to give that illusion, move the top of the darts over at an angle as shown above. Make sure the darts still point to the fullness. Jeans use this trick.
Darts can give you great fit and also provide a bit of illusion as you can tell from the last paragraph. The easiest way to change the dart angle? I like to trace the dart on another piece of paper and cut it out exactly on the stitching lines. You will have a narrow triangle of paper, somewhat of an arrow shape. Match up the tip of your arrow with the tip on the pattern and just shift the arrow to where you want it. Trace around the arrow on to the pattern piece and you are good to go.

Darts can have shape and that will enhance your fit as well. If you are swayback, like myself, you can curve the rear darts by sewing the dart in a curve that curves outward an eighth of an inch at the center of the dart. This is like a concave shape and the dart leg curves out toward the garment. This will cup your swayback shape better. If you have a tummy directly below the waist or a high padded hip, shape your dart inwards in a curve about an eight of an inch at the center of the dart, a convex shape. In this case the curve is toward the center of the dart. Adding that 1/8th inch in either of these cases will help the dart fit better without cupping or wrinkling. The shaping seams counter intuitive but it works. With two darts across the front or back, it will give you a half inch of additional room just where you need it on your tummy.
Some patterns have shoulder darts. If you don't like this look, just run a gathering stitch and ease in the area instead. You can use steam to help shape the ease with no wrinkles. If your pattern has no shoulder dart and you have prominent shoulder blades, take a curved ruler and at the center of the shoulder seam go out 1/8th inch, ending at the regular seam at shoulder and neckline. Then ease in your back shoulder seam to fit the front. This is similar to the "cheater" bust adjustment often used in knits.
Looking forward to your comments. I do hope this dart info will help on your quest toward great fit. Fit is accomplished in bits and pieces. Put darts in your fit toolbox and your garments will not have that look of inexperienced sewing. Till the next time............Bunny
I am using a basic bust dart for our example. Remember, darts release fullness so the fabric will smoothly cover any mound of flesh. To quote just one sewing expert, Roberta Carr, "Darts that end right at the apex remove intended fullness and ease." In other words, running the tip of a dart to the area of the highest mound of flesh removes the fullness you needed to cover the mound with no wrinkles of fabric. (It also looks uncomfortable and downright awful.)
Darts have two "legs". Darts can be in all sorts of places but 99% of the time those dart legs should be the same length. An exception is the French dart which has a deep slant from the lower side seam to the apex. The area that the dart folds up is called the takeup. The bigger the mound of flesh to cover, the deeper the "takeup". So if you are using one of those larger cup patterns, the darts will have more "takeup" as the cup sizes enlarge.
Marking the dart? I like drawing in the fold line. It makes it easier to match the sewing line. Then there is the Nancy Zieman method of clipping the dart legs and matching those up to get started. I often do that as well. Fold the dart on the center fold line and pin.
There are different ways to stitch a dart, including a method that uses the bobbin thread only and starts at the tip! But I will stick with this more conventional method for today. Start at the side seam with tiny stitches, 1.5 or 20 spi, to secure the seam. Then change up to your regular stitch length and stitch the seam.
Lift the presser foot, Pull your fabric backwards ( like you are removing the garment from the presser foot) for about an inch. Then pull it forward for about a 1/4 inch. This puts slack in the thread. Lower your presser foot.
Now take 2 or 3 of the small stitches. You are done. Remove the piece from the machine and snip your threads, which isn't done yet in the photo above. This give you a very secure dart tip. The bit of slack in the last thread move prevents any bubbling. Putting the ending stitch in the takeup of the dart prevents any chance of the threads coming undone in the wash.
Now it's time to press your dart. Press as stitched being careful not to press a crease beyond the tip of the dart. Then press the dart to the side. For bust darts, press toward the waistline. For waistline or hip darts, press toward center front or center back. Do this on the back with a piece of paper or oaktag under the dart fabric to prevent show through ridges on the front. Turn over and press over a ham to build in the shape of the dart. Let cool on the ham before removing.
Some fabrics will press and mold easier than others. Wools shape beautifully. "Harder" fabrics like the linen above need to have those last few stitches on the line of the dart seam right on the fold to make sure the dart doesn't bubble up at the tip. On really deep darts which are often the case for the larger cup patterns, the darts can be trimmed to five eights of an inch, not trimming the final inch of the dart. In that case the dart is pressed open. Since the edges are bias there should be no ravelling.
ETA: Just remembered something important. When sewing your dart you are going to do something different from the pattern. If you sew your dart leg, continuing out in a straight line to the cut edge, you will be making the area of the seam allowance smaller than it should be. Instead, sew to the side seam or waist stitching line. At that point start stitching in a bit so that the stitching line mirrors what is below the waistline seam. This way your seam allowance won't be tighter and smaller at the edge than at the actual stitching line. Hope this is clear.
This is my mock waistline dart. If both ends of the dart end in a point, as in a sheath dress, I sew the dart in two steps. Start at the peak which is the widest part of the dart and sew to the tip as just shown in the bust dart. Go back to that same spot and then sew down to the other tip. Sometimes these darts end not in a point at the waistline in which case you can start stitching at the cut edge, stopping and pivoting at the peak (the widest part of the dart). With a heavy fabric I would cut the dart open ending about an inch short of the tip and press it open. But in most cases of waistline darts, the fabric is not that heavy and the dart is pressed toward center front.
You will see a definite curve to your waist darts from the right side. So the dart does not "pull" oddly or feel uncomfortable, slash the dart ON THE BIAS at the widest part, before pressing. By cutting the slash on the bias you will prevent ravelling. That could easily happen as waist darts are usually on the straight of grain.
Just a comment here on my current jacket project. One thing I found odd about the pattern was the waistline dart. It was WAY to the left of the bust apex of anyone. I did some research and waistline darts, if single darts, should always be below the bust mound. Putting it to the side, like that pattern did, releases fabric in the wrong place. The exception to this would a design with two waistline darts. In that case each dart is equidistant from the apex on the left and right. So once you have established the location of your personal apex on the pattern, check that any single waistline darts end directly below, not to the side. Again, the waist dart should never, never go to the apex point. Can you tell how much that aggravates me? To move the waist dart to the proper location, simply draw a box around it. Cut the box out and move it over and tape.
Hip darts are interesting. A full buttocks, like that of my younger days, really fits better with two darts. If you only have one and have booty, measure the takeup at the waistline seam. If it is one inch, draw in two half inch darts instead.
If your booty is "regular" size and your pattern has one or two darts, make them both parallel to the center back. If your booty is a bit non existent but you have a padded high hip, both darts should be parallel to the side seam.
If you don't have much of a waist but would like to give that illusion, move the top of the darts over at an angle as shown above. Make sure the darts still point to the fullness. Jeans use this trick.
Darts can give you great fit and also provide a bit of illusion as you can tell from the last paragraph. The easiest way to change the dart angle? I like to trace the dart on another piece of paper and cut it out exactly on the stitching lines. You will have a narrow triangle of paper, somewhat of an arrow shape. Match up the tip of your arrow with the tip on the pattern and just shift the arrow to where you want it. Trace around the arrow on to the pattern piece and you are good to go.
Darts can have shape and that will enhance your fit as well. If you are swayback, like myself, you can curve the rear darts by sewing the dart in a curve that curves outward an eighth of an inch at the center of the dart. This is like a concave shape and the dart leg curves out toward the garment. This will cup your swayback shape better. If you have a tummy directly below the waist or a high padded hip, shape your dart inwards in a curve about an eight of an inch at the center of the dart, a convex shape. In this case the curve is toward the center of the dart. Adding that 1/8th inch in either of these cases will help the dart fit better without cupping or wrinkling. The shaping seams counter intuitive but it works. With two darts across the front or back, it will give you a half inch of additional room just where you need it on your tummy.
Some patterns have shoulder darts. If you don't like this look, just run a gathering stitch and ease in the area instead. You can use steam to help shape the ease with no wrinkles. If your pattern has no shoulder dart and you have prominent shoulder blades, take a curved ruler and at the center of the shoulder seam go out 1/8th inch, ending at the regular seam at shoulder and neckline. Then ease in your back shoulder seam to fit the front. This is similar to the "cheater" bust adjustment often used in knits.
Looking forward to your comments. I do hope this dart info will help on your quest toward great fit. Fit is accomplished in bits and pieces. Put darts in your fit toolbox and your garments will not have that look of inexperienced sewing. Till the next time............Bunny


Fabulous photos of dart stitching Bunny...I love the way you secure the tip of the dart and plan to start doing this. Interesting info on dart placement for pants/skirts...I am printing for future reference.
ReplyDeleteBunny, I found your post so informative and helpful...but I'm a visual learner, so I'm having a lot of trouble visualizing what you mean by the jeans/angled dart and the round tummy dart.
ReplyDeleteDo you have any advice/guidelines on the relationship between dart intake and dart leg length? I've noticed that when I try to sew a horizontal bust dart (about 2" intake), I always end up with a pucker. Doesn't matter if I'm using easy-to-press, pliable quilting cotton or muslin or difficult-to-press fabrics.
Angela, I will try to do some drawings tonight to illustrate the dart changes a little better.
DeleteTwo possibilities to for your pucker. Gradually angle in and stitch those last few stitches right on the fold and then off the fabric. Puckers will show more on what I call "hard" fabrics, like the quilting cottons, muslins, shirtweights. Bottomweights and woolens or other more textured fabrics and knits, will hide the end of the dart better. Also, the dart is to provide fullness over a mound of flesh. If your bust is smaller the takeup in the dart may need to be decrease so as not to release as much fullness and lesson the amount to cover your breast mound or buttocks. Also, if you are a smaller cup size the dart needs to be a little closer to the apex, just a little, and lengthening out the dart may help also. Remember, cup size is determined by the difference between your bust size and your band size, the measurement around your torso where the bra band goes. One can be a larger sized woman and wear a small cup if the two measurements are similar. Patterns are all made for B cups. Hope this helps.
I just added some simple pics to help make the dart info a bit clearer.
ReplyDeleteThank you for this informative post. I like the way you end your darts, and will start doing that - making a couple of stitches in the take-up. A great idea!
ReplyDeleteThanks, Dixie.
DeleteThank you,I've been trying to up my sewing skills and I really like this post,especially the last bit with the curved darts and a great way to fix my shoulderblade issues.
ReplyDeleteGlad to help.
DeleteWhat a helpful piece! I have struggled a bit with the angles of the darts on trouser seats, which I need as I have wide pelvis and narrow waist! This certainly helps my thinking about those. Just one comment. I note that in your waistline dart (I agree about starting in the middle and stitching outwards both ways) you have quite a pronounced angle at the centre. I generally incline to making more of a smooth curve there to avoid the point, which doesn't always sit flat, even with a clip.
ReplyDeleteGreat observation! Many patterns have angles like this mock up that I just drew off the top of my head. Others are curved which can give a smoother look as you say. What I really wanted to get across with this post is that you can manipulate the dart to work for you. It is not cast in stone and making it in more of a curve than an angle makes good sewing sense. Thanks for noticing that.
DeleteThis is so helpful, thanks! I will try the method for securing the dart and the swayback dart for sure! One new-to-me thing that I encountered this summer is elbow darts, on a vintage pattern. I rather liked them.
ReplyDeleteThey are a nice vintage feature. You can treat them like the shoulder darts and ease and steam them in.
DeleteGreat post, Bunny and the ones leading up to this one! One thing you may want to mention is dart length and where should bust darts end. We see so many so close to the apex these days. showing darts that can be shaped for high hip and swayback will help so many to realize they can be changed to fit the body. No longer do we have to follow those perfectly straight lines when our bodies have stopped being straight...ha ha!
ReplyDeleteYou are so right. Darts are made to release fabric over the peak of a mound of flesh. That can be your bust, buttocks, high hip. tummy, etc. The apex needs to fall short of the peak of whatever mound you are darting in order to make the shape to fit the mound. Being petite, I can't tell you how many tummy darts end at my groin. They need to be shortened. Patterns mark the apex of the biceps, hipbone and bust. That hipbone may not be where your mound of flesh is found. Take your pattern and find your apexes and mark them on the pattern. Then look where the darts end and make necessary adjustments.
DeleteJo, for years I thought patterns were sacred. If they didn't fit, they didn't fit and maybe I just got the wrong size, or maybe even it was my body that was wrong. I now know it is OK to mark them and change them to whatever works. Luckily, I think our newer sewists don't feel those constraints as much as I did back then and are more willing to move and chop till it fits.
You point out so many ideas about which I had no clue and am anticipating putting into fruition. These are wonderful posts, Bunny. Thank you for the energy and time you put into creating and explaining them.
ReplyDeleteYou're welcome, Lyrique Threads.
Deletewow, another wonderfully informational post!! Thanks so much!!
ReplyDeleteJoyce
"Great minds......." etc. Bunny, I have stitched my darts this way44444444 (cat on the keyboard) since about the 1980's. I get good, secure darts with little fuss every time.
ReplyDeleteI've been doing it since the 80's as well. Did we both get this on Nancy Zieman's program maybe?
DeleteThanks this was really informative Bunny! I've had some trouble with darts in ponte fabrics and I think this will help me solve them!
ReplyDeleteThis was a really great post!
ReplyDeleteI'm a new sewist (sewer doesn't look right in print :)
and love following your blog
I sure wish I could find something like this in a follow along video tutorial because I have big boobs small hips and short waist with belly and I really want to make a dress that I look great in but I always end up looking like the big lady in old Popeye cartoons Alice the Goon!
I love this post. Thankfully I had great teachers who taught me exactly where and how to dart garments. For example I have a really flat tummy and can leave the front darts out of trousers and skirts. But I definitely need two at the back, one longer and one shorter to deal with what my teacher called "the protuberance"! And one reason I like vintage patterns is that they usually have back darts and elbow darts which I feel give a better fit, especially on a closer fitting garment. Modern patterns often eliminate these darts so that many modern dress makers do not understand how useful darts are to get a really good fit. Anyway really appreciate these NLS posts which are useful even for quite experienced seamstresses.
ReplyDelete