
I have always loved ikat patterns with their bold geometrics and dry brushed paint appeal. You can see lots here: Ikat images . These designs have been around for ages and while I haven't done any research lately other than shop for them, I remember something about them originally being hand woven by maybe Guatemalans or Bolivians. I have to look into that.

For some time I have wanted to make a summer jacket. Around here you still get 40-50 degree nights and 80-90 degree days so a good light jacket is necessary. I was really needy in that department. Last fall I entered the Threads Fall Jacket Challenge and the jacket that I made for the contest is the same design I will be using for this jacket. It is Simplicity 2153. It's a classic anorak and a very versatile.
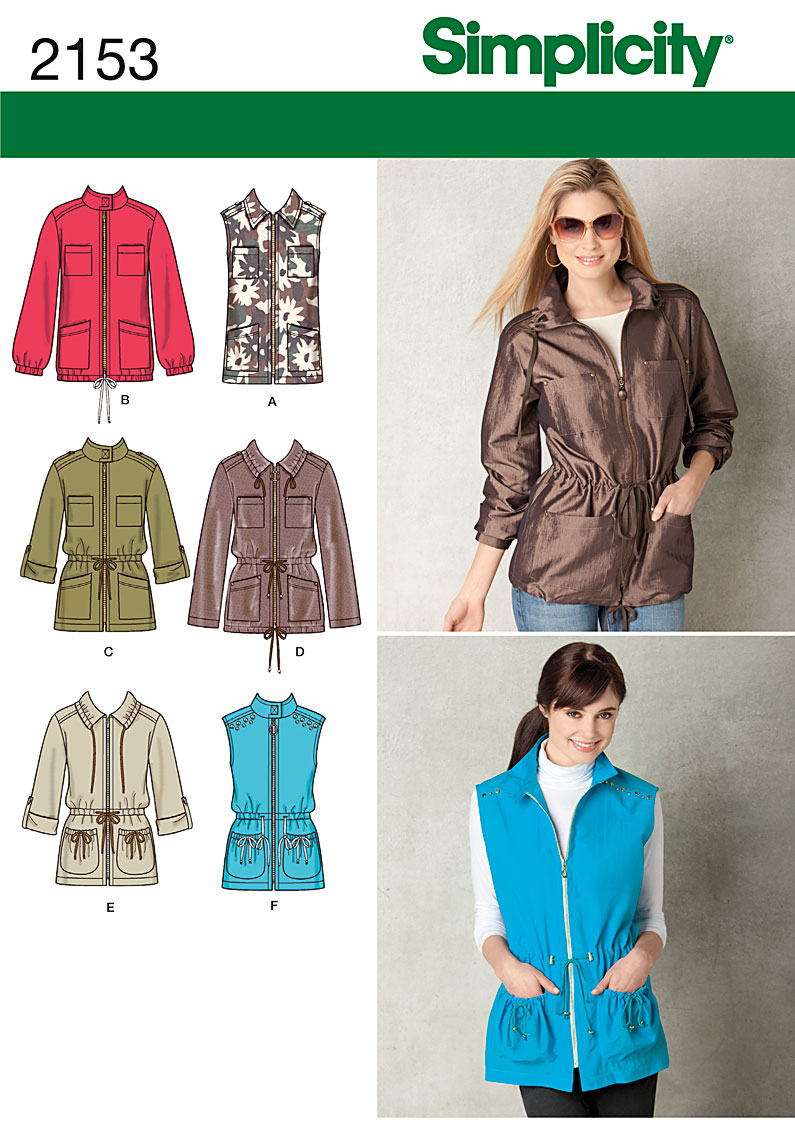
One of the really wonderful things about blogging is having a journal of your work. I knew I also wanted to flatline this jacket as I did on the original. This pattern also has all sorts of details like grommets and casings, yokes, etc. and it is great to have the resource of the previous post to refer back to.

Since I am still getting over my recent pattern matching fail I paid particular attention to what was going on with this design. The first thing I did was establish my bust point so I wouldn't have the ikats landing on my real estate in an awkward fashion. Then I set about cutting the first piece, the front bodice. All pieces were cut in singular layers.

Once the first piece was cut, I laid it on top of the fabric, matching the design. Then I cut the second piece out using the first bodice as my pattern.
Now to match the side seams, NO! I got them perfectly matched and realized that I paid no attention to where the design laid out on the back bodice. It was then I realized that with a large motif like this you need to establish the lay of design on any pattern piece before attempting to match. In other words, I took the back bodice pattern piece and laid it out so the hemline area lined up with the front and the ikat was centered on my back, not off balance. Then the side seams were matched on the vertical as a perfect match on the horizontal would leave the motifs off balance on the back bodice. You have to make decisions with each piece on how to match. It's not always black and white, at least at first glance. When I got to the sleeves it was the same. I needed to establish the center of the column of ikats in line with the center of the sleeve where it starts at the shoulder seam. After that I proceeded to match the sleeve with the bodice. Whew, lots of words, lots of concentration but think I did it ok this time. At this point all is cut out and ready to go.
A word about the fabric. It is a definite home dec print and I absolutely love it. I was looking for something with a blue jean coloration and when it arrived it looked even more so than it did online. I got it from Fabric.com, 22.99 a yard so not one of their bargains. It is really nice quality, for sure. I did serge the edges and machine wash and line dried it. The fabric softened nicely but still has that heavy linen look. I think with the flat lining it will work up to just the right weight.
I am going to "unit sew" this garment as much as I can. I like sewing that way, particularly on garments with varying details like this one.
I am still working on my friend's gown. I did a second muslin, which I think will be good and she will try that on this week. I sure hope this comes out nice. My beading is continuing as well and I am such a feeble beginner, but I am determined. When I have something to show I will....Bunny


I'm looking forward to seeing the finished jacket - I've been eyeing off some ikat in a local store but its something I've never sewn and haven't even seen any RTW garments in it locally so it will be great to see it sewn up.
ReplyDeleteI think you just have to be aware of pattern, where it lays out, and matching. You can do it, Suzy.
DeleteThanks for the post. I look forward to seeing the finished product.
ReplyDeleteThis looks like a great Ikat to wear with denim. I just studied your linked post on the Adirondack jacket (very lovely as well as educational), and I'm curious about the Hosta in the upper right behind you in the zipped up photo. Are they Hosta Montana? I'm looking for a very large-leafed Hosta to plant all along the edge of the forest and limestone beds behind our house. Thanks.
ReplyDeleteI, too, wish I knew what variety they were. They are truly the largest leafed hostas I have ever seen and each plant is huge as well. One day, at Kmart, after a wicked heat wave at the end of the summer, I saw these brown little hosta sprouts in the garden department there. They had at the most three leaves and most were burnt out from the heatwave. Knowing you can't kill a good hosta, I bought all they had for a dollar each, maybe ten or twelve and planted them around the yard. Next spring we were amazed when these giants came up and they are the pride and joy of my shade garden. Our chickens love to eat them as do the deer so it is a constant battle to keep them happy. Thanks for noticing them.
DeleteThis will be another great project to follow. I love blue and white. Wikipedia is helpful on the subject of ikat. I came across some while living in Japan. This is a link to a photo of two I came across while there: http://www.pinterest.com/pin/189854940516483167/ The top one is a cotton kasuuri and the bottom is a silk oshima.
ReplyDeleteThose are beautiful, Georgia.
DeleteI love them too Bunny and I know your jacket is going to be gorgeous.
ReplyDeleteLove the print! The first thing that came to mind when I saw it was "denim". :) I can't wait to seed it!
ReplyDeleteSo excited to see that you mark the bust point right at the beginning of planning and cutting!!! Everything is determined from that point and yet few women ever mark that or know where it should be. Ikat is so mysterious...draws you in making your eye move up and down or sideways depending on the arrangement of the fabric. I'm sure this jacket will be the perfect addition to wearing with jeans. Looking forward to following along on this new adventure, Bunny!
ReplyDeleteTell me again, Bunny. What is unit sewing?
ReplyDeleteAnd, what is flat lining?
DeleteCissie, this is something that I believe started with the Bishop Method of Construction. You make all the parts before putting together the garment. So when I do this I make the pockets first, then cuffs, then collar and other small pieces. Then I do the sleeves and after all this I put the garment together. Since I really enjoy the fiddly sewing this method is right up my alley. It makes sewing more enjoyable, IMO. Conventional patterns would have you sewing the shoulder seams together first, then side seams and doing the "parts" further up the road.
DeleteAnon, flat lining is a method that lines your garment and gives it a Hong Kong seam finish in one process. There are a few links on how I do it if you look above and click on "tutorials" right under the header. It is something I learned from Threads magazine years ago and it gives such a beautiful finish. Also, if you click on the link in the second paragraph, the one about the contest jacket, you can see what it actually looks like on the inside of the finished garment. I think it is a lovely technique.
DeleteLooking forward to the flat lining. Never tried it before, but it makes so much sense. Fresh fabric pattern. Love those blues.
ReplyDeleteIkat is made all over the world. The Fowler Museum on the UCLA campus often shows ikats. One show included a demo of how single and double ikat is made.
ReplyDeleteBasically, ikat refers to fabric whose threads are dyed before weaving. It's more work, and hence more expensive.
To make single ikat (yours is printed to resemble that), threads would be bound to keep some areas white, and then dipped in dye. The threads would be put on a special ikat loom and the warp threads would be shifted with pegs to create the zig zag. Solid yarns may be interspersed with the resist-dyed yarns to make distinct motifs.
If you see ikat with a cross-hatch look, that's done with double ikat.
I really like the look of ikat. But, the cost of true ikat is prohibitive so I am glad that so much printed ikat is available. However, I want people to appreciate the real stuff and understand why it costs so much. I don't want those artisans to lose their livelihood.
Thank you so much for that information. You are right. Such skills are the treasures of a culture.
DeleteWow, Bunny, this post and the comments are full of valuable information, thank you all so much! I will be following along with your jacket. I love the fabric!
ReplyDeleteBeautiful fabric. You should end up with a really nice jacket
ReplyDeleteTerry
ooo i can't wait for this, i'm in love with ikat too. i love seeing the process!
ReplyDeleteStunning fabric! I cannot wait to read more about flatlining, it's really something I would like to try in the future!
ReplyDeleteThis is going to be one very lovely jacket!
ReplyDeleteBunny, I'm in love with your fabric! I think it will look especially fantastic with jeans...and maybe one of the terrific white shirts you have made. This project is SEW exciting and I very much appreciate that you're letting us follow along : ).
ReplyDelete