First, thanks for the lively conversation regarding Liberty Tana Lawn. It's fun to share opinions, isn't it? It's what makes the world go round and the sewing blogosphere interesting, fun, and with a depth not found in other social media. Thanks all for you input.
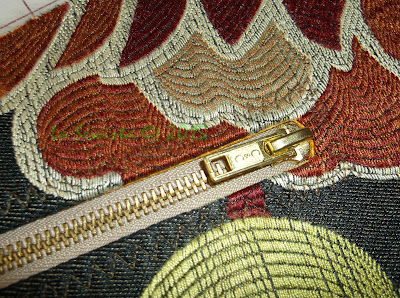
I spent a good part of this afternoon putting the zipper in the top gusset of the bag. FWIW, I am doing this bag totally out of sequence. Why? The interfacing will make this bag fairly stiff and I want to turn the bag as little as possible to prevent cracking. Secondly, in the pattern the upper gusset is set into the inside corners of the sides, all lined and interfaced. That is a recipe for disaster IMO. So the lining will be separate and I will use Shirley Adams' wonderful technique for doing inside corners that you can see here. Fingers crossed and I will let you know how it goes. Above you can see the completed zipper installation. I use upholstery zips a lot. I love their neutrality, large metal teeth and sturdiness. This one was the perfect highlight for this bag. Here's a little rundown of how I went about it.
When I make bags I do something I have really not seen mentioned by other bag makers, but very important to me. All interfacing is cut WITHOUT seam allowances and then fused. This eliminates huge amounts of bulk and gives a better finish to the seams. Remember, per Roberta Carr, "her" number one rule of sewing is to reduce bulk whenever possible! That's worked well for me. Above I am using old fashioned colored carbon paper and a serrated wheel to mark the seam line on the fusible fleece. That will be the cutting line for the interfacing. The results:
Once the gusset was interfaced it was time to put in the zip. This involved sewing a rectangle and turning it, just like you do for bound buttonholes or welt pockets. Here is the lining I chose. Light colored linings are important to me in a bag. This one has the added feature of some glitter. It is a simple quilting cotton, not the best quality, and therefore heavy and with body, just fine for its intended use.
Here is the zip installed in it's "window".
This zipper will get a lot of use, another reason for the heavy upholstery zip. Because of that heavy use I don't like to do the usual row or two of topstitching. Instead I use the triple zigzag as you can see more clearly in the first photo in the post. It's served me well. It's ok to not follow the pattern. Utilize your machine and all of it's wondrous abilities. With this fabric the stitches sunk right into the fabric. This is what the zip looks like on the underside.
This was enough for today! Next will be getting the bottom of the bag together and doing those inset corners.
I've decided this may be a Christmas gift, or not. I am also working on some jewelry gifts for my favorite women. More on that later!......................................Bunny


Oh, this will be a wonderful gift, or not. ;-) Great tip on the interfacing, and I've never seen a zigzagged zipper....it looks so nice and secure! So looking forward to the finished bag. jenmiller.
ReplyDeleteI used the triple zigzag. Each zig and zag has three stitches in it. It's very strong and that's good for a much used zip.
DeleteLove, love the zig zag topstitching along the zipper. What a great idea. I too prefer bags with a light color in the inside. It makes it so much easier to find things.
ReplyDeleteWhen I first started making bags I would try to coordinate the lining and outer fabrics. That was fine but I would occasionally end up with dark lining and I learned that it just is one big black hole! So now I go for the light.
DeleteLooking at this post looks like I didn't do much sewing today but I think I have a virus of some sort. DH and I are both aching and yucky, cough, etc. I'll do more as soon as I feel better.
Impressive as always. Looking forward to seeing the finished project.
ReplyDeleteI always learn and refresh my knowledge when I stop by your blog. Thank you! Should have been cutting the interfacing this way all along. I've always cut it out the same size as the pattern piece and then trimmed, which never yields a product with great accuracy. I just had a head slapping, "Doh!" moment, but thanks, I needed that.
ReplyDeleteGlad to help. Reducing the bulk makes it easier to sew and press the seams too.
DeleteThanks for the great tips! I've bought some upholstery fabric for making a bag also. Now to find upholstery zips
ReplyDeleteGreat ideas! I also like to use light colored linings whenever possible. I like the fusible fleece without the SA, that must make it so much easier to handle.
ReplyDeleteLove the picture of your Mom and you!
ReplyDelete