Sewing Vloggers

Showing posts with label bags. Show all posts

Monday, February 13, 2017

Bag Hardware


What you see above is a bag fresh from the thrift shop. I paid fifty cents for it. The hardware will be removed by cutting the bag apart. Then I will clean and  polish up what is clearly very dirty hardware and add it to the collection. 


I like to keep as much of the hardware as I can in little plastic ziplocs otherwise the pieces will scratch each other. I also buy hardware as well. Here are a couple of resources:


That nasty bag I just showed you....here's why I bought it:


Is this not the coolest? It is a key fob permanently installed into the interior of the bag. I love it, snake chain and all. I would put one of these in every bag I make if this were available. Hmmm,,,,I think I need to talk to my resources, don't you? 

I have been busy with the fur backpack and it is nearing completion. I have learned that I really need to hand baste seams for the machine to give me accurate seam allowance widths. 


Above you can see how I shaved the fur off off the body of the bag. That is because I decided to add two slip pockets on the exterior and it would be too much bulk otherwise. I have learned that many furs are backed with knits, so really need some substantive interfacing. I've added Peltex all over most of this bag and like the effect. It gets much more shape this way and otherwise it would be a sagging ball of fur. I've also found hand basting is critical to deal with all the layers of fur/lining/suede. This has a nap, albeit much longer than a velvet, and needs that security of basting just like a piece of velvet. Binder clips and/or pins are fine but this really needs to be handbasted. I am liking and enjoying this so much I may make another with a different fur I have. We'll see. Spring will probably call first! 

I would normally have the bag complete at this point but I am remodeling a bathroom, pretty much  on my own. My husband is not in a position where he can help me physically and I really don't want to spend 14,000.00 for this, the cost of my last bath redo. So I am pretty much on my own here with lots of wonderful feedback and encouragement from him and that's great. I have spent the last three weekends working on the bath and then sewing. I ripped out aging ugly wallpaper. Remember Venetian plaster, as in faux wallpaper? I swear I will never wallpaper again. Then it was remove the glue from the walls with two days of work and two different cleaners. That brought us to today which was mudding the sheetrock and letting it dry. Next weekend will be sand and remud as needed then hopefully start to paint. While we have a pretty good idea of what we want for knobs, paint, faucets, etc.....we will go shopping next weekend for all those goodies and see what sticks. It will be a four day weekend for us so hopefully we can make some major headway on this project. I definitely want it done soon so I can concentrate on other distractions. I will keep you posted and hopefully will have that bag done soon. I am really liking the results so far.......Bunny

Monday, February 6, 2017

Trimming Fur


My plan for getting the bathroom remodel done and the bag done at the same time got flummoxed a bit this weekend. Bathroom day found me with some fast moving, just short of violent sort of stomach virus. With the mess in that room, my sewing day had to become the bathroom remodel day on Sunday. ALL wallpaper is now finally down. What a chore and I will never wallpaper again! Next weekend will have me doing a TSP wash and then mudding the walls where needed. That will need to dry well so the weekend after it will be paint. Then I will start on the cabinets. We are still not finding the perfect lights but that is more a logistical issue with our cabinets. We'll find them! 

The good news is I feel great now and did get a bit of sewing in this morning before work. I decided on a fur flap instead of the suede and thought you might want to see how I trimmed the seam allowances. 

Once the fur piece is cut out it's flipped to the right side and the fur is brushed to the side, exposing the edge of the seam allowance. 

Then I put a little pressure on the piece and roll it away from the table so the edge of the seam allowance is facing you, sort of standing up. 


With the seam standing up, just slip the points of your shears about a 1/4 inch down and start snipping and sliding down. It goes quite quickly. Cut a few inches. Rub off the cut fur and put it in the trash then snip some more. 


Here you can see the shaved seam allowance, ready to stitch! I find it's good to be a bit conservative with the cutting. The shaved area always seems bigger than what you think you're cutting.

I hope this bit of a hint  helps someone out there. It works a lot better than trying to cut fur out out of the backing with everything laid out flat. Hopefully next time we talk the bag will be close to done.........Bunny

Sunday, January 29, 2017

The Lucy Fur backpack continues


It took me most of the day to get everything fused for the backpack. There were all sorts of straps, flaps and the fur pieces.  How do you fuse fur? You don't! What I did was first remove the seam allowances on the interfacing pieces. I cut a piece of quilting cotton the same size as the fur and fused the interfacing to that. Then this fused interfacing/cotton combo was stitched to the fur pieces with a 1/4 inch seam. I found binder clips really helpful with sewing this to the fur pieces.


This is also my lining fabric, a quilting cotton,  but I had extra so that is what I used to fuse the peltex to for this piece.  All of the fur pieces had their seam allowances "shaved". That was pretty easy and I just held the fur taut with one hand and slipped the point of my shears about a 1/4 inch into it and cut a bit at a time. It really went fast and now the seams will be easier to sew.  "Reduce bulk whenever possible." Thank you, Roberta Carr.

Below we have a perfect example of why we stabilize and do test stitching before starting a project The stitches on the left, so nasty, were just stitched on two layers of the faux suede. The top right stitches have stabilizer and you can see how nice and smooth they are.


It's also a good idea to try your stitches with the interfacing that will actually  be used. I know the flap will be topstitched and have a layer of fused Peltex, really thick, hard stuff. I decided on a 3.5 stitch length and a "triple stitch" for the topstitching needed. Here's an example. The stitches on the right are just a plain straight stitch. The others are "triple stitch".


This is the same "triple stitch" that some sewists use to stitch knits. No, no, and more no. Why? It's overkill AND have you ever tried to rip a triple stitch out a knit? I guarantee you will throw out the garment first. So keep your triple stitch for topstitching which it does beautifully and use a simple zigzag or other option for your knits. Rant for the day!

I have a big wallpaper removal project going on at home and have been handling it one day each weekend and the other day for my sewing. It keeps my sanity that way. So this bag may take a bit. longer than I hope but I have a plan to get it done (and the wallpaper, which I've decided I hate),  One thing about this project, and it is a good thing, is that there is a huge amount of fusing, good because the end product is superior. This backpack takes 3 1/2 yards of woven SF101 interfacing! That is because the bag is all interfaced as well as the lining. An interfaced lining really makes a difference, IMO, and you find the better bag Indie patterns specify that. The Big Four never do. I've sewn quite a few Big Four bags and have never seen the linings interfaced. So far all my experiences with Indie Bag patterns have been really positive. Keep in mind I have only made Swoon and Emmaline bags. I do hope to make a Blue Calla bag in the future as well. I really think those three are the top of the heap.

I think that now that the fusing is complete the actual bag will go together quite quickly. Fingers crossed for a completion next weekend! In the meantime, this is what came out of the seam allowances on the fur.....Bunny

Sunday, November 6, 2016

Sophie's Mini NCW, my #5!


At this point all of my grandchildren have had bags made for them in the past couple months. The one above, which I think is my favorite so far, is for Sophie, a fashion conscious 11 year old young lady. I have learned that girls her age are really into small bags with cross body straps. I provided both the cross body strap as well as the wristlet strap.


The camera is playing tricks making that wristlet strap look extra long. It's not. The mini is quite small, about five and a half inches across.

I've reviewed a mini and the NCW before and you can read that here: NCW

Here's the deets on this one, which really is my favorite of all.


Fabric:

The print fabric is a 100% cotton from the quilting area at Joanns. It is the same fabric used in the Stella Weekender diaper bag I just finished. The print is used for the lining, flap and straps. For the body of the little bag I used a faux leather in black, the same that I used in the Boy Bags.


The hardware is from Emmaline bags.

Interfacings used were  non-fusible  Peltex, SF101 from Pellon and Decor Bond. All were purchased at Joanns using their coupons. I am now buying this by the bolt on those big discount days.

Pattern:

The pattern used is the Necessary Clutch Wallet from Emmaline Bags, better known as the NCW. There is a mini version available and this is  the second mini I have made. My first was scaled wrong, my own printing error but this one was "juuuust right" as Little Red Riding Hood says. It was a tad larger than my first and I was thankful for that. It's really important with these small items to get the scale right. Measuring is done every step of the construction in order to stay on track and when half way completed I figured out the error on Carly's bag. I had to fudge to finish hers but this one was spot on with the proper scaling.  The straps and wristlet were not in the original pattern but there is info in the files on the NCW Facebook page. That includes measurements.

The pattern for the mini is an add on to the original NCW and as such only contains that which makes it different from the larger pattern. The directions are very clear despite them being written by someone other than the original designer. The mini pattern is with her blessing and featured on the Emmaline website. You will definitely  need the original NCW pattern as well as the Mini add on to get this done.

Construction:

I'll just deal with the differences from the big NCW here.


I have found it very helpful to mark the centers of all pieces of this little bag. It will definitely help you as with an item this small accuracy is critical. The mini directions for the zipper pocket simply refers you to page 6 of the bigger bag's directions for the zip pocket. No measurements were given. With the help of those on the FB NCW page I cut my zipper to 5 1/2 inches and proceeded from there. This does have the card slots of the original, but that's something you could certainly eliminate if you think a child won't need them. I kept them in mine as I think they give a "grown up" note to the bag. On the pleats above you can see the Chicago screws  being used. They are so much easier than rivets and far more fool proof, IMO. I probably could do better with rivets if I had the professional punch, etc but I just didn't want to invest in that.


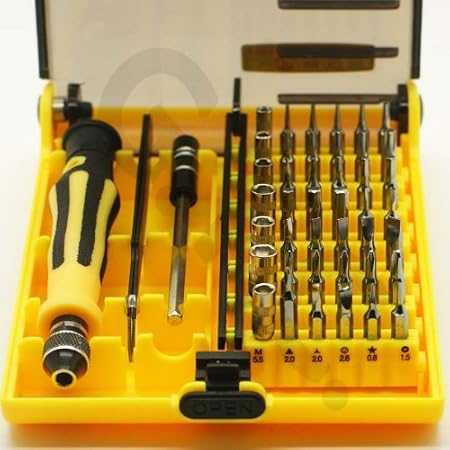
The turn lock is attached with tiny little philips head screws. I had one of that type of screw driver and it has disappeared since a couple weeks back. So I ordered this pack from Amazon of tiny little screwdrivers. I highly recommend if you are going to be using more than an occasional turn lock. Lots of bag hardware has these tiny screws, and whew, they are tiny.

This is the set I got from Amazon. It cost seven dollars and change and is Prime. Well worth it.

You can also see in the bag above I did not top stitch the flap. I simply forgot and when I noticed it I decided I liked it and have left it that way. Out of all the NCWs I've seen, they've all been topstitched. I like this one without.

The flap and body have Peltex interfacing. The lining is all fused with SF101 but I think next time I will used Decor Bond for the  zip pocket. The straps are fused with Decor Bond and fusible fleece. ALL interfacing has the seam allowances cut out, critical! The side pleat area has SF101 on the exterior faux leather. It is cut separately from the bag interfacing so the SAs could be removed. That really made the bulkiest area much easier to deal with. The bag has a really nice heft to it and I like that.

Conclusion:

This is my most favorite NCW yet and it is Number Five! I do hope Sophie likes it. It won't be my last to make either as these make great gifts. Keep in mind, this is not a quickie gift and definitely takes focus and a few "tricks". I highly recommend.

If this dress is looking a bit large for my size, it is. It was a gorgeous find, size large, from the thrift this week. Lots of fabric and I already have plans for it......................Bunny


Sunday, October 30, 2016

Three Emmaline Retreat Bags


This was a fun project, or should I say three? I made each of my grandsons one of these dopp kits. They all travel, camp, and just plain get around a lot. I think they will like their own little bag for their personal items and it's quite grown up looking after all.


Pattern:
This is the  Retreat Bag from Emmaline Patterns. It is for a traditional dopp kit shape and comes in two sizes. Here you see the three I've made and I used the 9 inch smaller size. The pattern is FREE from Emmaline and is a PDF download.

I made the two solid colored bags first for Graham and Zack. I decided to get a bit adventurous on my third effort which is for the oldest, Jack. I like how they all came out. The above pics shows the bags fully extended open. The zips are on the outside of the bags and have tabs, or what I call  "yanks" so you can hold them and yank the zipper open. You don't really yank, but just tug the zipper open like any other zip. The bags are lined and have interior pockets on each side. I chose to use just one slip pocket in these.

Fabric:
The exterior fabrics are a faux leather that really looks quite authentic. I bought a lot of it about five years back from WalMart. It's the only thing I've ever purchased in their fabric department and the quality has been quite good. I've used it for many projects and it has quite a "real" look and easily sews. 


The linings are all 100% cottons  from Joanns. They have all been given a protective layer of vinyl. It is now sold at JAs in a two yard box and is made by Pellon. The vinyl lets the inside of the bags have some wash/wipe ability. It is easily fused on. 

The interfacings vary. 

On Graham and Zack's bags the interfacing used is SF101 from Pellon/JAs and  fusible fleece as specified. You can see that in the front bag. The Pattern specs fusing the lining with SF 101 but I did not as the vinyl applications stiffened the lining a lot. 


Jack's bag, on the other hand, got a different treatment. I used a fusible foam behind the exterior fabric. But I did not fuse the foam to the bag. Instead I fused it to a layer of cotton batiste and stitched that to the bag pieces. therefore turning the interfacing (Flexfoam) into a sew in. I like how it "fills" up the space between the two layers.  I have to say I don't really have a preference. Both methods worked and the SF101 bags were easier to "seat" into their shape. But they all got there. Since Pellon SF101 is far cheaper than the Flex Foam, I'd say go with that but make sure you fuse both lining and exterior fabrics.

One of the things I discovered while making these bags is that the release paper for the clear vinyl is an excellent press cloth for the faux leather. Use it under and on top of the leather and let it cool before peeling off. It gives great pressing results, not easy with faux leather. 

The bag requires a zip longer than the bag opening in order to give that "pull tab" effect. Instructions are given on what length to cut your zipper. I might go another inch longer next time. There are also two wire frames   that give the bag it's recognizable look. I've seen  bags made without them and with. I prefer with the frame. Those without the frame still look cute but just don't have that obvious well known shape. Without the frame, it's close, but closer with the frame. The frames are quite inexpensive and come with little rubber tips that I recommend gluing on before using. Make sure you order the right size frame. Size A is what is used for these smaller bags.


Construction:

This is really a rather simple project and if you don't add an extra border and don't vinyl-ize your lining it can be made in a couple hours. That makes it a great gift. You are basically making a tote with a zipper across the top. The corners are boxed to give it the traditional shape. The lining is left open across the bottom so the bag can be turned, a bit trickier with that sticky clear vinyl, but doable. After turning and closing the lining a casing is stitched in all around the bag and following the zipper.  The wire frame is inserted inside the casing. Critical: make your casing with a GENEROUS 1/2 inch seam allowance. Mine were a bit short of that and I really had to shove to get the frame through the casing.  I ended up having to undo stitches and resew the casing after the wire was in. ( insert eye roll).  The wire of the frame is heavier than a coat hanger and quite sturdy. 

My vinyl lining and faux leather outside plus interfacing made for a quite firm little bag. That's how it is supposed to be. Instructions on the Emmaline site tell you that the frame needs to be zipped open and shut several times and will eventually seat itself properly on it's own. It's true. I just kept opening and closing the bags and they took their shape after a while. I believe this process is much easier on a fabric bag. There are some adorable feminine bags made from this pattern with prints. Handles are attached and they look quite functional. Just look how the bag opens wide. How nice is that for a women's bag?
.
Here is the inside of Jack's bag, a cotton batik that's been vinylized.


Above is a close up of the zipper installation and the wire frame channel next to it. The topstitching really seems to sink right in this faux leather.


In Conclusion:

This is a great design, easy to make, and FREE. It looks better with the specified  wire frames so I recommend them. A nice zipper pull , which I did put on Jack's, adds a bit of panache as well.  If you feel that you haven't been sewing enough for the men in your life and would like to make a gift that is quick, looks good and is functional, the Emmaline Retreat Bag is for you. For the women in your life, this would make a great makeup bag and I might make myself one out of some cottons. I will definitely be making more of these and I hope you give them a try. As always, NAYY.........Bunny

Three Emmaline Retreat Bags


This was a fun project, or should I say three? I made each of my grandsons one of these dopp kits. They all travel, camp, and just plain get around a lot. I think they will like their own little bag for their personal items and it's quite grown up looking after all.


Pattern:
This is the  Retreat Bag from Emmaline Patterns. It is for a traditional dopp kit shape and comes in two sizes. Here you see the three I've made and I used the 9 inch smaller size. The pattern is FREE from Emmaline and is a PDF download.

I made the two solid colored bags first for Graham and Zack. I decided to get a bit adventurous on my third effort which is for the oldest, Jack. I like how they all came out. The above pic shows the bags fully extended open. The zips are on the outside of the bags and have tabs, or what I call  "yanks" so you can hold them and yank the zipper open. You don't really yank, but just tug the zipper open like any other zip. The bags are lined and have interior pockets on each side. I chose to use just one slip pocket in these.

Fabric:
The exterior fabrics are a faux leather that really looks quite authentic. I bought a lot of it about five years back from WalMart. It's the only thing I've ever purchased in their fabric department and the quality has been quite good. I've used it for many projects and it has a genuine leather look. 


The linings are all 100% cottons  from Joanns. They have  been given a protective layer of clear vinyl. It is now sold at JAs in a two yard box and is made by Pellon. The vinyl let's the inside of the bags have some wash/wipe ability. It is easily fused on. 

The interfacings vary. 

On Graham and Zack's bags the interfacing used is SF101 from Pellon/JAs and fusible fleece,  as specified. The front bag above has SF101 and fleece. The Pattern specs fusing the lining with the same product but I did not as the vinyl applications stiffened the lining a lot. ( ETS to add the fusible fleece which I remebered in the middle of the night. Hate it when that happens.)


Jack's bag, on the other hand, got a different treatment. I used a fusible foam behind the exterior fabric. But I did not fuse the foam to the bag. Instead I fused it to a layer of cotton batiste and stitched that to the bag pieces. therefore turning the interfacing (Flexfoam) into a sew in. I like how it "fills" up the space between the two layers.  I have to say I don't really have a preference. Both methods worked and the SF101 bags were easier to "seat" into their shape. But they all got there. Since Pellon SF101 is far cheaper than the Flex Foam, I'd say go with that but make sure you fuse both lining and exterior fabrics.

One of the things I discovered while making these bags is that the release paper for the clear vinyl is an excellent press cloth for the faux leather. Use it under and on top of the leather and let it cool before peeling off. It gives great pressing results, not easy with faux leather. 

The bag requires a zip longer than the bag opening in order to give that "pull tab" effect. Instructions are given on what length to cut your zipper. I might go another inch longer next time. There are also two wire frames   that give the bag it's recognizable look. I've seen  bags made without them and with. I prefer with the frame. Those without the frame still look cute but just don't have that obvious well known shape. Without the frame, it's close, but closer with the frame. The frames are quite inexpensive and come with little rubber tips that I recommend gluing on before using. Make sure you order the right size frame. Size A is what is used for these smaller bags.


Construction:

This is really a rather simple project and if you don't add an extra border and don't vinyl-ize your lining it can be made in a couple hours. That makes it a great gift. You are basically making a tote with a zipper across the top. The corners are boxed to give it the traditional shape. The lining is left open across the bottom so the bag can be turned, a bit trickier with that sticky clear vinyl, but doable. After turning and closing the lining a casing is stitched in all around the bag and following the zipper.  The wire frame is inserted inside the casing. Critical: make your casing with a GENEROUS 1/2 inch seam allowance. Mine were a bit short of that and I really had to shove to get the frame through the casing.  I ended up having to undo stitches and resew the casing after the wire was in. ( insert eye roll).  The wire of the frame is heavier than a coat hanger and quite sturdy. 

My vinyl lining and faux leather outside plus interfacing made for a quite firm little bag. That's how it is supposed to be. Instructions on the Emmaline site tell you that the frame needs to be zipped open and shut several times and will eventually seat itself properly on it's own. It's true. I just kept opening and closing the bags and they took their shape after a while. I believe this process is much easier on a fabric bag. There are some adorable feminine bags made from this pattern with prints. Handles are attached and they look quite functional. Just look how the bag opens wide. How nice is that for a women's bag?
.
Here is the inside of Jack's bag, a cotton batik that's been vinylized.


Above is a close up of the zipper installation and the wire frame channel next to it. The topstitching really seems to sink right in this faux leather. All construction seams are 1/4 inch.


In Conclusion:

This is a great design, easy to make, and FREE. It looks better with the specified  wire frames so I recommend them. A nice zipper pull , which I did put on Jack's, adds a bit of panache as well.  If you feel that you haven't been sewing enough for the men in your life and would like to make a gift that is quick, looks good and is functional, the Emmaline Retreat Bag is for you. For the women in your life, this would make a great makeup bag and I might make myself one out of some cottons. I will definitely be making more of these and I hope you give them a try. As always, NAYY.........Bunny

Sunday, October 23, 2016

A few things I've learned.............

You know I have been on a bag marathon lately. Right now the boy bags are complete. I decided to make one for my other daughter's son as well and had to order another frame which should be in this week. Pics coming as soon as all the frames are in. I am pleased with the results and my favorite man thinks they are awesome. My latest project, also nearly done, is another mini NCW for our other granddaughter. So the machines have been humming and the cutters rolling! Here are a few tips gleaned from facebook groups that focus on bagmaking. I really appreciate all the knowledge they share and these tips really help me out.


CLIPS!

These can be the Wonder Clips by Clover. Some order large bags of generic clips through Amazon. I just hightailed it to KMart (limited resources in these parts) and got a bag full of binder clips. They all work. Why clips? They remove the distortion of pins. Bags can have some real shifty, bulky spots too. It is the nature of pins to go in and out and therefore get a bit bubbly. Clips keep everything flat and they squoosh any thick parts right down and hold those parts solidly. It really prevents the layers from sliding. Love my clips!


RELEASE PAPER !

This large piece on top is the same paper that backed the clear vinyl I used to waterproof the linings of the boy bags. This stuff is gold if are ever going to iron any kind of faux leather. I've sewn with tons of faux leather over the years. Ironing is next to impossible. Fusing? Forget it. What I have come to do is fuse the interfacing to batiste and stitch that in with the vinyl like an underlining. It works but it is more work. Appear this slick backing paper. It stays on  while you iron the clear vinyl to your fabric. You let the fabric cool and then slowly lift it off.

I decide to take a chance. Nearly every time I've used faux leather I've had some of it come off on the press cloth despite low temps. I had enough extra on my latest project to do an experiment. I laid the paper down on my steam press slick side up. I next laid down the faux leather, leather side down, touching the slick paper. Then came fusible interfacing on top with the glue side facing down on the faux leather. On top of this a dry press cloth. Fingers crossed, I lowered the steam press, gave it a burst of steam and then held it down for ten very long seconds. I was convinced it would be one melted horrid mess. I lifted the steam press and voila! One perfectly fused piece of faux leather. I let the pieces cool, slid them off the press, cooled them some more. Then I carefully peeled the slick paper from the faux leather. NOTHING! Nothing was damaged, melted or transferred. The fuse was totally solid and the leather looked perfect. I am sure this same process could be done with a regular iron as long as the same layering is done with the release paper. It was a Eureka moment.

Now don't think you have to run out and get clear vinyl to get the paper backing. The paper behind mailing labels  is the same thing, just a smaller page. I use Avery labels a lot at work and take home every sheet of paper when a page is used up. It is the same stuff and works perfectly.


SHISH KA BOB STICKS !

Need to push out the corners of those pocket bags? No, you don't stick the point or the blunt end in the corner. Instead, take the blunt end and starting a couple inches away from the corner, rub the blunt end along the seam line. The garment or bag would be right side out. Push that blunt end along the seam and right into the corner. Now run the chopstick along the other seam line on the opposite side of the corner in the  exact same fashion. You will be amazed how well this works and how stress free and simple it is. You have to push that stick right on the seam line starting a distance from the actual corner. I don't get the physics but it really works. I am a total convert for corner points now.


LOW TACK TAPE !

This is used to cover that nice hardware once it is installed. It keeps the scratching down and I will do this the minute any hardware is installed from now on. This turn lock tooks some serious chiseling to get installed but in the end looks great. This is Sophie's bag that I worked on today. It is so close to done and there is a lot of color in  it that you can't see.  I'll show yo later. Look at all those clips doing their thing!

**************************************

This week has found us leaving  months long drought status. While we were blessed with incredible weather all summer and fall a deluge the past three days has filled the wells and given everything a good solid drink before winter sets in. At the end of the rain event, the temp dropped,  the snow began and the sun came out. I thought I'd share a few pics Ern and I took on our sojourn today.  This is an area called Red Tavern Road where everyone lives off the grid and the river is running wild. 

 A little blowdown. 


And this last pic I took in the rain a couple days ago on my way home from work. It's a half mile from the driveway and it just took my breath away. What a beautiful goodbye to a lovely Summer and Fall....Bunny


Tuesday, October 11, 2016

The Stella Weekender


Here it is: the Stella Weekender from Swoon Sewing Patterns. I waited a bit to get some lovely fall background for the main pic. I  think it will make a nice gift for my nephew's wife and new baby girl. It was not hard at all and it's size and softness made it quite manageable under the presser foot.

Pattern:
This is my first Swoon pattern and it is a PDF. The Stella Weekender is available from Swoon Sewing Patterns. It has regular handles on top and a removable long strap for some more convenience. There are two different sized cargo pockets on the front and a large zipper pocket as well. The outside of the bag has slip pockets on the back side. The inside is lined and there are slip pockets inside, too, but you can do an optional zip pocket inside if you like. I didn't.  Piping is not mentioned in the pattern itself but many of the versions shown on the site and on the Swoon FB page are piped. You know I love piping and this was a great opportunity. The PDF comes with clear pattern layouts.At no place does it tell you to fold the main panel to make the pattern for the Open Pocket which did flummox me for a while. I eventually figured it out and it was really no big deal.


One thing I like about PDF bag patterns is that there may be many pieces but they almost all are small and fit on one page or even several to a page. Other pieces are cut from measurements and that is fine with me. Rotary cutters and mats make that easy. This bag has 37, yes, 37 pattern pieces to be cut out and 31 pieces of interfacing as well. The biggest chore with the pattern, as with most bags, is all the cutting and fusing. Once that is done the project flies. Another thing I like about the PDF directions is the size of the pages and the white space on each page. I've made copious notes in that space as I've gone along and that will be really helpful for the next time.

Fabric:
The exterior fabric and lining are quilting cottons from Joanns. The exterior fabric was one of their "premium" quilting cottons and the lining was off the shelf. For the piping I used a poly/cotton blend called Symphony.

All of the lining is fused with SF101 from Pellon, a fusible cotton woven. The exterior gets fusible fleece and some SF101 as well. The gusset has a piece of Peltex fused in at the very end before adding the lining. Peltex is that really hard fusible often used for bag bottoms. In the end this is a soft bag. I've worked out a personal preference  for a different interfacing configuration that I use for most of my bags. That method adds more structure. But this bag is really meant to be rather soft and I think it looks fine that way. I also always like to try the construction the way the pattern specifies before I do my own thing with it.


There is black hardware on this bags to go with the fabric and black zips. I used black D rings and swivel hooks that I got on Amazon. It's not easy finding the black in the size I needed from the bag purveyors but Amazon had it no problem.


Construction:
I followed the pattern sentence by sentence and checked off  each sentence with a pencil as I completed it's task. You do have to pay close attention but nothing is difficult and the directions are definitely clear. It is critical to read through all of the instructions before starting.

Things I'd change next time: In the straps I would use Decor Bond on one side and fusible fleece on the other. I think it will fill in the pieces better and still give stiffness. I also think it would eliminate some of the wrinkling, not much, that happens normally on the concave side of the strap. I also really like to triple zigzag my bag zippers instead of topstitching. I find that attractive and sturdy, just my signature thing.

When piping I got a little overly enthusiastic and piped all around the cargo pockets. DON'T DO THAT. It totally messes up the measuring and placement and took me a lot of unnecessary fiddling to get right. Just don't do it, trust me.

Make sure you move the inner pocket of the big exterior zipper pocket out of the way before sewing down those cargo pockets!  I didn't and  my seam ripper got a workout!

If I made this bag again, I would do the flaps and gusset out of a black faux leather. The bags I've seen on the site, after mine was cut out, that had contrasting flaps and gussets  out of a contrasting solid really looked polished.

I also would make my piping smaller. I am used to tiny piping for heirloom garments and I think a thinner piping would make a sharper, crisper look. But, again, that is sort of my signature thing.I just like tiny piping.  I don't know what size cord I used here but it was home dec cord, may 3/32.

In conclusion:

I recommend this pattern but just not as a first attempt. I suggest contrasting flaps, gussets and straps for a sharp look. Be prepared for some serious cutting and fusing, the norm for bag making. The actual construction, especially if you don't pipe, should move right along. This could be really nice in a heavier tapestry or home  dec fabric.

**************************************

My boy bags are complete except for the addition of the frames. I bought the wrong size, my fault.  You can see that reality hitting as I tried to put the too big frame in the casing. The right size is on order and as soon as the frames are in I'll show you those. Not sure what my next project will be. I am toying with the idea of a fur backpack. Love what I have seen of those.......Bunny


The Ray Pinafore, 2025's Epic Fail

  Happy New Year and welcome to my epic fail of 2026. I guess you have to have one, right? This is the Ray Pinafore from Paper Theory Patter...