
This is a FABULOUS pattern. Why? Well, if you buy it in the right size it should fit most figures right out of the envelope with no further adjustments. It is also very easy to sew and would be great for beginners with just a few garments under their belts. I love it's versatility as well, as you will soon see.

Pattern:
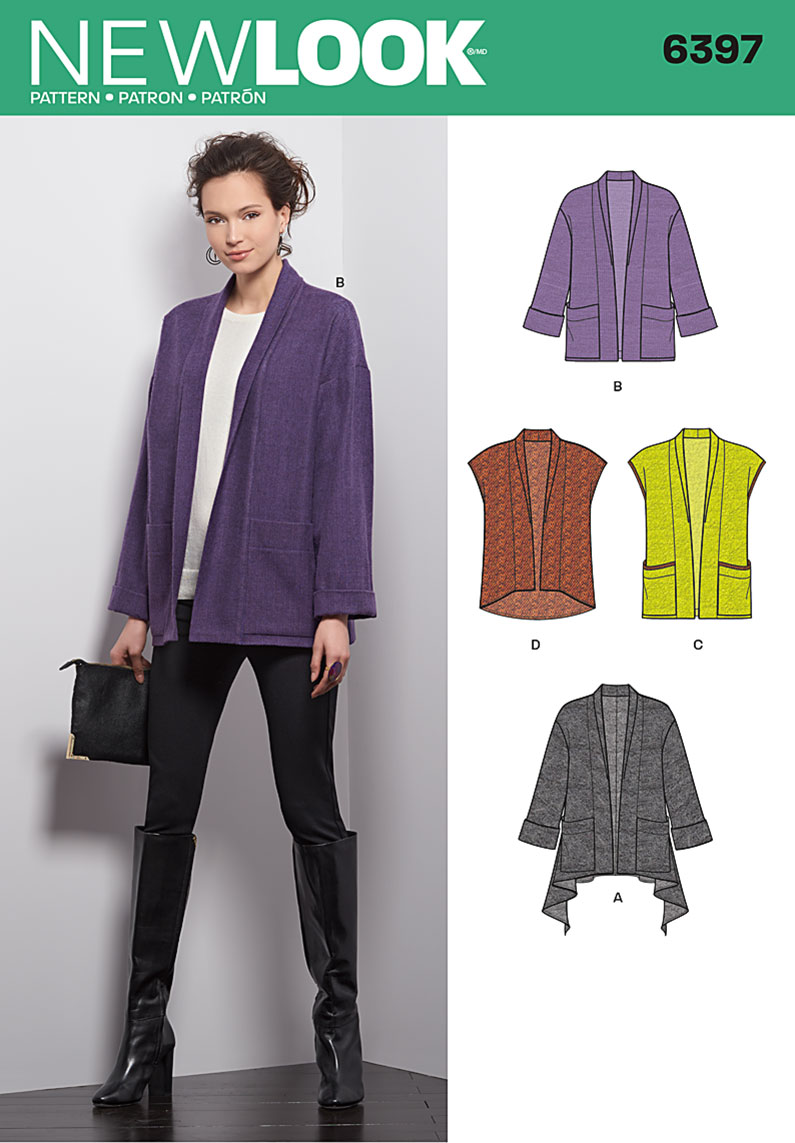
This is New Look 6397, a shawl collared jacket with the options of big pockets extending across the bodice, hi/lo and/or shaped hems and fold back sleeves. I took some design liberties with my version as , unlike most reviewers on PR, my version was for the summer and would function as a light topper. Recommended fabrics such as fleece and wools indicate the intended winter use for this jacket but don't let that fool you. You can make a lighter weight version just fine. Based on reviews, I think the lighter weight version actually looks better. I do think that is because the wrong size may have been cut by some reviewers who do reference the largeness. This pattern requires some flat pattern measuring before cutting. It is large as it is a jacket so there is a lot of ease there. A summer topper won't have sweaters and turtlenecks underneath so won't need all that ease. I made the smallest size, a 6, and the bust and hip were 40 and a 1/2 inches. As a jacket that worked out perfectly for me but flat pattern measure for yourself before cutting or make a muslin as some jackets I have seen appear too large.

The sleeves are dropped and require no easing, so very simple for newer sewists and the shawl collar application is quite simple as well, merely a long strip going from hem, around the neck and to the opposite hem. The pattern has it folded around the neck to give the shawl affect. For myself, I have a long neck, I preferred it just used as a band.
Fabrics and Notions:

This is made mostly from my favorite summer fabric, Kaufmann Essex Linen, a yarn dyed combo of linen and cotton. It has that glow of yarn dyeds which I love. The periwinkle is an Irish linen I had left from a dress I made last summer and you can see here, beautiful fabric. For the Hong Kong seams I used a rayon challis. I will be referring to the Hong Kong seams hence forward as HK seams.
Since these were very ravelly fabrics I didn't want to serge them with a neutral color or spend time changing thread colors on the serger. I chose to topstitch with a triple zigzag using matching threads. A word about thread: on yarn dyed fabrics it can be a challenge to get the right thread color. The green fabric is really a rather dark green warp and a lemon yellow weft and this combo gives a lively chartreuse effect. I've learned with yarn dyeds you have to pick a color somewhere in the middle.

Construction:
I made two fit alterations.
* The first change was strictly personal taste. Since this was a warm weather topper I cut 4 inches off the length of the jacket and it was a more flattering length as well for me. Out of the envelope, the length would have cut me perfectly in half, not good.
* The second alteration was to the shawl collar. I won't be using it as a shawl collar but more as a band. I made the band the 9 inch width the pattern gives you with various strips of my chosen fabrics. I tried it on and it just didn't work. I am narrow of torso and the width of the band was just too much. I reduced the collar band by one inch and it was a major improvement, much more to my scale and I'm happy. I am sure you can see the difference. I would recommend this reduction for anyone of petite stature., reduce the band width by an inch.
The first thing I did on this pattern was the pockets. I added a bit of piping in the orange fabric and folded a band to the outside at the top of the pocket to hem it off. The pocket runs across the full width of the bodice and is roomy. I did not care for the way it is hemmed at the bottom which you can see in the pattern envelope pic. If I made this style pocket again on this jacket I would run the pocket all the way to the hem of the jacket, and hem it right in with the jacket hem. It would be a much cleaner look.

All of the seams are Hong Kong. I find with HK seams, you really have to do some thinking and planning before you start sewing that first stitch in order to get the best finish. Seams intersect and can be several layers. This is why I very rarely do all the HK seams at once before starting to sew. This jacket is a perfect case. The intersection of the dropped sleeve and it's armscye and the side seam took some thought in the end it was neatly finished. When I did the sleeves I used bands of color and the bottom band was a folded piece of the periwinkle linen, therefore no hem. I did the HK seams and now what? I needed a neat finish at the hemline but no hem, just a fold. Luckily I hadn't cut off the HK seams yet and had enough to press and tuck under the seam allowance of the sleeve. I then put in a few tiny fell stitches to secure the SA to the sleeve and all was neat. I learned a lesson. Don't cut the ends of your HK Seams until you know exactly where they will go after the seam is sewn together.

For the hem I did a facing with a HK seam at the top and ditch stitched that in.
In the pic above you can see the inside of the band. Here is where I once again veered from the pattern but it was personal choice. The pattern had the bodice seams and band seams, inner and outer, all sewn together and then finished with suggested overlocking or finish of choice. It just all looked too bulky to me. I put in the band so the exterior band was sewn on the bodice first. The seams were graded and understitched which you can't see here. The interior side of the band had it's seam pressed under and I then hand stitched it to the seam so the understitching is hidden but works its purpose. It's neat, has little bulk and looks nice from the inside as you can see above.

The last variation from the pattern was the addition of a sash. I've never been a fan of open jackets. I have no idea why. I like sashing and belting them. I made a sash that finished at 1 1/4 inches wide. When I make a sash I like to find the middle and add a pretty rigid interfacing to the center 18 inches of the belt. In this case I used Decor Bond which you can see fused inside above. This interfaced area will sit at my back waist and go to the side seam. It keeps the sash upright and in place and neat looking. I am sure this is how I will wear it most of the time, probably with some white linen pants. The sash was topstitched about an 1/8th of an inch from the edge.
In Conclusion:
I really think this is a wonderful pattern, so very easy to sew and easy to fit. Kimonos are so on trend now to and so versatile in our wardrobes. I guarantee if you make this once you will make this again and again. I have just finished this topper and this morning cut out my next project. I will be doing View D, the shaped hem vest, out of wool boucle and a really interesting lining. It will be underlined with HK seams and patch pockets. Told you I loved this pattern!!! Highly recommend!
Stay safe from Corona everyone. You are all in my thoughts and prayers and may your quarantines be filled with sewing and healthy hours.........Bunny


Darling jacket, Bunny. Love the pieced collar which really adds pazzaz. Karen
ReplyDeleteThanks, Karen.
DeleteThis is so cute! I love the color blocking, it makes it so much more elevated. Happy sewing!
ReplyDeleteThanks. I was looking at the colors in the store and they just seemed jump together. I really had no plan to block out the design. Serendipity!
DeleteThis is so creative and colorful! Love it!
ReplyDeleteThank you! I've been looking for a basic jacket, cardigan or blazer I can throw on for court. I am definitely going to get this pattern and see what I can do with it. Thank you for all your useful tips.
ReplyDelete
ReplyDeleteYou have an amazing fashion sense and skill in sewing. This is so beautiful, I just love its color and design, although I usually buy ready-made jackets from Brown Leather Jacket UK, but this jacket is also amazing ill definitely try it.
Helpful guide for improving embroidery work.
ReplyDelete