
Brrrr, it was chilly and breezy the day I took these pics and my tabard was just perfect for the weather. Think of a tabard as one of the placards outside of a restaurant that lists the special of the day or something similar to get you to come in. It is a front, a back, simple like a board, and a chain or strap to hold the two pieces together and prevent them from falling apart. I have a lot to say about this pattern.
Pattern:

I did View B of Vogue 1569, the longer length, but shortened it to be just above my knees. I love long sweaters and sweater vests. The longer view has pockets as well. This was a fun make, mostly due to my fabric choices and I am happy with those in the end.
This is a Sandra Betzina pattern. Some of you may remember her sewing program on HGTV in its early and golden days, "Sew Perfect". I watched every time I could and taped it when I couldn't. Sandra is a very knowledgeable sewist. What I often found is that she was delightfully "ditsy" and a bit disorganized. I love her Power Sewing books but when I read them, I want to reorganize the content. It is the same for her patterns and their progression of instruction but that's me. What can I say? They are still great patterns and books. I will give you some suggestions further on about how I would make the next one to make for a simpler construction.
There are lots of clear illustrations here. There is also clear emphasis on specific technique. Sandra is obviously a fan of Steam A Seam and the half inch wide type is used generously in the pocket and hem instructions. Sandra often reminds you to press and pound your seams as well.
The pattern was dated 2017 and the tissue used was really nice. It was bright white with vivid blue ink, very easy on the eyes. It specifies knits or wovens and has a stretch ruler on the outer envelope, why I don't know as there really is no fit here. Two different fabrics are specified. One is for the center sections of the tabard, the "boards" as I call them. The second fabric is for the side fronts and backs and their facings, what I call the "flanges". My flanges and my boards contrasted as the pattern specifies. One thing I really liked about the pattern is how the flanges shape nicely to the curve of the shoulder. They are not cut straight at all.

The two "boards " are held together by tabs but those tabs are at different levels. I don't like that and would make them level on the next one. See in the pic above. Installing the tabs is the hardest part of the construction, IMO, so they will stay where they are.
I love this design and it's uniqueness.
Fabric:
For my center panels I used the back side of a "throw", a woven cotton number depicting a scene by Thomas Kincaid of people loading Christmas trees onto wagons and his every present home with wasted lighting from within. I did not like the artwork. What drew me to the fabric was the woven floats on the back side and their colors, lovely. I did a blog post on this and how I was going to make it work and you can read it here.

The throw is fused on the back with Fusi Knit tricot fusible to stabilize the woven throw and hide the imagery of the Kincaid design. The little dot you see is the back side of a Chicago Screw. More on that............There is no interfacing specified anywhere. You can see the pockets. They are made with a nice quality knit from my stash that I believe is rayon. You can see the topstitching showing thru. The flanges are made from a really nice black wool flannel.

Construction:
When the tabard was complete I tried it on and I liked it but something just was not right. I started pinching it here and there and it looked so much better with a bit of shape built in so I decided it needed darts. I decided to put them on the front and back in more of a dart at the top and a tuck at the bottom and I would put a copper Chicago screw in the middle for some intentional design punch, subtle and major improvement. I think this was a petite issue and I needed this shape to make the 'boards" not overwhelm me. Chicago screws are what I call wonderful whimpy rivets. They are for people who don't like rivets, like myself. They screw into places where you could use rivets and lots of bag makers use them. Chicago screws always work. Rivets can be unpredictable. You can get them from most purveyors of bag making products.
I am going to go thru the pattern and point out some things that I thought could use some improvement or updating or organization. You be the judge.
* Betzina suggests serging the edge of your pockets. By using a knit, I didn't have to. Knits don't ravel.
* SB recommends turning in the "Board" pocket edges 5/8ths of an inch, baste and topstitch. This leaves a raw edge. I serged my "board" pocket edges, turned and topstitched. Further on when the flanges are attached the pockets are not addressed in how you sew around them, over them, thru them, whatever. Be careful you don't sew thru them. Pin the tabard pocket edge out of the way when you attach the flanges and their facings. sew the flange to the pocket only, being careful not to catch in any of the opening on the "board" part of the pocket.
* She has you attach the pockets to the front panel with Steam A Seam.
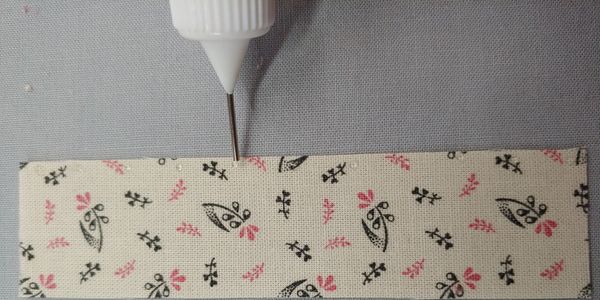
I used Acorn Seam Align. I placed down my pocket, lifted up the edge and laid down two or three dots, pressed the dots and did a few more until the pocket was pressed onto the panel. This made for an easy and stuck to the panel pocket that I took to the machine and topstitched no problem. You can certainly use Steam a Seam tape but I found this very easy.

* She has you trim the facing flange back to a 1/4 inch and then ditch stitch them the full length from the top side. I did not do that at all. My flange facings were all understitched at the edge to the other flange. Then I catch stitched the flange facing to the panel the full length of the flange. I did this before finishing the hem corner. THEN, I gave the flange shoulder area a good steam press and as you can see above, or better yet, can't see, I ditch stitched in the well of the shoulder seam on the flange. It is all very secure. That little area is the only ditch stitching I did on this garment.
* Here is how I would make big changes to the sequence of construction.
I would sew the collar.
I would sew the shoulder seams of the back and front panels.
I would sew the collar to the front and back panels. Set that aside.
I would completely sew together the flanges, tabs and flange facings, understitching the facings. Move the tabs to be even. When you make the tabs, turn them so the seam is on the back in the middle, not on the edge. Topstitch the edges, not mentioned in the pattern. Be REALLY careful about the flanges, marking them clearly when you cut them out with painters tape and descriptions. It is very easy to mix them up especially if they are all black like mine were. Put "left", "right", etc. Doing it this way will make the tab installation so simple you will wonder why I mentioned it. Trust me . The way the pattern has you deal with the tab installation is like a giant, awkward burrito method. Once you have your completed side flanges all done with facings and tabs, simply attach the outer, public flange to the front panel starting stitching from the shoulder seam down. When done, go back to the shoulder seam and stitch the flange to the back panel all the way down to the hem, just like you did in the front. After that, do the other side of flanges, same method.

Hems: When you get to the hems, SB has you enclose the facings and stitch around the hem and turn, like you would do a facing on most blouses. I ripped mine out after doing that. I found I got a much nicer finish by simply cutting the facing hem to about 3/4 of an inch, pressing it under and folding over the panel hems. I then hand stitched it in place and on the edge. I ended up with a sharper edge than sewing and turning.
In Conclusion:
I really think this is a great design. I don't think this pattern is for beginners, but those of middle/average experience should definitely be able to handle it with a little thought as to the logical sequence of events and perhaps a bit of googling to get the best results. I really enjoyed making it and I know I will enjoy wearing it this winter. It will be perfect with a turtleneck and some leggings. I can also see it in some floaty chiffon and light linen for the summer. I think it's a great design that an experienced sewist can definitely work with and make something quite special.

My sister came to visit for a few days this week. She just retired from a lifelong career as a high risk OB-GYN RN that included in its final days working with young moms in a covid clinic who had covid. She came to celebrate and we had a ball. She is as passionate about sewing as I am and we shopped and shopped and are ready to sew all winter with our purchases. I took her to my favorite thrift shop, my secret amazing little place in the woods that is always mobbed as a lot of people know this secret. We scored quite well but my favorite was this luscious oversized, wide and long and fringed velvet burnout scarf. It appealed to all the Janis Joplin inside my sixties soul. ....Busted flat in Baton Rouge, waitin' for a train.....................Bunny


