Sewing Vloggers

Showing posts with label knits. Show all posts

Thursday, August 5, 2021

This Tee Journey Is Not Easy!

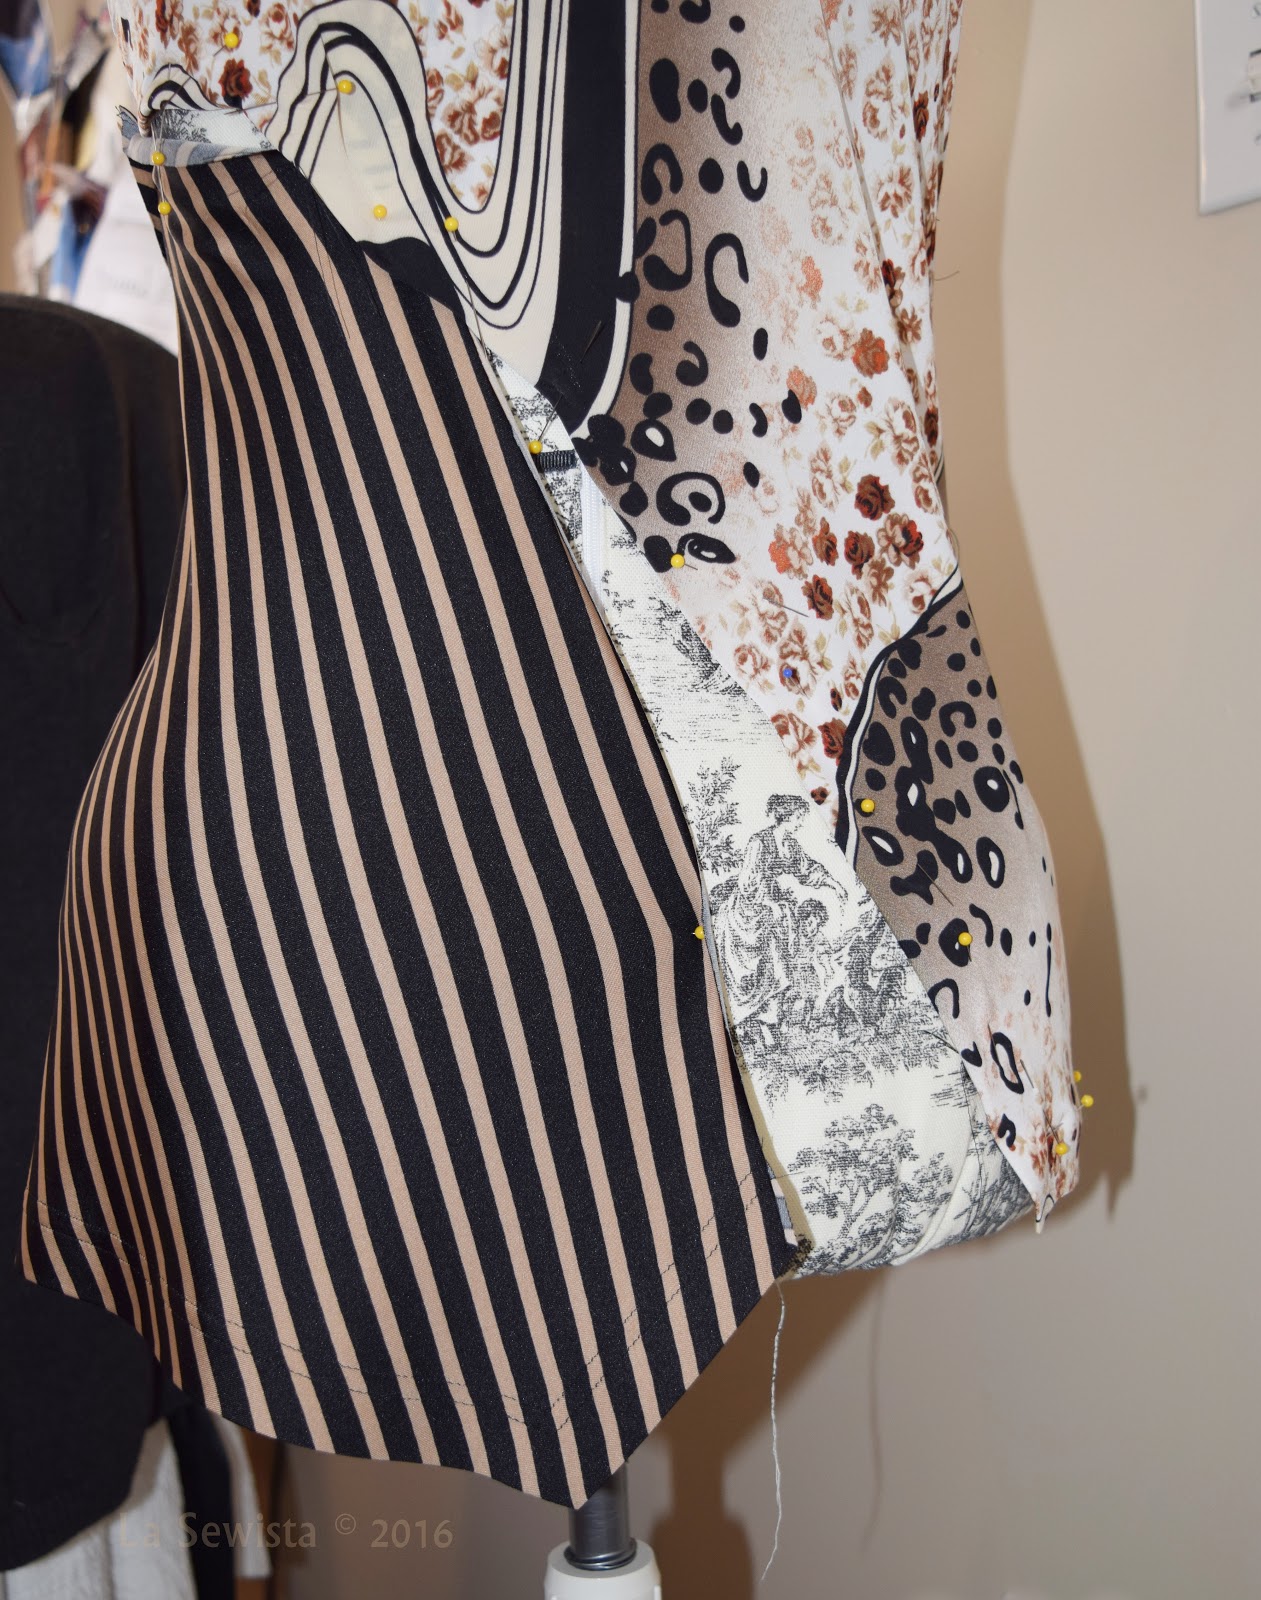
All photos have been wicked enhanced for contrast because of the black fabric. This makes for weird shadows and I apologize. 

The Tee Shirt Quest continues................and this was a story unto itself as well. I haven't hit the Holy Grail yet! I do have lots to say about this pattern. You may be thinking to yourself "she is really getting grouchy in her old age." Maybe I am but I don't think so. Yes, after a certain age our lips and what comes out of them do get a little looser but I am not getting crabbier. I just have a lot more experience under my belt at this stage and perhaps expect more because of that. The sewing world is changing and I am not sure quite what is going on with it as you will see in my review. Let's get started. 


 Fabric:

The first thing my husband said when he saw the tee was, "Wow, that is gorgeous fabric." It really is and makes a great tee. It had the stretch needed and was from ancient stash. This fabric, which I think is a rayon/poly blend interlock, came from the Fabric Fix, an awesome Mom and Pop fabric store whose owner hit the Garment District every couple of weeks and brought back killer bargains on designer fabrics and sewing notions. I think I paid 3.00 a yard for this and bought tons. I made a voluminous skirt from this fabric that I wore to death for years at work. I still have the skirt to recycle its fabric. I wish you could see it up close. It is lovely and a delight to sew. It topstitched and eased beautifully. 

Pattern: 


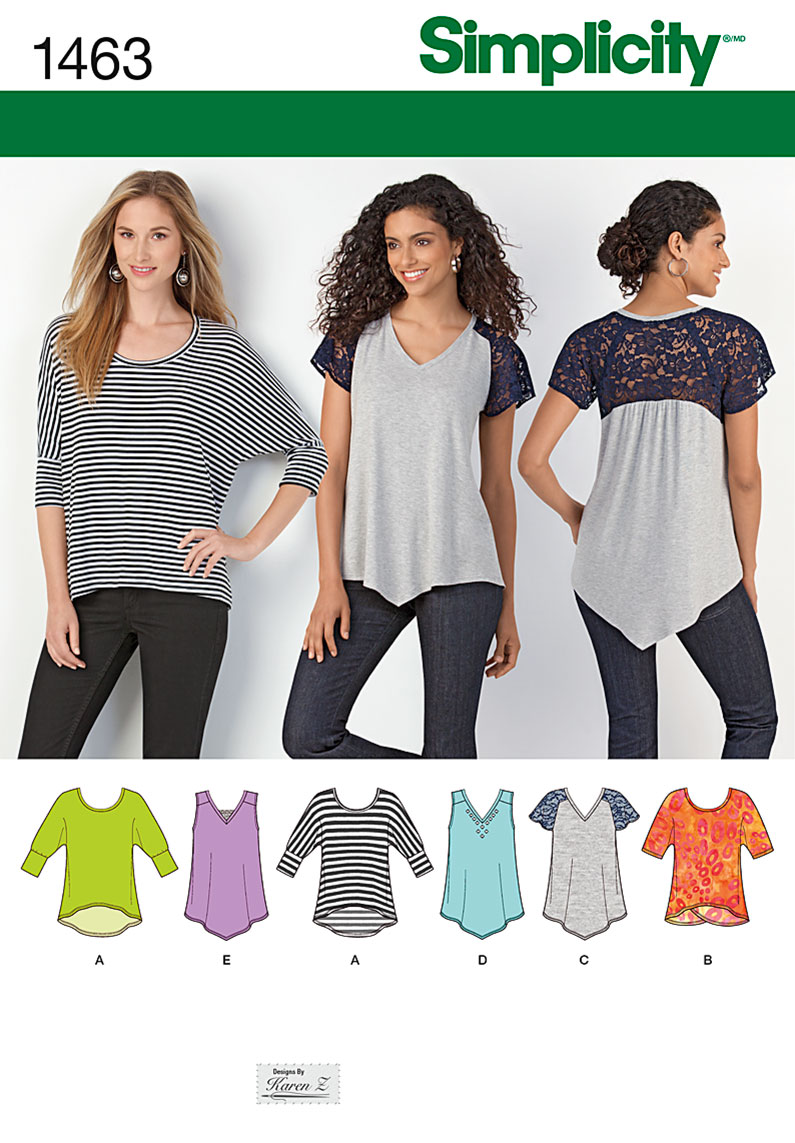
This is where it gets interesting! This is Simplicity 9229, cute little tee shirt number from "Something Delightful" ugh. You need to really look at this pattern envelope closely, the model and the back. I bought this pattern on a big pattern sale at Joanns about a month ago. I bought 4 tee patterns. Two were Simplicity with S before the number on the patterns and dated 2021.  Now I don't know what is going on with Simp, if they were sold off, acquired, owned by CSS, or Design Group, or Something Awful or what but things are different. These 2021 versions have a confusing guide on the back. It says Sizes and then underneath European. You take a look and tell me what that means. 

OK, maybe I needed more coffee, but I thought size 6 had a 32 inch bust.  Luckily for me I always flat pattern measure. Seems it was only 30 1/2. Now, for about 2 1/2 decades I have been achieving pretty decent fit with the Zieman method which put me into a size 6 with an FBA , not a big one. This pattern was way too small all over. I knew negative ease was involved and I don't like negative ease but this was beyond that. I ran to Pattern Review. Low and behold, the one review was having the same experience I was. I will let you judge for yourself here. The envelope and others like it also have no description of the garment which I found frustrating. I would think a description acknowledging the princess seams would be nice. In the photo above you will see that the cutting lines for side front are wrong for the size 10. They put the size 10 lines on the size 6 cutting lines. I did end up cutting  a size 10 and did an FBA and did a MAJOR bicep adjustment. Since I stopped working I am more active plus those health issues and have lost weight.  So my 107 pound frame jumped up in size, and after losing weight (only a number)  then I needed to add a lot more to that to get it to fit my bicep. There is just something wrong here. Read the PR reviewers comments as well, including those below her review. 


So I don't know what is happening at Simplicity but for the first time in forever, their sizing is not working for me like it has for years. 


I will be the first to admit it could be me but the PR review does give a bit of validation. I have remeasured myself and cutting out another tee right now with another pattern and we shall see what happens. 

Construction:

This fabric was delightful to work on. The pattern did call for inserting sleeves in the round so I went with it being my first try  but next time will be in the flat. Between the last tee and this one I stumbled upon Sara Veblen's method of inserting neck bands and used it for this shirt. Wow, her tips helped me get perfection. I am really happy with my results and you can see her video here on the Threads website.  The pattern did not call for it but I stayed the neckline with fusible tricot interfacing.  Before I inserted the sleeves and after doing the neckband, I pinfitted the sides and they were fine, plenty of room. It did seem to need a bit of a sway back adjustment but I would catch that on the next make.  Sleeves went in. I did the hems and done. I tried it on and it did not fit. I don't know where the fit went but once the sleeves were in it totally changed and I had no extra seam allowance to play with. I was not going to wad this shirt. I loved the fabric too much. I ended up cutting gussets for the side seams.  They were shaped like picket fence stakes adding one inch to each side and terminating in a point at the armscye. Worked like a charm but took time, ugh. Size ten did not fit at ALL. You can see it does not have negative ease, but neither does the triple size 0 model on the cover of the envelope. Is it not fair to expect my ease to match that of the photo on the envelope? With no description saying "close fitting" or anything else, I thought mine would fit like the model's, at least in regards to ease. I hemmed the sleeves and hem with my usual manner. That means a fusible tricot applied to the full hem width and stitched on the edge and again about an inch further up. 

In Conclusion:

I don't recommend this pattern. It required me to rethink a method of fitting that worked for me for decades. I feel the pattern itself is faulty and it shows on the poor guide on the outside of the envelope as well as the printed tissue.  Upon further investigation of the back of the pattern you get a "6" size, a "32" European and a "34" in Francaise. Is Francaise not European and are these measurements or what? I think those may be just representative of further turmoil within this company and if so they better get their act together as their competition is nipping at their heels with foam dripping from their mouth. This pattern is not one I will make again. I have one more I will try on the cutting table as we speak. This five foot tall, 107 pound woman cut a size 12 based on my measurements. If it fits perfect, so be it it. Numbers don't bother me. Change without explanation does.  Maybe they took lessons from Nancy Zieman and redid their pattern slopers.  We can only hope..............................Bunny

Sunday, August 1, 2021

I've changed my mind!


I have said it more than once and I know others agree with me. "I can't be bothered to make a tee shirt that I can pick up for 3 dollars at WalMart." The truth is I extremely rarely buy a tee shirt and rarely shop at WM. I have tons of tee shirts. I used them as underlayer foils against the cold when I worked and they all have some sort of text or logo on them. They are the tee shirts that are "affiliated". I hide the affiliations under layers or wear them in the garden in the summer. 

I recently watched several  youtubers looking for well fitting tees. One really appealed because it was not skin tight and it still showed a women's shape. No boxiness here!  I thought I might have  the pattern in my stash and I did. Before this I had been thinking  maybe I should get on the tee wagon and search out a great pattern, one that I could whip out over and over, one that did not have letters on it, one I could actually wear to a friend's for a glass of wine.  I was currently looking for my next project and this sounded like a good one --- finding the Holy Tee!


I dug out the pattern that I remembered the  youtuber used, even if I couldn't find it on Youtube again. I looked up reviews and got to work. Here is my review:

Pattern:

This is McCall's 6964, an oldie but a goodie. My envelope says 2014. The interesting thing is that this pattern has actually been re-issued by Something Delightful (???) as Butterick 6848. Who knew?? Hopefully the directions have been updated as well. It has several neckline styles and a tank version as well. The tank version uses the exact same armscye as the tee shirt. Hmmmmm..... I chose View C, 3/4 length sleeves, my fave, and a rounded out neckline. 


I like to follow a pattern pretty closely the first time I use it. This made for an interesting ride. Open it up and there were 7 pages, to be expected but not quite fitting with the "easy" description on the front. It is all about fitting and I can see this blowing away a newbie but they might not get their hands on this OOP number anyway. 

The first page starts with the classic pics of views then one column with a small blurb about creative ideas and more on "tips for knits". One tip was to stabilize the shoulder seams. I thought this would have been more appropriate on page five where you actually sew the shoulder seam. This pattern broke a lot of knit rules for me. I expected more finesse from such an acclaimed sewing expert. No stabilization of neckline, shoulders or armscye was shown. The side seams were stitched closed before the neckband was put on, which drove me nuts and I also thought a bit unusual. I get that you baste the side seams to check fit but I would have pin fitted as I have done with my current tee project. I soldiered on. The sleeves were installed in the round "for better fit." You know me. I am a traditional sewist. I am a total round sleeve type sewist, but not for knits, people! It's a knit tee shirt. So there was that making the simple tee more complicated as well.  Then the final clinker was, and we are sewing with knits here that don't ravel, right?  The final clinker was turning the hem under a 1/4 inch on the raw edge of the hem and then stitching. Really? Knits only are specified on the pattern. Every step of the way this garment was made more complicated than need be and that did not include any of the fitting instructions. 

Now for the fitting. There is a lovely shape to the side seam and that is what makes this garment work. That is why the youtuber loved the pattern. If you have followed me a long time you know I am not a fan of negative ease. I cut wide seam allowances here and petited the pattern to make it work for me. I've lost a few pounds lately (unintentional) and there is more ease on me than what you see on the form, just a bit but it is exactly how I like it. The shoulders fit great on me. On the dressform, the nature of dressforms, the sewn shoulders don't seem wide enough. They are. I was concerned about the bust in this pattern. I usually do an FBA for a C cup. With the weight loss I did not need one but I read through the pattern to see what to do before I measured myself for my own needs.  If I needed that C cup, I had to add a dart!!!! Really??? This is a knit tee shirt.  Anything higher than a B cup is suggested to add a dart and the pattern shows how, a complicated process for any newbie on their own. If I needed that FBA I would have just done a cheater version bumping out the sides and easing it into the side seam, done. 


Fabric:

My fabric is a lyocell jersey with a bit of spandex. It is in a color that does nothing for me but will go with several things I own and I can make it a more flattering piece with a scarf or jacket on top. 

Construction:

Well, you can tell from the pattern instructions that I would have gone about the construction very differently. I would have taped the neckline with  a fusible tricot tape. I would have used a more traditional knit method of construction, leaving the sides open until the neckline and sleeves were installed. I would never have turned a knit under a 1/4 inch at the raw edge of the hem, choosing instead to just trim back to the stitching line, which I did. 

In Conclusion:

I think this pattern could really flummox a beginner sewist. However, due to the really nice shape of it I would recommend it to those who are experienced with knit sewing and can follow their own method of construction. I also recommend it to those who prefer a top without negative ease. This skims and nicely. In the end, I like the look of my top and the shape. I did not like the pattern instructions at all.  I do hope the second generation re-issue by Butterick is more user friendly in it's directions and has a bit more finesse in it's directions for sewing and fitting knits.


I have already started another tee, another pattern and will have that review soon.  It is beautiful black knit I had in my stash and I am loving it. Above are a couple more knits that might make the tee project as well. Heavens, this last pattern bugged me. The current one is delightful, actually, Something Delightful, ha ha ha!!............Bunny

Wednesday, July 18, 2018

The Walk in the Woods skirt


The Walk in the Woods skirt is done and I love it. It is very comfy, cool and I like the look. Here's the deets:

Pattern:

There is none. I worked up the design myself which utilized the fact that I had two digitally printed panels to work with. One panel made the front and the second panel was split in half to make a back that would accommodate a zipper. Luckily the print is nebulous enough to not require precise matching.  I wanted a curved bottom edge and slits up the side. The waistband is elastic. 


Fabric:

This is a rayon knit. It is thick enough to be decent and is digitally printed with the design of a forest with blurred out details, rather pointillistic.  The colors are warm. Actually "warm and fuzzy" would be a good description. It is yummy to wear. I THINK it came from Emma One Sock but it is not on their site now. They do have some exceptional digital prints on their site. I can see this fabric working in the winter with boots and a sweater yet it is very comfy to wear today which is brutally hot and humid. Love skirts in the hot weather!


Construction:


This was a no brainer for the most part. I put an invisible zip up the back using Kenneth King's method which is one of those things that once you try there is no  going back. It is so simple and the results are great. For the waistband I used an 1 1/4 wide waistband elastic. I needed it to be fairly wide to cover my tumtum with short tops like the one I'm wearing. The panels were not shaped in any way but the fabric was thin enough to gather up on the elastic really nicely and fairly bulk free. After putting in the zip I had several inches of fabric to turn over the waistband elastic as you would a facing on the zip but I stitched the elastic into that seam as well. It snugs up really nicely on the waist. The elastic is secured at the zip, as mentioned, and ditch stitched into the side seams as well. No twisting! 


I wanted the curved hem and that was easy enough to draw out with a French Curve. As I did each of the four sides I matched the same numbers on the ruler to the fabric edges. The small hem was then interfaced with tricot and turned once. No ravelling with this knit so I wasn't about to add the bulk of a double turn, just no need to. Then I did my favorite knit hem technique, sewing on the very edge and then sewing a bit away, in this case about 3/8 of an inch. At the curve the interfaced hem was clipped and that handled the curve just fine. I used a 3.0 stitch length but the nature of this knit just sucked in the stitches and they look smaller. 


You can see how smoothly the back hangs with the zip. My hip to waist ratio is such that it really works better to add a zip rather than have a full pull on type of elastic waistband. The length was really determined by the most flattering layout of the digital print. I brought the darker stripe up to the waist area instead of the hips which  a longer version would have done.

In Conclusion:

This is simple, basic skirt construction, wide enough to not fret over fit other than length and the waistband elastic. I have actually ordered another digital print panel design that was so much an impulse buy and can't wait to make that up in a fuller, more classic version with a flat waistband. It was an impulse buy but I think it will be one of those things I will wear for years. I won't be using a pattern for that one either. Hey, maybe there's a future in becoming an Indie designer of rectangle pieces of fabric.............just kidding...........Bunny
ETA 08/01/18: Just want to say this has turned out to be a big thumbs up garment. It is so comfortable in this heat and so easy to wear. I've garnered compliments every time I put it on and look forward to wearing it in the winter with maybe a black turtleneck or sweater. I would make another pictorial digital print in a rayon knit in a heartbeat. ...Bunny


Tuesday, July 10, 2018

The Walk in the Woods skirt

I've started working on an interesting fabric from Emma One Sock. It is a luscious rayon knit with soft shades of greens and beiges, not my usual color choice. I knew I wanted to make a skirt and spent a lot of Eureka midnight moments waking to how I would go about this. I knew I wanted a slender soft look, not a big full gather,  and a curved hem. The big challenge was how to deal with the waistline. This skirt would go with the olive linen top I just made. I will review when done but here are a couple of points I am dealing with now.


I decided to drape the front panel on my form to see what I thought would be the right layout. It wasn't.  The print is horizontal and you can see that having that wide swath of beige and the print above at the waist is just not working. Luckily, I have enough fabric length to move this up and have the beige at the waist line. I draped that and it looked so much better. I am so glad I did this draping before putting in the Inviz Zip. This change will alter  the skirt from a ground hugging maxi to a more ankle showing look, which I think in the end will look better on my five feet. The volume in those super long skirts can sometimes just swallow a shorter babe right up. Hey, I'm thinking positively here!

Because the fabric is lightweight and tends to curl a tad,  I had to give a little extra attention to keeping the seams in line.


I pinned them parallel to the edge far back enough to let the presser foot not be bothered but also did pins on the vertical to further secure the edge from curling. I will stitch the back seam in and proceed to do Kenneth King's Invisible Zip method, love that and thank you Professsor King. Then it will be proceed to the waistline and get it done quick. My inspiration, BTW, was the Style Arc Indigo Maxi but I did not want any pockets. We'll see how this ends up. I am winging it and not using a pattern.

**********************************


I have begun making my own Greek yogurt in my Instant Pot. I never knew yogurt could taste this good. It is unlike ANYTHING you can get retail, so very easy and thick and rich as can be.  I've done two batches so far and make a batch weekly. To die for. I use the recipe from This Old Gal (who is not old at all.) Her directions are so very clear.....................Bunny

Sunday, March 13, 2016

The Grand Godet Top, Vogue 9169


This has been a very productive week! I have finished two projects, a top and a skirt. It was a toss up which one would go first but since I did the last post on the top, let's continue! I will start by saying I LOVE THIS TOP!  It is comfortable and if positive comments were worth money, well, I'd be buying you all lunch!

Pattern:

This is Vogue  9169, "Pullover top, has neckband, seam detail variations, and stitched hem" per the pattern description. I did View B with what it calls an "applied upper section".

This is a tricky pattern to alter, obviously.  I cut a size six morphing to ten at the hips. This was directly as a result of flat pattern measuring. That was tricky too but I thought I nailed it. I didn't.  I also did a minor "cheater" FBA, curving out the side seam at bust level. I still could use a tad more fabric on the bust and will do a more traditional FBA next go-round.  I DID NOT petite this pattern as it seemed to be just right when which you can see by no horizontal wrinkles between neck and bust.  Also, the apexes matched. The big fit issue were the hips. Yes, they would meet but I am not a fan of negative ease, just not me. So I added the godet as I showed you in the previous post. Frankly, I am starting to think of myself as the Godet Queen. Heaven only knows how many times you have seen me solve a fitting challenge with a godet. We've done hips, backs, sleeves, underarm to hem, you name it. Doesn't fit? Stick a godet in it! But don't call it a wadder and give up. Worse case, you donate it, but you will have also gained lots of sewing knowledge and experience in the interim. Out of the pulpit!

I also added one inch to the bicep area of the sleeves. I do this now automatically to all my patterns. I know most probably wouldn't alter the sleeves on a knit top, but again, I am not a fan of negative ease. Maybe I've just lurked too much on People of Walmart. The sleeves have been shortened to my preferred 7/8ths length.

Fabric:

The print is an ITY knit from Fabric.com. It is thin but not too thin. The stripe fabric is from a maxi skirt purchased at our local thrift shop, St. Vincent de Paul's. I have several knit garments I've purchased recently just to have the fabric. There is a lot of fabric in those maxi skirts!

I backed the hems with Dritz quilt batting tape, a soft but stable tricot fusible tape. For the neckline I used regular fusible tricot interfacing, however. This is because the neck hole really is not that big on this pattern. It goes over my head, certainly not the biggest, just barely. And the ITY is definitely VERY stretchy in all directions. That neckhole really needs to be a bit bigger, or something, so fair warning there.


Construction:

This was pretty straightforward for a knit top. Since I didn't have to do any petite adjustments or narrowing of the shoulders, I would recommend double checking your measurements in the upper bodice area. I am very narrow there and it fit just right in the size six, which usually requires some alteration for me.

All seams were stitched with a wobble stitch,  a very narrow zigzag of  1.0 length and .5 width. I did another row of stitching one eighth inch away and then trimmed back to the second stitching.

I was not happy with the neck binding.  I matched notches and seams  and the seam that closes the binding ended up in an odd spot. Watch out for that. I also have a question for all you knit experts out there as I certainly don't fit into that group. When you use a pattern piece for a neck binding on a knit pattern, do you cut it smaller? Or does the pattern take that into consideration. The binding was smaller but I felt it could be even more so to lie just a little flatter. I'd appreciate any input. So do you automatically cut back your binding a certain amount, even if it is from a pattern? Thanks for your answers.

I found matching the stripe section to the print section a bit confusing. There is supposed to be a line to match the two on the pattern but all my pieces had was a line for folding up the hem on the top bodice. So what I did was match the raw edge of the stripe with the raw edge of the folded under hem of the print. This put the stripe an inch and a quarter underneath the print. Then I topstitched. I found the topstitching directions/drawings a bit confusing, too. There is no topstitching line on the top bodice so you are on your own to figure out the best place to topstitch and how many rows. It would be hard to make that look really bad but it would be nice to know what the original designer intended.  In the pattern, the sleeves are installed in the round. If I did it again They would be done flat. I also think I would leave a shoulder seam open to insert the binding that way.

In Conclusion:

All in all, I am very happy with my top. It fits quite nicely even if not perfect and I can see myself making this again, It could be fun in a solid with maybe just a binding on the hem edge. There is a lot of opportunity for creativity here.


******************************
I have been in a skirt sort of mood lately and am anxiously awaiting some linen purchased on line. In the meantime, I took some denim I've had for some time  and just went with it. I tried a style of skirt that I really wasn't sure would work. I think it did and will have that coming up next. It has been a fruitful week!

And yes, I am letting my hair go gray, quelle horeur! Truth is I am painfully jealous of my sister's glorious white hair that she has had since she's thirty. If mine can be half as gorgeous........in the meantime it's calico head with the silver up front, the natural dark at the back and sides and the faded brown growing out poorly  on top. I will be happy when it is all grown out. But will it be like Sis's with it's thick white coloring?  Only time will tell.....Bunny


Sunday, March 6, 2016

Another save! Vogue 9169, adding a godet

I am the first to admit that I have ample hips. But you can see an issue on my mannequin who is made to my exact measurements. The underlay sections does not meet the overlay section of this tee pattern, Vogue 9169.  I flat pattern measured and there was ease but I am thinking maybe I did something wrong in that process. I did match notches, etc. In the end, there is just not enough room for my booty. What's a sewist to do? I had some stripe fabric left. BTW  the stripe fabric was a maxi skirt from the thrift shop for 25 cents. Let me tell you, there is a lot of yardage in last summer's maxis and they abound at our local thrift, a great source for fabrics.

After a bit of thought, I figured adding a godet would be the solution. However, the underlay was complete with side seam sewn and the hems in and double topstitched. I was not taking that hem out of a thin knit, either. Here is what I did to add the godet to the the underlay. 

 I cut a section, an arbitrary 10 inches wide, on grain. The sides of the underlay are curved at the hip. I took my hip curve ruler and curved the bottom of the godet. This makes it lay, more or less, at the same level as the finished hem. I don't know any math equation to do this. I just curved it up about an inch higher at the sides than the center. The hem was lined with fusible tricot, slashed to accommodate the curve and pressed up the same width as the hem on the underlay. 

Next, the godet was folded in half, all edges  matching. I used the hip ruler to cut a curve mimicking the side seam of the underlay. The top of the godet would be at my natural waist. 

Right sides together, the godet is pinned to the side seam of the underlay. I simply cut off the original side seam of the underlay to eliminate the stitching. The hem is folded out and the folds of the two hems match. I then sewn from the fold of the hem, not the edge, and up to 5/8ths inch away from the top of the godet. You want the point of the  godet to be free so stop 5/8ths inch short, like you see below.


Once that is pressed  (It will be trimmed after),  it is time to match up the other side of the godet. Simply pin the whole length of the underlay. You will sew from the bottom hem fold, again open, to that same point where you ended on the first side, 5/8th inch short of the end of the godet. 


Then stop,cut your threads, flip that end point of the godet out of the way. Go back under the presser foot and start sewing again from that point to the end of the underlay. This will leave the point free. Check the front and see if any correction needs to be made to have a smooth transition at the point and a tightly sewn point. You can maybe see that my seams are a "wobble" seam, two rows,  stitched a quarter of an inch apart. This was then trimmed back to the second stitch. The "wobble" stitch, an Nancy Zieman term, is a very very narrow zigzag which provides the needed stretch. It works great. Why not used the serger? For one, it's not necessary as this fabric will never ravel. Plus it can show bulk when pressed. Just my choice but many sew all their knits with the serger. That's fine, not critique there. Plus, maneuvering that point could get a little tricky with the knife! 

The hem is now folded into place and the top stitching sewn, match that on the original underlay. Now I can connect it to the overlay section, whew! Now it fits! 

**************************************

Winter just won't let its grip on us go. This icicles, curving into the house remind me of it's icy tentacles and the way we all feel after the nasty month of February. Please Spring, come!....bunny

Sunday, November 2, 2014

Butterick 5387

The rayon top is done and got some good feedback. I will get right into the details.


Pattern:  

The pattern is Butterick 5387 and I have made it before. If you check PR, you will see that there are many who had issues with the collar band and center front opening. I did too but it made much more sense this time than the first time I made it. While I did it a bit differently, only because it is hard to understand the drawing and directions, I managed to get the necessary final effect on the band. 

One thing about this pattern to pay attention to: this is in direct relation to our NLS post #4 about patterns. If you look at the front of the pattern there are four views.  Only view A has what appears to be a center front seam. The other views show the front seam definitely moved to  the side of the bodice, looking like it's running right over the apex of the bust. Not...the only difference between views is the sleeve style. No view has a pattern piece making the seam left or right of center front. When I originally bought this pattern I was specifically looking for the assymetrical front. It doesn't exist. Beware!  Also, my pattern has two tops with the pleats on the left and two with the pleats on the right. It looks like Butterick has since corrected that. 


I used a size 6 with an FBA, basically the cheater knit one where you add more length to the bust by rounding out in the side seam on the front and adding a bit of length too. 

The pattern could be MUCH clearer in it's explanation of bringing the pleats  around the band. Steps 18 and 19 make you go huh?????? But somehow I got it to work but I ended up with the  seam of that whole debacle not being hidden. So I trimmed it, catchstitched to the band, and it works and looks just fine. This one is a real handholder, if you know someone. 


Fabric: 

True confessions time. This was in the Joanns clearance sale. It's a Rayon, lycra blend and while it wasn't passionate love, I felt it would mimic the blouse I saw in a Mary Ray post on the Threads website. So for a few dollars I gave it a whirl. The pleating and tucking are irregular and random.

It is very thin so undies and my dressform react to the camera and show through, much more so than in real life. In my pics I have on a nude cami which helps. Think tissue paper with pleat texturing and you've got this fabric. It stretches bigtime and this is a snug pattern but I am comfortable with that look in this one. Part of that is because of the godets.

The tricot fusible I used to line the hem shows through from the flash as well but really not at all in real life. I love that stuff. It is found in the quilt department of JAs and called quilt seaming tape. It is the exact same stuff that is sold for the big bucks on line as fusible tricot stay tape. It makes a great knit hem. I iron it on, turn up a knit hem and either topstitch or catchstitch.


Construction:

This was like herding cats to sew. I helped that situation by starching and ironing each seam before sewing. If I did it again I would do a "jello blouse" to quote someone more clever than myself. That is the technique where you soak your flimsy thin fabric in gelatin to give it stiffness and it works really well.

What veered from the pattern were the band issues already mentioned, the fused hem, and my addition of the the godets in the side seam.

This was simple and easy. I left open the side seam about nine inches, from the waist level to the hem. I then cut strips of the fabric 11 x 22 inches wide. That gave me enough length to run the strip from hem up  to the closed side seam and down to the other hem. I stitched it in easily. Then I opened the whole thing out flat and trimmed the godet hem so that it was circular and both equal. Starch and hem and we were done! As one of my friends said. it gives me some "swish" and she liked that idea. I just liked the idea of jazzing up a pretty simple design.

Would I recommend this? With reservations. This would not be a beginner pattern due to the neck band difficulties, IMO. But I think if you power through you have a nice top and I do promise the second one will be easier, maybe not made the way the pattern says, but easier. If it's your first effort get a more forgiving type of fabric. An ITY knit would be perfect and I may make another. I do like this pattern..........Bunny


Thursday, July 31, 2014

Help! I need help with a project

I mentioned in a previous post that I am making  a full length dress for a friend for a wedding. She will be a bridesmaid and has been instructed to wear whatever she wants but it must be "baby blue". Since she was having no luck at all with local retailers and neither of us saw anything appropriate on line  for a 52 year old bridesmaid , albeit a very attractive one, I offered to make her dress.


We will be making McCalls 6612, View B (the pink one) with a flutter sleeve and floor length skirt. The cowl is less pronounced on this view. The fabric is a sky blue (much more flattering color) rayon knit. Since it is a bit thin  and could use some beefing up, it will be lined. I also think the lining will fall a bit more gracefully in the cowl area if it is lined.  I wanted to buy lining in person so I could make sure it didn't "stick" to the fashion knit. I hit my only option, Joanns,  and actually did really well with a "swimsuit lining knit". It didn't stick, had the same stretch factor and we are good to go. Here's my dilemma - do I do this as an underlining, treat both pieces as one or do I do it as a lining, connected only at the neck and armscye?

The dress is floor length, has a slit to the knee on one side, a cowl neckline, and I think flutter sleeves at this point. I am very worried that if I treat it as a single unit, the fabrics will shift and show wrinkles or pull at the seams somehow, although it hasn't done that with my sampling with it. The biggest issue is the slit. The lining is white. I don't want it flipping out when legs are crossed, etc. I am thinking of a blue stretch lace along the lining edges of the slit which I'll cut back, that is if I use a free hanging lining.  What do you think? Any and all suggestions are welcome.

We've been through two muslins and the fit is looking lovely. I have to say the neckline is really really pretty on her and we are both so pleased with that. It was a pisser to get the fit right and adjust the cowl.  So this weekend I will cut apart the muslin and get sewing. I just need some voices of experience with knit linings. The stretch factors and weights are the same.  You all know my knit experience is not deep so thanks for any help offered............Bunny

ETA: I just thought if I do as an underlining I can do a blue lace strip, mitered at the top, all around the slit on the lining. So if  anything peeks out it will be the pretty blue lace. Hmmmm,,,,,, just thinking but hope to hear your thoughts. Thanks,,,,,Bunny


Monday, March 24, 2014

Simplicity 1463, a Tons of Tops pattern


Simplicity 1463 is a great wardrobe builder pattern. It has six distinct tops in one pattern and I chose to start with View B, a back wrapping, shaped hem number.

Pattern:

Simplicity 1463 consists of 6 different tops. There are dolman sleeves, raglan sleeves, shaped hems, cuffs or not, etc. So you get six distinct tops in one pattern, great bargain! What you can't see here and only notice if you look at the tech drawing for View B is that the back is quite elaborate. It consists of two bodice pieces, on for back left, one for back right. They provide a lot of drape and a v neck held up by a tie around the back neck. It's hem is slightly shaped to be a bit longer in the back than front, not trendy looking as it is rather subtle, IMO. 
The back feature really caught my eye and was why I bought the pattern.

Fabric:

The fabric is a rayon jersey purchased from JAs. It did not need lining. It was a bit fiddley but that's the nature of the beast. Once again, I used the fusible tricot "Batting Tape" to edge my hems and stabilize.

Construction:

In these back photos I have on no bra. My bras don't ride up and the bra band was totally visible in the back. No worry, I will not go braless in this top! I love the way the back drapes. The outer right side is pleated and sewn into the left side seam. If sewn with a 5/8 seam it creates a big drape and very loose edge to the back neckline. It also makes the V neck lower.

 I solved this by putting in a half inch tuck (one inch taken out) right near the pleats in the left side seam. The tuck is in the neckline edge about an inch from the side seam. This caused the neckline to not drape open as much and raised the V. I do have one of those bras that can be converted to a low back so I can always wear that to be sure no wardrobe malfunctions occur. So my suggestion is to not automatically sew up the side seams in the areas that are left open for the  end of the back bodice to be inserted. Try it on and pull the bodice through the opening until you get your back the way you want. Then stitch up the side seams. You may not have the issue I had. My narrow back and shoulders gave no support so it all just fell and made a deep v neck.  As an aside, the colors in this photo directly above are true, no the dark version appearing in the other photos.

In conclusion: 

I think I have a pretty cute top here. Now that the deep back V is fixed I will be more willing to wear this top out and about. I can see it with some crisp white narrow slacks.  It is very comfortable with the draping back keeping everything loosey goosey. Elbow length sleeves are not my best sleeve look. If I make this again, and I more than likely will, the sleeves will be my preferred 3/4 length. 

I highly recommend this pattern and am looking forward to trying some of the other top versions soon. Next will be a review of the Marcy Tilton Tee.

I spent much of yesterday refining a muslin for the Donna Karan dress. Let's just say it was very challenging. This pattern, Vogue 1175, has more pleats, folds, squares, dots and unconventionally shaped pieces than you can imagine. Figuring out how to do a bit of an FBA was a challenge. I made a muslin and will have pics coming, but sorry, it will be on Miss Dumdum. There is some very serious decolletage in this pattern and you really don't want me to share a muslin of that with you.  You can see what I mean by clicking the link........Bunny
.


Sunday, March 16, 2014

Vogue 8962, not a tunic for me!

What a lively convo about the malapropisms! Thanks to all who contributed. It was fun to get our grammar and spelling rages out!


Knit top number two in the three pack is done! I love this fabric and am pleased with the final results. It fits nicely.

Pattern:
This is Vogue 8962, a tunic pattern. Its life as a tunic did not last long. The back is cut on the bias and has a center back seam. It then wraps around to the front and meets the bodice front piece.
Bias does not work on big bums and I've got a big bum. It  just wanted to cling and look not so good. The pattern also has a hi-lo  hem, not a favorite of mine, and that hem just emphasized the hip action even more. I ended up cutting off the hi-lo hem and it is now all the same length as the original front bodice. It looks much better  and my butt looks normal now.  The bias does look good in the back and I like the way it drapes and swings out.

I cut the size 8 with only my usual petiting length adjustments. I flat pattern measured and felt the bust would fit and it is just right, whew! I get nervous when I don't muslin.  I did not put it on to model as today was one of those no hair/no makeup days and I just preferred to spend time sewing instead.

Fabric:
Another ITY knit. I think this is the one that is rayon with spandex. It is a crepe texture, feels thin but doesn't look thin. The texture made this extremely slithery and I had to be careful it didn't slip under the needle or serger knife.

The pattern is interesting. The stripes match perfectly on the selvedges and then wave all over irregularly. They cannot be matched, only pointed in the preferred direction. I did not have enough fabric to cut the yoke  so added a center back seam.. I like the vertical stripes better and the seam is pretty well hidden.


Construction:
This was put together in a few hours. My first seam, the CB, was serged and I didn't like the bulk that showed when pressed so I went with the suggested two seams of straight stitching and it looked fine. It layed  (or is that lay, educators?) flatter when ironed. Everything fit together beautifully despite the bias edges and neckline. I chose not to add the cowl collar but made a separate cowl to wear like a scarf with it. It shows a bit of skin and looks cute with the top, sort of peekaboo.  The hems were all done with the fusible batting tape and it worked great. 

In the end I think I got a really cute top to wear to work, much needed. But hi low hemlines on the bias ARE NOT for me.

My third top in the trio will be a Marcy Tilton Tee shirt out of the royal blue and black snakeskin. I may finish that tomorrow. We'll see how it works around some much needed bra shopping. I hate bra shopping.....Bunny


Friday, March 14, 2014

Hemming ITY Knits

Someone has asked me to please show how I did the hems on the asymmetrical top, McCalls 6400. First, if you read the past few posts you know I am a very recent convert to these knit fabrics and their patterns. Therefore, this is no expert talking here. However, before I started on my projects I did a fair amount of research. Because what I had on hand was fusible tricot tape, that's the method I used. It was logistics, not experience sewing knits that brought me to that choice. I am still happy with the results but may very possibly find a better way further up the road.


First, about that tape....what I had on hand was a roll of fusible tricot tape, purchased years ago and on it's last legs. I had no packaging at this point nor a name but I definitely remember it being called a "fusible stay tape". I finished the roll with only inches left on this top. With more tops planned, more tape was needed. I hit Joanns as I needed instant gratification at this point and there was nothing similar. I found Steam a Seam and Tricot tape, non-fusible, not what I needed. One of the lovely Joann ladies walked the floors with me until we both gave up. I told her I was going to check out the quilting notions on the other side of this little store. She got back to her draping.

What's this? Batting tape? I squished it and it felt just like my used up roll did. I looked and it sure looked like tricot. But, batting tape, to tape batting pieces together for quilting??? Guess what, it is exactly the same thing as the "fusible stay tape" I put in the top. So if you need this product and don't want to wait and/or pay shipping for something in a different package, got to JA's and get yourself some 3/4  inch batting tape. It also comes in an inch and a half width and I am trying to think how I could use that!


Here is my simple hem. It does stretch as I gave it the slightest tug while sewing. That's why the stitches are a bit irregular upon close inspection but it's good enough for government work. On a more ambitious day I would use a double needle for the topstitching but that old I.G. (instant grats) was pushing me on.


The 3/4 inch wide tape was fused to the hem edge of the top on the wrong side. Then it was simply folded in half, matching the edges of the tape, and pressed. I think a tad of the fusible stuck through because it kept the fold in place nicely while I stitched, no pins. I just topstitched from the right side with an edge stitching foot and voila - decent hem. 

I am sure there are other methods and I look forward to finding them and trying them out. In the meantime, I think this is pretty OK for a rank beginner.

******************************************

I think the feedback from friends, family and co workers on my work shirt is the best of any garment I have made in the past couple years, really. For some reason this shirt represented something really difficult to do to a lot of my friends. I appreciate all the great feedback but it is really just a basic shirt with little fit.Thanks to all for the lovely words. 

******************************************************


If you've been around the Northeast borders/southern Canadian areas of our country you will know that we had an epic storm finish up yesterday. Halfway through, in the dark of night, I looked out the window at my little car. Storm Vulcan transformed it from a little gas saver into what appeared to be a Volvo Wagon. I snapped away and submitted my pic to the public radio station website up here for their Photo of the Day. I've submitted lots of photos to them, thunderstorms, birds eating, sunsets, rolling fields, lots! But it took my little eco car to get my pic on for all to see. I glowed.............Bunny


The Hanbok Vest

  I love this little vest. I thought about it for a long time. I am excited to tell you it's story.  Pattern: This is the Hanbok Vest by...