Sewing Vloggers

Showing posts with label collars. Show all posts

Wednesday, July 13, 2022

A Helpful Tip! Collars and Stands

 Right now I am working on a yarn dyed linen/cotton big shirt with a stand collar, my ode to the classic workshirt. I made a denim workshirt some years back and have worn it to death and will continue to use it around the house and in the garden. Love that shirt. This is it right here.  It was made from McCalls 6613, great, classic, unisex "bigshirt"  pattern.


The pattern has now been re-issued as a Butterick and has a different vibe being sent out on the cover. I think they would sell more patterns with the original cover photo. What do you think? Current cover below. I think the shape of View A is being made to look very A line, aka, tent-ish. It really is cut straight down from the armscye. 
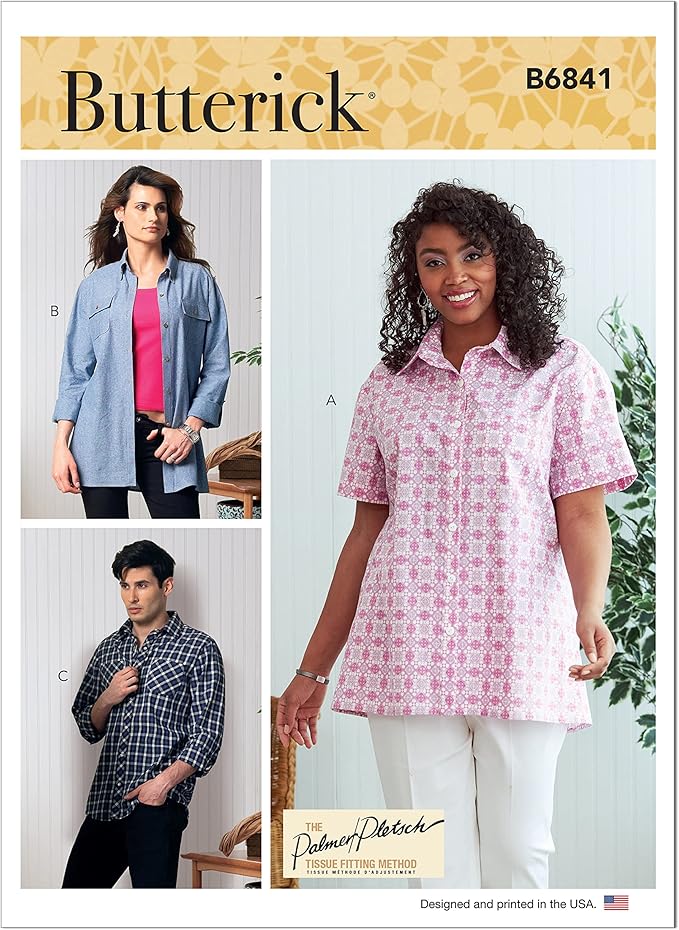


It is now being marketed as the, are you ready for this? Butterick Mister and Mrs. Fitted Shirt on Amazon. Those Amazonians need some help with their pattern marketing. There is NO FIT on this pattern, anywhere! It is a big ole shirt.  There is not  a dart anywhere on this shirt to be sewn. It is a perfect match to the original McCall when I laid them on top of each other, sold as unisex. I was referred on the McCalls site to this Butterick pattern as its actual replacement. Oy,,,,,  rant over. 


Back to my handy dandy tip. This is a traditional collar with a stand. I use to sew quite a few of these but  have pretty much put them aside the last few years.  I needed to brush up on my skills for collars with stands. I remember Nancy Zieman literally drawing out the stitching line on that last inch on each side of the stand part of the collar. Doing that really helped me get equally sized matching shapes, once turned, and without points, something I was having a hard time with.  Today I went to work on this detail of my shirt. My cutting table was messy with bits and pieces of all sorts of sewing detritis. As I picked up some leftovers of oaktag, it occurred to me, why not make a template for the collar stand out of the oaktag? It could be a permanent, easily  trace-around-able object and kept with the pattern in the envelope for the next blouse iteration. Yes!! Why, I could even do this with every stand collar I ever make again, just paper clip the templates to the pattern piece for the stand and tuck those little templates right into the pattern envelope ! Here is how I went about it:

* I simply traced the last 4 or 5 inches of the collar stand pattern piece on to a piece of oak tag with a light pencil and the help of a curved acrylic ruler. 

* I marked thru the tissue to get my large and small dots, center front lines an notches. I used my eyelet cutter to mark my dots. Making holes makes them reusable. The dark hole is my "large" hole. I cut two of these  stand pieces out, one to copy the entire pattern piece end and one to make a template for the stitching lines. On the first piece we have marked all the needed markings and the template is used to match the cutting lines of the fabric and make the markings accurately. 

*On the second piece of oaktag we will measure a 5/8th inch seam allowance out and cut the seam allowance off. 


This piece will be used to mark the stitching line but can also be used to fussy cut the interfacing which I did not do here, just eyeballed it. 

* I will paper clip the collar stand pattern piece and the oaktag templates together when done using them and put them into the pattern envelope until the next time.  Fingers crossed! We'll see how the finished product affects accuracy. This is such a fussy area.....Bunny


We were lucky to be in the Azores when the hydrangeas were in full bloom. They were truly spectacular and miles and miles of roads are lined like this one. This is a simple farm road as seen everywhere. The hydrangeas run from the deepest purple to plums and bright blues and baby blues, breathtaking.  They are everywhere....Bunny

Monday, January 5, 2015

Symmetry and Collars and Pockets, OH MY!

Symmetry - what exactly is it? It means an object is the same left or right of center or as the dictionary says "either side of a plane or line." What's that have to do with sewing? A lot.

In doing these lessons I try to think of subjects that will take a new or returning sewist to a higher  level of skill, one where their garments don't scream "I just made this." Collars can come out with their short sides different lengths.  Pockets can get placed unevenly on bodices and blue jeans. Unintentional asymmetry, not matching, is one of the lower rungs on the sewing skills ladder and easily fixable. So let's have a go.  Our goal here is to learn to make collars that have both sides perfectly matching. The same techniques can be applied to pockets or any other part of the garment that needs a mirror image either side of the center line.


This is my tried and true blouse pattern that I have made many times. I will be using it's collar for demonstration purposes.


First, iron that  pattern piece.Cut carefully.  As we go along think of 1/16th  of an inch being added each time. You will see by the time the collar is ready for insertion, there has been a lot of opportunity to muck it up.

If this is a Peter Pan collar with two separate sections, very popular in twee fashion today, do the same  as we go along but do it to each piece so the in the end all layers and edges match on both sides of center front. Actually, Peter Pan collars are more notorious for non matching shapes as it is easy to get into a mind set of working on each section as a separate piece. They need to be matched up each step of the way.
ETA:  Here's a pic of a Peter Pan Collar for clarity. They are usually separated in the back to accommodate the closure and therefore cut out with four sections, two for each side, lots of matching to do. They can go all around with a CF opening garment.


Cut out your fabric. Here is the next opportunity to pick up a sixteenth of an inch. You can see on my collar the right side only is about a sixteenth of an inch wider. I shaved that baby off with the rotary cutter and now all is matching again. Every stop of the process, recheck your collar for perfect matching, before and after sewing the seams.


The collar has now been interfaced and sewn. Ackkkk...what do I see? another sixteenth of an inch peeking out! When installing a collar we want the UNDER collar to be a sixteenth of an inch narrower so that it will pull the outer seam to the underneath once sewn. That's not the case here. My undercollar is longer! See it peeking out?  Another time to shave this puppy back to symmetry. That's the fourth opportunity for error!


The collar has been made even again so let's check it against the pattern piece. Well, looky there - the bottom collar is wavy. It's stretched out. Its the one with the interfacing here. I will steam this back into submission.  I often find the piece with the fused interfacing is the one that stretches out. You can see how important up and down pressing as opposed to back and forth ironing is. It makes a difference. 

Up until now we haven't checked our outside edges, the short sides, of the collar. Let's check that.


Hmmmmm.... seems I am off another sixteenth of an inch here. I am photographing at an angle so the points look uneven but they aren't. But the neck edges definitely don't match. This is probably the most critical test of the collar shape as once installed this is the part that will provide the front of your garment with two different lengths of collar and we don't want that! So aside from everything matching, it's important to fold that collar in half and check those short sides as well. I shaved this off to make it even. Do you see how many opportunities we have had to make this collar an uneven hot mess?

Not having to do with symmetry but on the subject of collars, now that all is symmetrical and sewn and ready to install, I will shave off the undercollar about a sixteenth of an inch starting about two inches from the ends.  On heavier fabrics, like for jackets, it would be an eighth of an inch. The seams will be matched when sewn to the garment or better yet basted together.  This will pull the top collar slightly under and prevent any peeking out of the seam or under collar to the public side. Patterns that offer separate upper and under collar pieces have taken this already into consideration.


We now have a collar with a lovely roll, no under collar peaking out, no seam lines showing at the edges and ready to be installed in the garment.

The same care needs to go into pockets or any thing on a garment that needs critical matching.  Also, under the tutorial tab, is another method for matching pockets you might find helpful. After a while you will do this OCD checking of cloth against pattern pieces and each other without thinking and your garments will have a much more professional look. Let me know how it works out for you.

One more thing, about stay stitching. Sacre Bleu! I rarely stay stitch, Years ago I took a class from Diane Hoik, reputed to be the best dressmaker in New Hampshire and former textiles professor at UNH. She told us she never stay stitches and and we shouldn't either. Couture sewists don't stay stitch either. They use steam to keep things in the right shape. Ms. Hoik's argument was that we handle our pieces of the garment roughly and too much and if we didn't they wouldn't stretch out. Her words were that the act of stay stitching alone was enough to stretch any bias edge so she didn't do it. We watched as she was teaching us something about this particular garment and I swear she carried the pieces so carefully and always flat, if at all possible. They hardly moved either. I've picked up her habit and it has worked for me for the most part and I know other good sewists who agree and most who don't. I say do what works for you. That is always the bottom line. But it might be worth a try to go the non stay stitching route for a bit just to see how it works out.

Please feel free to add your thoughts and experiences.

Till next Monday on Next Level Sewing............Bunny

Tuesday, February 28, 2012

The D & G Collar


While I referenced the collar last night I did not really get into its construction. The edge treatment required that I do away with any seam allowances on the outside edges of the collar. The top collar was interfaced with fusible weft insertion while the bottom was left unfused. In retrospect I should have fused both. Its the only  way to control the ravelly nature of this fabric. You can see here that there is no facing on this jacket. I chose to line it edge to edge like the Chanel. But how was I going to hide those nasty collar seams?

The right side of the upper collar was placed against the right side of the lining. The right side of the under collar was placed against the right side of the outer jacket. In other words you have a sandwich with the lining and jacket between the two collars. The collars are not sewn together at all at this point. I then stitched across the neckline ONLY, from edge to edge. This seam was pressed open over a ham, then graded. Then the two collars were put wrong sides together and pinned along the neckline edge. The outer edges are still raw and unsewn. I then triple zigzagged along the neck edge to secure the seam like an understitching. You can see it in the pic of you look close. It nicely sinks into the boucle. The jacket was then put on the dress form and the collar arranged and steamed heavily. There was much turn of cloth so the under collar was trimmed to match up the upper collar while on the dress form. Once the steam was dry the edges were pinned together and the jacket then removed from the form.

This time the silk bias was done a bit differently. I ironed the strip in half along the length. It was then placed around the collar edges like a binding on both sides. With one pass of the machine the same distance away as the other strips the binding was attached to both sides and complete. Out came the toothbrush and done.

I really like the results of putting this together "sandwich" style. I think it is a nice clean finish. In its next iteration, and I know there is more boucle in my future, I would fuse both collars with interfacing and quilt them together as well. Hindsight is always so clear.

The rest of the binding has been attached all around the jacket. I've decided on covered buttons and will pick those up in town tomorrow. It will be time to buy the chain as well. Gotta have the chain!...Bunny

Monday, February 27, 2012

The D & G Collar

Today I worked on the collar, all day! First I had to draft one and that was interesting. Luckily there was enough on the internet to help me out there.
This is from www.pattern-making.com.  Its a bit of a puzzle but eventually I got it figured out. I changed the shape to work with my vision. I think it looks pretty good. It is sitting on the dress form, flooded with steam, and hopefully will dry out and hold its shape. The lapels you see are hanging out of the way but this will be double breasted. Tomorrow I will work on that part and the  button holes. The sleeves will be last of all. I have to make sure I have enough bias before I finish those.


I am so pleased with how this pattern fit that I committed it to official TNT status by working it up yesterday on some oaktag. It will get added to the TNT collection but I already have plans for another out of faux leather. As far as when that will get stitched up, well, it depends on the weather. We are back to full blown winter so it may be soon. I also have in the queue a couple of dresses for Sophie and Carly. Lots of sewing going on here!

*********************************************************************************

I have had numerous emails/questions on the seam treatment. I just want to mention that the garment seams are normal 5/8 inch seams as you would sew on any garment. They are not inside out, on the front, or bound in any way. They are simply stitched and pressed open all on the wrong side. The bias silk strips are all surface embellishment topstitched over the seams on the right side of the garment. Hope this makes it all a little clearer. If not, please let me know. Tomorrow the buttonholes!!!.Bunny

The Ray Pinafore, 2025's Epic Fail

  Happy New Year and welcome to my epic fail of 2026. I guess you have to have one, right? This is the Ray Pinafore from Paper Theory Patter...