Sewing Vloggers

Showing posts with label flat lining. Show all posts

Sunday, July 21, 2019

The Periwinkle Linen Dress


The Dandelion Dress served as the muslin for the Periwinkle Linen Dress. I love them both and they  are really both quite different as you will soon see. They are both made from New Look 6866 with original alterations  to change the silhouette and hem finish. I was inspired by the garment you see here. With the Periwinkle dress I went for simple, letting the fabric shine.


Pattern:

New Look 6866 is a flowy, summery maxi dress that the pattern describes as  "five styles with length and neckline variations." They are all sleeveless and the necklines are all lovely. I went for the high front neckline and the V back. This is a fabulous basic pattern with lots of design ease but it fit me well in the upper chest/shoulders so I am very happy with that. I flat pattern measured and there was no need to do an FBA for my C cup. I will get on my high horse and say once again, this is design ease, that extra room, not a mistake in drafting the pattern.  You want big and flow-y, you get bigger and flowier than the basic pattern block.  Design ease..........


Fabric:


The computer does not do this fabric justice. It leans toward lavender and I used lavender thread to sew it. It is a yarn dyed linen/cotton blend, a fabric I have used many times and think is one of the best values out there. However, I am stymied. I want more of this periwinkle but did I look at the bolt end for info? Just quickly to discern that it was Essex linen from Kaufmann. Now, when I go to the color charts, I can't find this color. I can find Cadet but that is blue and I have some of that. This has a green selvage. I am going back to the quilt store where I bought it to see if they can help and hopefully order some more. You can never have too much linen. It is the fabric that will be in style forever.
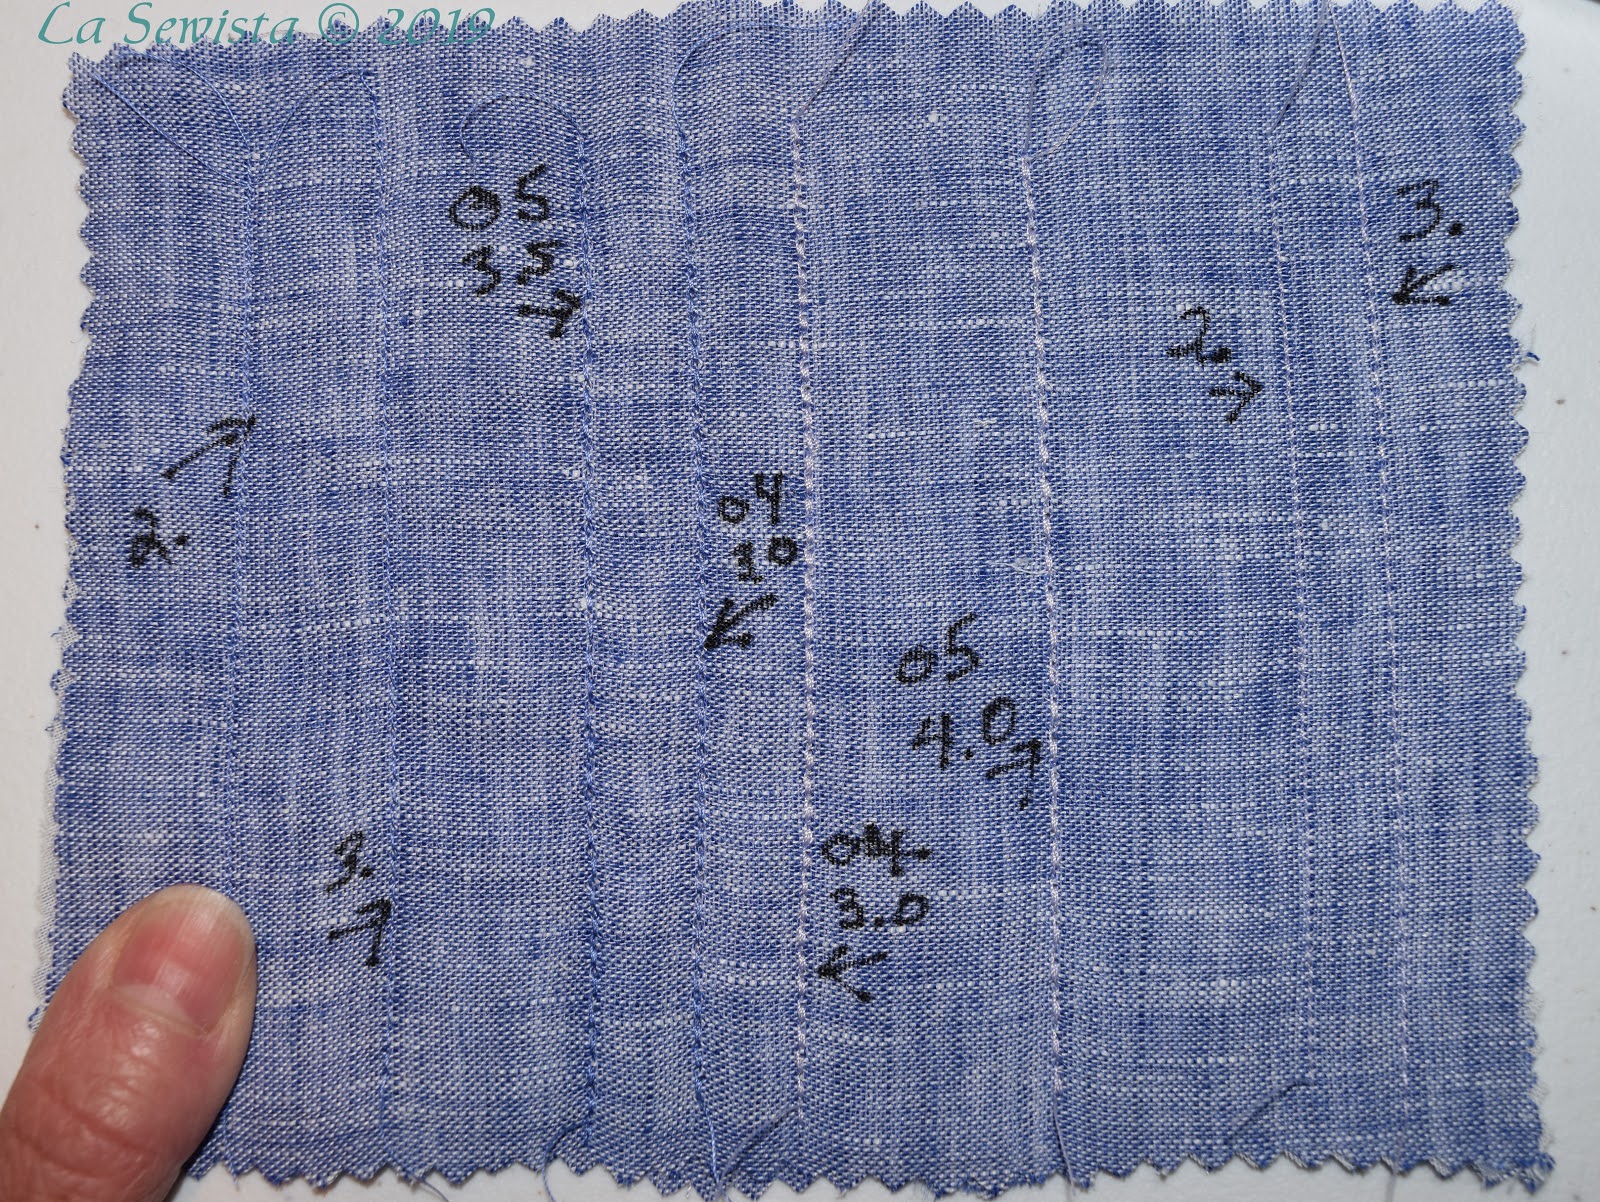

Another issue with yard dyed fabrics, well let me stop right here! Just in case you don't know what a yarn dyed fabric is here is an explanation: Yarn dyed fabrics have the yarns/threads dyed before they are woven into fabric. This allows you to have all of your weft threads one color and your warp threads another color. It gives a lot of character and depth to the fabric. If you've seen iridescent silk dupioni, you have seen a yarn dyed. Kaufmann's Essex blends are often  a colored linen thread and a white or black cotton thread going the other way. Back to the issue---I wanted to topstitch this dress, all over. It is hard to make prominent topstitching on yarn dyeds. Which thread do you match up to? Doesn't  matter the match will disappear and the non match will sort of look yucky. Either way, they just don't stand out. Above you can see some samples I did. On the right is the thread I was using for the construction, a lavender periwinkle color. You can see it just disappears in a regular stitch. In the middle, same thread with a triple stitch. I don't think it looks that good and my machine does a great triple stitch on other fabrics. On the left I tried a darker thread, really no improvement. I made the executive decision to not topstitch this dress anywhere. I liked it's soft look and was going to go with that. 

I also used a white  100% cotton voile to underline this dress. I did a "flat lining" in the method you see here. It worked out perfectly. This made the dress very  comfortable. I wore it today in 100 degree heat to a "backyard" wedding. The dress kept it's looks all afternoon and was spot on for the occasion. 

The facings were fused to cotton woven fusible interfacing. 


Construction:

Here are the changes I did for this dress, some of which were not done in the Dandelion dress. I wanted to reduce the volume a bit. You will see the difference:

* My usual petite shortening in the upper chest. 
* Raised the armhole 3/8ths of an inch at the side seam tapering to nothing at the notches to hide my bra. 
* Reduced the front width at center front by a half inch. 
* Reduced the back width at center back by two inches. 
* Reduced the "bumpouts" one inch from the Dandelion dress bumpouts. 
* Flat lined the garment which meant all vertical seams, really only 3, were able to get a Hong Kong finish. This was nice. The HK finish was on the hem edge at the top, the facing edges and all of the sides seams as well.  By flat lining I was able to catchstitch my hem and facings to the voile underlining. 


Another thing I did was to do a diagonal basting of the underlining to the dress, front and back,  after it was flat lined. I also basted diagonally on the  area where the upper hem edge would be. I let my dress hang out on the dress form for a couple days before doing this basting and trimmed as needed, not much. 

 The darts in the dress were made to include the flat lining. A line of basting was done down the center of the dart on the lining to hold the two layers together while the dart was being sewn into the dress. The hem band is just the linen layer so no special treatment on the hem darts. Just mark those top and bottom edges of the hem band.


The picture above shows where the seam gets ditch stitched to secure the hem band to the dress. This is done on the right side of the dress.  I think failure to do this will cause the wide hem to billow and this holds it flat. It also sort of bolsters the shape of that side seam bumpout.

I did have a screw up, totally my fault. In my unbridled enthusiasm I did not read my pattern instructions. Heck, I just made one of these although it wasn't lined. After the dress was flat lined, hung out, and the lining hand basted diagonally to the fashion fabric, I stitched together the shoulder seams. I bound the edges of the facings with the voile, stitched them together and attached them to the neckline. Next was my favorite, understitching the facing with the triple stitch a la Nancy Zieman, all well and good. Nope. Seems now I can't stitch the armholes and turn them. I looked on line for some sort of magic I knew nothing about to solve this. There is none. I was too late for magic.  I slept on it. What to do?  I refused to rip out triple zigzagging on this lightweight fabric. 


Luckily, this fabric and lining are quite lightweight. I did a wide bias binding, understitched with the triple zigzag, turned and pressed, pinked the edges so no bulk, and catch stitched down to the facing. I think it will pass. It doesn't add bulk and is neatly finished. 


Another issue that came up was the refusal of the side seams to lay flat in the curved bumpout area. I decided to catch stitch them down. I so love to catch stitch.  This actually helped reinforce the shape.


Here they are, all catch stitched, tamed and tidied. Now it was on to catch stitching down the facings but only under the arms. The rest of the facing is free floating.  I also catch stitched the upper hem edge. I just can't stop catch stitching once I get started!


The inside is all finished and pretty! No topstitching in sight, volume brought down as desired, fit is spot on, life is good. The dress is fitting snug on my form as I am a size or two  smaller now than I was when I made the form. 


In Conclusion:

Once again, I am really happy with this pattern and the changes I've made to it. I look forward to making it also as it is designed, as a long flowy maxi dress maybe in the view with bow in front and in a softer fabric, perhaps a cotton lawn print. I will be on the lookout for that. In the meantime I think I am putting aside my beloved skirts that are my  summer staples and joining Team Dress! It's just such a comfortable, cool way to go. I highly recommend this pattern and love the way the dress is draped from the bust and shoulders. Flat pattern measure first and make a muslin. Do not assume the pattern is too big. You decide if you want the design ease that has been put into it. I like it either way. I love the full volume of the Dandelion Dress and also the more conservative look of the Periwinkle Dress. I will say that whenever I wear the Dandelion Dress in public people stop and compliment left and right and ask where I bought it. We will see what happens with the Periwinkle dress. I like that the  Periwinkle look is a great foil for my jewelry too. 


And just in case you missed the last post here is another pic of our recent house guest:

Happy sewing!......Bunny

Sunday, January 1, 2017

V1526, Paco's plaid shirt #2


I got to work on the plaid shirt today and much was accomplished. Above you can see the pattern match complete for the front bodice. The fourth attempt was the charm! This had a fold over facing along the center front and it made it doubly tough to get the plaids matched.

Just in case someone wants to match a plaid across a foldover facing here is what finally worked.

Plaid matching on 1526 

Cut ONLY the right bodice. In the facing area there are two fold lines and a raw edge. Center front is marked as always. That is critical. You are matching one center front exactly over the other center front on the right and left bodices, NOT the folded edge.You have only cut out the right bodice so far!

*  On the right bodice fold the facing  area out of the way and under the bodice. Your crease is on the first fold line near CF. The rest of the facing is behind. Match that folded line to the fabric on the table.  Make sure it matches vertically and horizontally. Measure it along center front edge. My squares were two inches square so I measured the whole square at the edge that was on the right bodice and  lined it up with the fabric on the table.

* Take a removable marker  and mark that folded edge on the "table" fabric with tiny dots. The right bodice is still overlapping the fabric on the table. Place  the pattern piece on top of the right bodice and table fabric,   lining up the CENTER FRONT MARKINGS, not the edge line. Pin down the pattern now on top and outline the shoulders and neckline on the fabric on the table with the little dots. Remove the right bodice.

* Lay your pattern back on the table fabric again, lining up the edge fold closest to CF with the little dots. Cut it out. Make sure when you lay out on the table there is enough room for all the folds of the facing to be cut.  I messed that up twice, lining everything up perfectly and doing it too close to the edge to have enough for the foldover facings.

* Cut! Yay! Whew!

Flat Lining


This garment will be "flat lined", one of my favorite techniques. The vertical seams end up with a Hong Kong finish when complete and a nicely lined garment. I am lining this garment because flannel is notorious for sticking to whatever is under. I want it to hang nice and smoothly.


The first fold of the facing is shown above. The pattern specifies sewing that raw edge "invisibly" to the bodice before doing the other folds required to make the facing.

For flat lining you will need a quarter inch foot and an edge stitching foot. The edge foot really helps but is not totally necessary if you have a good eye.

Every edge of the lining is cut normally except vertical seams. The CF area of the lining is cut to the first folded edge so as not to add bulk to the facing. It sits underneath the folds.

 There are red arrows pointing to the foldover facing underneath. The side seam is cut one half inch wider.


The lining and bodice are place right sides together. The vertical seams, here the side seams, are matched and sewn with the 1/4 inch foot. It is then trimmed to an eighth of an inch. The lining is then pressed toward the lining and folded over the edge and wrapped around the seam allowance. . It is now stitched "in the ditch" with the edge stitching foot. Hong Kong seams, voila!

You can see much more about this technique in the tutorials page by clicking the tab just under the banner.


I've really enjoyed my sewing time this long weekend. Fingers crossed I will finish this tomorrow. I have not cut out my sleeves yet as I know there will be decisions there for the plaid matching. This is a VERY dropped shoulder so it should be interesting. More coming.............Bunny

Monday, September 30, 2013

Chanel Jumper??? Simp 1723


Sophie's jumper, Simplicity  1723, is a done deal! I put a bit of extra effort into this child's garment but that boucle made me do it!

Pattern: Simplicity 1723, jumper, jacket, skirt and headband, all with a slight nod to Coco Chanel. Amazing how her classic designs filter down to children even all these years later. It was not difficult.It does not require a lining but I did one. I recommend. My grandaughter loves any sort of jumper or long top to wear with her tees and leggings. 

Fabric:   It is made with an acrylic and cotton boucle and I pray it doesn't pill. It hasn't yet so that bodes well. I have machine washed and dried all fabrics used so expect no probs other than a lack of desire to press clothing on the part of my daughter. She will  more than likely send it to the cleaners. That's her MO for anything not knit. 

The lining fabric is a 100% poly, a charmeuse wannabe. It was "springy" as many older polies are. It was given to me by a friend when she cleaned out her stash. 

I used a poly grosgrain ribbon for the belt and some little lace flowers picked up at Fabric Place in Mass. I found the garment a bit too serious for an eight year old and had to fun it up a bit. Sophie loves polka dots.

Construction: After my last positive experience I decided to flatline the jumper much as I did my crinkle jacket.  It took a lot of "pre-sewing" but once done the process of putting the jumper together whipped right along. The facings, hem, and waistline are bound with the same lining fabric. The boucle really needed the structure of the lining and bound seams to keep it from unravelling, something it wanted to do with a vengeance.

If I had to do it again I would not face the jumper with self fabric. I would use a thin lining instead. It is far too bulky in the button area for my taste but I will just move on from that observation. It won't bug anyone but me. I did not make real buttonholes and just stitched the straps shut with the buttons. The zipper is plenty long so I don't think Sophie will have a problem getting it on. I used an invisible zip and machined stitched the facing ends into the zip, no handwork.
Facings were understitched as much as possible and the edges bound with bias lining fabric. I used my clapper and tons of steam to get those edges as flat as I could.

As far as fit, I did have to alter the pattern. Sophie is very tall and slender so this was made in a size 8 with an inch added to the bodice and another to the skirt. I think dresses look cutest on little girls when the waistline is a bit elevated and this does that  on her. Her back waist measurement is 2 inches longer than the pattern measurements and I only added that one. 

All in all, this pattern is simple, cute and could be whipped right out if you don't  flatline, line or bind those seams. This would be great for the serger. But my fabric required the additional fuss. I must admit, it does feel lush and yummy in the way a Chanel jacket does. Maybe next time I would do an edge to edge lining as she did. I hope Sophie likes it. She did pick out the pattern and pink fabric.

********************************************************************************
I just have to comment that we have had the most incredible Indian Summer weather. It has been in the high seventies for days with clear blue skies and leaves on the trees flaming with color. Will winter want payback?......Bunny

ETA: Why does my text publish in different sizes when I don't change the size?I've notice this on only certain computers, not all. Are you seeing my text in different sizes, other than the headings? Thanks...Bunny

Sunday, September 22, 2013

Simplicity 1723 Begins!

Any notions I had about whipping out a simple little jumper for Sophie have left the building. First the fabric: It's acrylic and cotton pink boucle, cute, and it FRAYS! Oy, does it fray! That was dealt with  as you'c expect. It stretches out. I ended up taping the neckline and armholes. I had to cut the tape to fit  the pattern and steam the fabric back into the proper length and stay stitch the tape on. The tape is selvedge from other projects that I save up in a jar.

I also chose to flatline this garment, so that all took time. My entire sewing yesterday was all prepping the pattern pieces before actually starting to make darts and stitching the jumper together. Now that all of that is done I can just put the thing together today. This will have a facing because of the shoulder tabs and that will be bound as well as the waistline seam. I am also putting in an invisible zip so the sequence of construction in the pattern directions will not work but that's OK.  The flatlining and topstitching all those bound seams should really strengthen the boucle weave and prevent seams from popping apart. Sophie is an active little girl who loves to dress up, a girl after my own heart, and I know  she will love this.
***************************

I have just discovered ground cherries at our Amish neighbor's farm stand. They are wonderful and today I hope to make a coffee cake with them. I am going to get lots more and freeze them up for the winter. Plan right now is to make a ground cherry pie at Thanksgiving. We will be having a houseful this year and I want to have a memorable feast. Have you ever cooked ground cherries?....Bunny

The Ray Pinafore, 2025's Epic Fail

  Happy New Year and welcome to my epic fail of 2026. I guess you have to have one, right? This is the Ray Pinafore from Paper Theory Patter...