Sewing Vloggers

Showing posts with label petites. Show all posts

Tuesday, August 18, 2020

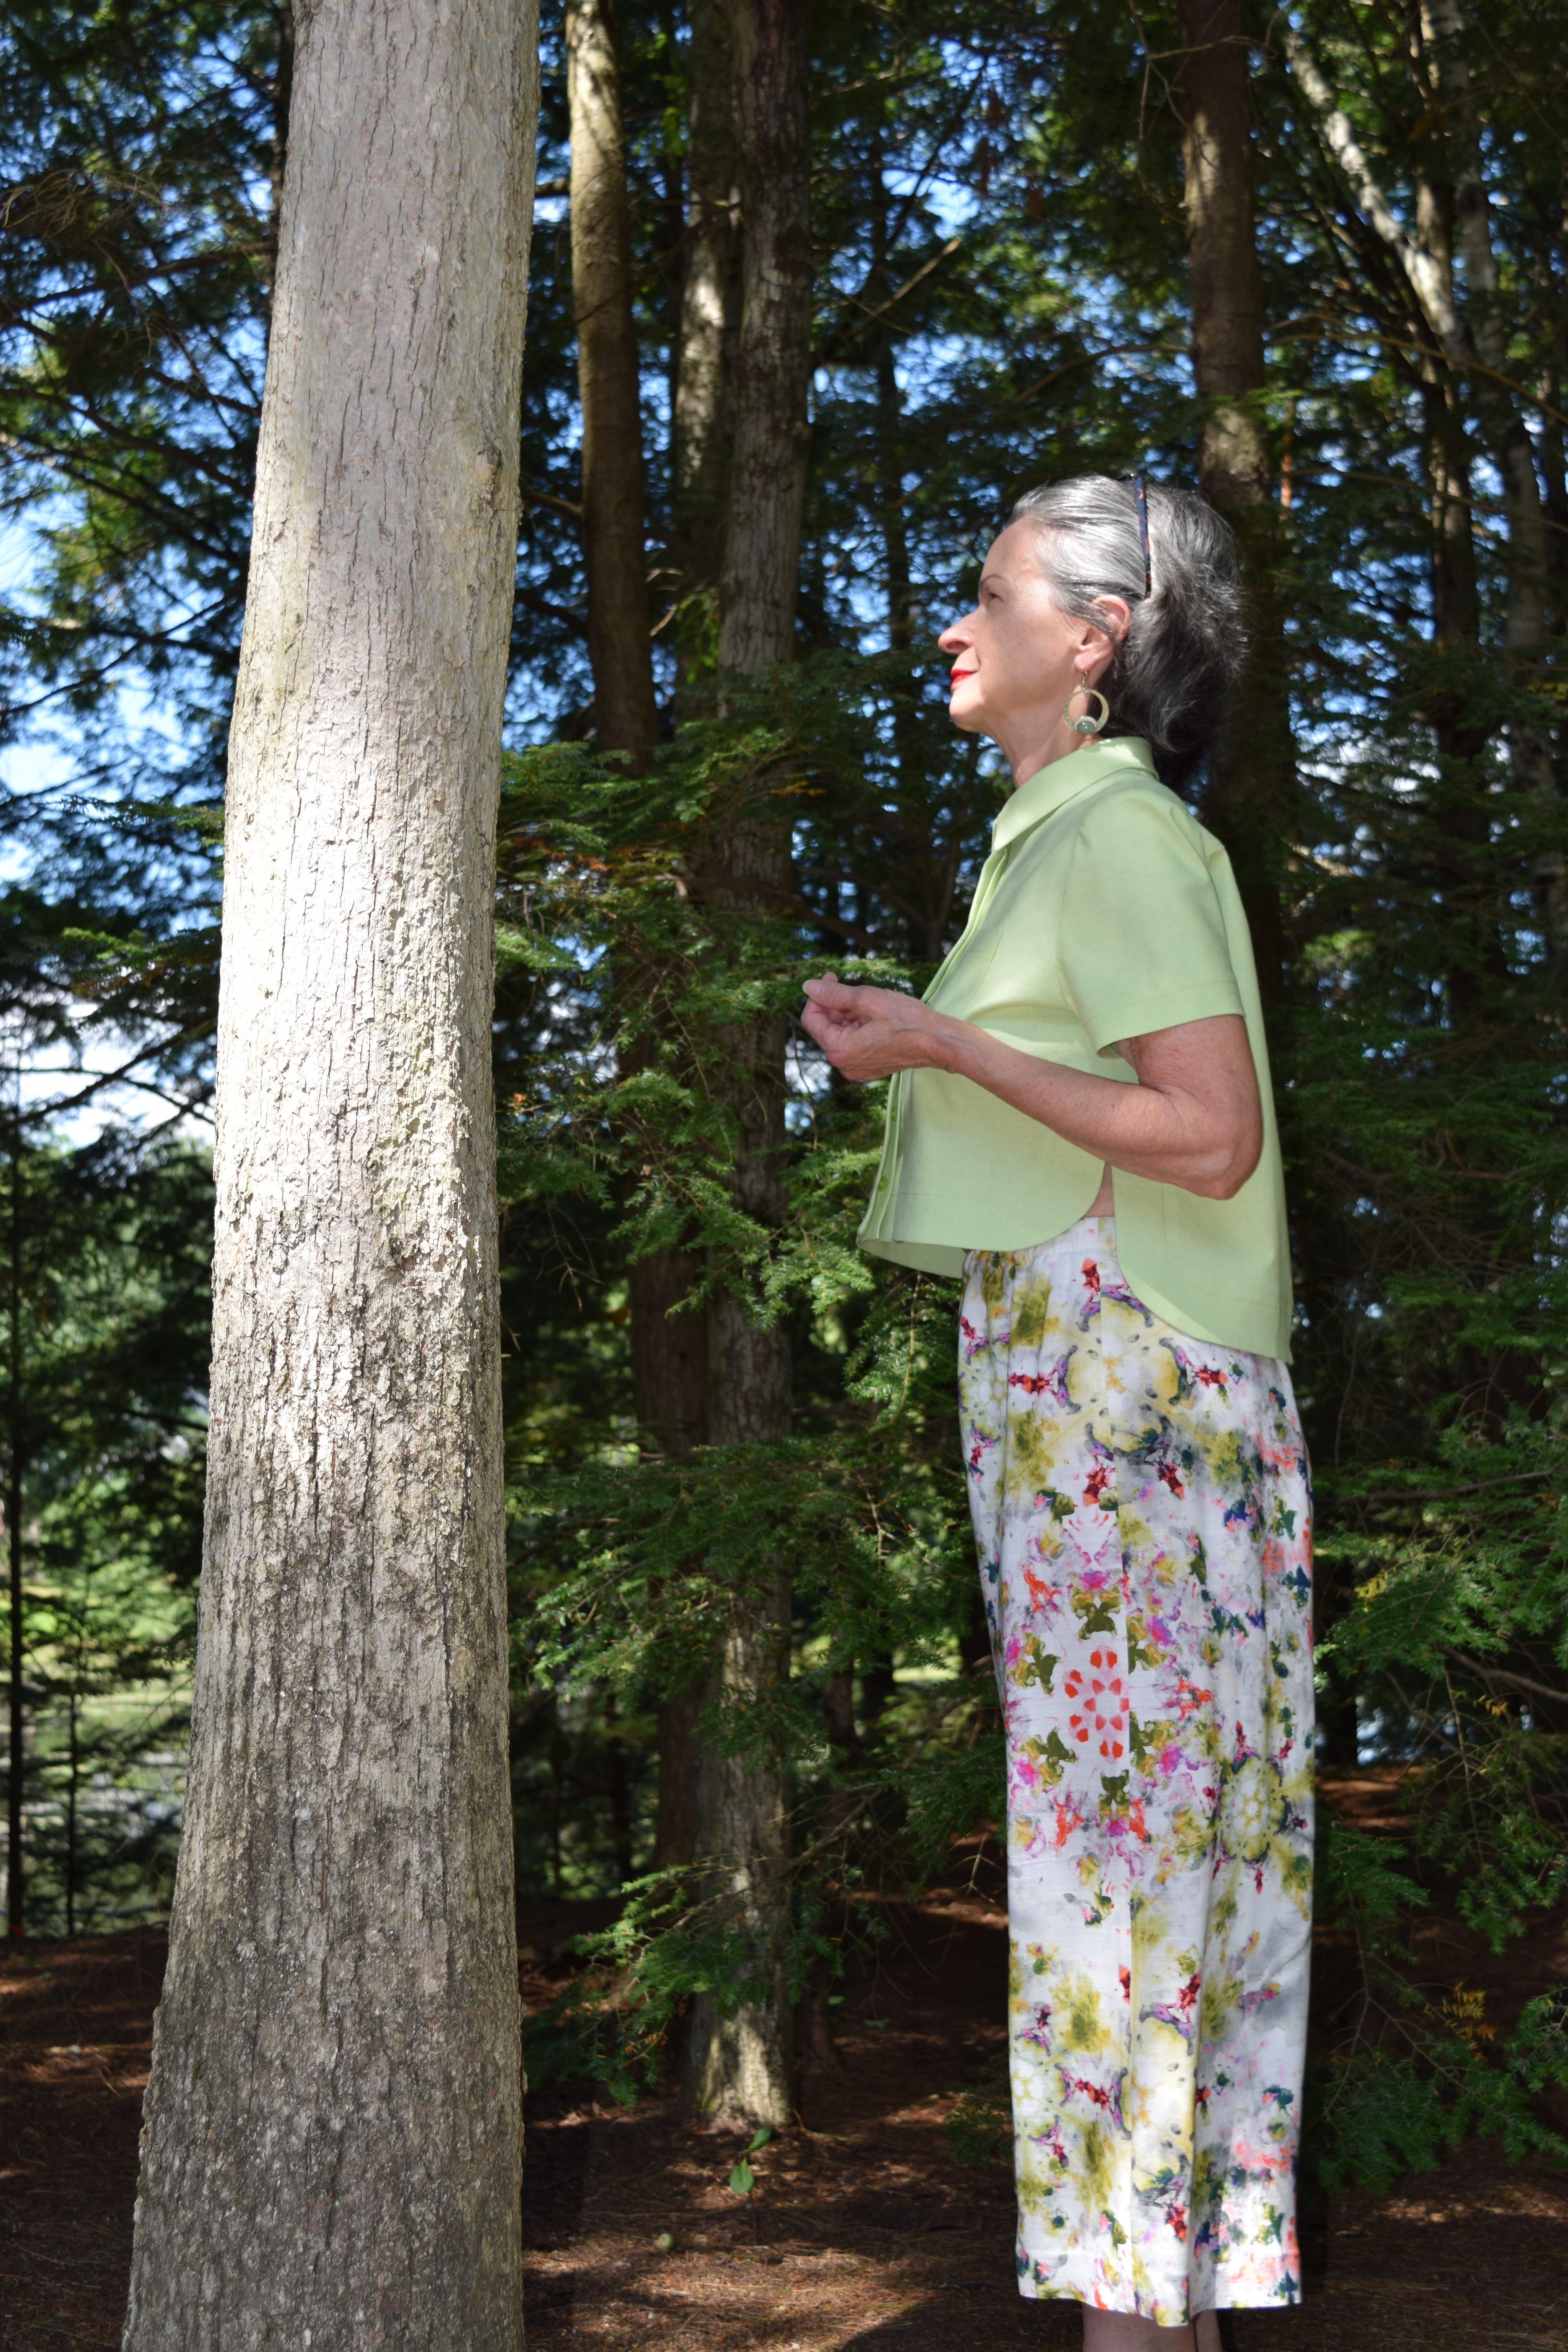
Mimi G Style S8889 and pants


As soon as I saw Simplicity 8889, a MimiG Style pattern, there was something about it that said "petite" to me. I loved the detail, the high collar buttoned shut, the interesting hem band. I even liked the high low bottom edge, not my usual taste in hem finishes. It all just seemed a bit downsized for a petite shape. I also thought it would be the perfect foil for the rayon print pants I just made.  It would go well with some pale green I had in the stash. It would also allow the full length of the cropped pants to show. The sizing would  require a bit of adjustment for petiting but that was nothing new.  I will review the top first here and then the pants. 

The top

Fabric:  

This is made with a fabric that someone, can't remember who, gave to me. It looks like Brussels Washer Linen, or so I thought. Once I started working with it I realized it had a fair amount of Spandex fiber and that was all on the crossgrain. I DO NOT LIKE Spandex but it was in there and I was emotionally vested in the project so went with it. It was a pain to iron and at the end drove me nuts on the last horizontal collar stand buttonhole. ugh. I found it behaved like a linen blend on the straight of grain but had a springy bounce to itself as well. So, in the end it was OK but I would not have bought it. I thank whoever gifted it to me. The hemband, collar and placket were interfaced with sf 101. I bought a bolt of this for bag making and it was handy. It worked fine enough. If I did it again I would interface just behind the specific buttonholes as the three layers of cloth for the hidden placket plus the interfacing made for a lot of thickness. Add in the spandex spring and it was a bit thicker than I would have liked but it came out OK. 


Pattern:

This is where it got very interesting. This pattern has no darts. It is what I call a box top or box jacket style. If you are anyone who has a C cup bust or more you know a dartless woven top does something special. It hangs straight down from the peak of the boob as you see above. This extends the bodice out into space as you can also see on the dress form. Do you want to show skin? Wear a light cami as I will ? Does it flatter? Did you forget this style does this? Did you notice how this was hidden on the pattern cover photo?


 Here's my version:


See that skin peeking out?  You can also see the top trying to make a bit of a dart, extending out, and hanging straight down from my boobs. Do you see my flesh at the side slit? I brought that slit down an inch or so. It is what it is. I have a white chiffon cami I will wear with this next time. Don't get me wrong. I still really like the  top. What get's me is that I didn't follow my own often spoken advice to really read the pattern photo on the cover. Guilty.  I'm not sure I would recommend this pattern for a newer  sewist. The directions are excellent, very clear, nothing missing. It is a bit challenging on the step where the hidden placket meets the hem band but it is all laid out. The good thing is MimiG has a youtube video sew along and you can follow the entire construction if you like.

Fit:

I flat pattern measured and actually decided not to petite the upper chest of this pattern. It worked out fine. 

* I did an FBA adding  1 1/4  inches to the bust. I take a C cup. 

* I shortened the back length by 2 inches. Why? The hem it came with would have put the hem edge right at a full part of my hips and shortened my "leg look length". By raising it, it ends up in a more flattering spot for me.  Five footers fight for all the leg length they can get!  It is still very hi-lo.


Remember, if you shorten the length of the top, do it in the area above the hem band and below the armscye. 

* The last fit issue I dealt with was adding more room in the hips. I found I wanted just a bit more ease in the back so the easiest way was to just make the pleat deeper. I added one inch to the depth of the back pleat and to the hem band in back at the same spot.  


Construction:

This is a pattern where you really need to follow the directions. There were 26 steps. I liked the challenge of all the detail. I chose to topstitch most edges with the heinous "stretch stitch" , aka, triple stitch. It is great for topstitching,  giving a thicker look to this seam finish. For the less experienced sewist, the curved hem band meetings at side seam can get a bit futzy and there is always the fun of a traditional collar with stand in this pattern as well. That is the one place I veered from the pattern and did the Nancy Zieman method which you can find in my tutorials. It gave a nice crisp finish as it always does.


Once again I did my buttonholes without a buttonhole foot and they came out beautifully, except for the one on the collar stand. That part of the stand is on the bias. That and the stretch spandex insisted on a wavy BH. I ironed it away but it was definitely  not as nice as the ones hiding in the placket. I would use a lighter interfacing or just behind the BHs, next time I do a hidden placket like this. I cut down the pocket a 1/4 inch all around, the petite scaling thing. I didn't do the collar as I liked it as it was. The construction went smoothly, just following directions. They were well written. 

The Pants

Fabric:

The pants fabric is Telio Kahlo slub rayon in "seaweed" coloration. I was inspired by a pair of loose, cropped pants I saw Linda Lee wear on a video. Matching this print was a near impossibility. It would have worked just fine if I went the no match route. but my inspiration pant had a soft large print match around the knees and I wanted that. I found in this fabric a couple of large motifs matched but there were tons of random splotches that defied any sort of repeat. I went with the large motif I wanted to match and didn't worry about anything else.  Results below. 


This fabric, 100% rayon,  is quite lightweight, I believe in the low 4 ounce range. It is near sheer. Lee suggested lining these near sheer rayons with polyester mesh. I'd never heard of such but gave it a try. It worked out great and I will do that again. The lining is a relatively heavy fabric so hangs nicely, doesn't ride or stick to anything and does it's lining job well. There is a lot more information on the fabrics I used HERE.

Pattern:

For the pants I used my Sure Fit pants sloper to start. I did a simple gathered waist and cropped leg with a 1 1/4 inch deep machine hem, no pockets. I rarely do pockets in pants as they add bulk and width to my already wide hips. I love this style and it's soft folds on the hips and legs help even out my proportions. I do think a short top makes it work. 

Construction:

These pants were very very easy to construct. They were classic  drop one leg into the other pants sewing. I have seen people on youtube making pants in such difficult other ways. Most patterns tell you to do the leg in leg method. It is so fast and easy. I don't get it. Oh, well, to each his own. 
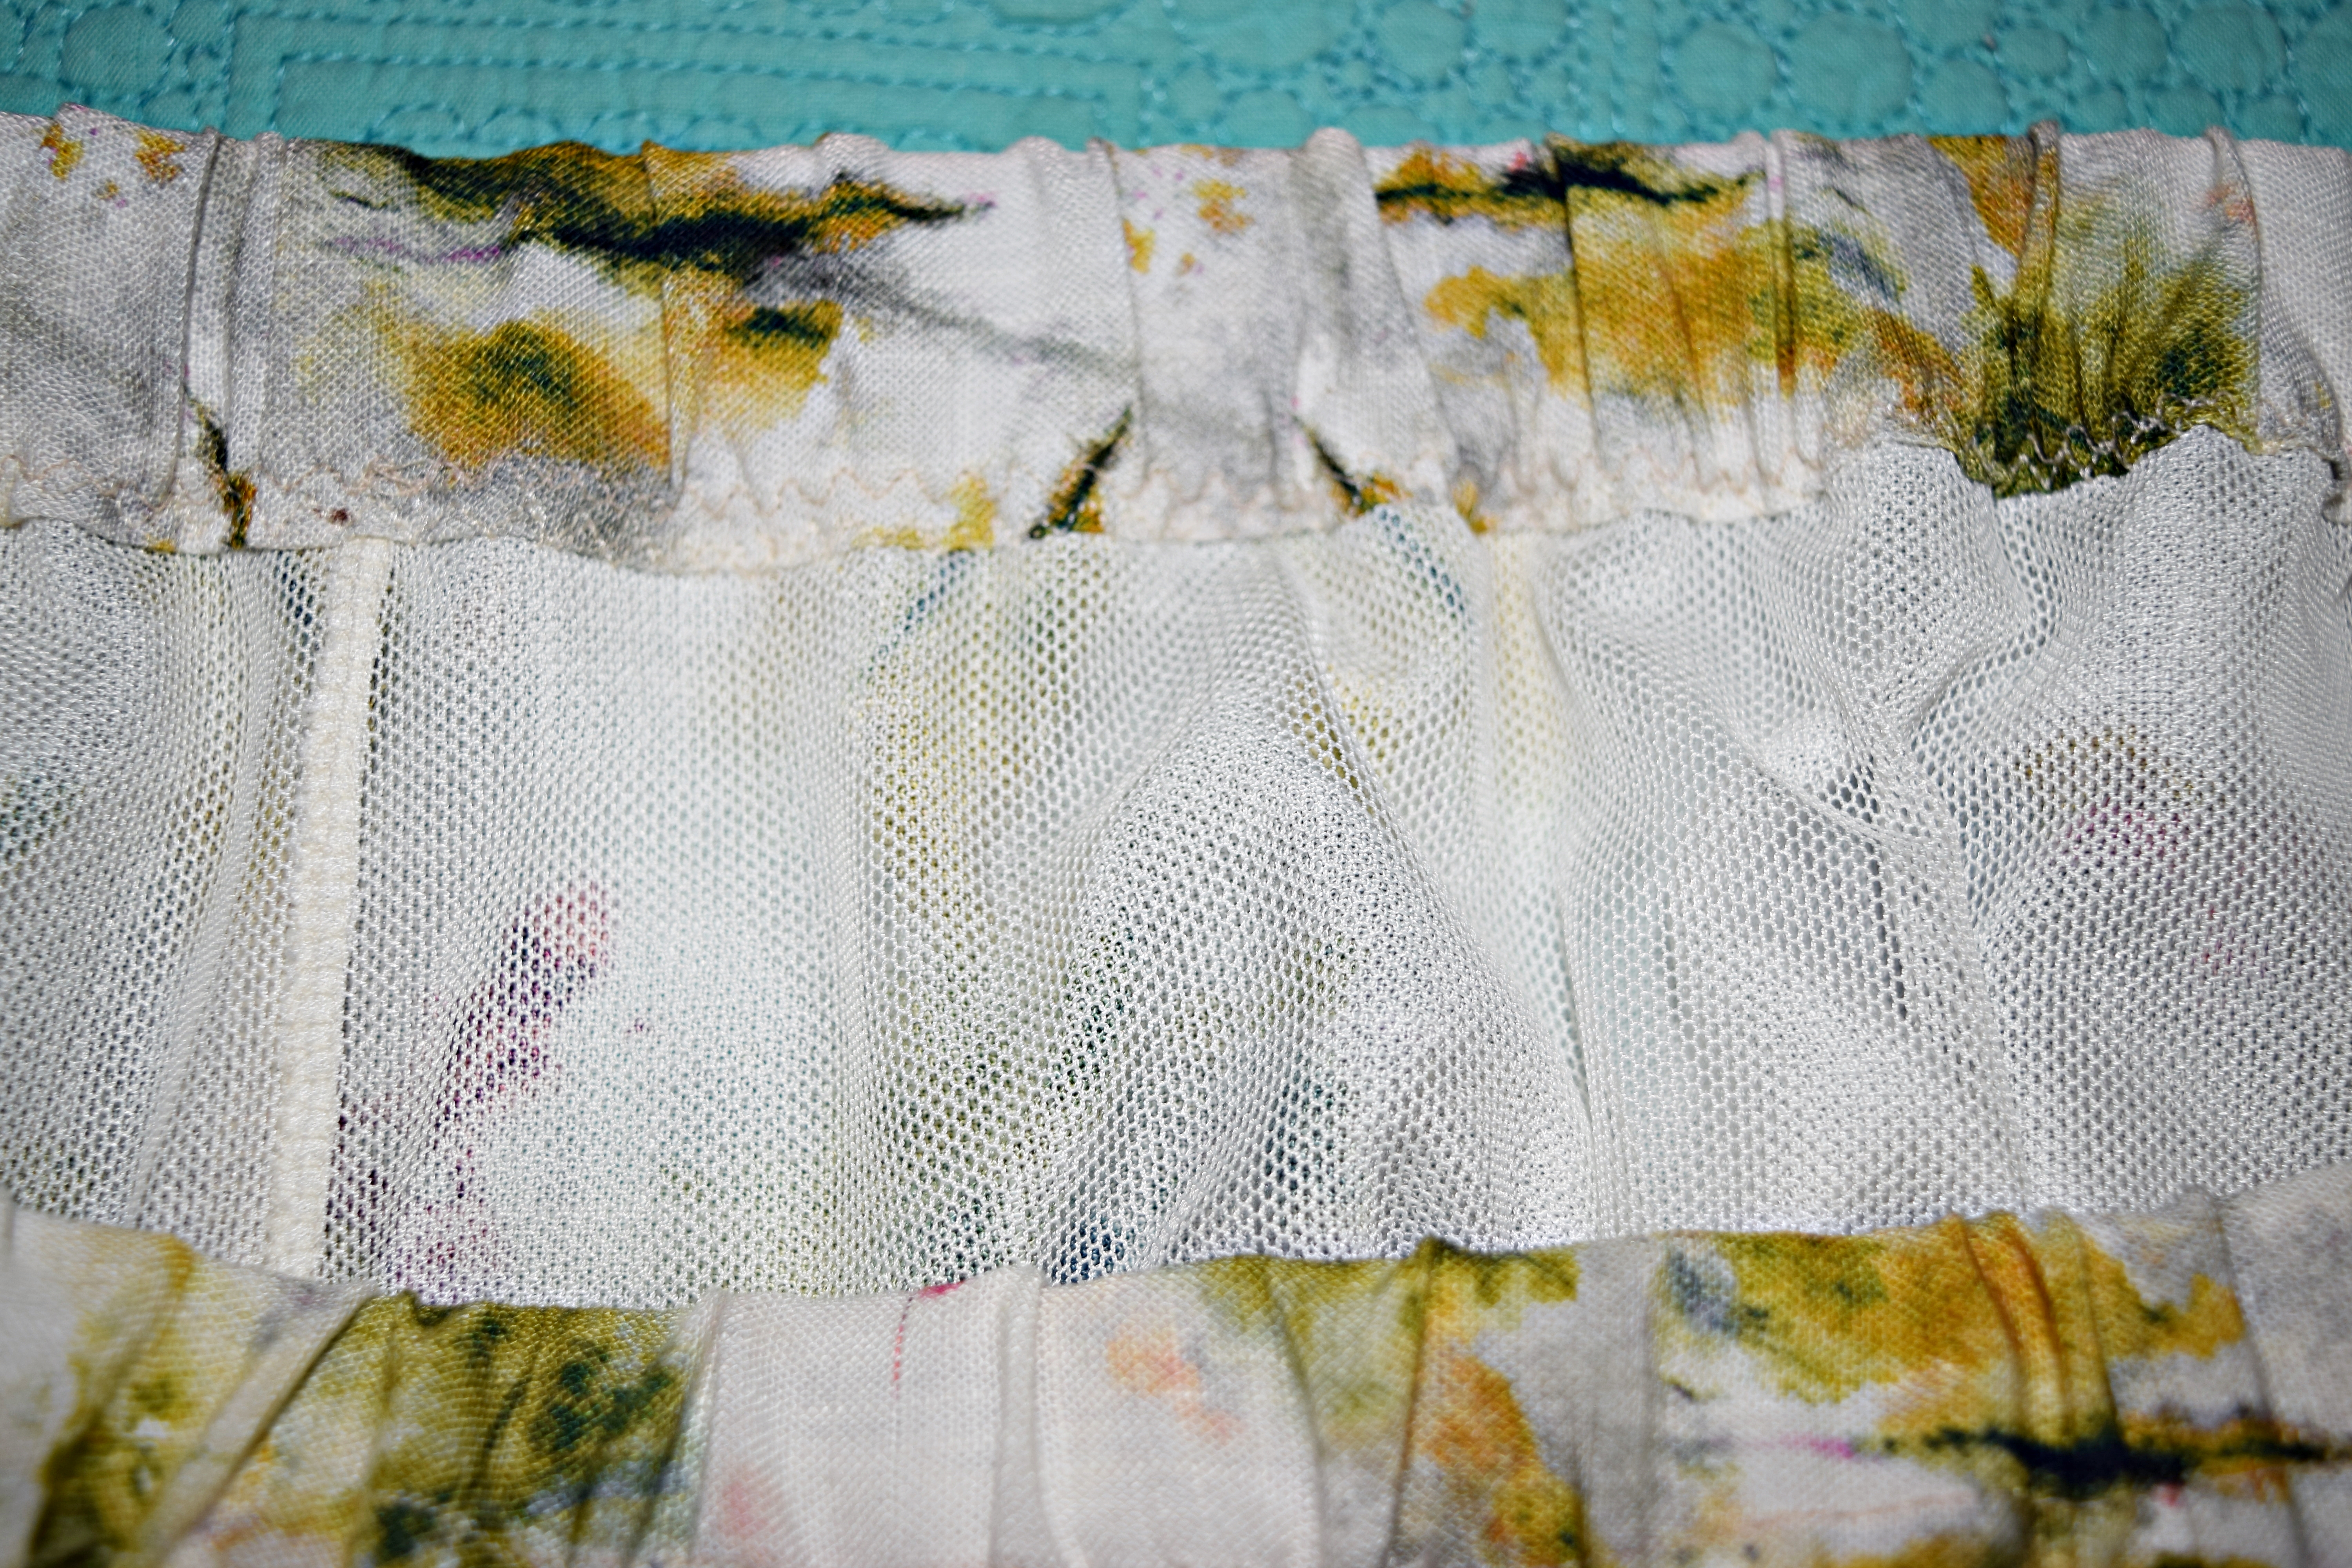

For these pants the toughest part  was establishing the print layout. Once I had that done it was pretty easy. I made the lining in the exact same method. I dropped the lining into the pant and basted them together at the waistline, not the seam.  I attached non roll waist elastic, cut 2 inches smaller than my waist, to the top edge of the pant with a triple zigzag stitch. I turned it to the inside,covering up the top raw edge of the lining. I stitched the bottom edge again with a triple zigzag. Done and so easy. 


The hem was serged , then folded to the inside 1 1/4 inches and stitched down at the top edge. I liked this deeper hem on such thin fabric. The extra weight of a deeper hem helps it hang better. Oh, I let this rayon hang out for several days before hemming.  The mesh lining was simply cut with a rotary cutter about an inch and a half shorter. 


I love this outfit. I like MimiG's  pattern and it's clear directions.  While I wouldn't recommend this normally for a newbie sewist, if they want to sew along with MimiG's video on youtube, I think they can pull this off. I'm not crazy about my top fabric of these coordinates but I do have a lovely and short sleeveless top in olive green linen that I made a couple years back. It  goes really well with these pants.  I think I will get a lot of wear out of them. I liked this fabric so much that I went right out and bought another few yards of a different print but still Telio Kahlo slub rayon. it will become a tunic. I recommend this pattern with the caveat about the fit of the bustline that happens to box type tops. I will live with it and wear  a cami underneath. 

****************************************************************************


My husband and I have been devoting nearly every spare minute lately to painting our home. I'll post before and afters when we are done. This is a 1962 ranch house that was painted  mint green with maroon trim. I can honestly say I lived in a very ugly house.  You can see we've gone whole different route. We love how darker homes look in wooded settings and it worked out well here. This cedar sunburst was black with mold and had never been cleaned or treated since the day it went up. My husband got off all the years of crud and will be sealing it tomorrow.That will bring out the beautiful cedar even more. My job will be painting the last side of the house on the left, yay!  Almost done!........Bunny


Thursday, August 9, 2018

Petiting Vogue 1515


This is a sneak peak of the fabric I used for the second version of Vogue1515. You can see this one coming down the road, can't you? But you know how I love to mix prints and do it fairly often and almost always with children's clothing. When I was reorganizing the new studio this two fabrics ended up being neighbors by accident and it was kismet. I had to do something that involved them both. Vogue 1515 is it!  Now to how to petite this pattern:


The first thing I did was cut the smallest size, Size A. The body measurements for Betzina's Size A are a couple of inches smaller than mine other than the waist but there is massive ease in this design and Size B was way too large. Then I did my usual petiting. This means removing length across the front  and back bodices. I am five feet tall, fairly proportional lengthwise and take out 3/4s of an inch by doing a 3/8th inch fold across the bodices usually right below the notches. That area usually keeps the shortening from interfering with necklines and other details but you can move it where it works best for you. Obviously if you carry your shortness below the bust you would make this adjustment there.


By using the Size A an additional 3/4 inch total came out of the shoulder seam. Add that to the petite adjustment and you have 1 1/2  inches in length removed from the incredibly low original armhole front and back. That takes care of that armhole business. Now for all that ease. I like the ease and it is part of the design but it was way too wide for my narrow torso. At the side seam under the arm I went in one inch from the cutting line on both front and back and angled that out to the original hem. I drew that in but before cutting the piece I folded in the dart so that when I cut it came out with the right angles as you can see above. On the original black linen top I added an inch in length as many PR reviewers suggested adding up to three inches in length. I guess they are not petites! I added nothing to this one and it should be fine.


Here's a little peekaboo for you. It will be a few days before I get to  model these for you as we have some commitments happening but I am looking forward to it. It has been fun doing these tops and I may even make another...................Bunny

**************************************


My husband and I have really been enjoying the beauty of New Hampshire since we have returned. This is from the White Mountain National Park and is the famous Kancamangus Highway. It is one of the prettiest places in the country. While this is a national park, we've made a bucket list of every state park in New Hampshire and are on our way!...Bunny

Friday, August 3, 2018

Vogue 1515, oh, my!


Talk about not come out as planned! I wanted to do a bit of fabric painting and decided on my design and paint, etc. Now for the fabric! I went digging and thought it would be interesting to have my background be black and that this linen in black would be a perfect foil for my plan. Now to pick a small top. I didn't want to do the recently made green linen top again and hunted for something different. That's when I found this top, Vogue 1515,  from Sandra Betzina, that I have wanted to make forever. Bingo! Now, I love SB, and I know her fit philosophy and it's difference from the Big Four. Despite being a fan of her style and adjusting the fit, it rarely works for me. Knowing this I went into this project eyes wide open. But, wow......................

I looked at all the pics on line, PR reviews, etc. I liked the look but some didn't fit the way I'd like the top to fit me. Another crazy issue here is my getting adjusted to a loss of weight. I can't seem to trust a pattern size I haven't used previously and/or I am hung up on my decades of FBAs, I just don't know. Those wide open eyes flat pattern measured everything. There was plenty of ease, but, geez, my bras still fit so I must need an FBA. I did one. I used size B. It seemed closest to my new measurement except the waist larger than mine, trademark Betzina. But this top had no waistline so, who cares? I really should have used the smallest size, A, with no FBA, but even then I think I still would have had issues.

I got the thing sewed up and it was HUGE. I even went back and looked at all the pics again. Reviewers said the armholes were too low. Yup on that! No one complained of the ease, however. It is 'loosely fitting" and it really is. But here is the issue accross the board as I look at other's tops and my own. The shoulders end in an odd place, IMO. They are not wide enough to be a bit of a flattering tiny cap and they are not narrow enough to further feature the unique collar and some nice shoulder bones, if one has those. They are just an odd length, IMO and I took a half inch off the shoulders, a lot for me, and they still sit "out there".

Low armholes? Bigtime. Loose fit? Bigger time. In all honesty and respectfully, I think SB has designed this top as more of a vest and that explains the fit. It works that way and I may use it that way one day. But, I have seen so many pretty summery tops made with this pattern. I think if the armholes were drawn higher and the additional width flared out from the top of the side seam it would all work as a lightweight top. But the extra width of the pattern makes for the " step right up and see if my bra is clean" look that is not for me, that is unless a bulky sweater is underneath.


When starting out I thought if it was a bit too large I would just take in the side seams  and all would be fine. I did sew the side seams a  quarter inch deeper. What to do, what to do? I am loving this top and it's cool collar. I reached into my heirloom sewing bag of tricks and pulled out a fairly common one from vintage garments. A child's sleeveless dress was often made far wider than needed. The excess was folded under the arm into a pleat that could be taken out as they child grew larger. Our Depression Grandmothers really knew how to make things last. Damn it, I'm going to do the same. You can see above a full three inches has been taken out from the entire side seam with the pleat. Now times two sides, that's six inches I removed from under my arms. It gives a better, sleeker fit to the front but still has all that ease and flare. I like it better! This will be topstitch in around the armhole, more pics later.

 To eliminate unwanted bulk and ridge lines when ironing, a linen hazard, I out another  vintage trick. The facing edges were simply pinked ans stitched. Worked like a charm.


Most seams are Frenched. Next time I do this collar I will do opposite of the pattern directions. I will attach the inside first and then top stitch on the outside. Too much drama involved with getting this collar right but it looks good now. It actually looks good inside out with one side not elasticated, just a big pouf, so I may do that to. I did seam binding as a flat casing for the elastic in the collar and that worked fine.

There will definitely be another one of these. I have the fabric picked out and will start tomorrow. I am determined to master this one as it is so cute. When done, I will model both so you can see what I do with the smaller size and different approaches to the details. The painting project, on hold for now but that's coming. Long weekend ahead! ......Bunny

ETA: Just want to say I love Sandra Betzina and her designs. I believe this pattern would be great as is, even for me, if it is used as a sweater vest of some sort. I can see it in a boiled wool with cut edges, so just keep those eyes open if you are contemplating a thin, blouseweight fabric. For a sweater top, use it as designed.;.Bunny

The Ray Pinafore, 2025's Epic Fail

  Happy New Year and welcome to my epic fail of 2026. I guess you have to have one, right? This is the Ray Pinafore from Paper Theory Patter...