
Here you are, just learning to sew, or maybe you are returning after having put sewing aside for several years. What do you really need for notions to get yourself started? Well, I don't think you need that much. That big pile of measuring tools you see sheds a pall on my honesty but it's true. I think when starting out on anything new it is wise to get comfortable with a few simple tools and add from there as projects get more complicated and require more complicated tools to help you out. You don't need a ton of notions to start out. Get a few basics and add as your designs require.
We've already discussed threads and needles and pins, so what's next? Let's start with cutting tools. At one time you would be advised what scissors to buy but today there are also cutting options that include rotary cutters and their mandatory mats and rulers. I don't think you need a rotary cutter to start. I firmly believe in laying a foundation and growing from there as time and skills accrue. So start with a good pair of shears. Many moons ago I worked in a fabric store that carried really high quality shears. When the decision was made to discontinue the top of the line models I was able to pick them up at bargain basement prices. My scissor collection boasts TOL scissors by Wiss and Marks and Gingher that are wonderful. But truly, if you look in most scissor drawers, the pair that you see most often, gets the most use, and seems to hold is sharpness interminably are those orange handled shears from Fiskars.
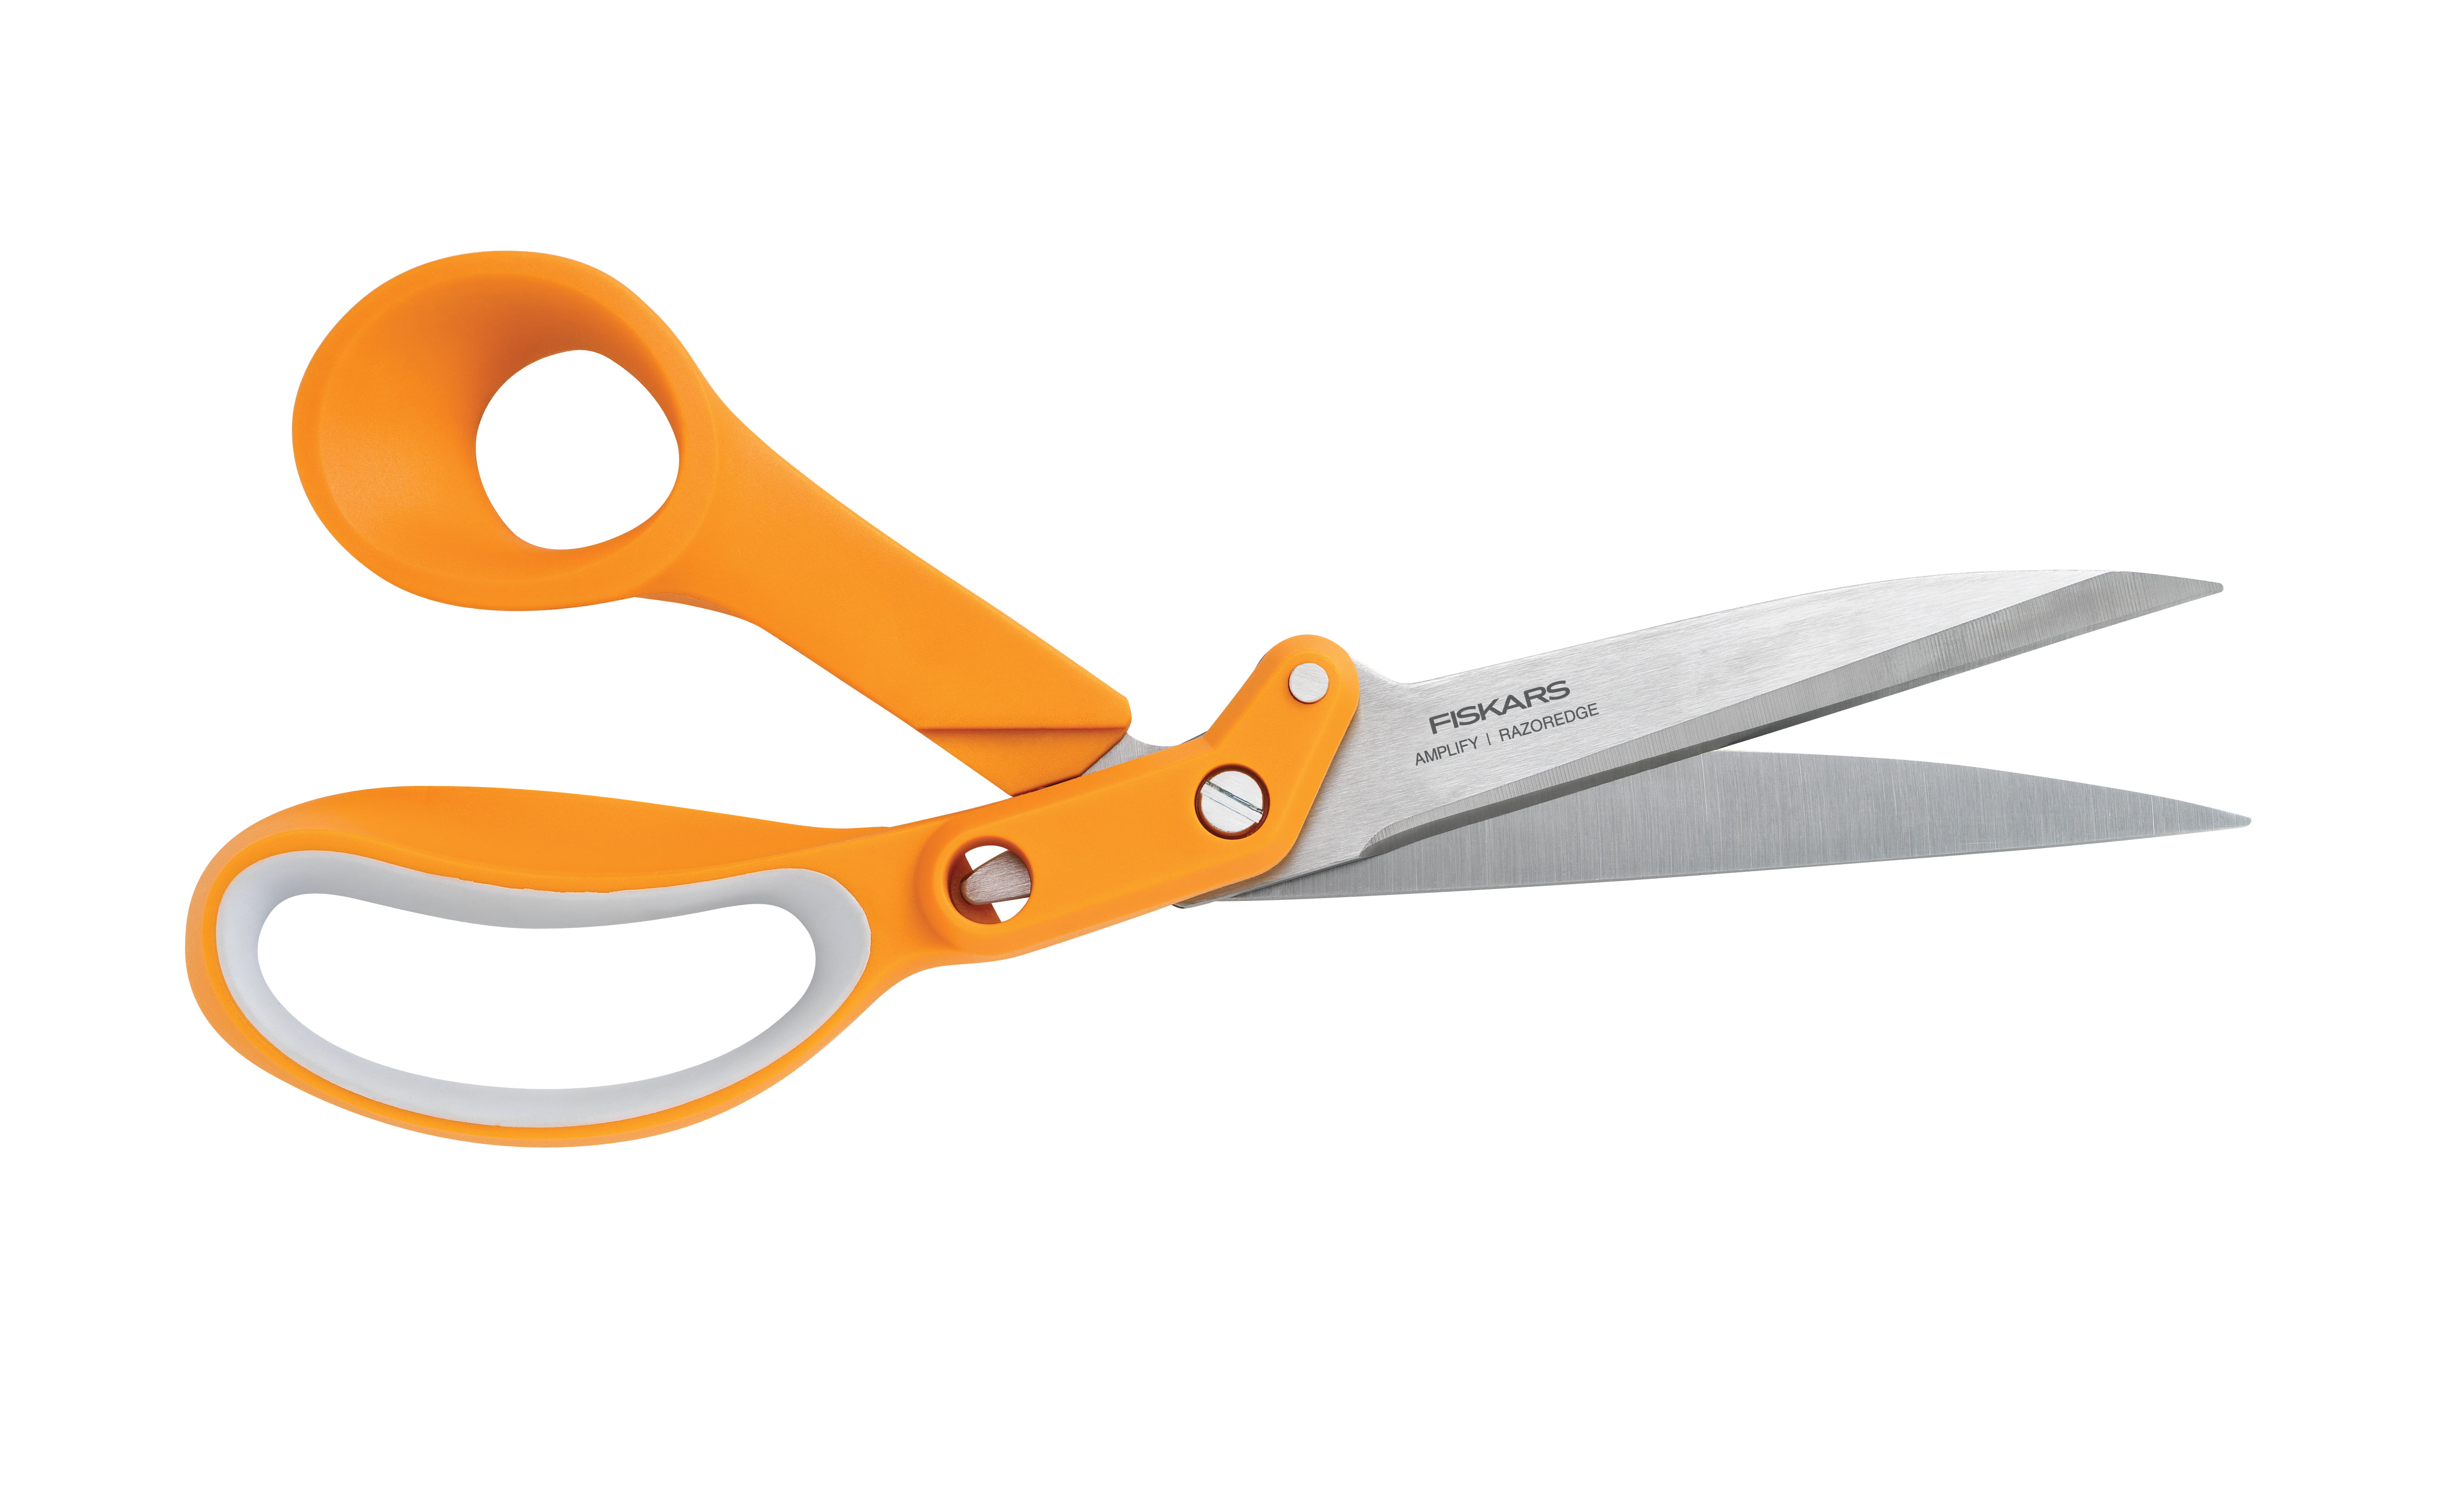
An 8 inch pair won't set you back too much and they will last you a long while between sharpenings. These are basics. They are also lightweight and easy to spot in the notions drawer. If you are going to use your scissors in a class put a wine charm around the handle so you don't lose them to someone who thinks they are their's. Just about everyone has a pair of these in the drawer and they should serve you well. There are lots of other types of scissors but one pair of shears and two other suggestions I have are all you really need. Scissors can run from five inches to ten inches long but the eight inch shears are the most versatile, IMO.
Here are some of the different kinds of scissors that you might like as your sewing skills mature and you start sewing with more challenging fabrics;
Knife edge scissors: These are your basic shears as you see above. They are sometimes designed so the side that your hand goes in, as opposed to your thumb, is in line with the blade. This makes cutting our your fabric easier as the scissors can be held parallel and next to the table while cutting. and therefore not lifting the fabric. Scissors that have the blades centered between the thumb and hand openings tend to lift the fabric as you cut and can easily give you inaccurate cutting despite the best intentions otherwise. Look for the blades set up like you see above in the Fiskars so that one blade can be laid against the cutting surface as you cut. Many scissors come with blade covers which is nice for travelling back and forth to class, safer too! Other manufacturers are are Kai, Marks/Mundail (vintage) and Wiss.

Embroidery scissors: Embroidery Scissors are very sharp usually four inch blade scissors. This is the second pair of scissors of the three I think are must haves for new sewists. These are your life savers. Why? Because they unsew. You will use these time and time again to rip out your sewing mistakes. The sharper and pointier the better as they can slip under the stitches. You have to be careful with these as one slip and it is easy to mistakenly cut your good fabric. It has happened to all of us, you go to cut a buttonhole open and you put a gash across the front of your bodice on a nearly complete garment. Know you are not alone and will get over the pain in time. In the meantime, also know that you need a good pair of sharp embroidery scissors. I have several types but find I really prefer my little Fiskars. Mary Corbet, esteemed embroideress, has a great blogpost on her embroidery scissors and all the different types which you can enjoy here.
Paper Scissors, Kitchen Scissors or any old junk scissors: These can be any type of old scissors that you will relegate to all the scissor chores needed by the rest of the family. Your good scissors - HIDE THEM! Better yet, get some cheapies for the rest of the family. At one time the chains had bins of dollar pairs of scissors. Today we have Dollar stores. I have lots of those dollar scissors hanging around for hubby to use. A good pair of Kitchen Shears is indispensable for heavy duty cutting that your fabric scissors would just faint over. Just know, the third type of must have scissors for any sewist are these, the junk drawer scissors. Make them easily accessible and you will be able to keep your precious sharpsters to your self, well hidden. ; )
Nice but not necessary

Serrated scissors: Above is a pair of Gingher Serrated scissors. Most scissor companies make serrated scissors. Why? They make it much easier and accurate to cut fine difficult fabrics like chiffons, organzas and silks. Those little serrated edges, which you can't see here grab the fabric better and prevent it from slipping away while cutting. Get these when you get to the point of sewing a lot of silks and sheer fabrics. They are nice.

Pelican Billed Scissors: These are also called applique scissors. These are used to cut things that really need extra care. For example, you have done a hem on a chiffon fabric that is first folded up a half inch. Then the folded edge is zigzagged or roll edged in the serger. You now have to cut off that excess piece of chiffon right up to the zigzagged hem without cutting the skirt. These scissors will lift the chiffon and make for safer cutting. These are also great for cutting right up to the edge of machine applique and getting rid of those pokies. The straight leg of the scissor is VERY SHARP AND POINTED. Don't use these to cut threads on the machine. Cutting threads repeatedly in the same spot will dull them over time and they won't work as well. This I personally know. Heirloom sewists use these a lot in their delicate work. These are a bit pricey but watch those coupons and deals from the chains and places like Nancy's Notions.
There are also scissors out there that are more ergonomic and if you are dealing with something like carpal tunnel syndrome, that may be your way to go. They come under names like the Softouch or Comfort Grip . They often don't look like traditional scissors but if they work for you and let you cut without pain, who cares?

Rotary cutters: Frankly, as a brand new garment sewist, I would hold off on the rotary cutter until you have mastered cutting accurate even lines with your scissors when cutting out your patterns. Remember to trim the pattern first before pining it to the fabric and cutting it out. But if you do have some experience under your belt and are ready to handle what can be an extremely dangerous implement, go for it.
Rotary cutters are more expensive. First you need the cutter. I like the smaller size for small curve cutting and the 45 mil size for the rest of my cutting. But you can do it all with the 45 mil cutter with practice. To use the cutter, you need the mat and if you are cutting out garments, you need a BIG mat which will go on a big cutting table. I have used Olfa's, Fiskars, and whatever this plastic thing is that you can pick up at Joanns on sale now and then. I don't know if I bear down too hard. I use only nice sharp blades. But I do a number on cutting mats and you can't imagine how many I have purchased over the years. Right now I am happy with the white plastic type mat from the chains, my second one of it's kind!
Third, you need the rulers. As a newbie, do you need all of these shown above? Not really. Some are leftovers from my long forgotten quilting days. You do need a good straight edge and I love the large 5x24 Olfa ruler that has a lip to sit on the edge of the cutting mat. It really helps keep things lined up while cutting. As you get a little more discerning with your rotary cutter, I would add a Hip curve and a Crotch curve if you can find them. I got mine at a fitting seminar I attended some thirty years ago and I would be lost without them. The crotch curve ruler just nestles perfectly into the curves of , well, crotches, armholes and necklines. A French curve will do similar. The hip curve is used for those longer, smoother curves you find on pants or skirts. I use my triangle ruler a lot too. It is great for establishing lengthen/shorten lines at right angles to the grainline. Do you see how the cost of this rotary business is adding up? Just be forewarned about the expense. It is fine to use scissors and never touch a rotary cutter and be an excellent sewist. Whatever works for you. What works for me is the rotary cutter at this point in time as I like it's speed and accuracy.
Also know that a rotary cutter is a dangerous instrument. I cut off a good hunk of my finger tip and across my nail one time. Never felt a thing. That blade just zipped right through it all and the next thing you know the blood was spouting everywhere. I almost went to the ER, but managed to stick it back together. I have heard some really bad horror stories. I don't think I would use an RC if there were little ones in the house, just too dangerous IMO. I have learned that every single time you run the blade of the cutter down the fabric, you finish that run by immediately closing the blade. Realign things and open the blade again only right before you start cutting. At first it will feel odd and you are opening and closing the blade constantly, but you shouldn't lose a finger. NEVER, EVER leave an opened blade on the table or anywhere, EVEN IF YOU ARE ALONE. Get into the habit of constantly closing that blade the second the cutting stops. If you are at a class and see someone else leave a blade open, read them the riot act. Tell them I said so if you have to. Rotary cutters are not to be messed with in any way. Annnnnddd....you can sew as well as you want without one.
A final update, 3/23/19, on scissors and about their sharpening. It has gotten harder and harder to find a good scissor sharpener. Gingher offers sharpening, for their products only, by their in house experts for a reasonable price and you can find out more about that here. I never could find a good scissor sharpener in the 13 years I lived in New York. Since moving back to New Hampshire, a new friend who hunts a lot hooked me up with the local gun and hunt shop. Hunters NEED SHARP KNIVES. These people are hooked up with excellent scissor and knife sharpeners. I now bring my scissors to the local gun shop and he sends them to his sharpener. I have them back within a week and they are the best sharpening job I have ever had on these precious tools. My pinkers never cut that good when new and if you can sharpen pinkers, you are good! So if you need scissors sharpened, look up your local hunting resource and give them a call. They were very very reasonably priced as well. Do I like going into gun shops? No, but I'll do it for my pinkers!
More notions:

Within the blue outline here you can see a rod holding all sorts of goodies. What do you, as a new sewist, need of these? The three rolls to the left are wigan. You definitely won't use that until you get into serious tailoring of jackets, coats, etc. But next in line, black and white, are fusible tricot tapes. I use these a lot for knit sewing. They help stabilize the hems on knit garments and give a really nice look to the finished hem. You can find them online but if you go to the chain store and in the quilting department you will find "fusible batting tape". It is the same thing and often on sale. I like keeping this on hand and stock up when on sale. This adds a nice finish to the hems of simple knit garments that many newbies enjoy sewing. So I would have this in the cupboard. That skinny roll with the red bull clip is "Wonder Tape". I would be lost without it and as a newbie it will help you immensely. It is a double sided tape that will wash out. It is great for holding zippers, buttons, trims, hems, all in place as you sew. It's a definite must have. If you've been sewing in your zippers with pins you will see a major improvement by using Wondertape. After that are rolls of real grosgrain ribbon. The real stuff is used in couture techniques so you hold off on that until your sewing heads in that direction.

It's nice to have a drawer, but it could be a simple cutlery tray, next to the sewing machine. I am right handed so the drawer is on my right. I keep my most used sewing notions in there and they are always at the ready. No need to waste time looking for things. Set yourself up with this configuration and it will add to your efficiency sewing. It also decreases that frustration when you have to go hunting for something.
Guard your tools. They are precious, not for play or cutting chicken bones. They are an investment. They allow you to work more professionally. And above all, they are yours and no one else's.
*********************************
I am happy to say that Claudine of Rolling in Cloth will be a guest blogger on our series within the next couple of weeks. Claudine is a spectacular ( no exaggeration) knitter, sewist, fabric dyer and all around sewing goddess. She is also very good at making sewing videos and has a really well done video as part of her contribution to NLS. I know you will agree with me on this.
When I started this series, Claudine immediately contacted me to do a guest post which hadn't been solicited. Seems she is passionate about passing along this art and feels very strongly that newer sewists should have the best information possible. With that in mind, she has put in a lot of work to provide you with a quality post and video. Stay tuned as I know you will enjoy it. If anyone else cares to do this at any time, just let me know. We are all motivated by just passing along these skills to all of our newbie and returning sewing sisters and seeing the craft continue. Thank you,Claudine.
************************
Just a reminder here, I don't know everything. But, I am all about passing on what I do know. I am totally aware there are many ways and opinions about sewing techniques. I welcome your input on your methods so feel free to comment about them in the comment section of the posts. So many generous commenters have added so much to our skills and understanding of each topic. I thank you all and hope you will continue to share your experiences and skills. Thanks so much......Bunny


I love this post!! Bunny, do you use a coverstitch? I used to use fusible bias interfacing on all my knit hems when I did twin needle stitches. But, now I have a coverstitch. I was just wondering if you would still interface a knit hem as a rule with a coverstitch.
ReplyDeleteI also recently acquired stacks of the Vislene interfacing with the little chainstitch on it from Europe. It's really amazing for knits
I don't have a coverstitch, Cidell. So far I just don't sew enough knits to justify it but who knows, maybe in the future. I will have to look for that Vislene interfacing. Glad you like the post.
DeleteGreat post Bunny! Very good advice to slowly acquire notions as your sewing skills develop. I would like to make a comment for left-handed sewists. When I was a little girl learning to sew, left-handed scissors & shears were not available...they certainly existed, but were hard to find and very expensive. I learned to cut using right-handed scissors with my right hand. It can be done & I am still pretty good at it, but I urge left-handers to locate a pair of true left-handed scissors, which are so much easier to find these days. I keep both right & left-handed scissors in my sewing room....the other folks in my house never steal my left-handed scissors! When you are ready for a rotary cutter, note that cutters with straight handles can be used with either hand, and many bent handled cutters can have the blade loaded on either side, so they can be made left-handed.
ReplyDelete"Very good advice to slowly acquire notions as your sewing skills develop."
DeleteAnyone can learn to sew with basic tools, and I certainly don't think a rotary cutter is necessary for garment construction because it still requires skills and can be dangerous. But if one has the money and the interest, there's nothing wrong in experimenting with different notions right at the start. Sometimes finding the right tool can make a big difference for a beginner.
Definitely, Anon. I am just showing the helpful basics. Looking at a Joanns notion wall can be totally intimidating to a new sewist and it can be hard to know what to just start with. But you are right. New projects requiring new skills and tools are how we grow and learn.
DeleteBunny:
DeleteI understand the point of the post and I think the posts are very helpful. I just didn't want to discourage anyone who wanted to go whole hog with notions. The cutting tools and the sewing machine are the biggest investments, everything else is reasonably priced and it's worth it to experiment, plus, as you wrote previously, in connection with marking tools, no one tool will work for every task.
I own only Gingher shears: I like the feeling of the metal in my hands. I would consider other well-regarded all-metal brands, but personally would not buy Fiskars, which I believe are the second line of the company that makes Ginghers. Ginghers, and I imagine Fiskars, can be sent back to the Gingher company for sharpening at a reasonable price.
ReplyDeleteTo distinguish your shears from those of others in a group setting, you can also tie a strip of fabric to one of the handles. I know someone who had his initials engraved on the blades.
I agree that rotary cutters aren't necessarily efficient or time-saving, unless one is making straight cuts. I have an Olfa 45mm with a safety button to lock the cutter. Unfortunately, it unlocks all the time. I also don't find it particularly ergonomic, which is another claim of the product. I also have 28mm and 18mm versions, which I like for tight curves. Sometimes I use them with a mini mat, although I have two larger ones.
You're right that it's more important to learn to cut properly with shears. The key is to move from cut to cut and not to lift the blade from the table. I, also, am very careful around RCs. I never cut when I'm tired and I always close the blade every time I put it down, I don't care if it's 100 times in a session. Cutting curves is always a little scary because I have to do it freehand. I've also found that even when using a straight edge I have to make some practice cuts on a scrap first because the blade doesn't fall where I expect. Unlike some people, I never just weigh the fabric down and cut: I pin as well. If the fabric were to shift it would be difficult to restore the layout.
Microserrated shears are wonderful, but you can try using freezer paper instead as a stabilizer. A light touch with the iron is sufficient.
The pelican billed scissors are great for welt pockets, but of course that is not a beginner project.
Freezer paper and microserrated sheers are very helpful for cutting lining fabrics, which some beginners and intermediates work with. They made all the difference to me when I had to cut Bemberg, an extremely slippery rayon lining cloth.
DeleteDo you iron the freezer paper onto the Bemberg, as the post above alluded to using a light touch? I had a horrid time with Bemberg the last time I cut it, and am on the look out for ways to improve the process.
DeleteI can cut more quickly and easily with a rotary cutter than shears. My hands hurt and tire when cutting with shears. Also, I am ambidextrous and only have right-handed scissors. Train yourself to use a rotary cutter in either hand and you will save soooo much time, running around the cutting table.
DeleteI would try starching the Bemberg, however the idea of ironing it on to freezer papers sounds like a really good one.
DeletePersonally, after years of practice, I do find RCs much faster and definitely more accurate as well. They are my cutting tool of choice but that is me. Others prefer shears and that is fine. I just think it is important to start with shears before using the RCs.
Bunny, all you have to do is lightly touch the iron to the Bemberg. If you're cutting out big pieces, you don't even have to have freezer paper covering every inch of the fabric, just enough spread out to stabilize it. As I said in a reply below, if the pieces are small, you can trace them right onto the paper, and can reuse them, which is handy for things like pocket linings. An FIT student suggested this method to me after I'd tried various methods for cutting slippery fabrics.
DeleteWith more experience and microserrated shears I don't have a problem with a fabric like silk charmeuse, but Bemberg is notoriously slippery. Before I started using the freezer paper my Bemberg pieces were so jagged and nasty looking that I hated working with them.
As for rotary cutters, everyone has her or his preference, but I don't find them faster or more accurate. If I'm cutting with shears, I can see exactly what I'm doing (BTW, I usually use the tailor's method of tracing the pattern onto the fabric, which is more accurate). I've made some cutting errors with shears over the years, but a cutting error with a rotary cutter could be disastrous. I use a quilting ruler as a straight edge and it often slips, no matter how I position my fingers. There are products that can be applied to make the ruler more tacky, but I don't want to risk that with good fabric.
DeleteI'm timid with the rotary cutter and have never had an accident (knock wood). But that means that even after some practice cuts I often don't bear down hard enough and often have to go over areas that weren't cut all the way through. I'm never making multiple garments so I don't need to cut through several layers. I do like the rotary cutter for sharp curves. After experimenting with various sizes, I prefer the smaller ones because they give me the most control.
A rotary cutter is also good for use with a slippery lining stabilized with freezer paper.
Another wonderful post! Thank you!
ReplyDeleteGreat post! I did not know about serrated scissors. Thank you! I am pinning this article.
ReplyDeleteI very recently purchased serrated scissors - do you still use tissue paper or something to hold the slippery fabrics in place, or do the serrated scissors take care of everything?
ReplyDeletePersonally, I would use both. Hopefully others will share what they do. The paper just helps secure the slippery fabric even more.
DeleteI use freezer paper. Tissue paper (one layer, than a sandwich of two), was one of the methods I tried using to cut silk organza but it wasn't working for me. With small pattern pieces, you can draw the pattern right on the paper and reuse it. If I'm cutting the paper and fabric for the first time, I use my regular fabric shears. The freezer paper stabilizes it and makes cutting easy. If I'm reusing my freezer paper pattern, I use my microserrated shears and cut around the edge of the paper.
DeleteIt may help some people to realize that the serrations are, as the name indicates, "micro," the shears don't look like pinking shears, which is almost everybody's assumption if they haven't seen them.
"(one layer, then a sandwich of two)" [correcting typo]
DeleteForgot to add that I sometimes use a rotary cutter when I'm cutting through freezer paper and lining fabric. It's painful to use my good shears, so if I have an RC and a mat available, I take them out.
DeleteIf I'm using a big piece of freezer paper I align it with the selvedge. If I'm tracing patterns, I of course copy and observe the grainlines.
Doesn't freezer paper have a waxed surface that can transfer to the fabric when heat is applied? If so, then this would create problems if one is working with silks...?
DeleteBunny, apart from your noted & very obvious inspirational teaching gift, you are an artisan at heart. Love that!
ReplyDeleteSince your fabric painting blog, I have renewed my keen interest in my fabric ink stamps. Thanks for the inspirational blog, creative lady!!
robyn x
It is fun, isn't it? Have fun with your stamping!
DeleteMy scissors have a note on their ribbon: USE AND DIE. I am not a threatening person, but I needed to make it clear. Listening to Adam Savage's podcasts on his tools, he has roughly the same attitude about his fabric scissors.
ReplyDeleteTissue paper: yes. Yes yes. Also big flat work surface that won't make me move the goods.
Mostly, I would recommend a really good seam ripper. And the patience to know it's good to use it.
"My scissors have a note on their ribbon: USE AND DIE. I am not a threatening person, but I needed to make it clear. Listening to Adam Savage's podcasts on his tools, he has roughly the same attitude about his fabric scissors."
ReplyDeleteIt was only after starting to learn to sew and acquiring tools that I began to understand how almost fetishistic people can be about their tools. :-) Most of mine aren't very expensive, but I get a kick out of looking at them.
(returning to sewing Joyce)
ReplyDeleteBunny, I so look forward to these posts! I just treated myself to some Gingher scissors --- I feel I deserve them and I too enjoy the metal feel. I have bought many "good pair" of scissors but somebody always ruins them on me. It's amazing the mystery of "who done it". I am definitely putting a ribbon on my new pair.
Bunny, I've been wanting to tell you. This week I have been working on a navy wool skirt, Simplicity 2475. Each and every step I have said to myself "Now, Joyce, what would Bunny do?" ha.....and it works! No unnecessary back stitching. The right thread for the right job. Lining the skirt because I know I should. Looking procedures up BEFORE I attempt something IM not completely sure of. I only have the hem left to do and I've very proud of my results so far , and it went so smoothly, no drama, not even the invisible zipper! I will continue to say to myself "what would Bunny do?" because this is the results I've been looking for.Thanks for sharing, your sure helping me!!
That's so sweet, Joyce. Thanks so much.
DeleteBunny, several years ago I was gifted with a big box of Wiss Scissors, Shears and pinking shears, most were still in the original packaging and a few were lightly used. The family that gave them to me said someone had a connection to Wiss and had given their Mom one of each size and kind. She had recently passed and they brought them to me at one of the schools that I did costumes for. I love them all but to be honest I also use my orange Fiskars the most because I feel like they cut the best. I get all my scissors sharpened regularly. I have writing on every pair that says "DO NOT USE" but my family will still come to me with any scissor to ask if they can use them to cut paper. I have them well trained.
ReplyDeleteI have a rotary cutter and mat but mostly use it to even off an edge or cut bias strips. It is just too easy to make a mistake with it.
I am so enjoying this series.
Nancy
That's great, Nancy. You just made me remember the pinking shears. How did I forget those?
DeleteTo totally protect your scissors- I have read of putting a combination lock through the handles when you are not using them! It made me laugh as I have threatened my family with this. As someone suggested, what I actually did was buy a big multi pack of inexpensive scissors and put them in accessible places for everyone to use. I love reading your posts!
ReplyDeleteI found out about your NLS posting at Sewing Pattern Review and I'm so glad I did! Thank you for taking the time to post these. I've found them really helpful and it's true that there's a gap between newbie tips and experienced articles. It's as though we're hanging out together and you're chatting about what you've learned that I may not otherwise find. Very much appreciated!
ReplyDeleteThank you Bunny for the detailed information of embroidery digitizing scissors.... Great job.
ReplyDeleteGreat insights shared in this post! The details about essential sewing notions are truly helpful for beginners. In the middle of every creative sewing project, having access to a digital embroidery stitching service USA ensures precision and quality. It’s amazing how technology supports traditional craftsmanship and enhances the overall embroidery experience beautifully.
ReplyDeleteThank you for sharing such helpful insights about essential sewing notions! I completely agree with your points. By the way, if you’re working on embroidery or hat projects, you might love exploring an Affordable cap digitizing service in USA that ensures precision and quality designs for all your creative embroidery needs.
ReplyDeleteThis post is such a wonderful guide for beginners! I appreciate how you’ve broken down the essentials and reminded new sewists that they don’t need every fancy tool to start creating. Your advice on scissors and the importance of maintaining sharp tools is spot-on. Quality equipment truly makes all the difference in precision work. For those exploring embroidery, pairing these basics with the best embroidery digitizing service can help bring custom designs to life beautifully—combining traditional sewing craftsmanship with modern technology. Thank you for sharing such thoughtful, experience-based advice—it’s incredibly helpful and encouraging!
ReplyDelete