
This weekend has really been great to get back into the studio. I started off with a major cleaning. It seams my beads and paints are growing and needed to find some space. Done! I've also spent time on my Great Courses photography class and am really enjoying it. The professor is wonderful. He lets you know it's not a "technical" course from the get go. But, while he gets into all sorts of technical issues, he really wants you to learn how to take a great picture, see things differently through different eyes. It's been quite enlightening. I am not sure how this will apply to close ups of sewing techniques and pics of fronts, backs and sides of garments, but I am sticking with it and enjoying it.
Once the cleaning and classes were out of the way, it was time to actually get back to creating. Back to the bag I started before the holidays! I promised I would show how to do inset corners and will in this post. I take no credit for this. A Shirley Adams video from Threads inspired me and taught me. It is well worth watching. In the meantime I will show you what is happening and how it applies to the bag.
There is a gusset across the top of the bag. The top of the bag is curved and the gusset gets applied to the sides of the bag with inset corners. Those inset corners are completed on the bag, eager that I was, but I took time to use the same fabric and interfacing and sample it up to show you how I did with Shirley's help. The sample is in the same shape as the bag piece. The fabric is interfaced with fusible fleece, no interfacing in the seam allowances. One side of the inset is on grain, the other is a curved. The fabric is way bulkier than Shirley's so I did not use the organza. Instead I chose a 2 inch square of quilting cotton. In this sample I have also used contrast thread so you can see what's going on.
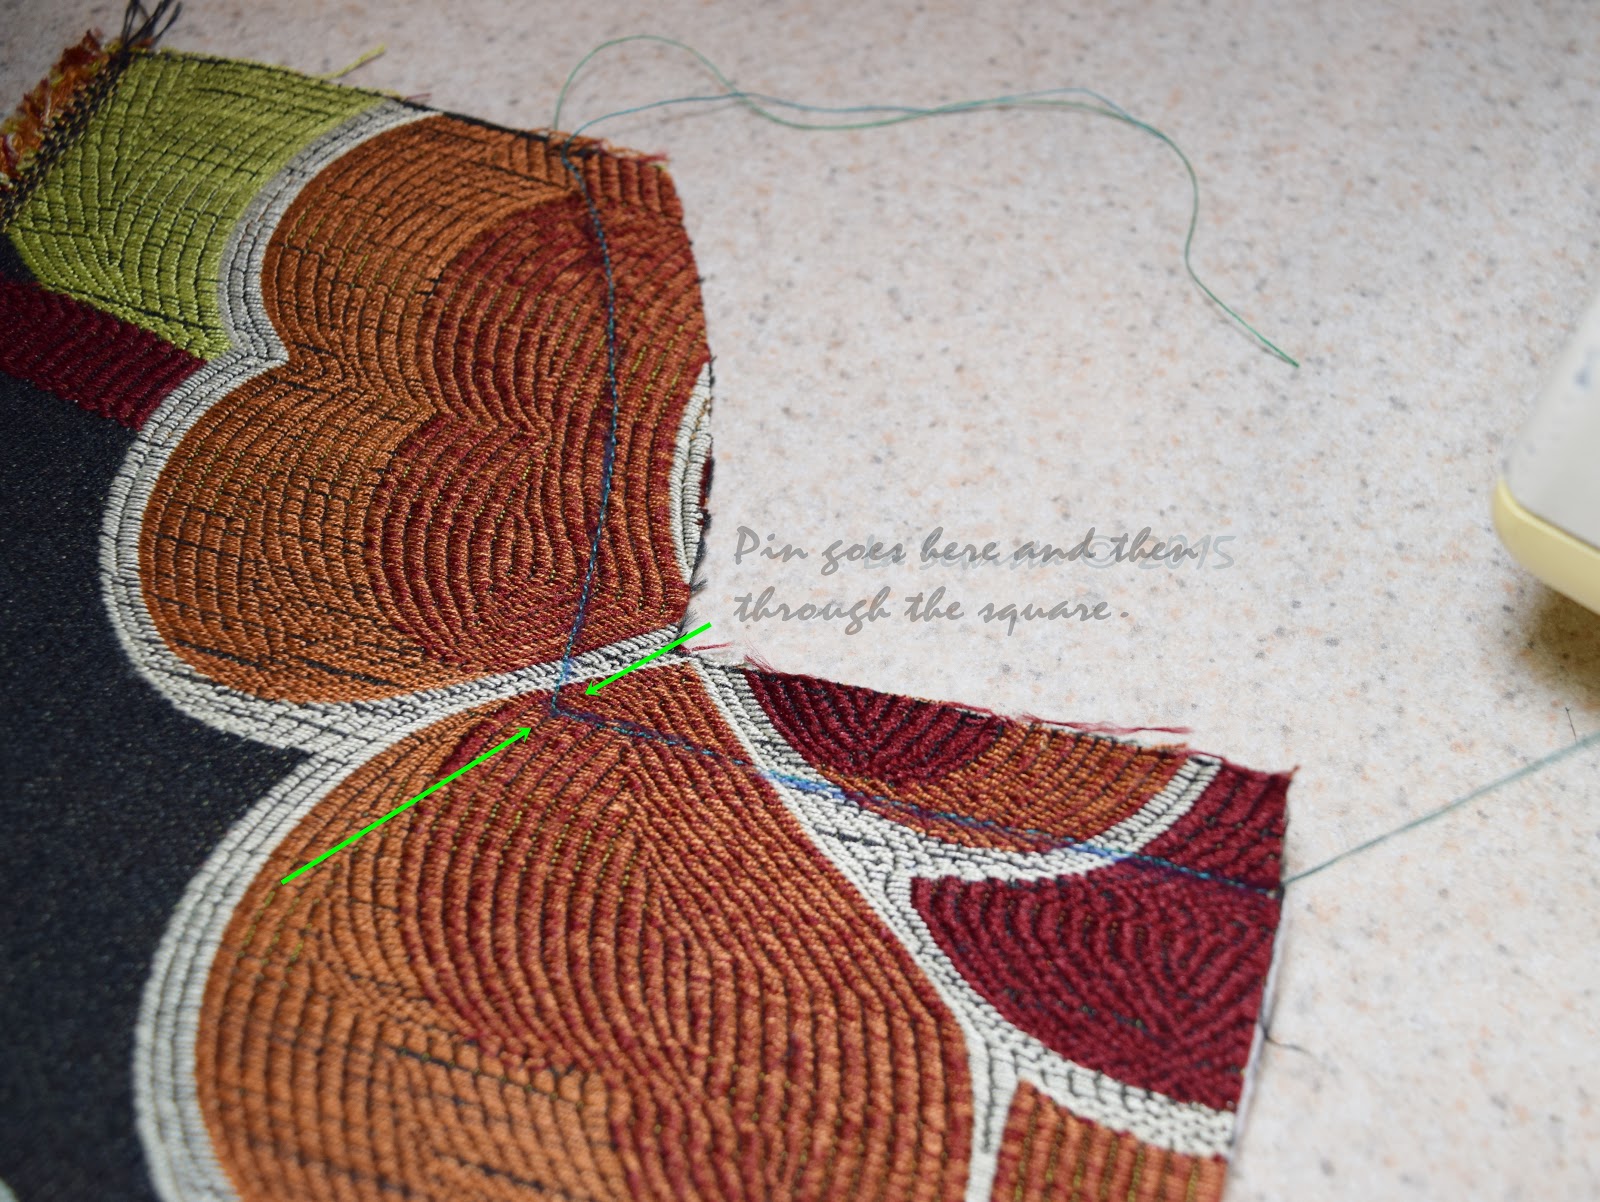
The seam line is drawn on and stitched on the bag. You can see the dark thread. The square is then placed in the corner. A pin is put in the intersection of the stitching lines and the square. Then, quarter inch masking tape, love that stuff, is put on with the tape crossing at the pin ( the corner intersection) but curving out to the raw edge of the bag. Shirley explains that this curving out gives room to cut into the angle without unravelling. Once the tape is on, the corner is stitched with small stitches. You start at the edge, go to the point, cross the point with two tiny stitches, then back down to the other raw edge.

Now you cut into the middle of the tape up to one thread from the point. You can see I have pinned the square on this bulky bag. Shirley was doing a neckline on a garment in much lighter fabric and basted everything. She used silk organza for her square. After cutting the slit, iron the square on the right side away from the seamline. Then iron the seam allowances of the bag to the wrong side. The stay stitching really helps that.

Below is the sample all done. Next the seamlines of the gusset and this inset area are matched and stitched. Once done, the seams are double checked, fixed then graded. If you are wondering what "double check" means - this is VERY bulky and much like doing upholstery. Wrestling with all that bulk contributes to crooked seams, which will become obvious in the pressing. For me that was when I went back to the machine, did some unsewing, and then corrected stitching. After that the seams looked much better once pressed, again. Here is the finished sample:


All I have left on the outer bag is close up the bottom. Then it will be on to the lining. If you are thinking of making this bag, I have gone totally out of sequence with the pattern. I am doing the lining separately and will hand stitch it in around the zip. Haven't even cut it out yet, but it's coming!
I am on the fence about my next project. It's looking like skirts and blouses but we'll see! I desperately needed this bag!................Bunny


beautiful, thank you for sharing. I have not ventured in this yet, too many other irons in the fire!
ReplyDeleteBeautiful - thanks for sharing!
ReplyDeleteWonderfully done. Thank you!
ReplyDeleteWhat a great technique, thanks for the post on it. The bag looks like it will be really beautiful.
ReplyDeleteThe bag is going to be fabulous, that fabric is beautiful.
ReplyDeleteThat is gold, thank you!
ReplyDeleteI had to go watch the video so I could fully understand the process, but now I get it!! Brilliant technique!
ReplyDeleteThe bag is going to be GORGEOUS, too....Yummy fabrics!
Thanks, everyone. I hope to finish it this weekend coming, fingers crossed.
ReplyDeleteWow!! This is a fantastic tip. Where did you find this gorgeous fabric? I am looking forward to getting back into making a faux leather Camera styled bag.
ReplyDeleteThis fabric was found in the home dec clearance section at our local Joanns'. I often find gems there, the garment clearance, not so much. Glad you liked the tip.
ReplyDeleteWhat gorgeous fabric!! And fascinating construction on the bag.
ReplyDeleteOk..So I made this bag...had it all together down to the zipper....I did not see your blog before ...any tips on how to get this in w/out taking the bag ALL apart and starting over?
ReplyDeleteAre you trying to put in a zipper? I'm not quite sure on the question. The zip goes in before the top gusset is put in the bag so fairly straightforward that way.
Delete