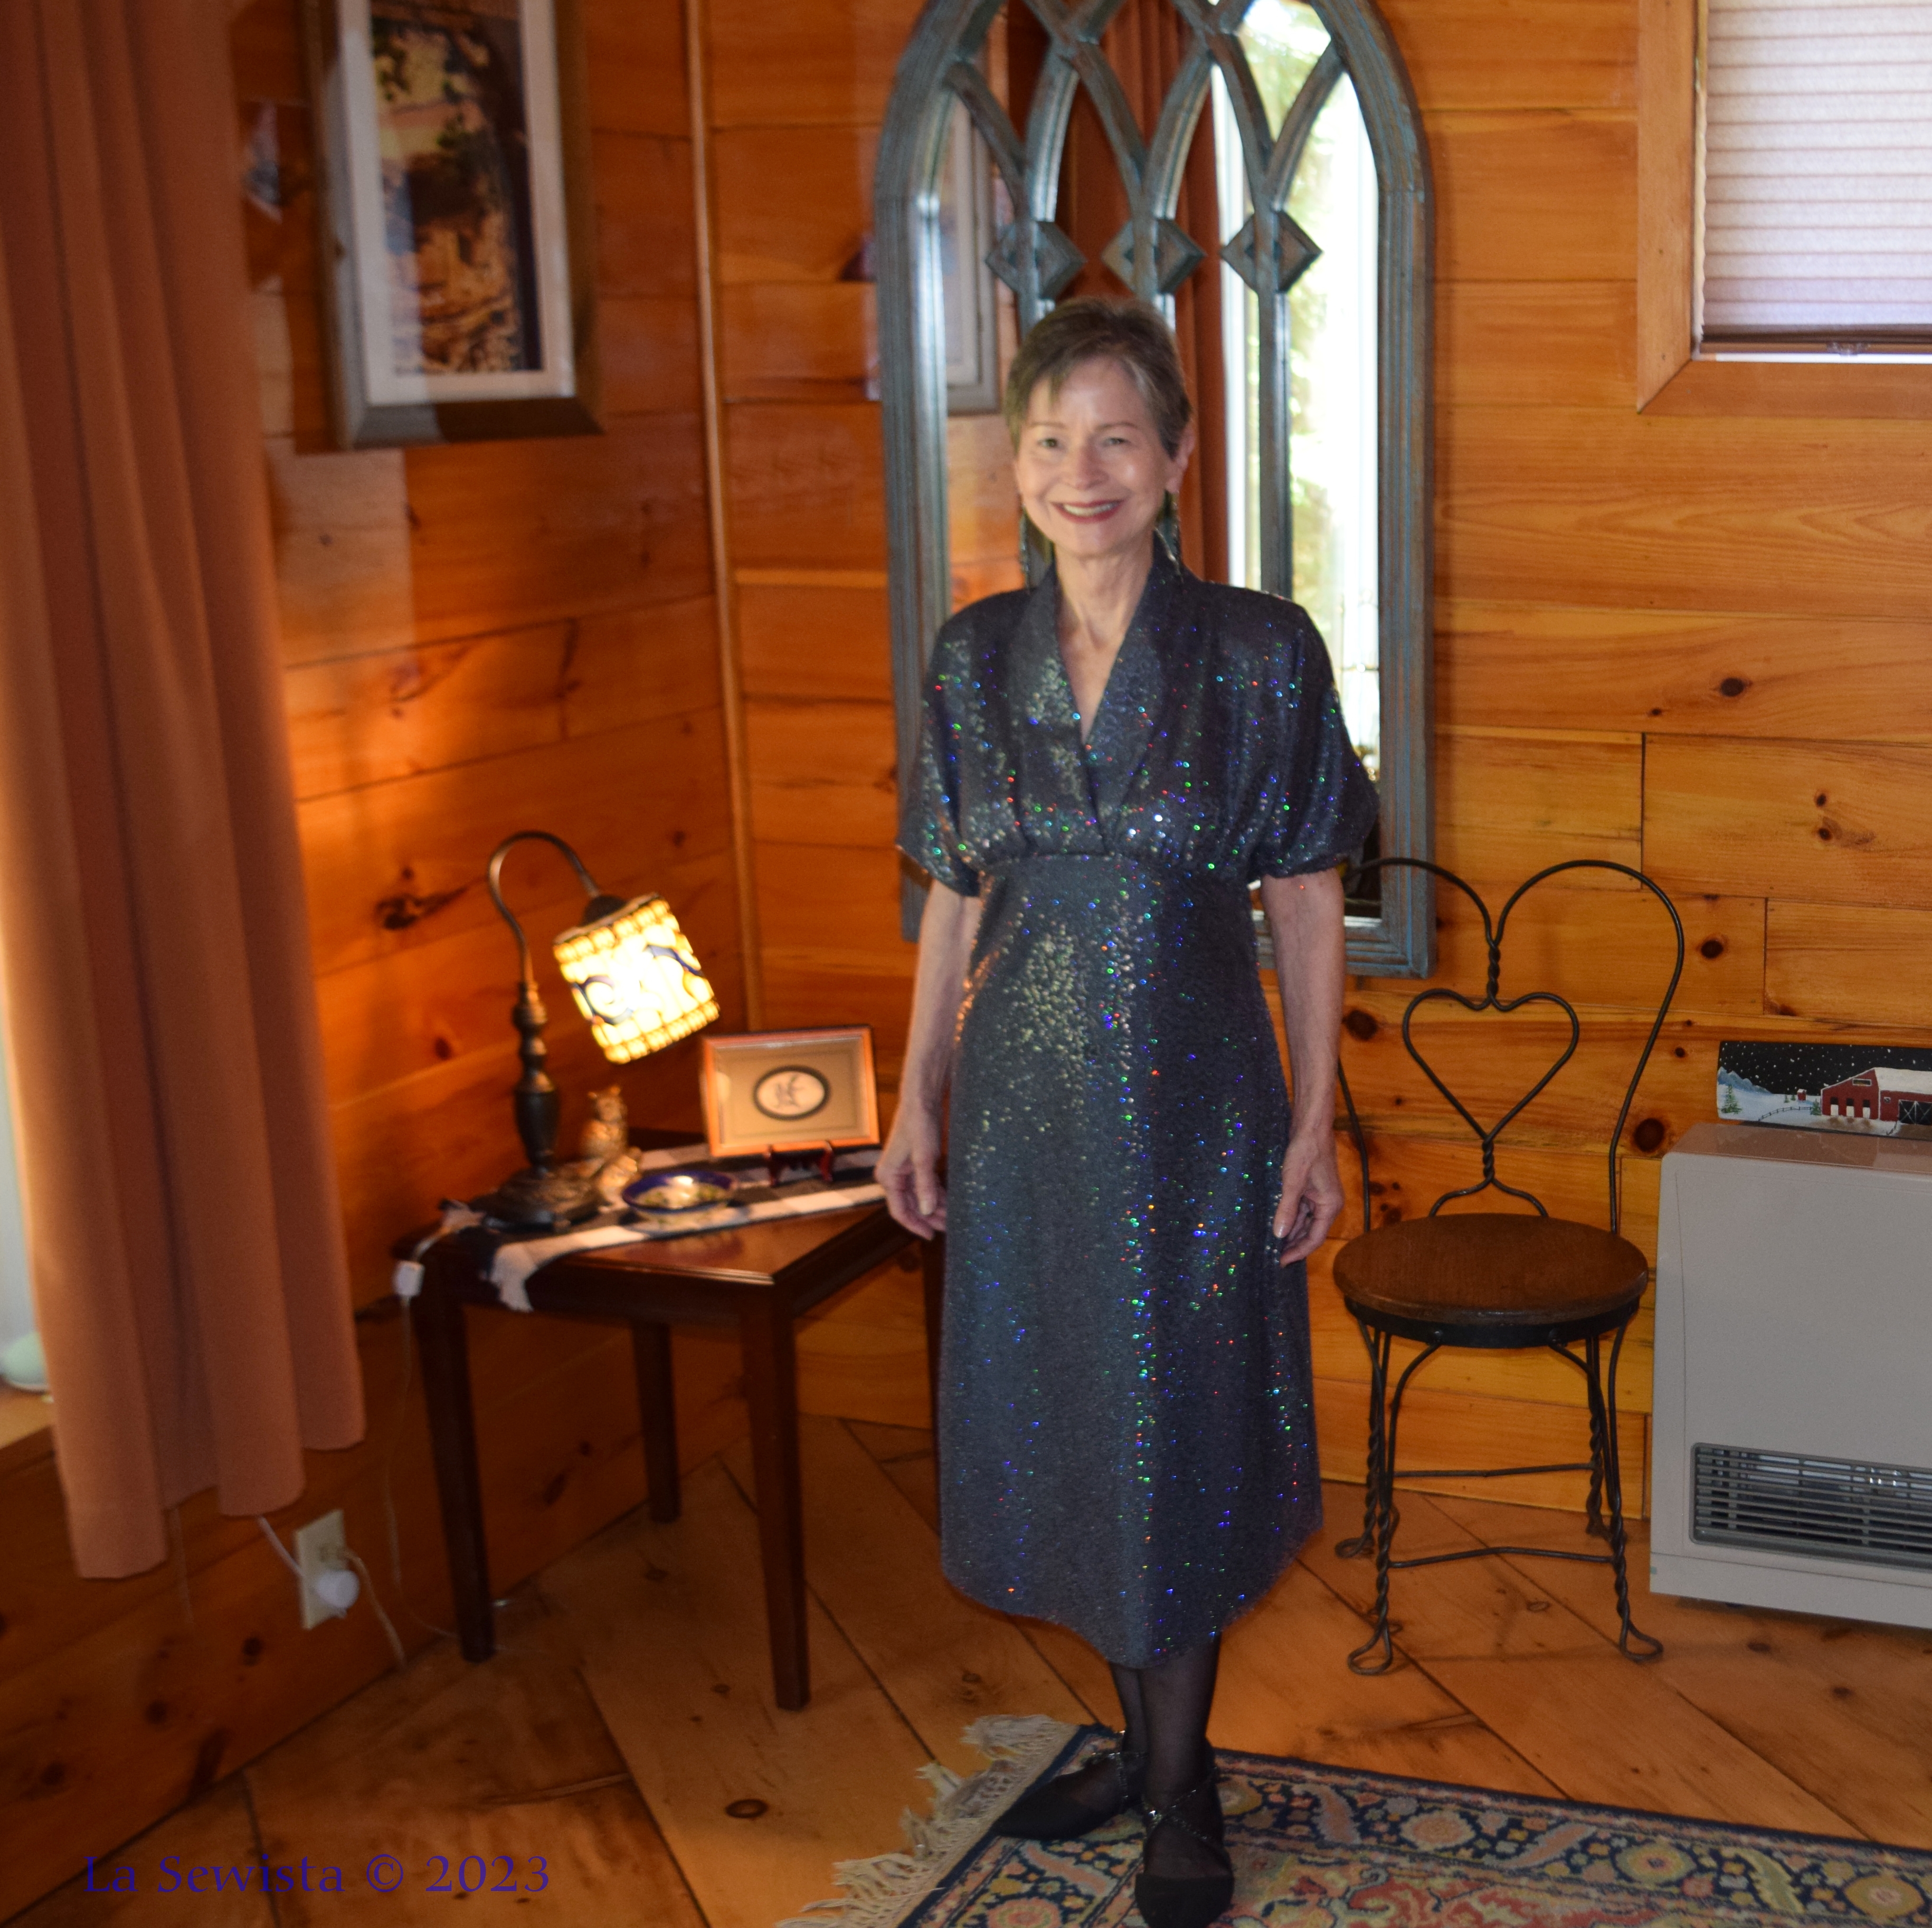
Chalk up another one! A bias cut dress out of sequined fabric. I have a lot to say about this project. First, it was perfect for the wedding. I had anxiety over whether I would be over/under dressed for the event. It was j u s t right! Second, it is hard to photograph this fabric. I took tons of pics and these two were the best. It just caught the light so weirdly in the photos and every time I moved in the slightest, the bias fabric had other ideas and movements. But in the end, it was perfect for the venue. Speaking of venue, the day was pouring buckets, foggy, just awful weather so the pics I planned on taking there just did not materialize. So let's get going on the sewing here!
Pattern
This is McCalls 8406. Here is their description, "It is McCalls 8406. They describe it as "Empire waist dress with sleeve and hemline variations has shawl collar neckline, narrow hem, bias skirt and invisible side zipper."
First, this dress needs a muslin created first. There are fit challenges here despite looking quite simple. For me, I needed to discover if I could even pull off a bias skirt with my hips and I could. But previous experiences at a heavier weight were otherwise so I was not going into this with confidence. I found the bias cut flattering and my husband really liked the fit, too. Next, there is a lovely empire curved rise to the bodice that under the arm dips down on the back bodice, very pretty. However, I needed a bit of Full Bust Adjustment and it is not easy on this pattern. The dolman sleeves are very deep but the bust fullness comes from those gathers below. I did a cheater FBA by adding a 3/8th inch ellipse curve in the gathered area below the bust. You can see what I mean with the red lines below.
This pattern is fairly simple and should be a breeze, but my fabric choices and vision definitely complicated things. I also wanted to do the fabric justice so used techniques to achieve a more couture finish. It took time and three muslins. More on the muslin process is two posts back here.
Fabric
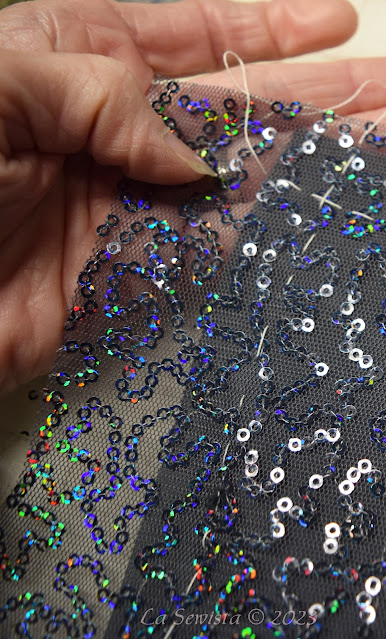
This was made with Ambiance lining and a sequin net fabric from Fabric Place Basement in Natick, Mass., the burbs of Boston. The sequins are tiny and trailing and on a net that is stronger than tulle and that does not stretch, unlike the mesh nets so prevalent right now. I learned a lot about sewing with sequins and you can read it in my last post here.
Construction
The dress consisted of two parts. The bodice was dolman sleeves and a bias folded collar band. Under the arm would be the start of an invisible zipper installation that would continue down from the waistline another 10 inches into the skirt The bodice was underlined with the Ambiance and all bodice seams were Hong Kong bound finished. Each pattern section was block cut, thread traced, stay stitched next to the thread tracing and then finally cut out. This was to make sure there was no shifting while cutting and no bubbles between the fabric layers. Lots of handwork and fussing! Using silk thread for the basting made things easier.
I made a change in the collar construction. I have discovered, in more than one project, that a large BIAS band collar changes direction of grain in relation to the body as it wraps around. In the three muslins, I always had a large wrinkle on one side. I decided to split the neckline band in half at the back neckline and put a seam there and then reverse the grain of the band. This way the grains would mirror match as the came around the neck. Big wrinkle eliminated! The collar went in beautifully and all match points were spot on with this pattern. I made no petite adjustments to this pattern other than length.
On to part two, the skirt. On the pattern you see an exaggerated shirt tail hem. I liked that. My lace had beautiful lace bordered selvedge edges. I carefully cut them off to attach to the hem of the skirt. But, first the lining. It was easy to sew but I made the skirt too large. The top was a size six and the skirt was a twelve and way too big. It had only two seams , each side. I went back and took it in to a size ten and it was just right. You can see the original stitching in the seam above. You can also see that with these seams being cut on true bias, there is absolutely no ravelling. I made the decision to do no further finish on them. It would only add bulk and time. I'd been at this for a while now and wanted to get it finished. I have seen numerous vintage cocktail dresses finished exactly this way, of similar fabric, and was comfortable with my decision. I was using a size ten microtex needle but it still left holes. I think a finer thread would have helped as well but none to be found in this color.
Back to the hem. When I originally made the muslin I knew I did not want a full length dress. Below knee was fine but the shirt tail was deep. I moved the hem up before cutting by five inches. I wanted to maintain the shape of the hem and slit look. You can see how I did that here in this post. I then went on to deal with the edge of the net hem. I spent an afternoon attaching the border lace, about an inch plus wide, by hand, in a very weak gather, just enough to make the curve of the hem. It was hand basted on then machine stitched. Looked pretty enough, but, alas, I had to deal with it again later.
Next was dealing with the zipper, my most challenging situation. I had to transition at the waistline seam from a traditional installation in the bodice to one in the lining that was only in the lining and hidden by the netting so it would still be invisible. Now, I have seen and worked on these often in formal gowns, but there has always been a heavy fluff of gathered tulle or organza to hide the zip in the lining below the waist, easy peasy. I had no fluffy gathers. I wanted to maintain a smooth line from the waist to hem, all the while having access and hiding the zipper in just the lining layer. What's a sewist to do?
Very tiny snaps and Fabric Fusion adhesive to the rescue! I installed the invisible zip above the waist as per usual. I then folded the netting out of the way and continued to install the zip in the lining. I just placed my needle back in the zip area on the other side of the netting. Zip installed! Now to hide it.................I searched my notions and found some very tiny black snaps. I tested and found they totally hid in the netting. But they were so small I could not get them to cooperate with my fingers while sewing. Frustration! I used my forceps to hold them and a bit of fabric fusion to place them. I walked away for an hour. I came back and the snaps were stuck just enough for me to easily sew them on.
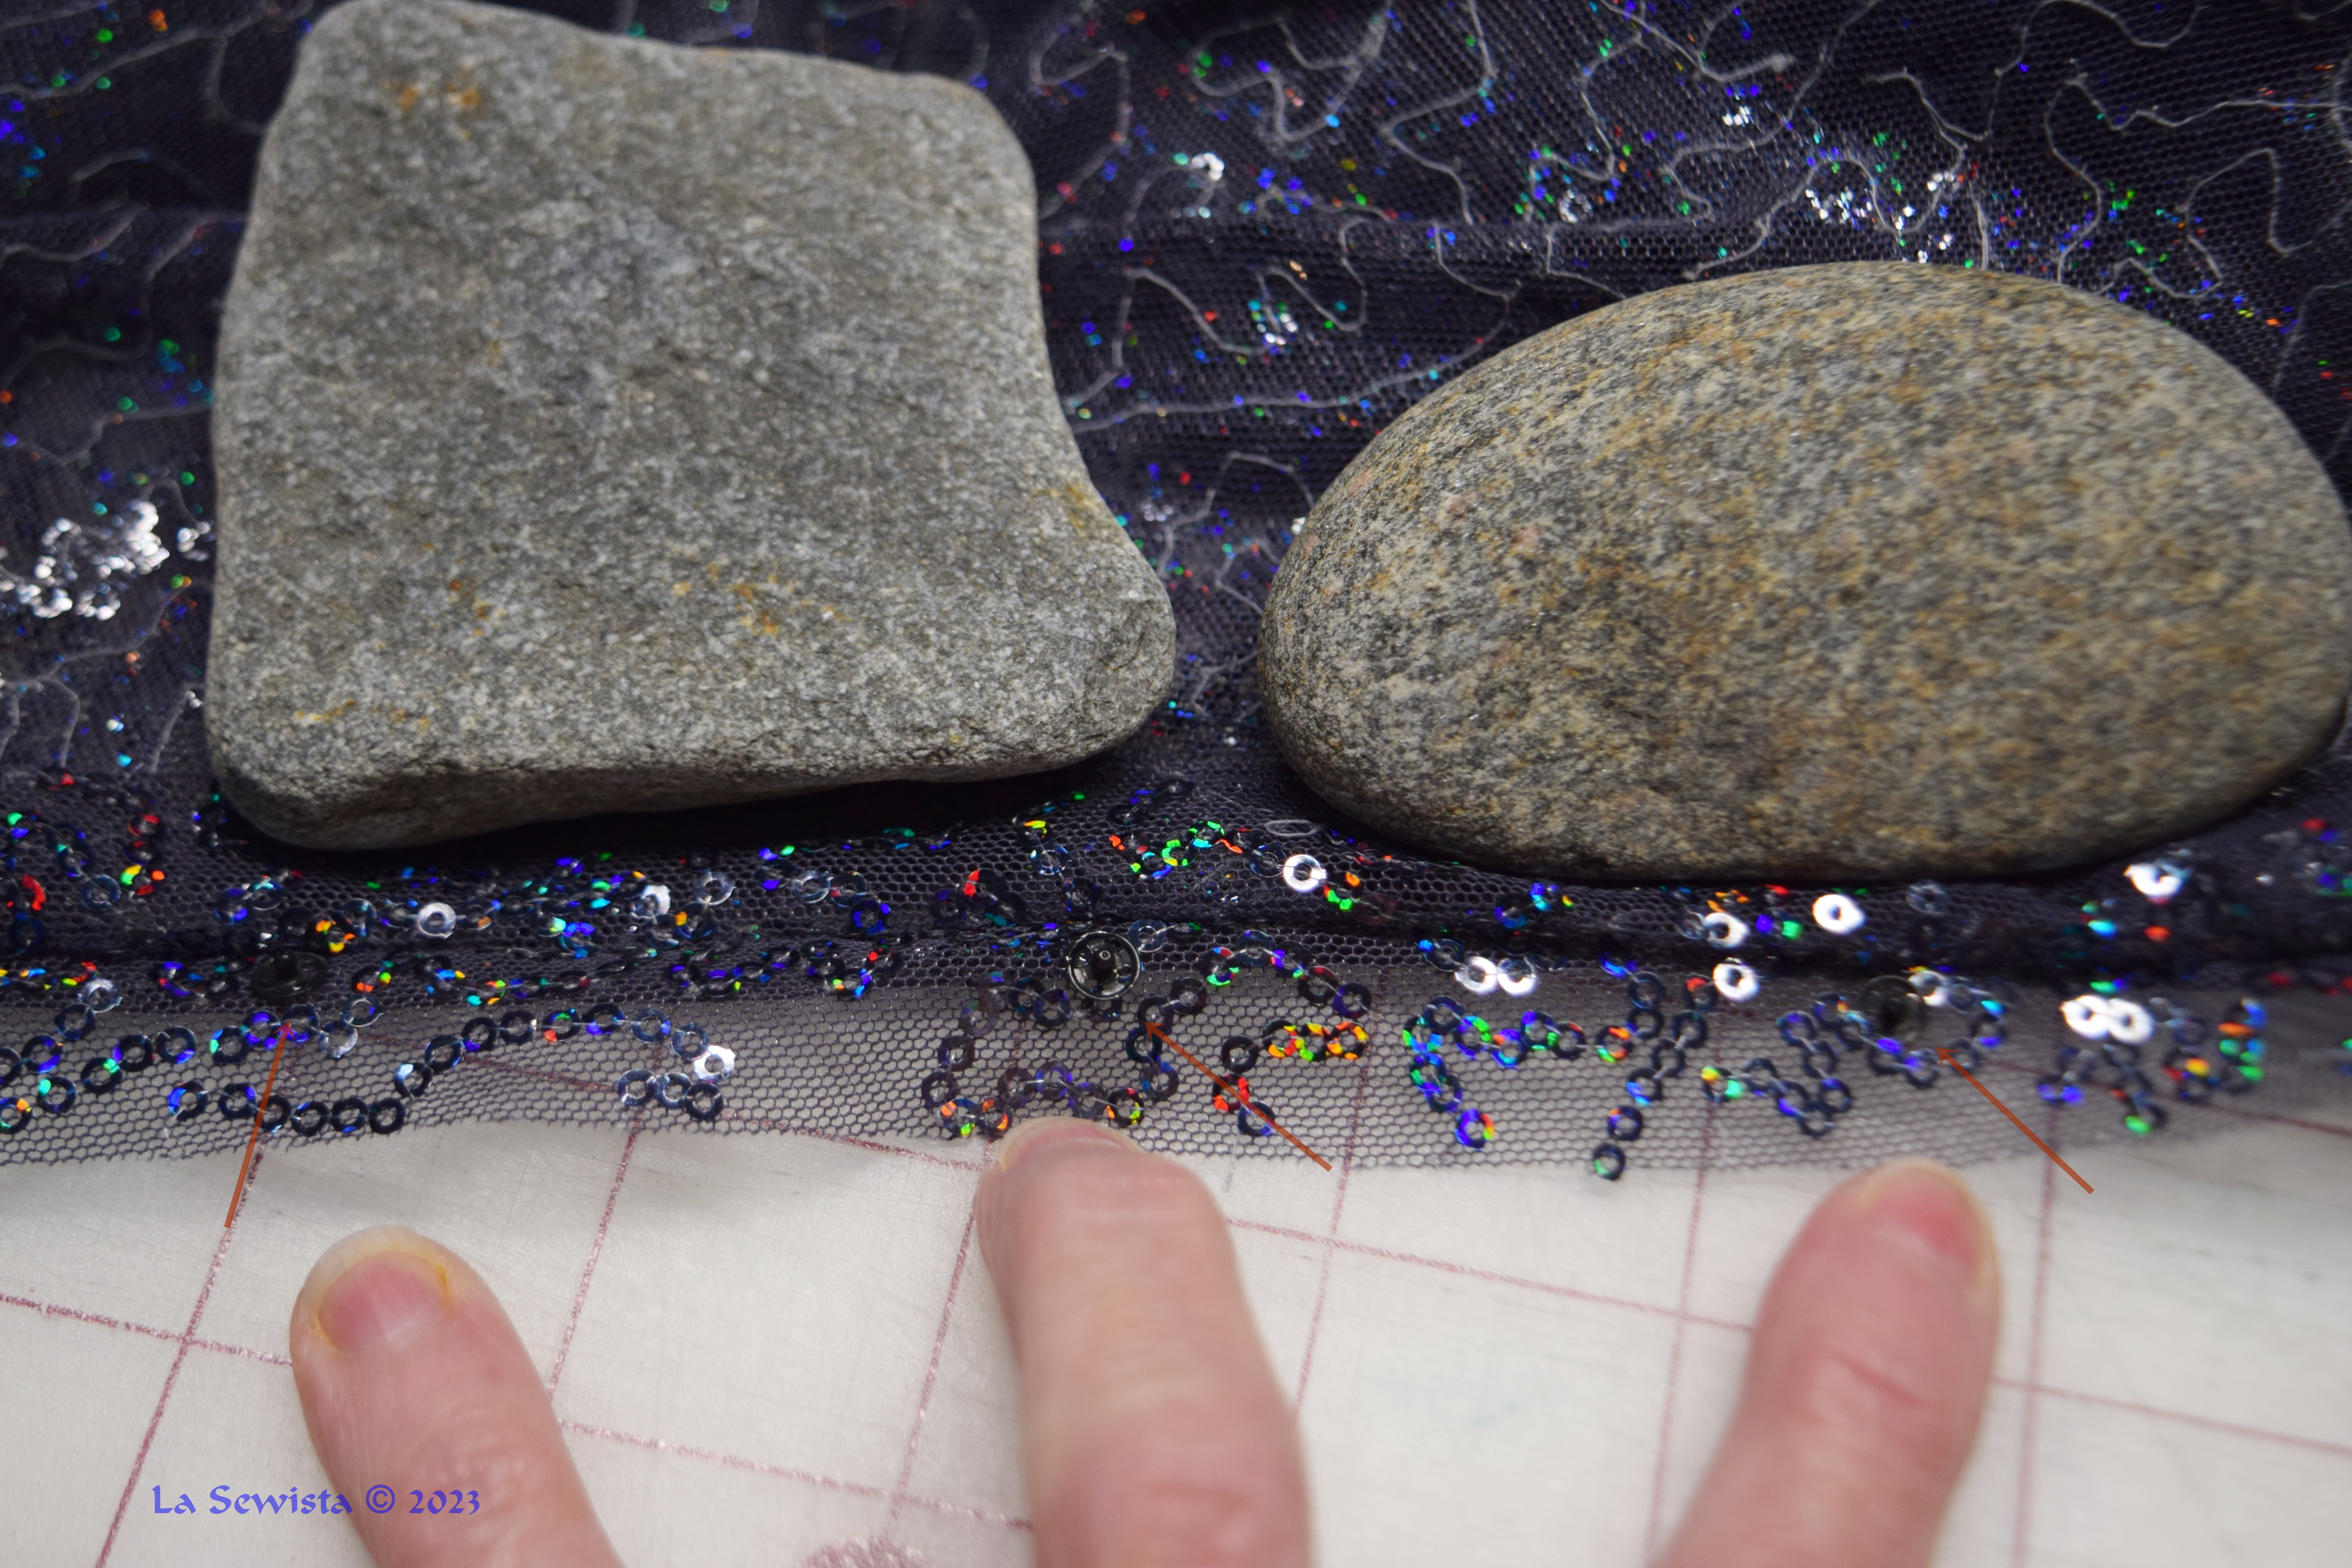
First, I had cut my seam allowance on the net skirt extra wide to accomodate the zip. I then sewed it shut traditionally with regular stitch length in the seam and long basting stitches in the zipper area. The seam part was pressed open. The zipper part was pressed to the side to make sort of a placket. That is on the right in the picture. I cut a slit between the two. This netting does not ravel.That folded to the side seam will now become the placket and home to 5 teensy snaps.
You will need to blow the above pic up to see what's going on. Red arrows point to the glue drying snaps. The rocks hold fabric out of the way. Once dry they were easy to stitch on. I then did this again on the other side with their matching snaps and then we were good to go. You can see it all transitioned smoothly, although it requires some serious bending to reach the little buggers and get them shut.
I tried the dress on now that the zip was in. It flowed smoothly in that seam and I was pleased. I was not pleased with my dress. The length of the hem I had put all the lace on looked frumpy and the slightly ruffled lace edge made it look like lingerie. Hubs totally agreed. I shortened the skirt another 4 inches, no lace ruffle edge and it looked much better. He agreed on that as well. I trust his judgement after all these years. But talk about adding more work. I had to shorten the lining too.
I also discovered, as well suspected, that I needed shoulder pads, just some little skinny ones. My shoulders seem to be drooping with age, a new development in that onward journey. The dolman sleeves really accentuated it. So I got to work.
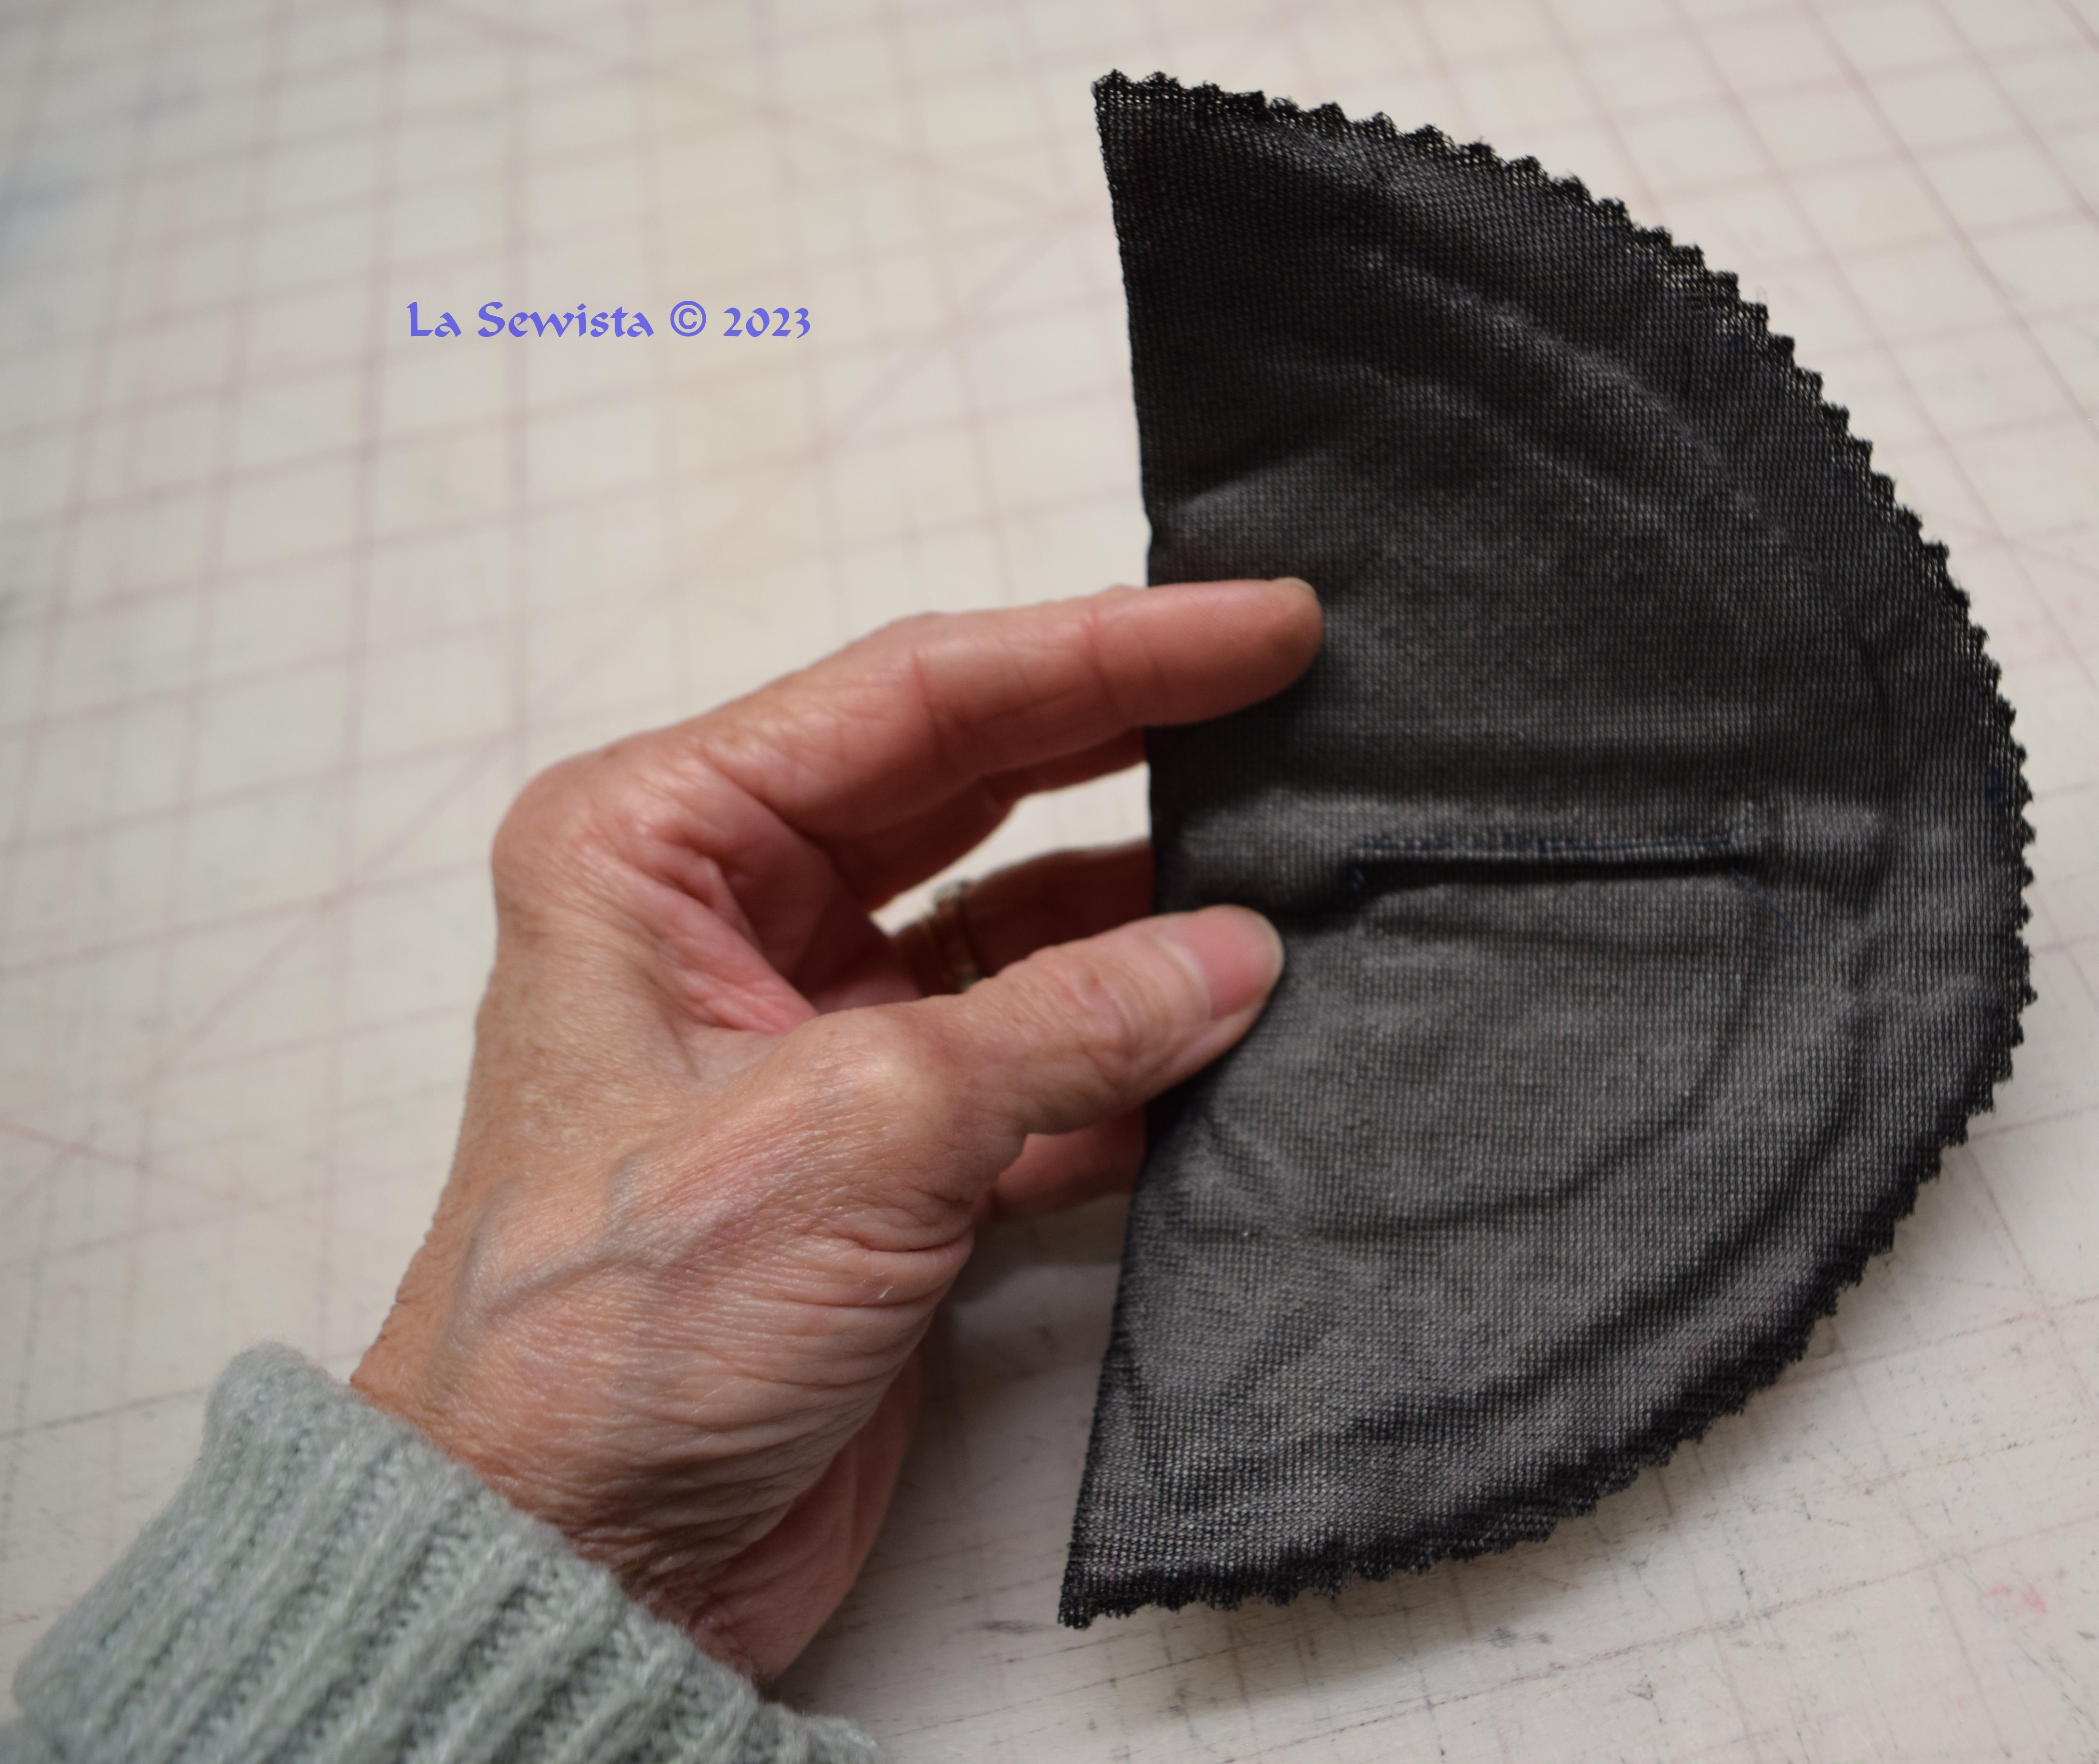
While I had 1/4 inch pads in my resources, I did not like how they shown thru the dress. I made my own.
I measured the dress while wearing it to see how large to make these. I then laid out a layer of Fusi Knit tricot fusible interfacing. I cut a large shape and graduating smaller ones out of batting. I put a straight strip of batting, about an inch wide, across the pad. It did not extend all the way, just built up the middle. The Fusi Knit was then folded over and pressed to the batting sandwich. I then stitched very close to the pinked edge. I took a small tuck in the center of each pad to force the curve. I pinned them to my ham, gave them a good steaming and left them overnight. they made a definite positive difference on how this dress draped on my sloping shoulders. Don't be afraid of thin should pads!
In Conclusion:
This dress was a lot of work. All of that is of my own making and choice. As far as the pattern, here I will share something that I have deliberately held until the end. I found this dress EXTREMELY difficult to get in and out of. I have very narrow shoulders. I used the size zipper recommended. I installed exactly where the dot was for that purpose. It barely got over my shoulders. I have a very narrow torso, you all know that. I can't imagine how anyone else could get in and out of it. If I made another here are my suggestions:
* Run that underarm zipper a good four inches into the lower sleeve seam. I can't see any other way to make it work otherwise.
* Consider making this dress out of a knit. Then you will get the stretch for getting it off and on.
* Last of all, add a center back seam to the neckline as I did, and run the invisible zip to the top as you do have a center back bodice seam to work with. I think this is the best option.
I love the style of this dress and would consider making it again, possibly in a knit. I like the bias cut of the skirt. If I made it again I would had a triangular godet to the upper sleeve seam, begining at the outer shoulder edge, to make a fuller sleeve. I felt they could use more volume. I definitely recommend the pattern but with these mentioned caveats.
******************************************
I am on to my next project, the Imby Flowy top. I am starting with a muslin. While digging in my muslin fabric tote, I found this and decided to play with it for my Imby. More to come...........Happy Sewing..............Bunny