Sewing Vloggers

Showing posts with label faux leather. Show all posts

Sunday, October 30, 2016

Three Emmaline Retreat Bags


This was a fun project, or should I say three? I made each of my grandsons one of these dopp kits. They all travel, camp, and just plain get around a lot. I think they will like their own little bag for their personal items and it's quite grown up looking after all.


Pattern:
This is the  Retreat Bag from Emmaline Patterns. It is for a traditional dopp kit shape and comes in two sizes. Here you see the three I've made and I used the 9 inch smaller size. The pattern is FREE from Emmaline and is a PDF download.

I made the two solid colored bags first for Graham and Zack. I decided to get a bit adventurous on my third effort which is for the oldest, Jack. I like how they all came out. The above pics shows the bags fully extended open. The zips are on the outside of the bags and have tabs, or what I call  "yanks" so you can hold them and yank the zipper open. You don't really yank, but just tug the zipper open like any other zip. The bags are lined and have interior pockets on each side. I chose to use just one slip pocket in these.

Fabric:
The exterior fabrics are a faux leather that really looks quite authentic. I bought a lot of it about five years back from WalMart. It's the only thing I've ever purchased in their fabric department and the quality has been quite good. I've used it for many projects and it has quite a "real" look and easily sews. 


The linings are all 100% cottons  from Joanns. They have all been given a protective layer of vinyl. It is now sold at JAs in a two yard box and is made by Pellon. The vinyl lets the inside of the bags have some wash/wipe ability. It is easily fused on. 

The interfacings vary. 

On Graham and Zack's bags the interfacing used is SF101 from Pellon/JAs and  fusible fleece as specified. You can see that in the front bag. The Pattern specs fusing the lining with SF 101 but I did not as the vinyl applications stiffened the lining a lot. 


Jack's bag, on the other hand, got a different treatment. I used a fusible foam behind the exterior fabric. But I did not fuse the foam to the bag. Instead I fused it to a layer of cotton batiste and stitched that to the bag pieces. therefore turning the interfacing (Flexfoam) into a sew in. I like how it "fills" up the space between the two layers.  I have to say I don't really have a preference. Both methods worked and the SF101 bags were easier to "seat" into their shape. But they all got there. Since Pellon SF101 is far cheaper than the Flex Foam, I'd say go with that but make sure you fuse both lining and exterior fabrics.

One of the things I discovered while making these bags is that the release paper for the clear vinyl is an excellent press cloth for the faux leather. Use it under and on top of the leather and let it cool before peeling off. It gives great pressing results, not easy with faux leather. 

The bag requires a zip longer than the bag opening in order to give that "pull tab" effect. Instructions are given on what length to cut your zipper. I might go another inch longer next time. There are also two wire frames   that give the bag it's recognizable look. I've seen  bags made without them and with. I prefer with the frame. Those without the frame still look cute but just don't have that obvious well known shape. Without the frame, it's close, but closer with the frame. The frames are quite inexpensive and come with little rubber tips that I recommend gluing on before using. Make sure you order the right size frame. Size A is what is used for these smaller bags.


Construction:

This is really a rather simple project and if you don't add an extra border and don't vinyl-ize your lining it can be made in a couple hours. That makes it a great gift. You are basically making a tote with a zipper across the top. The corners are boxed to give it the traditional shape. The lining is left open across the bottom so the bag can be turned, a bit trickier with that sticky clear vinyl, but doable. After turning and closing the lining a casing is stitched in all around the bag and following the zipper.  The wire frame is inserted inside the casing. Critical: make your casing with a GENEROUS 1/2 inch seam allowance. Mine were a bit short of that and I really had to shove to get the frame through the casing.  I ended up having to undo stitches and resew the casing after the wire was in. ( insert eye roll).  The wire of the frame is heavier than a coat hanger and quite sturdy. 

My vinyl lining and faux leather outside plus interfacing made for a quite firm little bag. That's how it is supposed to be. Instructions on the Emmaline site tell you that the frame needs to be zipped open and shut several times and will eventually seat itself properly on it's own. It's true. I just kept opening and closing the bags and they took their shape after a while. I believe this process is much easier on a fabric bag. There are some adorable feminine bags made from this pattern with prints. Handles are attached and they look quite functional. Just look how the bag opens wide. How nice is that for a women's bag?
.
Here is the inside of Jack's bag, a cotton batik that's been vinylized.


Above is a close up of the zipper installation and the wire frame channel next to it. The topstitching really seems to sink right in this faux leather.


In Conclusion:

This is a great design, easy to make, and FREE. It looks better with the specified  wire frames so I recommend them. A nice zipper pull , which I did put on Jack's, adds a bit of panache as well.  If you feel that you haven't been sewing enough for the men in your life and would like to make a gift that is quick, looks good and is functional, the Emmaline Retreat Bag is for you. For the women in your life, this would make a great makeup bag and I might make myself one out of some cottons. I will definitely be making more of these and I hope you give them a try. As always, NAYY.........Bunny

Three Emmaline Retreat Bags


This was a fun project, or should I say three? I made each of my grandsons one of these dopp kits. They all travel, camp, and just plain get around a lot. I think they will like their own little bag for their personal items and it's quite grown up looking after all.


Pattern:
This is the  Retreat Bag from Emmaline Patterns. It is for a traditional dopp kit shape and comes in two sizes. Here you see the three I've made and I used the 9 inch smaller size. The pattern is FREE from Emmaline and is a PDF download.

I made the two solid colored bags first for Graham and Zack. I decided to get a bit adventurous on my third effort which is for the oldest, Jack. I like how they all came out. The above pic shows the bags fully extended open. The zips are on the outside of the bags and have tabs, or what I call  "yanks" so you can hold them and yank the zipper open. You don't really yank, but just tug the zipper open like any other zip. The bags are lined and have interior pockets on each side. I chose to use just one slip pocket in these.

Fabric:
The exterior fabrics are a faux leather that really looks quite authentic. I bought a lot of it about five years back from WalMart. It's the only thing I've ever purchased in their fabric department and the quality has been quite good. I've used it for many projects and it has a genuine leather look. 


The linings are all 100% cottons  from Joanns. They have  been given a protective layer of clear vinyl. It is now sold at JAs in a two yard box and is made by Pellon. The vinyl let's the inside of the bags have some wash/wipe ability. It is easily fused on. 

The interfacings vary. 

On Graham and Zack's bags the interfacing used is SF101 from Pellon/JAs and fusible fleece,  as specified. The front bag above has SF101 and fleece. The Pattern specs fusing the lining with the same product but I did not as the vinyl applications stiffened the lining a lot. ( ETS to add the fusible fleece which I remebered in the middle of the night. Hate it when that happens.)


Jack's bag, on the other hand, got a different treatment. I used a fusible foam behind the exterior fabric. But I did not fuse the foam to the bag. Instead I fused it to a layer of cotton batiste and stitched that to the bag pieces. therefore turning the interfacing (Flexfoam) into a sew in. I like how it "fills" up the space between the two layers.  I have to say I don't really have a preference. Both methods worked and the SF101 bags were easier to "seat" into their shape. But they all got there. Since Pellon SF101 is far cheaper than the Flex Foam, I'd say go with that but make sure you fuse both lining and exterior fabrics.

One of the things I discovered while making these bags is that the release paper for the clear vinyl is an excellent press cloth for the faux leather. Use it under and on top of the leather and let it cool before peeling off. It gives great pressing results, not easy with faux leather. 

The bag requires a zip longer than the bag opening in order to give that "pull tab" effect. Instructions are given on what length to cut your zipper. I might go another inch longer next time. There are also two wire frames   that give the bag it's recognizable look. I've seen  bags made without them and with. I prefer with the frame. Those without the frame still look cute but just don't have that obvious well known shape. Without the frame, it's close, but closer with the frame. The frames are quite inexpensive and come with little rubber tips that I recommend gluing on before using. Make sure you order the right size frame. Size A is what is used for these smaller bags.


Construction:

This is really a rather simple project and if you don't add an extra border and don't vinyl-ize your lining it can be made in a couple hours. That makes it a great gift. You are basically making a tote with a zipper across the top. The corners are boxed to give it the traditional shape. The lining is left open across the bottom so the bag can be turned, a bit trickier with that sticky clear vinyl, but doable. After turning and closing the lining a casing is stitched in all around the bag and following the zipper.  The wire frame is inserted inside the casing. Critical: make your casing with a GENEROUS 1/2 inch seam allowance. Mine were a bit short of that and I really had to shove to get the frame through the casing.  I ended up having to undo stitches and resew the casing after the wire was in. ( insert eye roll).  The wire of the frame is heavier than a coat hanger and quite sturdy. 

My vinyl lining and faux leather outside plus interfacing made for a quite firm little bag. That's how it is supposed to be. Instructions on the Emmaline site tell you that the frame needs to be zipped open and shut several times and will eventually seat itself properly on it's own. It's true. I just kept opening and closing the bags and they took their shape after a while. I believe this process is much easier on a fabric bag. There are some adorable feminine bags made from this pattern with prints. Handles are attached and they look quite functional. Just look how the bag opens wide. How nice is that for a women's bag?
.
Here is the inside of Jack's bag, a cotton batik that's been vinylized.


Above is a close up of the zipper installation and the wire frame channel next to it. The topstitching really seems to sink right in this faux leather. All construction seams are 1/4 inch.


In Conclusion:

This is a great design, easy to make, and FREE. It looks better with the specified  wire frames so I recommend them. A nice zipper pull , which I did put on Jack's, adds a bit of panache as well.  If you feel that you haven't been sewing enough for the men in your life and would like to make a gift that is quick, looks good and is functional, the Emmaline Retreat Bag is for you. For the women in your life, this would make a great makeup bag and I might make myself one out of some cottons. I will definitely be making more of these and I hope you give them a try. As always, NAYY.........Bunny

Sunday, October 23, 2016

A few things I've learned.............

You know I have been on a bag marathon lately. Right now the boy bags are complete. I decided to make one for my other daughter's son as well and had to order another frame which should be in this week. Pics coming as soon as all the frames are in. I am pleased with the results and my favorite man thinks they are awesome. My latest project, also nearly done, is another mini NCW for our other granddaughter. So the machines have been humming and the cutters rolling! Here are a few tips gleaned from facebook groups that focus on bagmaking. I really appreciate all the knowledge they share and these tips really help me out.


CLIPS!

These can be the Wonder Clips by Clover. Some order large bags of generic clips through Amazon. I just hightailed it to KMart (limited resources in these parts) and got a bag full of binder clips. They all work. Why clips? They remove the distortion of pins. Bags can have some real shifty, bulky spots too. It is the nature of pins to go in and out and therefore get a bit bubbly. Clips keep everything flat and they squoosh any thick parts right down and hold those parts solidly. It really prevents the layers from sliding. Love my clips!


RELEASE PAPER !

This large piece on top is the same paper that backed the clear vinyl I used to waterproof the linings of the boy bags. This stuff is gold if are ever going to iron any kind of faux leather. I've sewn with tons of faux leather over the years. Ironing is next to impossible. Fusing? Forget it. What I have come to do is fuse the interfacing to batiste and stitch that in with the vinyl like an underlining. It works but it is more work. Appear this slick backing paper. It stays on  while you iron the clear vinyl to your fabric. You let the fabric cool and then slowly lift it off.

I decide to take a chance. Nearly every time I've used faux leather I've had some of it come off on the press cloth despite low temps. I had enough extra on my latest project to do an experiment. I laid the paper down on my steam press slick side up. I next laid down the faux leather, leather side down, touching the slick paper. Then came fusible interfacing on top with the glue side facing down on the faux leather. On top of this a dry press cloth. Fingers crossed, I lowered the steam press, gave it a burst of steam and then held it down for ten very long seconds. I was convinced it would be one melted horrid mess. I lifted the steam press and voila! One perfectly fused piece of faux leather. I let the pieces cool, slid them off the press, cooled them some more. Then I carefully peeled the slick paper from the faux leather. NOTHING! Nothing was damaged, melted or transferred. The fuse was totally solid and the leather looked perfect. I am sure this same process could be done with a regular iron as long as the same layering is done with the release paper. It was a Eureka moment.

Now don't think you have to run out and get clear vinyl to get the paper backing. The paper behind mailing labels  is the same thing, just a smaller page. I use Avery labels a lot at work and take home every sheet of paper when a page is used up. It is the same stuff and works perfectly.


SHISH KA BOB STICKS !

Need to push out the corners of those pocket bags? No, you don't stick the point or the blunt end in the corner. Instead, take the blunt end and starting a couple inches away from the corner, rub the blunt end along the seam line. The garment or bag would be right side out. Push that blunt end along the seam and right into the corner. Now run the chopstick along the other seam line on the opposite side of the corner in the  exact same fashion. You will be amazed how well this works and how stress free and simple it is. You have to push that stick right on the seam line starting a distance from the actual corner. I don't get the physics but it really works. I am a total convert for corner points now.


LOW TACK TAPE !

This is used to cover that nice hardware once it is installed. It keeps the scratching down and I will do this the minute any hardware is installed from now on. This turn lock tooks some serious chiseling to get installed but in the end looks great. This is Sophie's bag that I worked on today. It is so close to done and there is a lot of color in  it that you can't see.  I'll show yo later. Look at all those clips doing their thing!

**************************************

This week has found us leaving  months long drought status. While we were blessed with incredible weather all summer and fall a deluge the past three days has filled the wells and given everything a good solid drink before winter sets in. At the end of the rain event, the temp dropped,  the snow began and the sun came out. I thought I'd share a few pics Ern and I took on our sojourn today.  This is an area called Red Tavern Road where everyone lives off the grid and the river is running wild. 

 A little blowdown. 


And this last pic I took in the rain a couple days ago on my way home from work. It's a half mile from the driveway and it just took my breath away. What a beautiful goodbye to a lovely Summer and Fall....Bunny


Saturday, October 1, 2016

Boy bags begin!

It is so easy to find something to sew for my granddaughters. That really came home to me when I gifted Carley with her mini NCW . I always give the boys something special as well so they certainly aren't ignored. But,  this time Zack asked me, " Bunbun, could you make me something?" and of course I said , "yes, I will make something for both you and your big brother." Enter the Retreat Bag:

with permission of Emmaline Bags

Some call this a Dopp Kit. My brothers used to call theirs d-----bags.  I call them cute and a perfect gift you can make for a young man.

The Retreat bag is a FREE PDF pattern from Emmaline bags. Yes, free! I am not sure there is anyone else out there who has anything similar. At least I haven't seen it! It comes in two sizes and I will be making the smaller size bag for the boys. There is a frame that goes into the top of the bag so that when the zipper is closed you have that classic fold on the corners. I have seen some choose to go without the frame.Those look good but I think the frame adds a bit of snap and professionalism to the finished item. (NAYY here)  I have also seen some add straps and make this into a women's handbag as well, very cute!


For my exterior fabric I have chosen a cordovan red faux leather that I  have sewn before. It's masculine bit of color should work well.


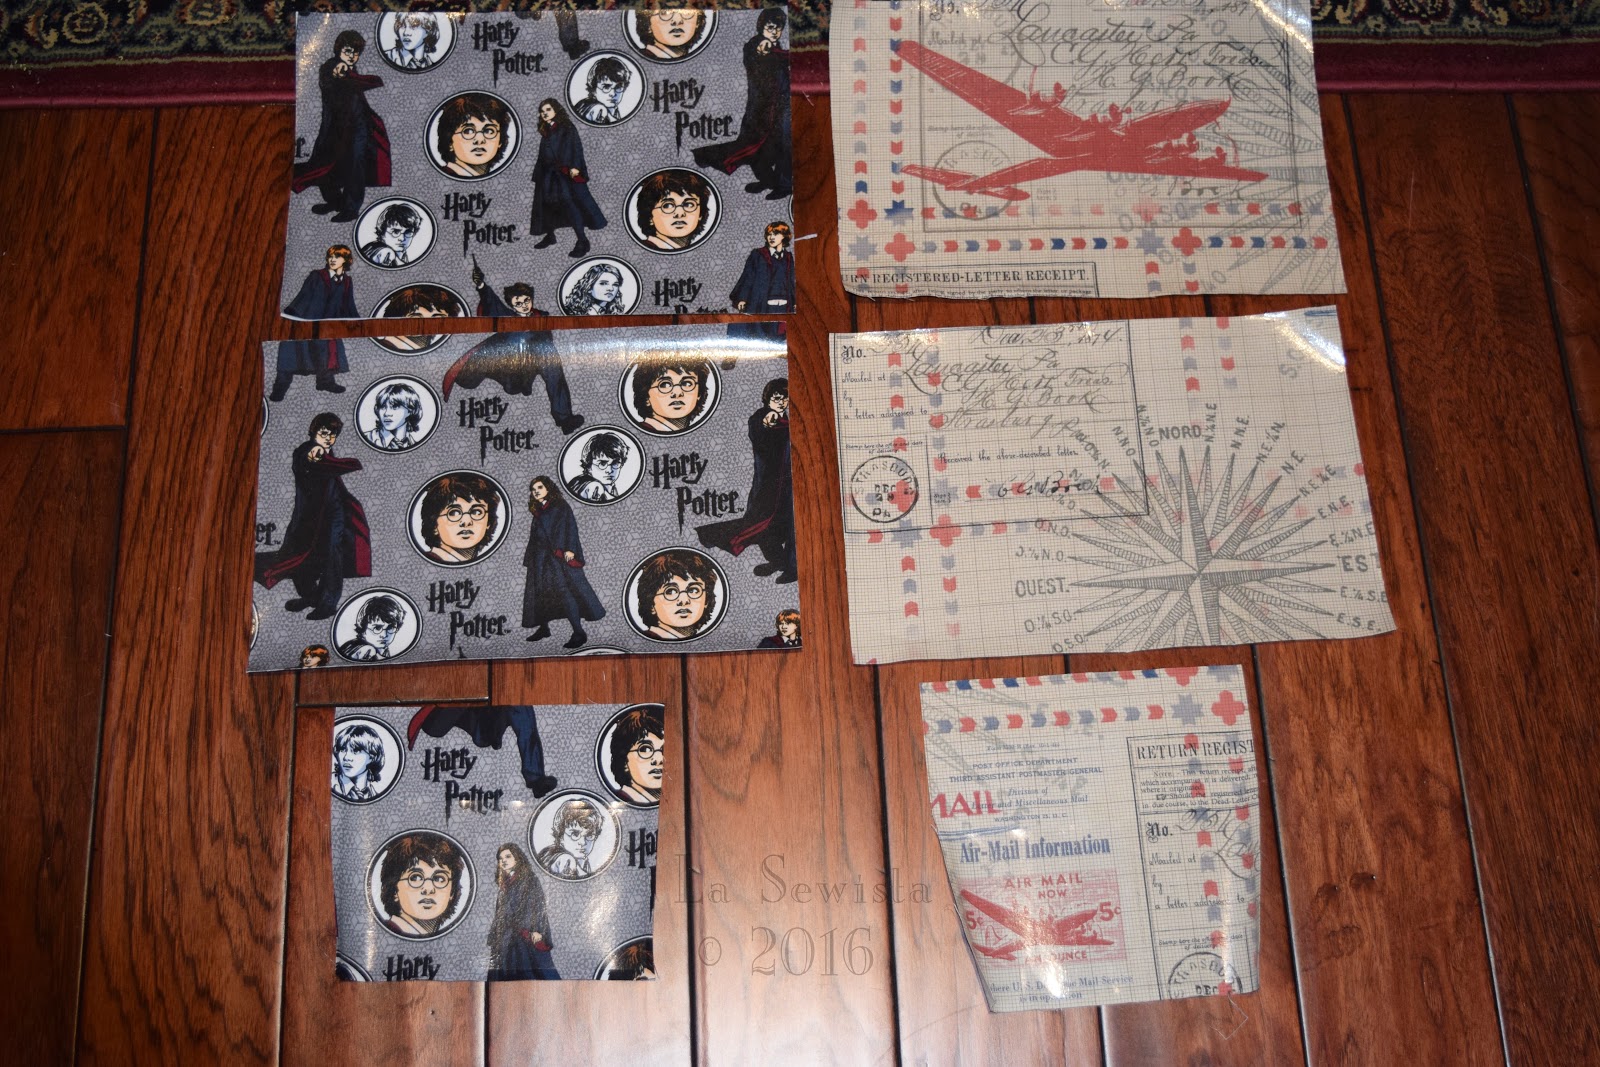
The lining is where some imagination gets played out. One of my grandsons is crazy for airplanes to the point where he has his first job at the local airport. He cleans the offices and gets flight lessons in exchange!  Graham's lining will  be this "aviation" print .


 My other grandson is an avid reader. He is in third grade and had read every Harry Potter novel by the end of second grade. We should all be thanking J. K. Rowling for planting the love of reading in the hearts of so many children.  Zack's will be a Harry Potter print. Both came from Joanns. They each have red tones in them that should work well with the leather color. If you are going to fussy cut printed fabric to highlight the motifs, make sure you get extra. I got twice the amount need but have enough left to make an NCW lining. Fussy cutting adds so much to a made at home bag. Also, be careful with directional prints and cut them one layer at a time so each side will face up.


I decided to "vinylize" (my word) the lining fabrics in order to make the inside wipeable/cleanable. The first step was buying a by the yard  product made by Pellon called Vinyl Fuse. I found a clearance bolt at JAs and with the overall discount paid 1.50 a yard, yahoo! I bought a lot! If you can't find that I believe the same product is now marketed in pieces and sold in a box.  I was a bit intimidated by the product but once I tried it I found it really wasn't tricky at all. I was expecting to maneuver a big sticky mess . Think Contac Paper. Instead I found the vinyl quite cooperative. I followed the directions exactly. It's important to use the paper the vinyl comes with as a "press cloth" between it and the iron. Don't throw it out. It will come in handy for pressing seams later.


I didn't know how the vinyl would react to the heat so laid down a layer of drill cloth on the steam press for this project. Hey, it's new after all!  FWIW, I did the first vinyl fusing with my regular iron and it worked just fine. But the steam press really shined with this task.  Above is the steam press fusing the interfacing on the bag piece.


It's really important to fuse all the interfacing to the pieces before fusing the vinyl. Just trust me on this one. Above you can see the vinylizing set up. Drill cloth, exterior fabric FACE UP, and lastly the release paper/vinyl combo with the vinyl facing down. 8 seconds down with the press, no steam and voila! The red arrow points to the vinyl that didn't get attached and the green is the release paper. You can see I had excess vinyl on the edges and it easily pulled off of the drill cloth while the pieces were still warm. This process truly made no mess and was quite easy. It would just take a bit more time with an iron but just as neat and clean. One thing to be really careful of before putting down the vinyl is that there are no pieces of lint or thread on the fabric. They will be there for time eternal if not brushed off. Also, you will see the vinyl may look to be "loose" on areas of the release paper that rounded the edges of the bolt. Don't fret. It all presses out to perfect flatness. And really important,,,, no steam used here. I pressed the right side 8 seconds, flipped it over and pressed the wrong side 4 seconds, exactly as Pellon describes in the directions. I will definitely do this again. It was easy. The boy's bags will be wipeable inside and how good is that? They travel a lot with their families and these will really come in handy.


All is fused now with vinyl and interfacing. I blocked fused the large pieces so the vinyl is in the seam allowances. The pockets had the vinyl cut back from the seam allowances and from one half of the square that will be the lining of the pocket when sewn.


Here's a closeup of the fused pieces. I love how it prevents the edges from ravelling.


The exterior pieces had the vinyl, the fabric, fusible fleece and SF101 interfacing. How to keep the bulk down? I took a piece of batiste and cut it the same size and shape as the bag exteriors. I then fused the fusible fleece, with no seam allowances to the batiste. I turned it over and then fused the SF101, again with no seam allowances, to the other side. Now I will just stitch the batiste into the seam allowance of the bag, so basically a sewn in interfacing.

One thing I have I've been impressed with is the well thought out and "proven before market hit"  way Indie bag designers use and specify interfacings. Most bags have at least two types, Many have  three. But in nearly every pattern out there Pellon SF101 is used, A LOT. It is a woven interfacing and works well in these bags. I will honestly tell you that I don't use Pellon products in my garments but for these bags, the SF101 and the foams work really well. Also,  I wanted to fuse my fleece to a separate fabric because on past projects I found it could pick up wrinkles while turning and handling during the construction process.

All pieces are now vinylized, fused and ready to stitch. I will need to do some stitching samples before sewing all this vinyl and that is next!..........Bunny

Monday, April 18, 2016

The Cobalt Bling bag continues.....


I had to figure out a way to do a decent zipper installation on Vogue 8823. I was not going to put a zipper across the top of a a totally completed and lined bag, after the fact. There had to be a better way. I thought about this for the past three days and there were quite a few options considered. This is the winner. The goal here was to install the zipper more easily and at an earlier point in the construction. I think I've got it. Because I am going against pattern directions, I want to document every step for you.


The first change made in the pattern:

The pattern has you turn under the edges of the Bottom piece, shown above. The scalloped edges will then be stitched to the middle painted section. Taking from my heirloom sewing experience I decided to do a "mock" Madeira Hem. I say "mock" because this is not heirloom sewing but the concept is similar to  Madeira Hems the way Martha Pullen teaches. What you do. instead of painstakingly  basting and turning under scalloped edges and hoping for a smooth look, is make a "lining". Cut a second piece of fabric exactly like the bottom band piece. Right sides together, stitch the edges in a half inch seam. Clip inner points and grade and notch the edges. You can see here on the second edge I used my pinkers which did a great job.   Now turn this right side out and go to the ironing board.


Iron the scalloped edges doing a tiny "favor" to the wrong side, like you would on a neckline. You can see here what a much cleaner finish the edge has as opposed to turning and basting. It's easier and quicker too! Now this has to be attached to the middle painted section.


Next is to mark the half inch seam allowance on the middle section of the bag. It also has the scalloped shape.

Now Wonder Tape, a double stick adhesive tape,  is placed in the seam allowance. The paper is pulled off and the bottom leather section can now be placed on the marked line. Press it down with your fingers and head to the machine. No pins! They are not a friend to faux leather.

All placed and ready for topstitching! I put on the edge stitching foot and did a line 6 clicks in from the edge, about an eighth of an inch. Then I lined the blade of the edge stitching foot on top of the just done stitching and stitched again. Here are the results:


Doin' the Happy Dance!

Next this  lower section will be interfaced with fusible fleece. Because ironing can be unpredictable with faux leathers, I am trying to do as little as possible. The fusible fleece will be attached to a piece of muslin that will be an "interlining" to the bag. The same will happen on the top section. Fingers crossed. There is more finagling to do. ....Bunny

Monday, February 16, 2015

The Loom Carrier, self drafted

The loom carrier is complete! I cannot tell you how much I enjoyed this project. The drafting, the construction, the always there frustrations, all of it was great fun and I am really pleased with the results and it looks like it will work IRL.

Pattern:
This was self designed and drafted. I started by thinking about what I would need to make my new  Mirrix loom easy to travel with. It has all sorts of parts that need to be kept track of.  I also had given both grandaughters bead looms for Christmas and we always work on crafts or sewing when we visit.  I wanted to be able to bring my loom with me so we could all weave some beads or fibers together. Let me tell you, the apple doesn't fall far from the tree here. They both LOVE to do this sort of thing and I am thrilled that they like to do it with their grandma. So a travelling bag was needed. I also plan to attend a two day seminar in March on making tapestry and bead jewelry so this will be great for carrying the loom to that fun event.

I started the design by getting out some graph paper and taping it to be big enough for the project. I then measured the loom and took a good look at the parts to see what was needed  to prevent them from getting lost. . I love that part of design, the problem solving part, so much fun. I knew the outside would be pretty straightforward but the inside was the working part of the project and needed a lot of attention for good function.
 
Here you can see each side of the inside lining.


I also made a well padded bag to hold the actual loom. As some one far more experienced pointed out to me, my warped loom could get it's warps all caught up in the other parts of the bag. The bag is two layers of thick quilt batting that is quilted to the inside lining of this bag. There is a drawstring at the top with a ribbon. It is well protected. Here you can see how it works in the  actual loom carrier.

Fabric:
This was definitely fabric that called out to be purchased. I am a huge fan of impressionist painting and Van Gogh's Starry Night clearly inspired the outside fabric. The inside is a knockoff of Monet's Iris Garden. Be still my heart!

The faux leather is the stuff I get from WalMart, the only thing I get from WM. I detest their fabric department. The wovens are total thread bare garbage knockoffs of all the licensed more quality fabrics found in quilt shops. Huge Difference! But I experimented with their faux leather a long time ago and I really like it. It's very sewable, and has held up well in other bags I've made. Like I said, the only thing I will buy from WM.

The Starry Night fabric is fused to fusible fleece and Peltex was used to make the bottom gusset and the bag sides "hard" and it worked. I gave directions on how I handled that in yesterday's post.

Construction:
Making this was pretty straightforward. There were details. I lined the pockets with flannel and added a little flannel band to the pocket intended for needles, the better to stick them on to travel.

There's a special pocket for my small scissors.


There are wide, large loops to hold the shedding device.


There are loops for holding fibers and zipper pockets on both sides for whatever other goodies need to travel.


I put all these details in the bag based on the very tiny amount I know about weaving with this loom. I know, just like in garments, that after a few uses I will have the "coulda, shouldas" and that's OK. I am a newbie with unbridled enthusiasm. What can I say? I will learn how  to do the next one better and with a more efficient layout. Maybe I'll find out I want outside pockets. Who knows? All I know is this project confirmed that I am so totally a process person. That's what I get off on. Sure, I love the end results when they are good and am sad when they are not so good, but the process? The process is almost always very good. A few more details:


Teh straps are stitched in an "X" to make them secure. The straps were topstitched before attaching to the bag and then topstitched again, in the same holes to secure them to the bag. 

A close up of the gusset zipper junction. 
*******************************************************
Blogging and Next Level Sewing will be a bit sporadic for a while. as we work on our "move". There is much to be done in the house before it hits the market and around here Spring comes fast and suddenly. 

My sewing room is COMPLETELY torn apart. Two of these bags hold fabric and two other bags, one not shown, hold about 200-300 patterns.  We are taking a drive tomorrow to donate these to an appreciative source. There is a lot more chucking to be done before it is all done.  I soooo don't want to move this stuff. There is always more fabric and patterns to buy and tomorrow's another day! How would you draw the line on what patterns to keep and which to donate?

The Ray Pinafore, 2025's Epic Fail

  Happy New Year and welcome to my epic fail of 2026. I guess you have to have one, right? This is the Ray Pinafore from Paper Theory Patter...