Sewing Vloggers

Showing posts with label alterations. Show all posts

Sunday, July 7, 2019

Adding "bumpouts" to a pattern, New Look 6866 or any other

I have started working on my linen dress. It will reflect some fit changes from the original Dandelion Dress shown here. It will have a tad less volume, particularly in the back. The armscyes will be raised about a half inch but otherwise, it is the same dress. I have a new pattern to play with as they were on sale and this way I could start fresh for all of you who wanted to know how to go about adding a bumpout to an A line dress or even a skirt. The pics aren't too exciting as they are of pattern tissue but the concept is a fun one so let's get going!

What do you need? 

* New Look pattern 6866 if you want to really copy what I did which is fine or any other maxi A line pattern. 
* A cutting board so you can see the measurements as that helps to establish grain and get your alterations correct.
* Dressmaking ruler, French curve or whatever shaped ruler you like to use for pattern drafting. Above are my rulers , decades old, purchased at a travelling sewing show. Great learning experience and lots of unusual notions. I don't think I have put these down since I got them in the eighties. I use them for everything despite their names. 
* A red or blue fine point Sharpie or whatever you would like to use to make your changes as long as it is not black or navy. You want a line that stands out to avoid mistakes. 
* Tissue paper in case you would like to trace from your original pattern, which I would recommend,  or if you need to add extensions.

That's about it. 

The first thing you need to do is iron your pattern tissue, BEFORE CUTTING, and I insist on it. It will just be easier to work with, never mind other good reasons why. If you are using 6866, be aware that the facings have different sizes on different facings and they are overlaid on each other and I don't know why. 

A note about the pattern and really any pattern you are going to cut. Iron it (no steam), lay it out flat, and measure it. Only then will you know if it is close to fitting. In this pattern I used the smallest size. The bust area, I think, fits great on me. You judge. There are 40 inches in the bust for the size small. THIS IS DESIGN EASE, PEOPLE. I will write a post on this soon. This is not an ill fitting pattern. The shoulders were perfect on me.  More to come on this subject as there is so much misunderstanding about the concept of fitting ease and design ease, two different things. Movin' on.......

Getting ready to cut:

Roughly cut out your pattern pieces. Do not get rid of any of the tissue in the side seams. Keep it all, including all sizes.  Use your red marker to extend the View E hemline out to the end of the tissue from whatever size you are using. I am using small here. Don't cut off any of those other sizes. 


 If you are using the larger sizes you will have  to add an extension of tissue or paper about 4 or more inches wide to draw the bumpout.  I am using View E, the shorter version here. Don't cut anything yet!  Lay out your front piece. We will concentrate on the hems for now.  Measure across the tissue six inches down from the View E hemline and make marks all across. This will be your new hemline. Connect the marks to give you your new cutting line for your hem.


This is the new cutting line for your deep, shaped hem. Cut out the hem, ONLY , across the bottom. 

Fitting. Do any vertical adjustments you need to do before cutting any further. I simply tucked up some length a couple inches below the waistline but whatever VERTICAL  adjustments you need, go ahead and do them now. 

After that you can cut out any other parts of the tissue EXCEPT the right and left side seams for front and back. 

Let's look at the front first. 


I always find it easier on these nested patterns to outline MY dart in a contrasting color. Makes things a lot easier to mark and match up. I like to put dashes down the center too, to fold on. 

It is now OK to cut out your pattern everywhere EXCEPT the right and left side seams from the notch under the dart to the hem. 


If you need to do any further alterations, FBAs or such, do them now. You can see I raised my armscye a bit here, plight of the short people!


For larger sizes, add an extension piece of paper, maybe 5/6 inches wide to the side seam. You will be working outward from your normal size seam, whatever that may be. Place the tissue pattern piece on your cutting board ON GRAIN. With your French Curve or any other curvy Dressmaking ruler and your red sharpie draw a new side seam on the pattern as shown in this diagram below. It will give you the shape of my original Dandelion dress. In my linen version, I will be only extending out two inches, not three, to reduce a bit of volume and play with the shape a bit. In a nutshell, here is what you will do as you can see in the diagram. 


* Place your pattern piece on grain on your cutting board.
* One inch from YOUR SIZE side seam, at the new hemline, make a hashmark. This is where you will start your new curved bumpout side seam. 
* Twelve inches up straight up from the hemline make a mark on the old side seam.
* At that 12 inch mark, turn  Right 3 inches and make another mark. This is where your widest part of your bumpout will be.  Feel free to do less if you would like a different look. 
* About 4 inches below the notch, make another mark. This is where you will start curving in, instead of bumping out to give yourself some waistline shape.

Lay your new altered pattern down on the cutting table. Lay your back piece on top, matching the notch and side seam of the original dress. With your sharpie draw out the same shape you just made on the back of the dress side seam. Done. 

We still have the hem band to deal with but I want to get the linen all cut out first and lined and you will see why later.  You may want to wait for that instruction before starting to have a complete understanding as more shape is to come. 

I am five feet tall. These are the dimensions I came up with  based on nothing more than my inspiration picture. I am sure the model in the picture is far taller than me. You can move these curves  up and down any way you like to work with your own height. I have no magic formula. A muslin is wise. Just remember to go in that one inch from the side seam line for YOUR personal size, not mine. This helps shape the wide hem band.  Also remember to curve back in about 3 or 4 inches before you reach the notch to give your waist some shaping. A dress with this much volume needs that inward curve to look decent. 

You will be doing more shaping when the wide hem band goes in. 

Once all of your lines are drawn in with your red marker, cut out your tissue. If you've read this far, you can see that you are destroying the original tissue. I suggest that before starting you trace out your original tissue as this is a great classic pattern that I am sure you will use over and over. I know I will. 

 I did not cut out the wide hem band until the dress was all cut out for what will become obvious reasons. We will continue with that step in the next post as it is a bit involved. Stick with me! We are almost there! 

**************************
Because you have endured these rather "dry" pictures of pattern tissue, I will leave you with a bit more color. My husband and I have been working hard on our property we bought last year. The outside, like the inside was a nightmare but one with great potential. We took care of the inside with a total rehab and love it and it's like a brand new home but the outside now needs our attention. It is quite sorry. This property is on a bluff/cliff, whatever you want to call it on a small lake in New Hampshire. We have incredible wild life every day who drop by and visit. Looking forward to less energetic years at some point we are making this a no lawn, woodland shade garden for about 90 % and all of the back yard. It will be filled with mosses, pachysandra and other shade and acid loving goodies. We have done massive clean up here , I mean massive grunt work but it is looking so much better. We have a long way to go, long way, but gardening takes time and teaches patience. You can see our fairy moss growing happily and we can't wait till we have velvet everywhere. It is doing really well, coming from just a tiny bit. It will come as things grow and more hardscape goes down. Here's a few pics:


Happy Sewing!.......Bunny


Sunday, January 24, 2016

vogue 9162, Some serious petite-ing!

 Work has begun on a new white shirt. I really liked this design by Katherine Brenne for Vogue, 9162. I like the tailored hi-lo hem as the higher front gives more leg length for me and the back covers my bum. Something about those curved hi-lo hems just doesn't appeal to me, however.  As I often advise. I took a close look at the pattern photo. Look with me here. The mandarin type collar is very deep, something that may be out of proportion to my petiteness.  The same goes for the pocket. These are intentionally large details but I think they still are not the right size for someone five feet tall and not too wide. The armscye seam is barely above the elbow.  Then there was the issue of width. I know this is supposed to be a wide bodice but I just wasn't feeling sure about it all. .  Time to flat pattern measure!

This top is 63 inches wide in the extra small size, sorry, just way to much for me. It was clear this pattern would require some major "petite-ing" to work on my frame. 


When I sew I always start with the smaller details. I took one quarter inch off every edge all around the pocket. That meant that the facing wouldn't fit. I had a brain fog moment or maybe just over thought, but something told me not to do the same with the pocket facing. Yikes, would the edges, the curve, not fit if I did?  Rather than spend time with this math moment, I cut back the vertical edges the same 1/4 inch and folded out the remaining 1/4 inch across the facing, perpendicular to the grain. It works. 

Next was dealing with that deep collar. 

Again, I folded out a quarter inch across the center of the collar, perpendicular to the grain.  Once that was made permanent by fusing a strip of leftover interfacing to the back, it was time to cut. 


In my wild enthusiasm here, I took a pic of me truing the seam for the largest size but you get the idea. The edge was trued. The seam allowance attaching to the neckline was not altered in any way.  Now for that amplified bodice! 

Nowhere on the pattern is offered finished measurements. Really, Vogue? Is it assumed that this is so stinkin' big that it doesn't matter? Well, it does matter. I am making the extra small. It is for a 29 1/2 inch bust.  I haven't seen that measurement since I was prepubescent, way pre pubie. I went ahead and measured the width. There are no pleats in the back. The bodice width at the waistline and hem is 63 (yikes!) inches and that is for the XS!. I do think I can let a bit of that go.

Four inches were taken out of the back bodice, two on each side. Then two inches were taken out of the bodice left and right, two different pattern pieces, so a minus of 8 inches total. This leaves a bodice width of 55 inches. I will live with that as this is a BIG shirt and the bodice should be wide. But when the bodice is wider than I am tall, well that's a problem. Once the width was folded out vertically the shoulder seams needed to be trued as shown in the pic above.

When all is said and done, will this swamp me? Will it look totally out of proportion? Will the ninth planet remain hidden behind the sun? I don't know the answers but we will find out soon enough, at least on the first two questions! Talk to Neil Degrasse about the third question.

*******************************

I found this little number in the clearance area at Joanns. Imagine, a bound buttonhole tool! I haven't read the directions yet but am anxious to give it a try. Has anyone ever used one of these?...Bunny

Tuesday, May 12, 2015

A little alteration!


I rarely do alterations and when I do they are only for those who truly appreciate it. The tall and lovely daughter of my friend Mary is going to the prom this weekend and the perfect dress needed a bit of help. Despite her height, the gown still needed two inches off the hem and lining. I also raised the shoulders up two inches, much needed, and that came out really well. the dress looks a bit skewed but that is because it is the appropriate length for someone five foot nine and it is on my five foot tall dress form and a bit twisted. It looks just lovely on Erin. I added the bling too which is perfectly even on Erin.

For the hem I used the Kenneth King hem technique to make quick work of it all. Love that technique and bow down to Professor King every time I use it. It is always up in my list of tutorials.

I am on the final stretch of my dress for the wedding and right now am hand picking the zipper with tortoise shell seed beads, very subtle and I love it. More to come! ....Bunny

Tuesday, August 6, 2013

Fixing a Too Low Armhole

As promised here is a post on how I fixed that nasty situation when an armhole is way too low and your bra is showing way too much. It shouldn't be showing at all. This is the Cynthia Rowley dress I picked up for the wedding. You are seeing it after the alteration. I believe you all know what this issue looks like so you don't need to see my armpits for further explanation, just TMI.
While Sis and I were scooting around getting ready for the service I asked her to take a pic of my armhole to show the result. Obviously, she took a pic of more than the armhole! I really wished the camera showed off this fabric better. It is a silver metallic linen, subtle and lovely. Back to armpits....
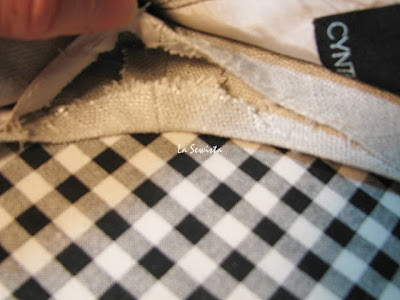
The dress is fully lined but the yoke in the front is self faced and connects to the lining at the bottom edge of the yoke and at the shoulder seams. With a combination of razor blade, pelican scissors and a dental pik, I unstitched the lining from the edges of the armhole, aka, the understitching. Of course underneath lay the smallest of seam allowances so don't be too rough and get them to unravel.
You can see the outside shoulder seam. This needs to come apart.  Press your SAs nice and flat. Now it is time to do a little measuring. I took my outer shoulder seam in 1/4 inch at the neckline and angled out to a half inch at the shoulder edge. You may be different depending on the slope of your shoulders. My amount pulled the bottom edge of the armhole  up a good inch .I also had to deal with the little studs but they were really no problem and came out fine.
Stitch your new seam and press it open. A seam roll or better yet, a wooden dowel, makes it easier to get inside and iron it open. Remember, iron flat, iron it open, then iron the right side.

Trim back the SAs with pinking shears. It is easier to get in and do than serging at this stage. You are kind of working inside out here so make it easy on yourself.
 
Turn the shoulder back right side out now, like you would be wearing it.  Give those edges a good hard press. Watch out for the lining. It may not take the heat as well. If you haven't done it yet, unstitch the lining shoulder seam. Press the lining SAs flat. 


Now take the front shoulder lining/facing and pin it down to the dress shoulder matching as best possible the already factory pressed edges. It helps to use an ironing board and ham to get this to lay right. You want to favor the dress side of this edge, meaning the lining side of this edge is a bit shorter so it won't be seen from the outside while wearing. Hand stitch this facing SA to the dress shoulder SA. Do not go through to the dress. You are only stitching SAs together.  Trim as needed to have slightly graded SAs.
 
Now take the back lining shoulder and flip it up and over the the pinned front shoulder. Trim as needed and turn under the lining SA. Pin all your edges as before. 

Now it is time to hand sew. First fell stitch down your shoulder seam. Then do the same with the neck and armhole edges. Give it a good press inside and outside and you should be good to go. 


**********************************************************************

A pic of the tee shirts we all wore to cheer on our running newlyweds!.....Bunny


Thursday, January 12, 2012

Maternity Conversions

I do alterations and dressmaking on the side as I feel like doing it. I like to do really simple things like hems or something that is very challenging. The in between stuff doesn't interest me much. I don't post these alterations as they are just that, alterations, but this latest job was quite interesting and I thought worth sharing.

I was approached by her superior to convert some police uniforms for a female officer to maternity uniforms. There are several pants and shirts. This was one of those challenges I jumped right on, the type that look complicated but really aren't for those of us who do these things. I was given extra uniforms to use as needed  for piecing. First I did the maternity conversion on the pants. That was really quite easy and I won't go into detail on that. However, you can find all the directions for this refashion here on Grosgrain. After maternifying the pants they needed to be hemmed and have a gusset installed at the ankles for additional width. My client is a very small woman which made these adjustments necessary. She is thrilled to have pants that will fit better.

Now on to the shirts. These are the typical very tailored shirts you see on most police officers. I don't want to post the whole uniform with all its badges and such for obvious reasons but I think you will get a good idea  what was done. First, I found out my client gained 80 punds with her last pregnancy so would need ample room for expansion. We looked at the shirts and discussed various ways of adding in more material. The shirts had machine pintucks, sort of pseudo pleats that would make things easy to do. I had plenty of additional fabric to install where needed. In the end I decided on adding a 6 inch wide panel of fabric under each arm and another 6 inch panel on the back. This will give here 18 more inches all around. There is always the option for installing more if needed but I think we will be fine with this and she thought so as well.

First I needed to deconstruct.
Don't flinch. This has been my preferred method since I have been fifteen. I find it far less injurious to the fabric than the traditional ripper and I have never hurt myself on it, ( fingers crossed! There is a method here though. This is a flat razor, the kind you put into a box cutter. I always use a pretty new one. Accidents and holes come from dull blades. First your seam allowances must be ironed all to one side. I lay the  garment down, right side up with the side with the pressed seam allowance to my left. I don't pull the seam apart to  better expose the stitches. Then I use my fingers  to pull the seam taut along the length, not open.  I lay the razor flat with the fabric on the right, the side without the seam allowances. I then take just the tiny tip, keeping the blade flat with the fabric and just run it down the seam.  This will let the point of the razor just glide right down the seam and open all the stitches. They make a popping noise when I am  doing it right. BE CAREFUL! This is my personal method and I take no responsibility  here. It's is just something I discovered many years ago that  works for me. You should stick with whatever you are comfortable with for safety's sake. You also don't want to ruin a garment.  Now that I've shown you how I do that, on to the alteration.

The side seams are ripped open. Next rip open the amscye seam two inches to the left and right of the sleeve underarm s/a. You should have something like the above. Undo the hem.  I don't fret too much about all the threads as they will all be serged off but on the pieces where I want them out I use an art eraser.

Press all the seams open and flat. Cut a piece of fabric 6 1/2 inches wide by the length of the side seam plus and inch and a half. Place the corner along the top of the side seam extending 3/4s of an inch. Pin along the seam, stitch, then serge clean. Do the other side of the side seam/ panel. You will have some extending at the bottom.

Using a drafting curve, cut off the extra fabric at the bottom even with the undone hem. Mimic the curve of the hem.  Cut the excess at the armscye leaving a little for insurance. The curvier the armscye, the more excess you will need.

All this handling will undoubtedly make the under sleeve seam open a bit. Sew this shut. Here come the interesting part. I have tried this numerous ways, including hand basting first. The method I prefer is straightforward and no fuss. For now, leave the sleeve seam pinned out of the way. We will just be working with the armscye seam on the bodice.
Take the bodice/panel seam allowance and match raw edges together just up to the seam line of the undersleeve. Stitch the armscye up to theis point.
Push all the excess fabric out of the way and do the same thing, meeting raw edges, pinning and sewing the armscye s/a  this time on the other side, right up to where you stopped the first stitching line. You will have stitched the underarm closed with a big fold of fabric unsecured and left over in the middle. On the inside fold this to make a pleat.
It will have equal amounts of fabric on either side of center. Pin and stitch this. Once stitched trim to the shape of the underarm. Sew the armscye sleeve seam shut. Serge to finish.

Finish the hem edges mimicking the original hem construction.

The completed underarm which now has six additional inches of fabric inside. You can leave this loose or press nice and sharp. These uniforms are made of poly for washing ease and are very springy. They don't hold a crease so I let this just flow. I also put in a six inch panel in the bodice back but that process was very specific to this particular shirt so I am not going to show it here. However I thought this idea for the underarm area of the bodice could be used to refashion just about any top into a maternity top. Not matching the fabric could make for a cute upscycle.  This garment received a total of 18 more inches of fabric around the waist.

I hope you got something out of this. I thought it was a fun job and wanted to share as I know there are many young moms out there who read the blog and maybe wondered how to pull this off. There is no maternity sewing in my personal future. That shop is closed in this family. But anytime  I can help a young mom with my skills, it is my pleasure.....Bunny

The Hanbok Vest

  I love this little vest. I thought about it for a long time. I am excited to tell you it's story.  Pattern: This is the Hanbok Vest by...