Sewing Vloggers

Showing posts with label pockets. Show all posts

Thursday, September 18, 2014

What's wrong with this picture?


One of the suggestions on this pattern was to use rivets at the corners of the pockets. I liked that idea and had some nice silver ones. These are flat with concentric engraved circles not visible here. I chose them because I really like the look. Hammer away!


The next morning I went to wear my recently made print jeans and looked at those rivets which I installed after watching a few youtube videos. Have you figured it out yet? I put these in backwards. ugh.....but I did that because I thought the back of the rivet was the "pretty" public side. Clearly there is minimal rivet experience here but I have learned a lesson.  OK, the rivets could have been installed with the little nipple side out but they weren't as shiny or as interesting. So while I made a mistake here, it was that "wild enthusiasm, unencumbered by the thought process" that had me make by decision by the look I liked, not by the "rules". So while my ego has been bruised by my lack of knowledge, I am comfortable with a look I chose from the outset because I just  liked it. Do you really think the rivet police will come after me?

Next snafu was the yoke. It is well installed but not the way I wanted it to be. Again, wild enthusiasm took over. I was doing the burrito technique for the yoke which is in the tutorials. But I topstitched the yoke before closing it up. This meant I didn't have a free seam allowance to connect with the wraparound lining yoke. Whahhhhhh......So I just did the traditional handstitched yoke finishing you see here and all is fine, just not quite what I wanted. I will adjust the tutorial to reflect my stupidity   eagerness.


I am on to the sleeves now, s l o w l y  on to the sleeves. I want them to have a fold back cuff with a slit.  I've adjusted the photo so you can see my markings a bit better. The top line is the hem fold. I added another 3/4 inch for turn options. How deep did I want it to turn? Then the cuff which has a slit in the middle, then the final seam allowance. I haven't cut off the surplus yet. The lining will have a facing that will be two inches wider than the "cuff" space. They will be placed right sides together and stitched on the drawn lines. Fingers crossed. Go away unbridled enthusiasm, go away...........Bunny

Wednesday, September 10, 2014

Challenging Pockets!

What's so challenging about a couple of big ole patch pockets? Matching them the way I wanted to! It was a bear.


First, I deviated from the pattern in that I wanted a slanted cuff on the pocket. I also wanted the pockets on the diagonal, bias pockets, so they would need an on grain lining to keep them from stretching out. Then the cuff needed to be bias as well but in the other direction. If I put it all going in the same direction you won't notice the cuff. So the cuff had to go the other way, That was the rub!

This is not as easy as it sounds. It took a lot of head scratching, flipping of fabric and pattern pieces to finally get it right. There are two pockets and they mirror image their bias design. I need to line the pocket and for the top 2 1/2 inches there would be ikat fabric that when folded down would go in the opposite and bias direction of the pocket, basically a faced edge to the lining. Then I had to do the reverse for the cuff on the other side. Confused?  Trust me, it took many tries to finally get it right. If anyone ever tries this the trick is to put wrong sides together and make sure the pattern flows continuously. You can see that with the green arrow above. If I cut that piece in this direction, it will work. I had to cut them wrong side up to make sure I got it right. I'm exhausted already.

Here the pieces are trimmed for a trial run and ready to get their lining. Don't want to mix anything up!

I got them sewn together tonight and they are ready for topstitching. I need to sample that out first. I've decided to topstitch in the darkest shade of the blue,  a trick I learned from smocking. An expert told me to pick out either the darkest color in the print or the lightest color when choosing smocking thread colors. We'll see how that works with this jacket! I may also use that triple stitch once again. I really like the look and this jacket could use some heavy topstitching to casual it up. So next stop is samples and then get those pockets on the front of the jacket. Till then..........    Bunny

******************************************


We woke up to this the other morning. Seems Rocky Raccoon thought the pickings inside our house were even better than what was outside and literally chewed through the screen and weather stripping. Nasty, huh? Do you know how many times on a hot summer day I leave this window open when I am not in this part of the house or out busy in the garden? Not any more!  I would have died if I woke up to a raccoon in the house in the middle of the night! At this point hubby and his Have a Heart trap have dealt with the issue and now we just need the window fixed! Rocky can go chew through someone else's kitchen window! Oh, he climbed up the porch rails, onto the grill and over to the window..,,life in the boonies!.....Bunny

Saturday, July 5, 2014

Jeans, nearly done!

Keep in mind this is the very first time I have ever attempted jeans with all the bells and whistles so all is new to me. As I usually do, a lot of time has been spent in research. My "muslin" jeans are looking pretty good but we will see what the final finish brings. I'll share a few things I've learned.


I used some Frog Tape to make a template for topstitching the zip. I just stuck it to my cutting mat and cut it to the right size with the rotary cutter. Then I just pulled it up and stuck it on the pants. It made the topstitching more precise and also made sure that I cleared the plastic on the zipper end. You could use any painter's tape. As I always do, the zip is longer than needed. Why go around that lumpy bumpy zipper pull when you can just have it out of the way with a longer zipper?


Then came the rivets! There are a bunch of Youtube videos on how to put the rivets in your jeans and I learned a lot from these. What would we do without youtube videos?  Just search jeans rivets and they will come up. I did learn why the rivets fell out of a project I did a few years ago! I needed fabric "washers" !
Jeans rivets consist of a disc with a post and a decorative disc with a nipple. You will put the post part through the fabric on the wrong side and then hammer it into the nipple rivet on the right side. These pics should make it a little more clear.


For supplies you need a hammer with a very smooth head otherwise it will mar the surface of your post disc. A smooth metal plate of some sort helps. I tried using a 3/4 inch thick piece of maple but it was not hard enough, so find some sort of hard metal surface for your banging. Also needed is some sort of pointed poking type of object. On my old failed project I used an eyelet cutter to make a hole for the post. Bad! You don't want to use anything to make your post hole that will cut the fibers. You want to poke something through that will push the fibers to the side and not cut them. I started with a seam ripper and then switched to my trust dental tool, perfect! A hole will need to be punched in the actual jeans spot where the rivet will go as well as in the fabric "washers".  Say "Ahhhh".


If the fabric is not thick enough as in maybe four layers of denim (per one video) you need to build it up with layers of fabric and make a fabric "washer"  to go between the lining and the post. Failure to do this is what makes the post too long and causes it to break. So I cut these little squares of layers of fabric and used them between the lining and the rivet post. The rivet post goes through everything and on the right side of the jeans you place the nipple disc in the point of the rivet post, you know, that male/female thing. While holding on to the whole thing turn it over so the nipple is face down on that metal plate. Give a few not too crazy hard bangs with the hammer. Trim the edges back to the circle shape and it should be done. Again, this is my first attempt at jeans rivets and just what I learned from you tube. Hopefully it will help others out there. I could not find  non youtube resources on this technique and appreciate any input my dear readers have to offer. This is a new journey I am on.


I got my rivets from a place called Taylortailor.com . They have great instructions on installation and sell in small amounts. 

Then it was on to the pockets, again, this is all a first time for me. I do hope the next pair, real denim, will be a smoother, quicker make. Back to the pockets: It took three sets before I got it right or at least as right as anything can be the first time you do it. My first pair of back pockets, well, I forgot the seam allowances. My second pair I used a satin stitch for the design and because I did not use a stabilizer and the fact that the fabric had lycra, the design was a wavy nasty thing that just ruined the pockets. I mean, we sew real here but three times the charm! I copied the size and shape and placement of pockets on an existing pair of jeans that I own. Since the satin stitch did not work the design would be made using the same triple topstitch that I have used all along with some tear away paper stabilizer,  no regrets. 


Here you see the pocket on top of a piece of typing paper for stabilization. That helped immensely. It all ripped off pretty easily.  After the design was stitched the angles were mitered and SAs pressed to the back. Finally, after three attempts I was able to install the pockets on the jeans. I used the same triple stitch for topstitching them and did a bar tack at the corner. I had planned on a rivet at each corner but one video I saw made the point that rivets on back pockets are really good at ruining leather uppholstery, whether in your car or at home. Since we have both, that was the end of that idea! 

The waist band needs installing and then hopefully a bit of modeling and pics. This always requires a bit of  "let's make a deal" with my personal version of Richard Avedon. Maybe a good meal? ...Bunny


Sunday, October 27, 2013

The Super Fussy Piped Matching Pocket

Tunic #2 is done and I like it a lot. The weather has not been cooperating with my photography needs so pics may just end up on the dress form. But for now I have moved on to a pair of Jammies for my Zackie. He asked me for them with no solicitation. What could I say? Of course Bunbun will make you some winter jammies. I bought the wonderful flannel from the North Woods collection on Equllter.com.

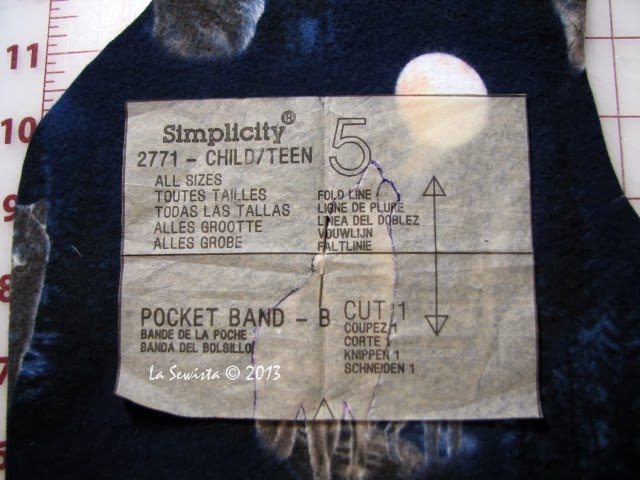
This is my go to jammie pattern, simp 2771. Included are sizes from a 2 year old to Big Daddy, all the family. I have traced off  half of the sizes at this point and of course not the one Zackie needed. My slow brain has since decided the next time Joanns has a Simplicity sale I will just buy one for  each size, duh. No brainer. In the meantime I traced away.

This is a simple pattern, one of the reasons I love it. I've reviewed it here numerous times. This time, however, I am using a very strong print fabric. If I put a pocket on that did not match it would scream tacky and incompetent and I wanted that pocket. I needed to make a pocket with a band and piping in between that perfectly matched the bodice. It took a bit of effort that I will share with you.
I marked the pocket location with a horizontal line on the bodice. I matched the fold line of the band to that location line. Then I drew an outline of the big wolf on to the pattern piece. I matched to a scrap of fabric and cut out the band. I did the same for the pocket. Then I folded them on the seam allowance to see if they would match once stitched together.
I actually cut the pieces larger than needed to make sure I had a bit of fudge factor for matching. I didn't trim them to the proper size until the piping was installed.

I made my piping with a "moon colored" flannel, the cheap stuff so I washed it several times. I attached it to the lower pocket section. I am using half inch SAs here.

There was going to be a lot of bulk and 4 SAs of flannel so grading was inportant. I opened up the piping and cut the inner SA waaaayyyy back. Now it was time to attach the pocket band. I made sure my wolves matched up and stitched on the same seam line. There is a tute on the right sidebar all about how I do my piping if you are interested.
The band SA was graded back as well. Then I pinked what remained.
Success so far!

Now it was time to trim the pocket to the correct size and once again being careful to match to the bodice. I pressed the band on the fold line and trimmed the edge with the pinkers in an effort to keep the bulk down. I folded back the band, pinned it, and topstitched two rows above the piping.
Then I folded back the SAs, mitering and trimming the bottom corners. Too much bulk to do that at the top!

Now here comes the most important information I can give you today. DO NOT TOPSTITCH OVER YOUR PIPING. You will topstitch the bottom pocket first and as a separate process topstitch the band after. At no time will you cross the piping. Also, if you haven't already, take the cording out of the SAs, again, gotta get that bulk down!

I like to stitch a triangle at the tops of my pockets on just about everything. Then I usually follow with a zigzag at the very top but that would have been too bulky so I didn't. I used 1/4 inch masking tape to line up my triangles and stitched starting and ending at the piping.

All of this fiddliness took about an hour but I think it was time well spent. 

 It would have driven me to madness if it didn't and I would be howling at the moon along with these wolves!.....Bunny


The Hanbok Vest

  I love this little vest. I thought about it for a long time. I am excited to tell you it's story.  Pattern: This is the Hanbok Vest by...