Sewing Vloggers

Showing posts with label buttons. Show all posts

Saturday, November 13, 2021

Vogue 1644, Kathryn Brenne


My husband's first words? " That will be great for going to lunch with the girls." I tend to agree. In the picture it looks rather tweedy and heavy but in all honesty this is one layer of pretty normal cotton, just a step above quilting cotton. I did not underline it or line except in the sleeves. I do think it desperately needs a big flower or pin or scarf as it is so nondescript but that's OK.  It went together quickly and the pattern definitely has finesse. With the princess seams and center back seam, Kathryn Brenne did not fail to take advantage and add in subtle shaping wherever she had the opportunity. She did add Dior darts to the  princess seams which I mindlessly sewed, never thinking to adjust them to my bust level. Luckily,  they pretty much camouflaged out and they did land in an area where I go narrow and do my petite adjustment so their placement didn't seem to make a big difference fitwise and the fabric texture and design hid the fact that I screwed that up. That and another bit of stupidity would have you thinking I was under the influence but in the end it all came out OK. I do love the fabric. Now for some details. 

Pattern:

This is Vogue 1644,  a Kathryn Brenne design. I do favor her designs. 

Vogue still appears to be holding on to it's pattern descriptions, thankfully,  and it says" Fitted jacket...unlined and has button trim with snap closures." You didn't need a masters in Literature to write that description. I would add that this design has armscye princess seams front and back and Dior darts on the center front.  The sleeve is two piece.  It is rather straight cut but I think it is fine. Others who have made it have said it was too full. I found it just right but I altered it to turn up a couple of inches and appreciated the fullness. I found these directions quite clear and logical and the only thing that took some fiddling was the eventual placement of bias strip on the back neckline. I went with it but would have done it a bit differently the second time around for a bit less bulk but it really was not a big deal. 

Fabric:


This is another Sevenberry fabric marketed by Kaufman.  It reads black from a distance but really is navy. You can get it thru quilting shops and online. It is heavier than quilting fabric and has the texture and weight of a light to midweight linen. Sevenberry markets it as a canvas, but maybe in Japan, where it comes from. It would not pass for canvas here. That may be a translation issue.  I really like this fabric and am wearing pants made with it as I sit here and type. They tend not to hold on to wrinkles like most cottons and that goes for a jacket that is not underlined.


I did do Honk Kong seams as well with a colorful leftover poly blouse weight . It's the gift that keeps on giving and I have used it for so many HK seams. When you consider that most lengths in blouses are fairly short, it makes sense to keep your lightweight scraps for just this purpose. Sometimes I will actually cut them up into bias strips an inch or so wide and wind them on empty thread spools. Then they are at the ready for HK seams when needed. 

Construction:

This is a pretty basic top and would be good for a beginner to stretch their legs on. There is a lot of fitting opportunity here with the princess seams, Dior darts and two piece sleeves. Just remember to check where the Dior dart lands when and if you move your bust point. 


Not the greatest back view but the best I came up with all alone today. It does give you an idea of the subtle shaping to all those seams. I do believe on the next version I will pull in the shoulders and hips a bit. I always cut my hips larger but now see I need to do a ten instead of the usual 12. The rest of this garment is a 6.  I did a three inch hem on the sleeves so I could fold them up, the way I like them.  I also cut the hem off about three inches as well. The scale is close to the same look as that of the model on the envelope but  I did a deep hem on the jacket as well. I wanted that weight to help pull down that light weight cotton fabric.

Above is my big faux pas but you really can't tell. I always make sample stitchouts before I start a new project, auditioning thread, stitch lengths, tensions, etc. I grabbed what seemed like a small pile of scraps from my cutting  table and brought them to the machine for try outs. I stitched away and made my final decisions.  Time to start! Well, when I got to the part when I had to sew the side princess panel to the center front panel the first one went in just great. Where is the second princess side piece? I went crazy looking for it. Then I realized I had zipped it thru my serger over and over to test out the stitching. It was in serged shreds. Now what? I did not have a piece on grain and long enough to cut another. You can see how critical the grain is here. But I did find two pieces that would be big enough to put together and make the whole side panel. How about if I make it look like they are connected by a welt pocket? Well, I did just that and it's crazy but you can barely see the welt pocket but it's there. Saved by the welt. 


The pattern calls for 1 1/4 inch buttons, 3, down the front and snaps underneath. I decided on covered buttons and explained how I went about doing that on this blogpost. These were big snaps and they worked out well.  Reflection makes it look otherwise, but they are all square and placed on the diagonal, easy to sew. 


A peak at the inside shows the Hong Kong seams and deep hem and snaps. The princess seams were stitched and serged, no HK seams. That would have been too bulky.


Here you can see that little Dior dart higher than it should be and the larger  concave shape of the princess seam wrinkling up to fit into the convex shape of the opposing seam. This is why you don't do the HK seam on the princess seam.  This serged seam lies much flatter. 

In Conclusion:

* I will bring the shoulders and hips in just a bit the next time. 
* I will remember to lower the Dior dart next time.  
* I might underline the sleeves as opposed to lining them. I think I would underline         the whole jacket while I am at it. 
* I like the deep hem and cuffs. 
* I will style this to have some vibrant color, SOMEWHERE, PLEASE.

! I would not do buttons as big as specified but go with a one inch and probably a bound buttonhole instead. 
I will handle the back neckline with a slimmer HK seam finish next time. 

There really is not much to be displeased about with this pattern.  I would definitely recommend. I just have to find a mask, a restaurant that has enough help to be open at lunchtime (unlike my last visit with a friend where it took 3 tries to get lunch) and some girlfriends.  I think I can look a bit "ladies who lunch" as Hubs said ;)   ............................Bunny


Friday, October 29, 2021

Covered Buttons, Vogue 1644


It seems like Vogue 1644, really a simple jacket, is taking forever. It sort of is. I have been down with a nasty head cold for about a week now. It's not covid, so no worries there but it is "rhino virus". Yes, the jokes ensued and I kept sleeping. I am sewing but it definitely is slow sewing this week. These buttons are the end of it all and they are a bit of a mystery to me.


This jacket is not lined or underlined. It simply has facings and interfacing where traditionally needed. I chose to finish all the seams and hems with a Honk Kong finish. It is a Kathryn Brenne design and I really like the simple look. What I don't understand, that you can see above, is why the buttons are sewn on the front and then the actual closures are snaps inside on the facings. I just don't see a reason for this. Being the first time I used this pattern, I wanted to follow the directions, my usual MO. I thought some obvious reason would eventually pop up but none has. If anyone knows of a good explanation, please share and I thank you ahead for that. 

With all that said I needed 3 buttons. 1 1/4 inch specified and that's what I searched for. I really did not want a showy button.  The fabric color is tough. It is oatmeal and a very dark navy, easy to mistake for black but black it is not.  In the end I decided on a classic covered button in size needed.


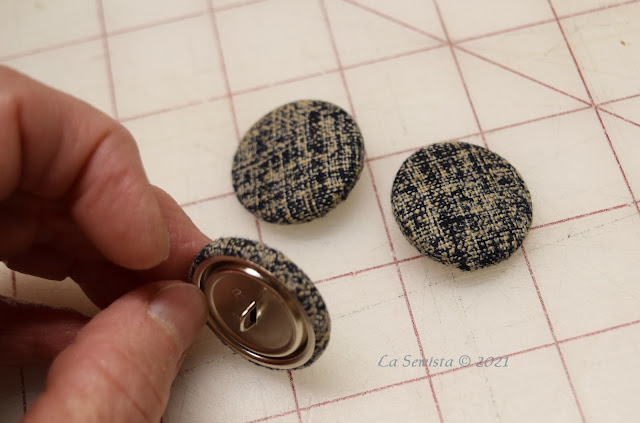
If you've never  made a covered button you can easily find them inexpensively at the chains. This is made by Dritz and came  from Joanns'.  They have two parts, the public side which is either a flat or rounded cover with a loop and a back piece with ridges and a hole that snaps into the domed cover, just what you see above.  The domed cover has nasty little teeth inside and your job is to wrap the fabric over the dome and get it to hook onto those teeth, evenly all around and without tearing any human flesh. Sometimes this is easier said than done. I've made a lot of these over the years and you probably have too but for our newer sewists here are a few hints to save you some aggravation.

*Nothing is more disheartening than to get that fabric all pulled snug onto those little teeth over the dome in perfect fashion and when you turn your button over to admire your fine skills you realize that you can see the shine of the metal dome through your fabric. Suddenly your idea of a custom covered button looks horribly cheap and you have to start all over. To prevent that from happening cover the back of your fabric with a layer of fusible interfacing and then cut out your button cover. Your packaging will provide on the back a template to trace for your perfectly sized button cover. Trace this out after you have fused on the interfacing. I then cut my circle out with pinking shears. Now I have a sturdy piece to pull and shove on to those tiny teeth and nothing will shine thru and cheapen the look. 


* Next you will need a few tools to get this job done with minimal distress. Trust me on this. I've been there. Your next step is a pencil eraser. This is actually recommended on the back of the packaging. You will pull your circle of fabric over the button dome and using your nail try to get it stuck on a tooth or two. Next go onto the exact opposite side of the dome and do the same. I know, this is barely stuck in but that's OK. This is where your eraser comes in. Now I went thru two brand new pencil's erasers and watched them break off. Instead find a pencil with the style eraser you see above. It is PERFECT for pushing the fabric under and into the teeth. Just shove that long edge of the eraser into the fabric and push under the teeth. No ripped nails! Now  work opposite sides once a side is a bit secure, just like stapling a picture to a picture frame. Once the fabric circle is secured on 4 opposite sides by shoving in that eraser, work the eraser all around getting the fabric in nice and snug. 

* The next tool , #2, you will use is the E6000 glue. I use this for everything crafty and sewing. Nothing separates this glue once dry. Put a small dot of glue along the ridge of teeth down below. No need to go all around or near the top edge, just a blop on two opposites sides. On top of this lay your flat ridged part of the back button cover. Set it up so the little loop comes thru the hole like you see in my pictures. 

* Don't even try to push this together.  Just don't. Line up the hole nicely and grab tool number #3, the small flat head pliers. I use these for jewelry making but they come in handy for lots of things sewing. Put your button inside the flat "mouth" and give a gentle squeeze on just a side of the button. It will usually pop in the whole button. If it just pops in one side, turn it a bit and squeeze again. If it went in correctly you will hear a definite click before you are completely pressed in. Done. Leave to dry overnight before attaching to your garment. 

According to my pattern I need 3 "medium" snaps.  I am not sure what size these are. They are a half inch wide so that sounds medium to me. I need to install them on the facings under the buttons. Like I said, I don't understand why. Hope this covered button tute helps you. I do enjoy making them, sewing snaps, not so much!.....Bunny

Wednesday, June 16, 2021

A couple of quickies!


I recently came across a couple of brilliant sewing tips I thought I would share. First, the above are buttons covered in silk from a silk dress that was given to me. See, I know someone who knows someone who works in a thrift store in a very affluent neighborhood and they get some really lovely things donated.  The friend of a friend I do know but neither of these friends live near me. Well, she always has her eye out for something I could use to either harvest for fabric or actually wear. She knows my size and style. About 2-3 times a year she sends me a bag with 4 or 5 garments, that's all. I'd say she has an 80% success rate and what doesn't work I donate locally. This last bag had a totally 80s silk dress out of the most beautiful royal blue silk jacquard. I harvested the fabric and was almost going to dis the buttons when I looked closely at them. Maybe you have, but I have never seen a covered button like this or this construction referred to in anything I've read. The top of the covered button has the fabric wrapped around to the back like any other covered button. But the piece of metal in the back that snaps into the back of the button to hold that top fabric tucked in is also covered. That back covered piece was stitched right thru on the garment. If you look closely you can see the little holes from the stitches.  What a beautiful application! I can't wait to try this on a blouse. It just blew me away.


My other great tip that I really can't remember where I found, is to take tissue paper  and cut it into a pile of short strips and use these as starters for thin fabrics or folded up as mini hump jumpers if needed. Once I got this pile next to my machine I found I was using them constantly. Being tissue they are so easy to just rip off and toss. I just need to figure  a good way to store them neatly next to the machine. 

Work continues on my ditsy floral shirt and not much is left to do, just the button band and sleeves. I am through all the hard part and will have much to say in my review.  Today is the first day of my new retired life and I am so enjoying it already.  I have so much sewing planned and will make two more hats quickly and then some dresses for summer.  My work did not allow for dresses, too impractical but now I am moving on to what I saw one sewist today refer to as the "new house dress", nice, feminine dresses that are comfy. Seems people want to leave behind the year and a half of slovenly but comfortable clothing that no one really saw and breakout in nicer duds, even if  just around the house.  Do I hear the possibility of June Cleaver's pearls and heels? Oh, Ward...........................Bunny

Monday, December 8, 2014

Who's got the button? Guest Blogger Claudine of Rolling in Cloth!

It is my great pleasure to have teaching us tonight, Claudine from Rolling in Cloth. She is an amazing seamstress, fabric dyer and painter and has a very creative fashion view point that wonderfully surfaces in her garments. I was thrilled when she contacted me to do a guest post on Next Level Sewing. She feels strongly about our newer sewists getting quality information and generously shares her knowledge tonight. We often think of the lowly button as an afterthought when it comes to technique but Claudine shows us the right way to install buttons and some new tricks to make them look good and last long. I learned a technique totally new to me and I think you will too.  Let's begin!

************************************************

When Bunny started this Next Level Sewing series, I thought it was a fantastic idea, and wanted to be somehow involved.  It can be hard to know where to go online to get good information that is not linked to product sales.  I asked Bunny if I could take over for a week and do a post of my own, and she graciously accepted my offer.  For those who don't know me, I normally blog at Rolling in Cloth.


Aren't buttons great? There’s such a variety available, and it feels so good to find just the right one for a project. They’re my favorite thing to buy as a souvenir when visiting a city. Then when I use the button that I purchased, I can think about my trip again. There’s a huge variety of buttons available, some of which are pictured above. The top left buttons are metal; top right are plastic; bottom left are fabric-covered buttons; and bottom right are natural and dyed shell. 


You know how to sew on a button. Obviously, you do. Even people who “don’t know how to sew” know how to do it. But, as with a lot of things, there is a right way and it may not be as obvious as you might think.
The picture above shows a well-sewn-on shirt button. The top view picture does not tell you much, since most buttons look passable from the top. When you turn it over, you see a few small stitches on the wrong side and no loose threads. From the side, you can see a thread shank that lifts the button slightly, allowing room for the buttonhole to rest under the button. The following video will go over my method for sewing this button on.


There are loads of different kinds of buttons. Most buttons have 2 or 4 holes to pass the thread through. Other buttons have a shank for attaching to the garment. The video above shows how to sew on a shirt button with 2 holes. You would need to extrapolate a bit to use these directions for a shank button or a 4-hole button, but the process is very similar. The main difference when sewing on a shank button is that you will sew it directly to the fabric. You won’t need to add the thread shank.


Use whatever thread you prefer. I like to use cotton thread for most applications. One exception is the button on the waistband of trousers, where I use the strongest thread that I have. Lately, I have been using artificial sinew that I bought from Dharma Trading to sew on trouser buttons.


Jackets (like in the photo above) can have backer buttons. Backer buttons add stability and durability if you are working with an unstable fabric. Make sure you match the number of holes in the backer button to the number of holes in the functional button, and sew them on simultaneously. I used backer buttons on the jacket above because the tweed fabric is very unstable, and I was afraid that the buttons would tear right off. I used whatever buttons I had around for backer buttons, but you can buy buttons that are specifically designed as backer buttons. They are very flat and are made of clear plastic.


Backer buttons
If you have a shank button that is non-functional (such as on a double-breasted jacket), you can sink the shank in a hole in the fabric made with an awl, then sew the shank button to a backer button very tightly through the hole. This will keep the button more flush with the garment fabric and keep the button from drooping. In the picture above, you can see that the button on the left is resting on top of the fabric, making it droop slightly and move around more. The one on the right is sunk into the fabric, causing the button to lay flatter. Honestly, I have never done this on a garment outside of school, but I have a couple of coats with drooping decorative shank buttons that I wish I had done this with.
On the subject of double-breasted jackets, sew the decorative button on the right side and the functional button on the wrong side separately. This will keep the decorative button in place if you lose the functional one.


Heavy or unusually shaped buttons are often non-functional. Generally, you would sew the button on the right side of the garment, then sew a snap underneath the button to keep the garment closed.


And lastly, when using a 4-hole button, never, ever sew it on with the threads crossed. Crossing the threads is not a design decision. It is poor technique.
 

***************
Thank you so much, Claudine. You made us realize how important it is to sew a button on correctly. Your method of making a hole with an awl to seat the shank button is brilliant. It is a new technique for me and I would guess many. It is so wonderful that you have shared with our newbies and all our sewing sisters your methods.  Isn't her video great? She has the patient voice of a great teacher. I think I speak for all when I say I have a new appreciation for sewing on buttons and I thank you immensely for that. 

If you have any questions feel free to put them in the comments and Claudine will answer them as she can. She is looking forward to it. Thanks again, Claudine.....Bunny

The Hanbok Vest

  I love this little vest. I thought about it for a long time. I am excited to tell you it's story.  Pattern: This is the Hanbok Vest by...