Sewing Vloggers

Showing posts with label designer. Show all posts

Monday, January 18, 2016

McCalls 6532, Completed!


Finally! Ok, the worst part of this project was hand stitching the lining to the zipper at the very end. It was a mere three hour project involving waxed and doubled thread, a thick heavy needle, a thimble  and most importantly, a pair of pliers. If I had a buck for every needle stab and pin prick I wouldn't have needed to buy that Powerball ticket last week! Finally its done!

I really like this bag. It is a bit larger than I thought it might be. I would make it again but cut down the size a bit. Here's the 411:


Pattern:  
This is McCall's 6532, a Kay Whitt design. I will be honest and tell you I really don't know who Kay Whitt is. I will have to do some googling on that one. But it is her design and a nice one. It is much larger than I thought. Sure, I can measure and I did but its sort of like buying food in restaurant. You see things and just buy too much. I saw that the bag was large and just  kept going. What I am going to do to make this bag work a little better is make an organizer for the inside. More to come on that front. This, with a bit more interior organization would be a great diaper bag or carry on bag.

I did not follow the pattern. I was convinced I had an easier way to deal with the future bulk of it all and I did until I got to inserting the lining.


Fabric:
The fabric comes from Joann' clearance home dec area. It is a heavily embroidered design in rayon thread on black denim. I easily found the same denim to match at fabrics.com. I needed that for the straps and bottom. The tapestry was purchased for five dollars a yard and only wish I had purchased more but the next delivery is always around the corner at Joanns. I have seen some really great fabs in their home dec clearance. 

The lining is a quilting cotton, a not really nice one. By that I mean the fabric was heavier than I would like for a quilt but perfect for this use. It has little sparklies all over. and is nice and bright to dig around. I passed on the interior pockets because of the future "organizer". 

The interfacing is what really made the bag. It made it great and it made it frustrating. The exterior bag was fused to fusible fleece as the pattern recommended. This would have been fine with quilting cotton exterior but I had upholstery fabric going on here. The pattern has you interface the lining. This is where I went overboard but it what got me the luggage look, which I think is rather professional looking. I first fused Decor Bond to the lining, never in the seam allowances. Then I fused on top of that a layer of Peltex. The Peltex, heavy board that it can be, got cut back a half inch away from the seam allowances. I also pieced the Peltex so that there was no interfacing in the areas of the bag that needed to fold. It would have been a nightmare without doing that and there is more on that two posts back.  


Construction:
We have established that I didn't follow the directions. I STILL read them through at least three times as this bag is rather involved. I needed to be careful about the sequence and put some thought into what would come next. My goal was to have a sturdy bag that would require as little turning right side out as possible. I accomplished that by making the bag and lining separately and dropping in the lining at the end and hand stitching it around the zipper to close. That last hand stitching was brutal so I don't recommend it. I would only use my sequence if you are dealing with really heavy fabric like this home dec piece and all that interfacing. That Peltex is a bitch.  Making this in a lighter fabric or quilting cotton, I would just follow the pattern. 

The bottom and straps are the matching black denim. You can see I put bag feet on the bottom.The bottom of the bag has a piece of Peltex that is covered with muslin and attached at the bottom side seams. It "floats" and gives hardness to the bottom. There is also another layer of Peltex in the bottom from the lining bottom. I don't like how the straps are secured at the zipper height. If I made this again I would do that as suggested but would also secure the straps to the bag a few inches higher as well, maybe with a buckle or such. 

I topstitched as much as I could but that wasn't much. It was just too hard to maneuver this hard bag under the needle. I did use my workhorse now 40 year old Kenmore for all of the construction. I also used a size 16 jeans needle throughout. I had no tension or stitching issues.  The zippers are home dec type zips. I use them a lot. They are rugged, quite neutral in color, inexpensive and I like the heavy brass look. 

In conclusion:
Would I make it again? Yes I would and I may. However the next time I make it I will take it down a couple of inches in length and width. That will keep the luggage look away. I actually have fabric ready for another one but we'll see what becomes priority in the cave as I reassess my wants and needs. I recommend but not for the faint of heart or the inexperienced bagmaker.
***************************************


First egg of the season after a long molt period. The first was yesterday and two more today! The girls are back in business!.................Bunny


Friday, November 7, 2014

Smitten and have bitten!


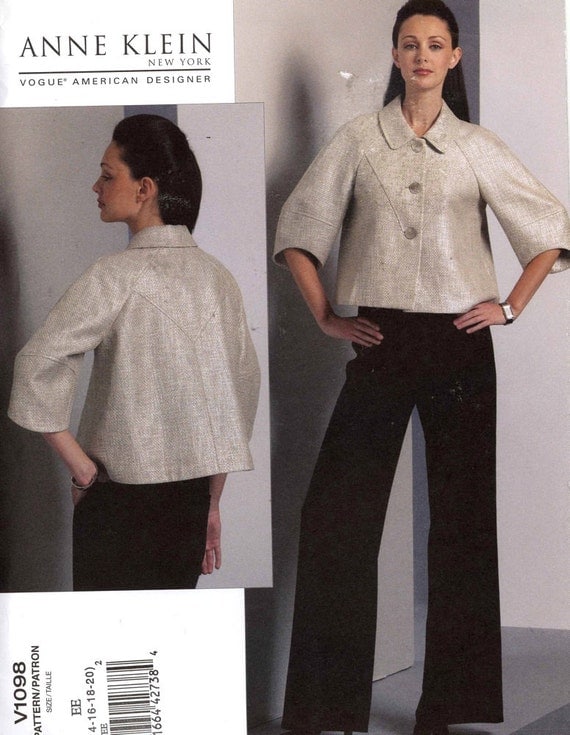
I  stumbled upon this top on the internet and have fallen in love. This jacket would be perfect for my work but obviously not out of the  metallic linen shown here. I would like that, though, as well! And as my luck would have it, it's an OOP (out of print) with a big price tag through Etsy shops. Then I found it on Amazon, did the Prime click, and it will be here by Tuesday! I am not sure about fabric yet. I may do a trial run with some linen or chambray and then on to a wool or such. I have always loved swing jackets and the cut of theses sleeves is spectacular. So more Vogue Designer fun coming! Check out the yoke lines and the curve of the sleeve hems, beautiful.


More to come!........Bunny


Saturday, August 16, 2014

So elegant!

I just had to share these three short videos. They were on the RTW Fasters group on FB thanks to Deborah Jones.

It is hard to believe such elegance existed but clearly it did. I found myself smiling serenely as I listened to the speaker's detailed descriptions. His use of  the model's names was surprising. That Delouri  had quite the hand action!

I loved that these women looked healthy and were not babes plucked from high school. I would say most were in there thirties with stunning figures.

The elegance of the audience was rather amazing as well. I loved the  grey striped dress on the woman on the  right. Everything is so exquisitely tailored. Was I born in the wrong era?

What is your favorite? I had several but loved the blue coat, black dress in video three.


The fashion show consists of three short videos.  Enjoy! I sure did.........Bunny

Friday, May 30, 2014

Claire Shaeffer, Chanel and Palm Springs, CA


Life has been a whirr since I returned from my utterly fabulous week of learning in Palm Springs  with Claire Shaeffer. It was followed just a few days later  with a planned vacation in the White Mountains of NH with family. Talk about contrast! Now life has settled a bit. I'm back to work and finally have a moment to share with you this incredible sewing experience.

First, start saving now and do yourself a favor and take this class! Claire's depth of  experience and skill and those breathtaking couture garments will make it all worth while. The hotel above is where all our classes were held and where us non commuters had wonderful accommodations for the length of the trip. The Palm Mountain Resort is right in the center of all the action in Palm Springs. Each day I was able to go for long walks before class and at night visit one of the many restaurants for dinner. Palm Springs is gorgeous, perfectly manicured and a great place to window shop as well. I took this pic of a store  window because I thought the ideas shown on the knit tops were really clever and useful for future efforts.Love those faux straps on top left.

And then there were our classes! Claire is a treasure, an elegant gamine of a woman whose knowledge of couture, couturiers and "mains" (the " hands ", sewists in the couture workrooms) is priceless. She shares generously of her time and knowledge and is a great teacher. Here she is instructing us on inserting wiggan into our hems, all the way it is done at Chanel.
We were able to purchase hard to get supplies to take back home for our own creations and you bet I brought home lots of various widths of wiggan. Wiggan is a bias strip of woven interfacing with a crisp hand. Yes, there IS interfacing in those jackets, in the hems and sleeve vents and edges!

Above is my attempt at starting a Channel mitered corner, done quite differently than other methods I've used. That is what we were there to learn - how things are actually done at Chanel and Claire delivered. When someone can tell you the difference between a Valentino miter and a Chanel miter, well, I'm impressed and listening! Claire's knowledge of couture is personally experienced and deep. She has taken apart numerous garments for study and had an amazing collection of garments for us to peruse. Every day she brought in another dozen or so of actual Chanel garments for us to "dissect" visually. What a learning opportunity that was! First, we were able to see first hand the incredible techniques as well as admire their beauty. And there was SO much beauty. If you have ever wanted to see or pet a real couture garment, this class far exceeded that expectation. It was inspiring to see how each garment interpreted the classic style. There were collars, lapped center fronts, belts and all sorts of variances from what we all perceive as the Chanel jacket. That taught me that I can make pretty much any jacket with these techniques and the results would be just as lush and lovely as the classic cardigan style. And I will!

The buttons on these garments were works of art in themselves, like fine jewelry. It was such a treat to see them. What appears to be a selvedge edge is machine topstitched for the above edge treatment.

This garment above has a facing at the hem and center front. Again, not exactly what we have been primed to expect and I love how this taught me that I can use these couture techniques and make the jacket I want. There could be a facing, a collar or one of the many unique edge treatments. Wow, those edge treatments! Another observation - those chains in the hems are much heavier than I expected. I have been using the wrong chain! 

And then there were the sewing friends I made at this retreat! Is that not always the best part? 


From left to right, Brenda, Lynne, myself, Claire, Kristie and Lori. Not in the photo were Linda, Janet and Louise. Linda was our savior, helping us with our struggles and encouraging us every step of the way. Janet supplied comic relief and really was a hoot. Louise was in the background perfecting the latest design for Vogue from Claire. I won't let out any secrets but will say it's a stunner and not a jacket. You will just have to wait. The design will look great on every woman and I predict it to be a big seller!

Kristie is an amazing newbie, relative to the rest of us. She has been sewing five years and man, she is self driven to become a master. Kristie was my table mate and I couldn't have been happier about it. I predict Kristie will be a great sewist as she mastered her lessons really well. Her skill level was awesome given her length of time sewing. Way to go, Kristie!


Brenda's smile is infectious and I always strained to hear the fun happening at her table. Let's just say she is "pithy and astute." Brenda is an instructor in garment construction at a college in Arizona, another delightful woman with whom  to share this passion  of  sewing


And here we have the amazing Lori, draper and patternmaker extraordinaire. She also teaches textiles at the same college as Brenda.  I loved hearing her views from the patternmaker standpoint, very informative!


And the lovely Lynne, shown here with Claire admiring this really interesting jacket. It has wool facings approximately 6 inches deep and they extend past the garment edge as trim. So interesting!
 Lynne and her hubby are artists, she with a needle and he as a sculptor. Lynne makes incredible cosplay garments and blogs as well. I have added her blog on the right to my blog roll. Lynne  asked great questions.

People, WE LEARNED SO MUCH! Claire had another class the following week continuing with more of the Chanel suit. Oh, to not have to have gone back to the reality of my job, albeit one I love... Future classes are planned for pant fitting as well as couture pants, a couture dress class and more. Claire has been in the workrooms of Paris and London and worked directly with couturiers. Her anecdotes are priceless.  She works with the Museum of the City of NY, Phoenix Art Museum, Los Angeles County Museum of arts and numerous other museums around the world. Her resume is very impressive and in case you have been visiting another planet, Claire designs great patterns for Vogue with more coming. She has held faculty positions at numerous colleges and has authored numerous books and DVDs. I think we could all say we got the most amazing education in our week with Claire in Palm Springs.


And then there was Palm Springs. Its beauty was in such contrast to the green Adirondacks and rolling fields  that surround me here at home. It is a small town, very modern, spotless, and lush in a desert sort of way. I had never seen the desert and was captivated. The endless cobalt skies that backed the stark grey mountains surrounding the town were the perfect backdrop for a real life oasis. Rosemary shrubs, lots of wafting scents, blooming trees and giant palms were everywhere. You could tell water was precious but in the evening tiny misters on edges of buildings provided a fine spray to fall on all passers by. It dropped the temp a good 20 degrees when you hit the misters. This was a new experience for this New Englander. Temps ran from 103 to 106 while we ate lunch on our patio. I never found it uncomfortable as the arid air magically made it bearable. I enjoyed my long walks no problem in the heat.

I had my breakfast under the red umbrellas every morning, just a short walk from the hotel.

My head is still spinning. We hope to do a sew along, or maybe we could call it a "sew together"  and make our jackets. I am on a quest for the right fabric and you know how it is when you have a specific vision in your mind. Hopefully my swatching from Banksville Fabrics will provide what I need. I didn't see the colorway I wanted at the Linton site but will keep looking. Claire had some marvelous fabrics I had never seen that we could purchase, including a luscious silk muslin. It was certainly a week of sensory delights.


In our class we built our half jackets with collars, linings, vents,  bound buttonholes in the lining, and all the other required details of a couture jacket. Claire instructed us patiently and clearly with each step. When it took us an entire week and then some to learn and do these techniques you can certainly see why the finished jackets take a hundred plus hours to complete.

This class is so worth it. Claire was a fabulous instructor, totally knowledgeable of her subject and very generous. The women I met were all so much fun and what a treat to be with those who share your passion equally. I can't put into words what a great experience it all was. I hope all of you get a chance to take a class from Claire. You will be so glad you did........Bunny

Saturday, April 27, 2013

Upcycle a la "Antipast"


"Antipast" is one of several designers carried  by shop in Charleston, S. Carolina that also has a website. It is called Worthwhile.  I saw this top and fell in love with it. I can't seem to find a price for it but haven't found anything in their store under 395.00. We're talking 695-895.00 for skirts. I originally saw this on Pinterest and thought, "what a great recycle." While I still think it is nothing more than a recycle it is not being marketed as such.


   This top is basically a tee made from voile with a sweater cut apart and appliqued to the top. As I said I love the concept but the execution of a garment selling for over four hundred dollars is horrible. Check out the side vent:


So duly inspired I am attempting to make my own interpretation of this garment. I have a white crochet top that shrunk horrendously but I don't throw out anything handmade. It seems to have sort of felted because cutting it is like cutting iron and it doesn't seem to fall apart despite being cut. I was taking all sorts of precautions when I cut the first slice but quickly realized  I could just slice into it then stitch away. Here is how I started. 

First I picked my pattern. I decided to use my now TNT top pattern that I just made the pintucked damask top with, Simp 2192, a Cynthia Rowley design.  Once that was decided it was time to cut the crocheted top.  It was easy . This is a rough cut. It will be fine tuned later.

Here is the fabric I am using for the tee. I wanted a lot of texture in this. I also wanted something with the sheer factor fairly obvious. I decided on this 100% cotton batiste with some flowers on it.

I added center front and center back seams to my pattern. I liked seeing the seams between the sweater parts. The CB and CF seams and also the shoulder seams were put together with french seams. This fabric has been really nice to work with. Aren't all totally natural fibers?  The next thing to do before adding the sweater parts was to finish the neckline. At first I thought I might do the Kenneth King tiny hem and then over wrap it with perle cotton for more texture. Then I remembered I had a mess of entredeaux. So I finished the neckline with a simple traditional application of the entredeaux. I love entredeaux.


 I trimmed 3/8s of an inch off of the neckline seam, leaving me a 1/4 inch seam. I cut the entredeaux edges back to a quarter inch as well. Then I just placed right sides together, raw edges matching, and stitched right up to the entredeaux with my edge stitching foot. You can see the blade running right next to it. This was then pressed to the wrong side of the neckline and once again using the ES foot and 3 clicks to the left I topstitched the entredeaux on the right side.Then I removed the remaining batiste from the entredeaux.


Once this seaming and neckline were done I had a pallet to work with. I put the top on my dress form and played with placement of the sweater parts. I decided the best look would be to cut around some of the circular shapes of the sweater parts. I also wanted a good amount of batiste showing at the hemline. I started snipping and pinning till it fulfilled my vision. Right now I am in the process of hand sewing the sweater fronts to the fabric with size 80 cotton thread. It literally is invisible. So in this top so far I have french seams, entredeaux, and appliqueing with heirloom very fine size 80 thread. It will be different looking than the inspiration but I think will make a fun light summer top.
**********************************************************************

Blogging and sewing have been sporadic. White shirt number two has been in a lump on my couch with a pile of buttons sitting on top. I just haven't gotten to it, but I will soon. My darling hubby is not doing well and his situation is worsening. He is not in a life threatening situation but is in extreme pain and other nasty things like total bed rest. We will leave northern NY this week for Beth Israel/Deaconess hospital in Boston and hopefully resolution and recovery. I am not sure when the next blogpost will be but will try my hardest to make it as soon as possible. Sewing and blogging connect me to the most wonderful people and give me the most satisfying feeling. It would be hard to give up anything that special. So, I will be back hopefully soon but probably not too predictably....Bunny


Sunday, March 24, 2013

Voguee 8813, Done!

 
At this point I've decided there is a love/hate relationship going on with me and  Marcy Tilton designs. I love them, the way they look, the way they fit and fall, just love them. But getting them to work out of the envelope, according to the envelope just seems to be such a challenge for me. Give me an Issey Miyake any day.  But I will keep on this crazy relationship as she has another dress looming on my horizon. Just bear with my dramas. 

I love this dress. It is comfy, cutesy/different, and just whimsical. Yes, Marcy's designs are whimsical and that's what keeps calling me. Now to the down and dirty. 

Fabric: a double faced  ( two layers connected by threads in the middle) fabric from Joanns. It is 65% rayon, 35% cotton. Dots are on one side and stripes are on the other.  It has that "heavy" drape that rayon knits have which I like. The texture was akin to sewing two layers of thin white Tshirt fabric that have been stuck together and it could be quite unruly. I also thought the completed dress would "stick" to my tights and other clothing but it hung beautifully. I have on just tights in these pics, too lazy to go upstairs and put on my boots.


Pattern:  Vogue 8813.  This is a Marcy Tilton design. There is little fit involved. It has two huge inseam (?) pockets that drape in a really cool way allowing the lining of the pocket to hang out like an applied cuff or edge. Because of the pocket design the hem will never hang straight on this dress. It is cut straight as you'll see when I spread it out but those crazy pockets hang in a way that alters the hemline. I like that, again that whimsical charm. So don't get hung up trying to make an even hem on this one. Just go with it. The dress has a center panel that is gathered over string and tied off and sewn into the edges. Don't do that either, more ahead.

Fit:  No horizontal fit issues were needed to be dealt with. I always do an FBA but the panel in the front of the dress allows you  to adjust  the width, therefore accommodating more or less room as needed for the front bodice area.  I had big issues with this. Because I am five feet tall I did my usual upper chest decrease of a half inch. I did this on all the pieces, sides, panel, and back bodice. This was a half inch shortening of the length of the dress. Then how come my panel hem is about four inches shorter than the rest of the dress? Luckily I was able to even out the hem without cutting into the pocket business, whew!  Sometime being short is a good thing.

Next fit issue was the bust and that gathering. I followed the pattern directions and the perle cotton specified was used. It pulled right out of the seams when I went to attach the panel to the side piece, every single stinkin' row of gathers pulled out. I didn't want to do it that way anyway. I really should have run it through my pleater but felt it was too late in the process for that. So instead I did two rows of machine basting for each row and just pulled. Once I had the gathers where I wanted I just zigzagged over the top of them across the row. It was really secure now. I had to add three more rows of gathering to get the gathers to end in the right spot.

The other fit issue was the hem. I am not sure it's in the right place for me but you can get into those kangaroo pocket if you cut the hem too short. So it is what it is and I'm fine with it. It looks cute with boots.

Construction: I did have some issues, once again, and once again it was in that neckline. It did the same bowing out thing at the bottom of the v neck just like my last MT pattern did, same drafting issue I guess. I finally got the front to lay flat when I tucked part of the panel underneath the collar to take up the slack. I steamed this in and it now layed flat at the bottom of the V neck.

And then there was the v-neck! Because every v neck I have ever sewn has gone down to my navel due to my height I knew I had to adjust the V to be higher up on my chest. I took a half inch out of my panel length to match the rest of the shortened bodice. So I then decided to raise  the neck only one half inch more, all in all only one inch of neckline height gained. Click on the pattern link and see where the neckline ends on the  five foot eleven model. Now see where it ends on my form/me. It's so high up. All dots where checked and rechecked. I had it all matching right. Well I guess I will just have a really high neck. That's OK but I can barely get this thing over my head, really. I really thought I maybe missed a back neck facing or something.

Other peaves: In step seven it has you " Pin upper side front to pocket facing, matching symbols... yada yada. " It says " pocket will not lay flat". It sure lays flat in the picture so what does that mean? Doing that pocket is really tricky and I just winged it with my sewist's intuition and it came out. I do love how the edge hangs out on the pocket and think it is just brilliant.

All in all, this is not for the faint of heart, in my opinion, but it is a really cute design, very comfortable to wear, just fun. Doubtful I will make another as it is too distinctive but I am itching to start my next MT dress. It's just gotta be easier. Third times the charm!

**********************************************************************************


This young lady was in my back yard this morning with her three girlfriends. She loved chewing on my yew until I shooed her away. This is Spring in the Adirondacks and I can't wait till it's over and green grass and sunny skies greet me when I look out our windows. What a long winter! ( the reason the turleneck is under my new dress!)

*******************************************

Thank you, all of you, for your warm thoughts regarding my hubby and my frustration with the spam. Your comments are always treasured. Thank you..............Bunny

ETA, 05/24/2013, REALITY CHECK:  I have worn this dress several times. I figured it would be comfy and great for travel so have worn it a couple of times to visit my daughters in New England. MISTAKE! They have dubbed it my "frumpy dress" and say it does nothing for me and I look better in a lot of other clothing that I own, unquote! Since one's daughter's are usually one's best fashion critics I have to give this some serious consideration. No one wants their mom to leave the house looking worse than they should. So my cute little French Housewife's Dress will stay just that, something she should wear and not me, unless it is a rainy day and I am not leaving the house. Reality? I think my children don't want to see me age. They don't want me to go grey either,,,,,Bunny

Saturday, March 3, 2012

The Dolce & Gabana Jacket Completed

The final word: I like it a lot. It's comfy, fits really nicely, just skimming things, and I know I will get a lot of use from this when it gets a tad cooler. Here's the 411:


Fabric:  The boucle, I'm embarrassed to say, was from Joann's clearance and scored for 3.00 a yard. It's 60% cotton and 40 % acrylic. It was washed and dried in the machine twice and came out  beautifully so my usually fabric snobbery got put aside for this one. The lining, on the other hand, is a silk charmeuse print that ran about 20 dollars a yard and was from Thai silks. It is so yummy. If you  have made one of these jackets you know how luscious they feel to wear. This one is no different thanks to the lovely silk. The boucle is fused to a lightweight tricot and I will definitely do that again. A lot about this jacket is Chanel technique and a lot is sacrilegious. I cherry picked how I wanted to make this and since the sewing police were busy going after the big criminals, I got away with it.

Construction:  This is where it gets interesting and here are the highlights.

*    The boucle was block fused to nylon tricot fusible interfacing. Will definitely do that again. (Not Chanel).
*    Seams were traditional  5/8ths on the inside. The outside of the seam was embellished with bias silk strips  with one turned under edge and one raw edge. The edges were brushed to promote fraying The interior seams were not overcast down. For one, the fusible prevented the fabric from fraying so this technique was not needed to finish the seams. Also, the stitching required for the bias strips secured  both of the seams down. (Not Chanel)
*    The side fronts were cut on the bias, something not in the pattern. This was to eliminate pattern matching issues and add a bit of interest. 
*    The silk lining was machine quilted to the boucle (Chanel).
*    The lining, other than the armholes, was totally stitched together with tiny fell stitches all by hand. (Chanel)
*    The sleeves have the lining/fashion fabric stitched as one to the bodice lining/fashion fabric. (Not Chanel).
*    Sleeve seam allowances have a cording stitched along the cap and are bound with more charmeuse. (Not Chanel)
*    The collar was put on in a unique fashion to eliminate facings and come up with an edge to edge lining. While the collar technique is my own, sewing the lining edge to edge with the jacket is definitely Chanel.  Here you can see the wrong side of the collar and how it is triple zigzagged to the upper collar to keep it crisp and give it a roll. My post of two days ago has details of how that was achieved.(Chanel)

*    The buttonholes were machine stitched. They look rather large and are because a boucle covered button is not easy to get through a buttonhole. Additional length was added to the BH to facilitate. (Not Chanel)
*    Here you can see the boucle covered buttons. They have a tiny piece of charmeuse underneath to prevent the metal of the button from showing through. I made the first one without and it was definitely needed. Getting the boucle to stay in the button cover was not easy at all and an entire afternoon was spent making these six buttons. I eventually figured out that if I got the  fabric and button pushed into the little rubber thingy and then soaked the remaining boucle with fray bloc I could manipulate the fabric to stay inside the button and accept the cap. This was probably the most difficult part of the jacket. The Fray Bloc worked and they seem quite secure. (definitely not Chanel)

Pattern: I love the way this jacket fits. It has gone into TNT status and is now waiting to be made up again. My next vision is in leather with lots of zippers. Hey, stop rolling those eyes! 

The pattern, Simplicity 2284, I HIGHLY recommend. There is a really nice shape to the two piece sleeve. The side seam sits back from where a side seam would be giving the impression of an under arm panel and helping with the fit. This patterns HAS CUP SIZES. I think the bust fit is beautiful on this pattern and I did nothing but "petite" it by shortening the bodice a bit, something I always do. If you are planning on a similar jacket, just know that the pattern meets at center front. I added an extension and collar to make it look like my original inspiration from Dolce Y Gabana. Originally I remarked how bubbly the bias trim looked on the original. Well, its not easy getting it to be flat, let me tell you. But I think I scored a little higher than the original on that one. I think only a wet baby's bum is more slippery than bias strips of silk charmeuse.

It's time to move on to the next project. Some smocking for Sophie and some bag experimentation are in the offing. I will be pleating this afternoon. As far as the bag, it will utilize a very simple design and on the bag  the foil technique I have been aching to try. 

Just want to pass on a very big Thank You to all who follow and those that just drop by and visit as well. I so enjoy all your comments and appreciate every one of them and you as well. Thanks again for making blogging and sewing such and enjoyable endeavor for me. Its always nice to share with kindred spirits....Bunny


Tuesday, February 28, 2012

The D & G Collar


While I referenced the collar last night I did not really get into its construction. The edge treatment required that I do away with any seam allowances on the outside edges of the collar. The top collar was interfaced with fusible weft insertion while the bottom was left unfused. In retrospect I should have fused both. Its the only  way to control the ravelly nature of this fabric. You can see here that there is no facing on this jacket. I chose to line it edge to edge like the Chanel. But how was I going to hide those nasty collar seams?

The right side of the upper collar was placed against the right side of the lining. The right side of the under collar was placed against the right side of the outer jacket. In other words you have a sandwich with the lining and jacket between the two collars. The collars are not sewn together at all at this point. I then stitched across the neckline ONLY, from edge to edge. This seam was pressed open over a ham, then graded. Then the two collars were put wrong sides together and pinned along the neckline edge. The outer edges are still raw and unsewn. I then triple zigzagged along the neck edge to secure the seam like an understitching. You can see it in the pic of you look close. It nicely sinks into the boucle. The jacket was then put on the dress form and the collar arranged and steamed heavily. There was much turn of cloth so the under collar was trimmed to match up the upper collar while on the dress form. Once the steam was dry the edges were pinned together and the jacket then removed from the form.

This time the silk bias was done a bit differently. I ironed the strip in half along the length. It was then placed around the collar edges like a binding on both sides. With one pass of the machine the same distance away as the other strips the binding was attached to both sides and complete. Out came the toothbrush and done.

I really like the results of putting this together "sandwich" style. I think it is a nice clean finish. In its next iteration, and I know there is more boucle in my future, I would fuse both collars with interfacing and quilt them together as well. Hindsight is always so clear.

The rest of the binding has been attached all around the jacket. I've decided on covered buttons and will pick those up in town tomorrow. It will be time to buy the chain as well. Gotta have the chain!...Bunny

Monday, February 27, 2012

The D & G Collar

Today I worked on the collar, all day! First I had to draft one and that was interesting. Luckily there was enough on the internet to help me out there.
This is from www.pattern-making.com.  Its a bit of a puzzle but eventually I got it figured out. I changed the shape to work with my vision. I think it looks pretty good. It is sitting on the dress form, flooded with steam, and hopefully will dry out and hold its shape. The lapels you see are hanging out of the way but this will be double breasted. Tomorrow I will work on that part and the  button holes. The sleeves will be last of all. I have to make sure I have enough bias before I finish those.


I am so pleased with how this pattern fit that I committed it to official TNT status by working it up yesterday on some oaktag. It will get added to the TNT collection but I already have plans for another out of faux leather. As far as when that will get stitched up, well, it depends on the weather. We are back to full blown winter so it may be soon. I also have in the queue a couple of dresses for Sophie and Carly. Lots of sewing going on here!

*********************************************************************************

I have had numerous emails/questions on the seam treatment. I just want to mention that the garment seams are normal 5/8 inch seams as you would sew on any garment. They are not inside out, on the front, or bound in any way. They are simply stitched and pressed open all on the wrong side. The bias silk strips are all surface embellishment topstitched over the seams on the right side of the garment. Hope this makes it all a little clearer. If not, please let me know. Tomorrow the buttonholes!!!.Bunny

The Ray Pinafore, 2025's Epic Fail

  Happy New Year and welcome to my epic fail of 2026. I guess you have to have one, right? This is the Ray Pinafore from Paper Theory Patter...