Sewing Vloggers

Showing posts with label sleeves. Show all posts

Tuesday, August 5, 2025

The Mersis Dress, FINALLY!


                                                                         It gets better than this, what a journey!


Ahhh,,,,the Mersis Dress from Pattern Fantastique.....  This dress was not made for my body but eventually I think I got it to work. It all started with my seeing it online on a tall, lithe 30 something. Her fabric I recognized to be a Lady McElroy print that I had been pining for  but is now out of print. She looked stunning. The sleeves, the slit on her tall body, the casual sandals, I wanted to make this dress so badly. My journey began. I think this took me longer to finish than any thing I can remember in a long, long time. It is now done and I am glad it is!

Pattern:

I found the pattern itself extremely frustrating. I printed it off at home on a 2 month old printer and with a new laptop. I've had no issues printing other patterns and docs. This pattern has little blocks with half triangles to indicate  the placement of the pages. That was fine  but there was no page one or any other page that would match up with the pattern piece needed on the first sheet. Being the first sheet with those silly blocks, the page could have gone in any corner but it  didn't even  come close to matching it's neighbor pages. I did have a first page and it was a logo page with a tiny section of pattern  piece that did not match up  to anything anywhere on any of the pages. So frustrating. Luckily the flow of the design let me draft my own continuation of the abutting pieces, with crossed fingers for sure. Buyer beware. Other reviewers did not mention this issue. 


Look at the outline of this shift type dress. It is the exact opposite of my shape. Throw in my diminutive height and we have a recipe for challenge. 

                                                                         Much better with the belt. 

The pattern gives the following ease for sizes 6 to 26:

Bust:     5 7/8 inches
Waist:   13 3/4 inches !!!
Hips:     2 3/8 inches

Loosest where I am  slimmest, tightest where I am broadest. And I thought this would work..............who am I fooling?

This is the exact opposite of how the Lord made me but I proceeded. I made a muslin which revealed much, too much volume, too low front v neck, way too long  dress and maybe sleeves, I made the smallest size, 6 and did major adjustments some of which I increased as I went along. This design is one tricky little momma to adjust! I usually get away with using a pattern company's smallest size and a bit more petite adjustment.  That did not suffice.  I still loved the potential of the dress, my gorgeous Lady McElroy fabric and those amazing sleeves. 

Fabric:

                                                     This neckline shot is a good one of the fabric. 


The fabric is a Lady McElroy cotton lawn called "Pansy".  I used Fusi Knit tricot fusible interfacing to stabilize EVERY seam on this garment. In making it again I recommend interfacing the center front seam with the same lightweight fusible if you are using a lightweight,  floaty fabric. This pattern would also be great in a lightweight linen as the structure would really emphasize the sleeves, its best asset. 

                                                                     Such a difference that belt makes!

I also fused the two inch hem with the Fusi Knit. There are a couple of reasons this dress is so tricky besides the fit issues. To achieve that beautiful hang of the sleeves and the shape of the dress control is had by GUSSETS.  That is not unusual but we are talking a four part gusset here. It is made of very unusual shapes, one shaped like an apostrophe, no exaggeration, and the other  like a weird triangle. There are two for each side front and 2 for each side back, 4 in all. They are bias and curvy. the front apostrophe one,  IMO, serves as a princess seam for the bust. If you need bust alteration, this pattern may not be for you. The curve of the apostrophe could be enlarged along with the dress bodice to accommodate, just thinking out loud  here. Care has to be taken not to put these pieces together backwards. The directions warn of a lot of ease to get them  to fit. I eased my heart out then realized it did not look right at all. I rechecked my notches,  not all of which printed, and realized this was in backwards. Once that was resolved, the gusset pieces fit in exactly, with no big easing.

When I cut out the pattern I raised the length 2 inches on the lengthen/shorten line.  Then I cut off 4 more inches from the bottom hemline. I raised the CF slit 3 3/4 inches.  After the gussets were in  I raised the hem another 3 inches for a total of 9 inches of length removed. I made sure I did not remove length across the gussets. 


Above you can see what I thought was the trickiest pat of making the dress.  You need to connect the neckline facing to the  two inch wide seam  allowances at center front. You have a 1/4 inch seam to do so and some confusing dots to match up.  It worked if I ignored the dots. The illustrations are small and have the overlocking stitches which makes for an unclear view of what you need to do. Many reviewers complained of this step and I agree. Why a traditional vneck facing could not have worked here, I don't know. 


This is the most brilliant part of the construction. The hem is also 2 inches. Rather than make you figure out how to miter a perfect corner, the pattern comes precut with the corner cut off  in the perfect spot at the perfect angle and all you have to do is stitch a 1/4 inch seam and voila! a perfect miter, no fussing whatsoever! Why can't all  patterns do that?

Now for the glorious sleeves.  You run three rows of basting  in the flat at thesleeve hem.  You then  pull up and quarter the sleeves, spreading the gathers evenly . After you have pulled and basted your gathering threads you press them hard on  those gathers only, as you see above. I know, not the usual. Then you trim them to 1/8th inch from the basting. Now you will  bind them with your bias strip,  sewing to the inside  first,  wrapping around  to the topside and then topstitching. Your sleeve is all  still in the flat when you do all of this.  Your sleeve is then sewn together from hem  to cuff and pressed. I pressed to the side and hand stitched down the SA at the cuff. It gave a lumpy finish there but was easier than  sewing in the round.  I really like the sleeve gathering finish in the end. 

What I Like:

* The design is elegant, unique, and gorgeous.
* The sleeves are exquisite, both in effect and detail.
* The cut,  along with the curved 4 piece gussets was interesting and quite challenging.
* I wanted a sewing challenge and got it.
* The fabric was gorgeous, worth every penny and a delight to work with. 


What I did to make it work for me:

* Drafted a new neckline facing
* Drafted/raised the center front neckline 1 1/2 inches.
* Raised  the back neckline 1 1/2 inches
*Took  2  inches out at lengthen  shorten line
* Raised hem  8 inches.
* Went from 12 to 11 inches on cuff bias strip
* Reinforced all seam allowances  with fusible knit tricot. 
* Added 2 fisheye darts, each one inch wide, to back bodice 

Next time I would: 

* Acknowledge fit issues of sloping shoulders and slight rounded back. 
* Add tucks or darts to front bodice as well as back bodice
* Shape the side seam
* Make the cuff strip shorter
* Use topstitching thread or two threads in one needle for topstitching
* Interfacing, knit, in hem
* Cut underarm  area higher  up


A few final thoughts: I dreamed about this dress for quite some time. In my dream it would go together so easily as well as look  amazing. Sometimes our projects don't quite work out that way. I had a dear friend/mentor who was so gifted and he told me one day, "you wouldn't believe what I throw out and how much just isn't that good. " Now I found that hard to believe  because he was just an incredible portrait artist which he loved doing. That love came out in his work. But he taught me to never feel bad about the mistakes, to just persevere and move on and that the great things will come. Anyway,  after trying on the initial muslin, I was disappointed. I decided to continue. It happened that night I watched the summer Ralph Lauren runway show on youtube. It was utterly fabulous and so my dream wardrobe. He had dress after floaty dress with loads of volume wafting thru the sea air and so many of these dreamy garments had his big leather signature belts at the waistlines and it looked fabulous. When my bag of a dream dress disappointed me, I ran upstairs and grabbed my wide leather belt, a la Ralph. It made the difference. My friend Si would be proud I persevered but I also thank Ralph for giving me the idea to belt my dress and make it work. Happy Sewing!........Bunny


 

Tuesday, July 31, 2018

Lany's Dress Complete, McCalls 3063


Our little knock off is complete. It has been very hectic here, lots of company and we went back to New York state to tie up some loose ends for a few days as well. I finished Lany's dress the minute I got home. This is the first child's garment I've done in some time. My piping skills were rusty. I threw out the first collar then reviewed my own tutorial to brush up on my skills. The second one came out fine and if there is a soon third, that one will hopefully  be even better.

This was an easy sew. I tried to honor the details of the original but wanted to finesse it up a bit. I think I have done that. Rusty skills or not, this is much nicer quality than the treasured original which I posted about here. I know it will be greatly appreciated by Mom and her tiny new daughter to be.

Pattern:

I used the bodice and sleeves from McCalls 3063, a Christening gown pattern. It is a size "small" and the way the Big Four run in children's sizing, I would say a size one. The original dress was a three. The skirt is simply gathered. and connects to the bodice with a classic fold over placket. ( I really need to do a tute on those.) The sleeves on the pattern are VERY full, too full and too long in my opinion. I cut back the sleeves by reducing the top and bottom edges  a 1/4 inch, so a total of half an inch out of the height.  I didn't want to take a full half inch off one edge out of such a tiny garment and by balancing it out I think it gave me the results I envisioned. 

This pattern has lots of different Christening gowns including a cute one I have used in the past for a boy. Other than the too large sleeves, which I think is a sign of the time of the pattern, ca 2007, it is fine. 

Fabric:

This fabric was gifted to me by Kristine Balinski of Couture by Kristine. She has a great blog, BTW.  Some time  back when she saw a post about the original dress she let me know that she had leftover fabric from a project for her daughter that was almost the same and would I like it. Her generosity is so appreciated and without it I could not have pulled off this very special project. It is a near perfect match.  Thanks so much Kristine. You just never know how what we do affects people. It is one of those shoulder taps that reminds what waves we make with just a little kindness. 

The fabric is a 100% cotton. It is a white and very soft blue floral, so quite traditional. I may have a fuzzy memory but I think back when the original dress reigned, so did chintz. My own daughter's first prom gown at the time was chintz.

Construction:


I did make a few changes particularly on the sleeves. The pattern shows long lace attached to the bottom of the sleeves giving a 3/4 length effect to the dress. Perhaps that is why the sleeve was so long. Whatever the reason, I cut back 1/4 inch on the top edge and 1/4 inch on the bottom edge of the sleeve where it hits the cuff. I also cut the cuff width by half. The pattern specs 4 cuffs be cut, two being facings. This would give you a cuff twice the width of what you see above, too much. Instead I threw out the facings and  interfaced the remaining cuffs completely. The piping was then attached in a 3/8th inch seam and the cuff and piping were stitched to the gathered sleeve bottom. The bottom half of the cuff was folded to the inside and handstitched  to the sleeve, encasing the bottom edge of the sleeve and giving a clean finish. 

The most important thing I did to alter the appearance of the sleeve was to cut them on the true bias. There is nothing fluffing up the inside of the sleeves. I think because of the bias they fall in much softer gathers and truly doubt that I will cut one of these types of sleeves ever again on the straight. They have not been ironed either. The bias just lets them curve so sweetly. This was a lemonade out of lemons situation as I just did not have enough to cut the sleeves on the straight of grain but could accommodate the true bias, Yay!

The collar was changed. I struggled with the piping on the corners until I finally threw that out, too! I got out my trusty small Gutterman spool of thread and used it to trace a curve around the corners of the collar, much prettier than sharp corners. The original dress had a foofy little pink flower in the middle. My knock off has a pompom made of cherry colored silk charmeuse. 


Back to the original---being from the eighties, the era of all things logo, the dress's tag was on the front of the skirt. I did the same with my Bunny tag. Normally  on this type of garment it would have gone inside but again, just trying to mimic the original. 


I am really pleased with the back placket as it falls perfectly and was made with no grief. The bodice is lined. The skirt gets a simple bound placket. If you've made these you know they are prone to puckers at the bottom or not lying flat and being hidden. Seems this was one of the skills my fingers didn't forget, unlike the collar. I think I may do a tute on that in the near future. ( I haven't forgotten the knit hem tute, either. )

I cut the hem extra long and actually did not need all the length. I removed about six inches and that still gave me enough to have a double turned 3 inch hem which I catchstitched in. I love those deep and heavy hems as they make the skirt stand away a bit yet hang nicely with all the weight. In other words, they don't look cheap like a 3/4 inch machine stitched hem would have. None of that for this sweet little girl!

The seams were French seams. 


Conclusion:

I hope you have read two posts back to the original "Lany's Dress" post. If not, there you can find the story behind this cutie and why it is so special. Mom is two days overdue and we are all waiting. Once she is settled in with her new daughter, I will visit and bring her both dresses. I have really enjoyed making a garment that has been in my thoughts for years. Thank you for letting me share it's story with you all......Bunny

Saturday, August 9, 2014

The lining solved and a flutter sleeve


I made my decision regarding the lining/underlining quandary with this knit dress. The nude lining will be treated as an underlining for the neckline, shoulders and sleeves, being sewn into the seams as if it were one with the fashion fabric. Then from the armscye down the lining and dress would be sewn separately and hang freely. How's that sound? Now that it is all done I am really pleased with the results. I put wrong sides together of the FF and lining for each of the front and back and proceeded per the start of the pattern. 

Clear elastic was stay stitched into the back neckline. Then it was  turned in on the 5/8ths seamline as the pattern instructed. I then topstitched it twice. After that I put some cotton selvedge stay tape on the shoulder seam line which basted the lining to the FF there.


Just to keep it real here, this is my cowl facing snafu. Just between you and me, ok? We really sew here and I don't try to gloss over my mistakes. Most of the time I read through a pattern once or twice before even cutting it out then it is pretty much put aside. This time it was a mistake.  I lay my pattern out on the fashion fabric and as soon as I cut the armscye out on the dress front I looked and just knew it was too short. As usual I lined up the hemline of the pattern with the bottom left of my yardage. I had plenty of fabric but to move both pieces, front and back, past that cut armscye to get the additional 15 inches would not work, no matter how I tried and I tried everything.  I walked away. I went back an hour later, looked at the fabric and immediately had my solution. All of the blue you see above is the inside facing of the cowl. No one is going to see that, right? By piecing the cowl facing, I could, with fingers tightly crossed, squeeze out enough fabric to get the lengths I needed for the back and front. This is a floor length dress. It worked and I am beyond thrilled. We really sew here, to paraphrase Emeril.


Again the lining is being treated as an underlining here. But I decided to cut it off at the fold of the cowl. I thought it would look "thick" otherwise. So the blue cowl facing you see will fold at the edge of the nude lining and be caught in the sleeve construction. I basted the edge of the lining to the FF so it wouldn't fall in and droop inside the cowl. I felt that was really necessary and it worked well. Once this was done the dress was put together at the shoulders with the cowl facing wrapping around the shoulder seam and giving it a really nice finish. 
******************************************

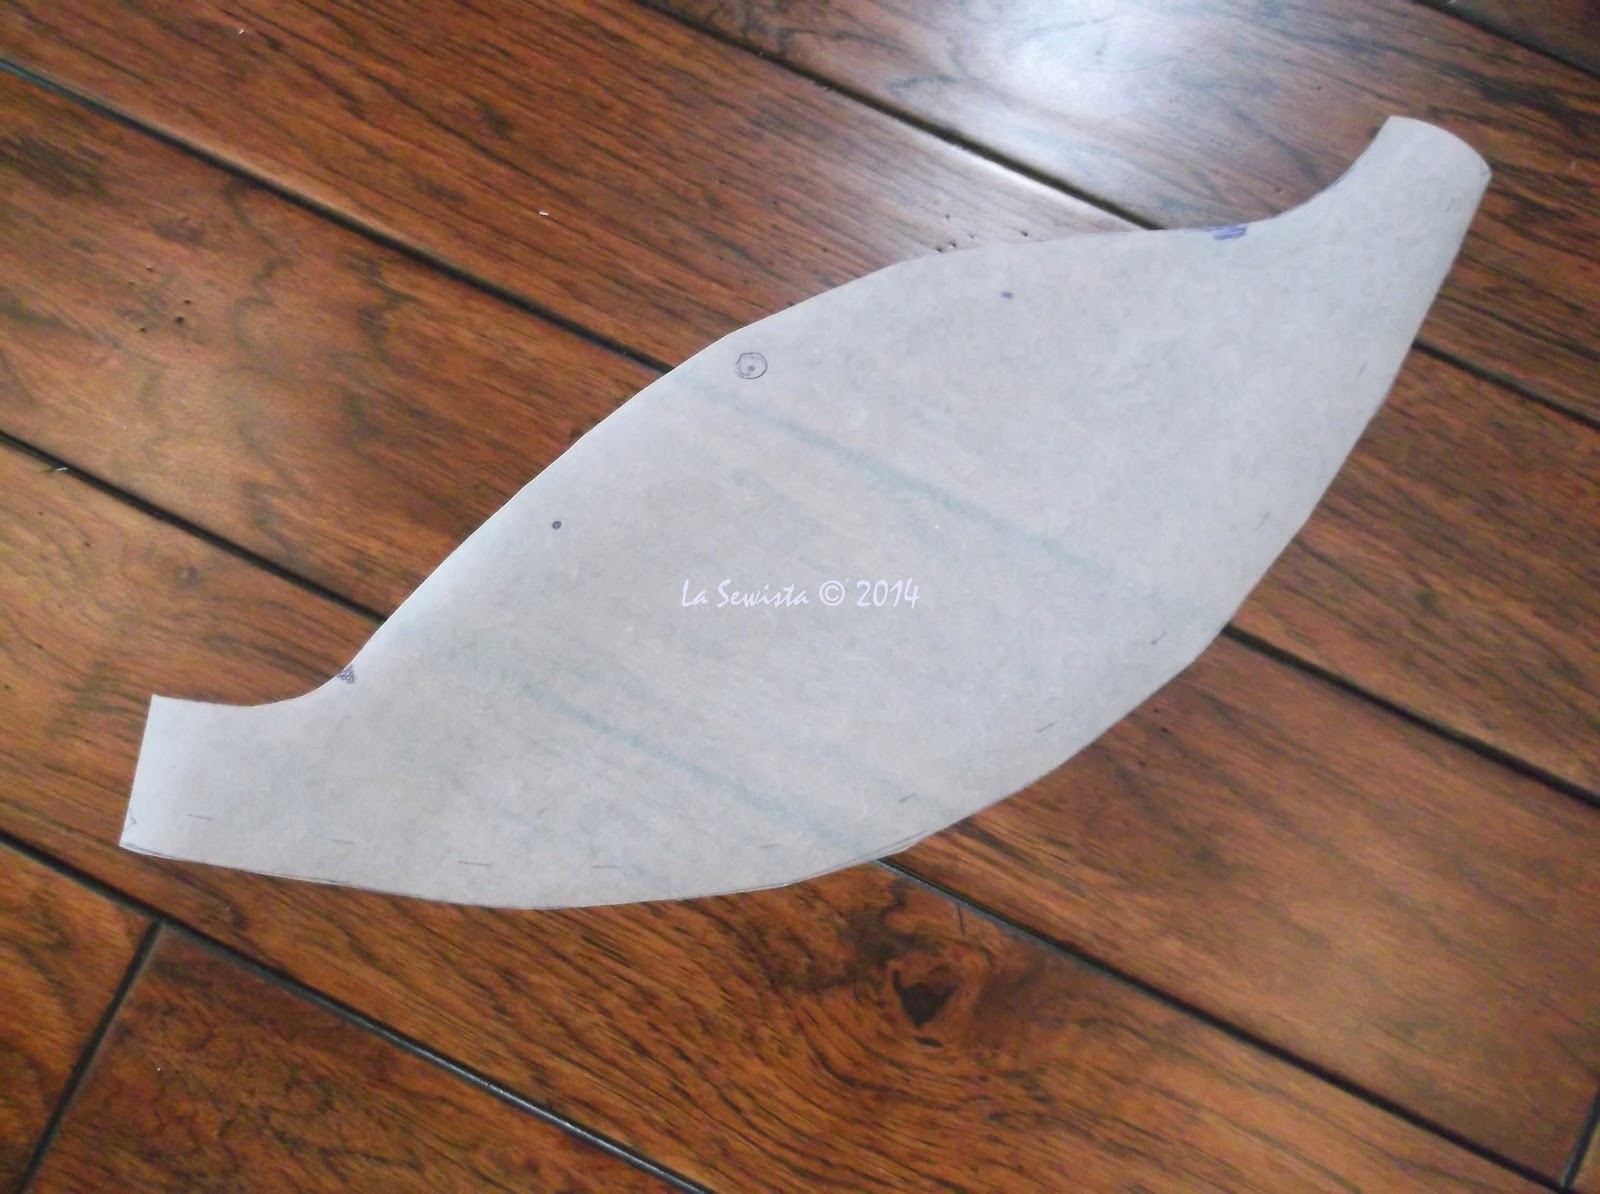
My next challenge was to draft a flutter sleeve, really quite easy. The sleeves on this dress would be faced with the nude lining. In the end it gave the sleeve a really nice drape and look. Here's how I made the flutter sleeve. I first took the short sleeve of the pattern and at the sleeve center and three more times left and right of center I drew a red line from the cap to the hem. These lines were one inch apart.  Most instructions out on the web show these lines continuing to the underarm seam. Don't do that. That contributes to excess floppy fabric in the underarm area. You really only want the flutter on the "top" of the sleeve where everyone can see it. This line was then cut from the hem to about a 1/4 inch from the sleeve cap edge. This gives you a hinge to keep your sleeve cap shape and still spread out the sleeve. 


I taped the top of the piece, at the cap, to the tracing paper. Each slit was measured and taped to the mat at 1 1/2 inches apart. When all is measured, spread and taped, draw the outline on your tracing paper.  

Mark all your dots and notches. I decided this sleeve was too long and measured back an inch and a half. In researching this sleeve project I found that a flutter sleeve that is too long can look EXTREMELY frumpy. So I cut this one back. Luckily, my friend is the same height as me so I was able to proceed without her on this length issue. 


Here is the final pattern with which I cut the two sleeves and their facings. I sewed the FF to the lining at the long curved edge and pressed toward the lining. I then understitched the lining. This gave me a really pretty, soft edge to the sleeve. This is a lot more work than one would usually do with a knit but I did not want this thin knit to look like a tee shirt. So I kept the finished edges clean of topstitching, at least everything except the back neck which needed it and looks OK. The dress has a softer more formal look this way. I would take pics but this dress is too large for my form. I will definitely get pics on my friend. 

After the sleeves I sewed the lining side seams together and then separately, the dress side seams together. It hangs and looks lovely and I am really pleased with the cowl. It came out better than I thought. That trauma of miscutting had me wondering but no more.  Next I'll put the sleeves in the dress and then bring it in for my friend to try on . I'll measure for the hem, sew that, and then it will be on it's way. I think she'll be the prettiest bridesmaid there..............Bunny

Monday, September 9, 2013

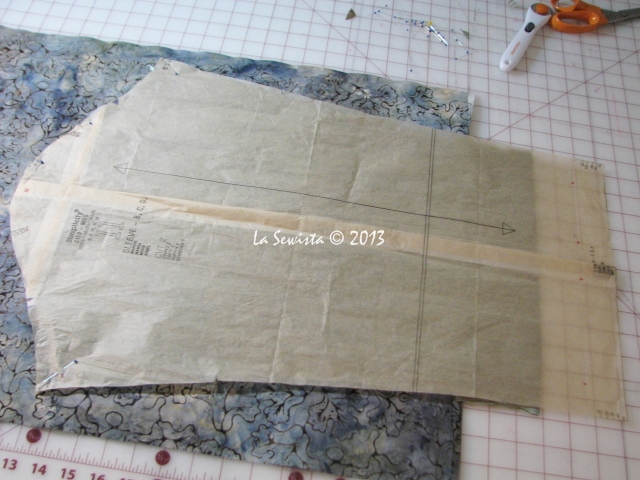
The Zieman Sleeve on Simplicity 2153

We are almost at the finish line. It's a good thing. We had frost last night and even colder tonight so my fall jacket is much needed. Tomorrow we will be in the low 80s but tonite it's frost. Such is life in the Adirondacks!

Nancy Zieman is my heroine. I have said it many times. I used to tape every program and watch and rewatch them to the point of happy brainwashing. This woman has taught me so much that I use in all my sewing from fit to zippers and back. This jacket I am working on right now will use a method I  learned from her program at least 15 years ago, maybe more. Her techniques are timeless and they save time and effort. On the crinkled jacket I will be using her quickie lined sleeve technique. I really wanted all my seams either bound or hidden. With this
technique they will be and once done,  the inside of the jacket will be totally and cleanly finished. This is very easy. I did it just a  bit differently because I wanted to be able to roll up the sleeve a bit. This meant I I needed a really deep hem and a longer sleeve. At this point the fashion fabric sleeve is cut out with a 3 inch hem. This means once folded I will have a one and a half inch cuff folded up. So the fashion fabric needs to be cut twice the length of the foldup. Hope that's clear.  Now we need to cut the lining. To do this I first cut a block of fabric out of the lining making sure it was on grain. The hem edge of the FFS (fashion fabric sleeve) is pinned to the crossgrain of the block  and a seam is stitched.

I then marked the fold of the hem on the RS (right side) with a frixion marker. This hem fold was pressed in and the heat of the iron makes the pen marks disappear.

The seam is ironed toward the sleeve not the hem. 
Flip the fabrics over. Your FF, which is already cut into a sleeve, will be facing up. Wrongs side are facing.  Pin the sleeve pattern back onto the cut FFsleeve including the lining fabric. The tissue on the right shows how my extra sleeve length has been folded up and seamed to the lining block. Once pinned the lining is cut out to match the FF sleeve pattern piece.

Once cut and flipped over this is what you will see:
Take the pattern tissue off and open out the sleeve. Pin the underarm seams together and stitch the full length.  Press your seams flat then open over a seam stick or roll.


Once done put the lining sleeve on your arm and pull the FFS over it. Match seams and pin around the armscye edges. Stay stitch around the entire armscye seam on the sleeve. Now you are ready to install this into the jacket. The pattern , Simp 2153, has you stitch the sleeve in flat but that would leave my underarm seam raw or needing to be bound .. Instead I stitched up the side seam which also gave me a chance to check the fit (nice) and installed the sleeve into the armscye in the traditional manner, in the round
.Once the sleeves were installed the armscye seam was bound with bias binding from the lining fabric. Sleeves are done and all that is left now is to put some beads on the cord and string this baby up and then a fashion shoot! We'll see what the weather holds tomorrow! ....Bunny

Saturday, March 3, 2012

Sleeve Improvement

First I want to acknowledge and thank Claire Kennedy who generously shared knowledge and opinion regarding the sleeve heads. Thanks, Claire! I have narrow shoulders. I can also  use all the width I can get to balance the hip area. I tried shoulder pads of varying styles and thickness and they just didn't have the correct look for this jacket. I also was not crazy about the "soft hang" of the sleeve head area on my narrow shoulders. They needed a bit of support.

I remembered and made note of one of Claire's blog posts when she did a CJ. She shared the same opinion, that the shoulder needed a bit of support. FWIW, stronger shoulder lines are definitely the trend. We both know that this is not the traditional "sweatery" look but personal preference and when you sew for yourself, its all about personal preference. After consulting with Claire and also using my gut instincts I sewed the sleeve and lining into the bodice and lining like any blouse or jacket. This is not the traditional Chanel method of treating the lining and boucle separately.  To get the slight lift I wanted I took a poly cord and stitched it the only the area between the notches around the cap. The seam was then bound all around with silk charmeuse. Can you tell I am now out of my lovely print? Luckily I had some silk charmeuse in the stash in a color that worked well. Per Claire, the SAs on the lower part of the armscye were trimmed back and the SA around the cap left in place and pressed toward the sleeve. Because of the change in thickness of the SAs, the binding is fairly wide, but it is so thin it doesn't add any additional bulk and looks pretty. Doing this gives the cap just the slight bit of lift I wanted as you will see shortly. A bit of personal maintenance and I will be ready to try on and model....Bunny

Friday, March 2, 2012

The Third Time..........


is the charm! I set these sleeves in three times before they were to satisfaction. At least now it is done. All that is left is to hem the sleeves and it is totally un fait acompli! Should be up with modeled pictures soon....Bunny

Friday, October 28, 2011

BB Dress Sleeves

I am determined to finish the BB dress today or early tomorrow. Then it will be moveon.bunny. There are a lot of gathers  where the sleeve meets the sleeve band. To space them out properly I used my oaktag pattern piece, aka template. Little clips came in hand to clip the ends down and then spread out the gathers evenly. I have one row of gathers (2)  riding each side of the 3/8th inch seam line, NOT on the seam line. This will allow for more even pleats that stand up nicely.

 
Next, I lay a strip of Wonder Tape to one side of the piping. The ends of the piping get snipped off to fit. I can now remove the sleeve from the template. All is to the correct size. The piping gets sewn down but not snug up to the cord, maybe a couple of needle widths away. Then the band is placed on top. Yay, it fits just right! Flip the pieces over so you can see the stitching line you just made to attach the piping. Stitch the band on going a needle's width closer to the cord. I find an edge stitching foot can help here as you just run the blade down the first stitch and move your needle one click to the left towards the cord. Now inspect your work. Do you see what I see? 

Yes, I have already ripped out a section of stitching. Do you see how the print snuck out of line? That looks nasty. So I unstitched, pulled the band back to where it was supposed to be and stitched the line again. It worked. My point here is something I have found out about piping that nobody ever mentions. After stitching you must inspect your work. Is some fat, some thin? More than likely it is. Even with today's great machine  feet I still almost always have to do some adjusting to the width of the piping. Don't get mad and walk away. Just expect it and just redo it. To me, if you want tiny piping you need to work at it till its just right. So inspect and redo. That's the piping game. Now I know some of you, I won't mention any names, can do it all perfect the first time around. But for us more mortal sorts this is the reality. I also find piping requires slow sewing so don't do this when you are in a hurry. I love doing piping and sure hope I haven't discouraged you. Now two sleeves are complete and it is back to my cave to keep moving on....Bunny

The Ray Pinafore, 2025's Epic Fail

  Happy New Year and welcome to my epic fail of 2026. I guess you have to have one, right? This is the Ray Pinafore from Paper Theory Patter...