It is so easy to find something to sew for my granddaughters. That really came home to me when I gifted Carley with her mini NCW . I always give the boys something special as well so they certainly aren't ignored. But, this time Zack asked me, " Bunbun, could you make me something?" and of course I said , "yes, I will make something for both you and your big brother." Enter the Retreat Bag:

Some call this a Dopp Kit. My brothers used to call theirs d-----bags. I call them cute and a perfect gift you can make for a young man.
The Retreat bag is a FREE PDF pattern from Emmaline bags. Yes, free! I am not sure there is anyone else out there who has anything similar. At least I haven't seen it! It comes in two sizes and I will be making the smaller size bag for the boys. There is a frame that goes into the top of the bag so that when the zipper is closed you have that classic fold on the corners. I have seen some choose to go without the frame.Those look good but I think the frame adds a bit of snap and professionalism to the finished item. (NAYY here) I have also seen some add straps and make this into a women's handbag as well, very cute!

For my exterior fabric I have chosen a cordovan red faux leather that I have sewn before. It's masculine bit of color should work well.

The lining is where some imagination gets played out. One of my grandsons is crazy for airplanes to the point where he has his first job at the local airport. He cleans the offices and gets flight lessons in exchange! Graham's lining will be this "aviation" print .

My other grandson is an avid reader. He is in third grade and had read every Harry Potter novel by the end of second grade. We should all be thanking J. K. Rowling for planting the love of reading in the hearts of so many children. Zack's will be a Harry Potter print. Both came from Joanns. They each have red tones in them that should work well with the leather color. If you are going to fussy cut printed fabric to highlight the motifs, make sure you get extra. I got twice the amount need but have enough left to make an NCW lining. Fussy cutting adds so much to a made at home bag. Also, be careful with directional prints and cut them one layer at a time so each side will face up.

I decided to "vinylize" (my word) the lining fabrics in order to make the inside wipeable/cleanable. The first step was buying a by the yard product made by Pellon called Vinyl Fuse. I found a clearance bolt at JAs and with the overall discount paid 1.50 a yard, yahoo! I bought a lot! If you can't find that I believe the same product is now marketed in pieces and sold in a box. I was a bit intimidated by the product but once I tried it I found it really wasn't tricky at all. I was expecting to maneuver a big sticky mess . Think Contac Paper. Instead I found the vinyl quite cooperative. I followed the directions exactly. It's important to use the paper the vinyl comes with as a "press cloth" between it and the iron. Don't throw it out. It will come in handy for pressing seams later.

I didn't know how the vinyl would react to the heat so laid down a layer of drill cloth on the steam press for this project. Hey, it's new after all! FWIW, I did the first vinyl fusing with my regular iron and it worked just fine. But the steam press really shined with this task. Above is the steam press fusing the interfacing on the bag piece.

It's really important to fuse all the interfacing to the pieces before fusing the vinyl. Just trust me on this one. Above you can see the vinylizing set up. Drill cloth, exterior fabric FACE UP, and lastly the release paper/vinyl combo with the vinyl facing down. 8 seconds down with the press, no steam and voila! The red arrow points to the vinyl that didn't get attached and the green is the release paper. You can see I had excess vinyl on the edges and it easily pulled off of the drill cloth while the pieces were still warm. This process truly made no mess and was quite easy. It would just take a bit more time with an iron but just as neat and clean. One thing to be really careful of before putting down the vinyl is that there are no pieces of lint or thread on the fabric. They will be there for time eternal if not brushed off. Also, you will see the vinyl may look to be "loose" on areas of the release paper that rounded the edges of the bolt. Don't fret. It all presses out to perfect flatness. And really important,,,, no steam used here. I pressed the right side 8 seconds, flipped it over and pressed the wrong side 4 seconds, exactly as Pellon describes in the directions. I will definitely do this again. It was easy. The boy's bags will be wipeable inside and how good is that? They travel a lot with their families and these will really come in handy.
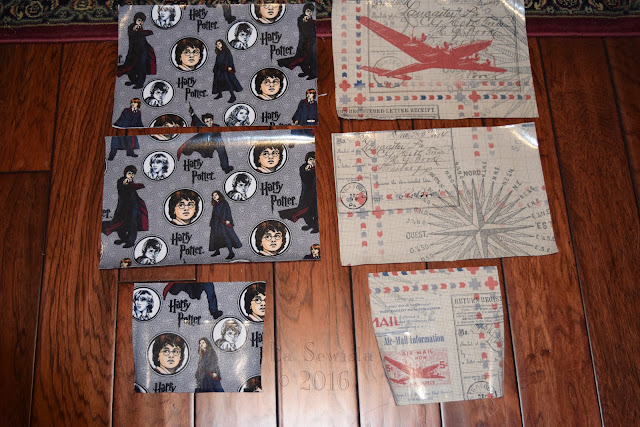
All is fused now with vinyl and interfacing. I blocked fused the large pieces so the vinyl is in the seam allowances. The pockets had the vinyl cut back from the seam allowances and from one half of the square that will be the lining of the pocket when sewn.

Here's a closeup of the fused pieces. I love how it prevents the edges from ravelling.

The exterior pieces had the vinyl, the fabric, fusible fleece and SF101 interfacing. How to keep the bulk down? I took a piece of batiste and cut it the same size and shape as the bag exteriors. I then fused the fusible fleece, with no seam allowances to the batiste. I turned it over and then fused the SF101, again with no seam allowances, to the other side. Now I will just stitch the batiste into the seam allowance of the bag, so basically a sewn in interfacing.
One thing I have I've been impressed with is the well thought out and "proven before market hit" way Indie bag designers use and specify interfacings. Most bags have at least two types, Many have three. But in nearly every pattern out there Pellon SF101 is used, A LOT. It is a woven interfacing and works well in these bags. I will honestly tell you that I don't use Pellon products in my garments but for these bags, the SF101 and the foams work really well. Also, I wanted to fuse my fleece to a separate fabric because on past projects I found it could pick up wrinkles while turning and handling during the construction process.


with permission of Emmaline Bags
Some call this a Dopp Kit. My brothers used to call theirs d-----bags. I call them cute and a perfect gift you can make for a young man.
The Retreat bag is a FREE PDF pattern from Emmaline bags. Yes, free! I am not sure there is anyone else out there who has anything similar. At least I haven't seen it! It comes in two sizes and I will be making the smaller size bag for the boys. There is a frame that goes into the top of the bag so that when the zipper is closed you have that classic fold on the corners. I have seen some choose to go without the frame.Those look good but I think the frame adds a bit of snap and professionalism to the finished item. (NAYY here) I have also seen some add straps and make this into a women's handbag as well, very cute!

For my exterior fabric I have chosen a cordovan red faux leather that I have sewn before. It's masculine bit of color should work well.

The lining is where some imagination gets played out. One of my grandsons is crazy for airplanes to the point where he has his first job at the local airport. He cleans the offices and gets flight lessons in exchange! Graham's lining will be this "aviation" print .

My other grandson is an avid reader. He is in third grade and had read every Harry Potter novel by the end of second grade. We should all be thanking J. K. Rowling for planting the love of reading in the hearts of so many children. Zack's will be a Harry Potter print. Both came from Joanns. They each have red tones in them that should work well with the leather color. If you are going to fussy cut printed fabric to highlight the motifs, make sure you get extra. I got twice the amount need but have enough left to make an NCW lining. Fussy cutting adds so much to a made at home bag. Also, be careful with directional prints and cut them one layer at a time so each side will face up.

I decided to "vinylize" (my word) the lining fabrics in order to make the inside wipeable/cleanable. The first step was buying a by the yard product made by Pellon called Vinyl Fuse. I found a clearance bolt at JAs and with the overall discount paid 1.50 a yard, yahoo! I bought a lot! If you can't find that I believe the same product is now marketed in pieces and sold in a box. I was a bit intimidated by the product but once I tried it I found it really wasn't tricky at all. I was expecting to maneuver a big sticky mess . Think Contac Paper. Instead I found the vinyl quite cooperative. I followed the directions exactly. It's important to use the paper the vinyl comes with as a "press cloth" between it and the iron. Don't throw it out. It will come in handy for pressing seams later.

I didn't know how the vinyl would react to the heat so laid down a layer of drill cloth on the steam press for this project. Hey, it's new after all! FWIW, I did the first vinyl fusing with my regular iron and it worked just fine. But the steam press really shined with this task. Above is the steam press fusing the interfacing on the bag piece.

It's really important to fuse all the interfacing to the pieces before fusing the vinyl. Just trust me on this one. Above you can see the vinylizing set up. Drill cloth, exterior fabric FACE UP, and lastly the release paper/vinyl combo with the vinyl facing down. 8 seconds down with the press, no steam and voila! The red arrow points to the vinyl that didn't get attached and the green is the release paper. You can see I had excess vinyl on the edges and it easily pulled off of the drill cloth while the pieces were still warm. This process truly made no mess and was quite easy. It would just take a bit more time with an iron but just as neat and clean. One thing to be really careful of before putting down the vinyl is that there are no pieces of lint or thread on the fabric. They will be there for time eternal if not brushed off. Also, you will see the vinyl may look to be "loose" on areas of the release paper that rounded the edges of the bolt. Don't fret. It all presses out to perfect flatness. And really important,,,, no steam used here. I pressed the right side 8 seconds, flipped it over and pressed the wrong side 4 seconds, exactly as Pellon describes in the directions. I will definitely do this again. It was easy. The boy's bags will be wipeable inside and how good is that? They travel a lot with their families and these will really come in handy.
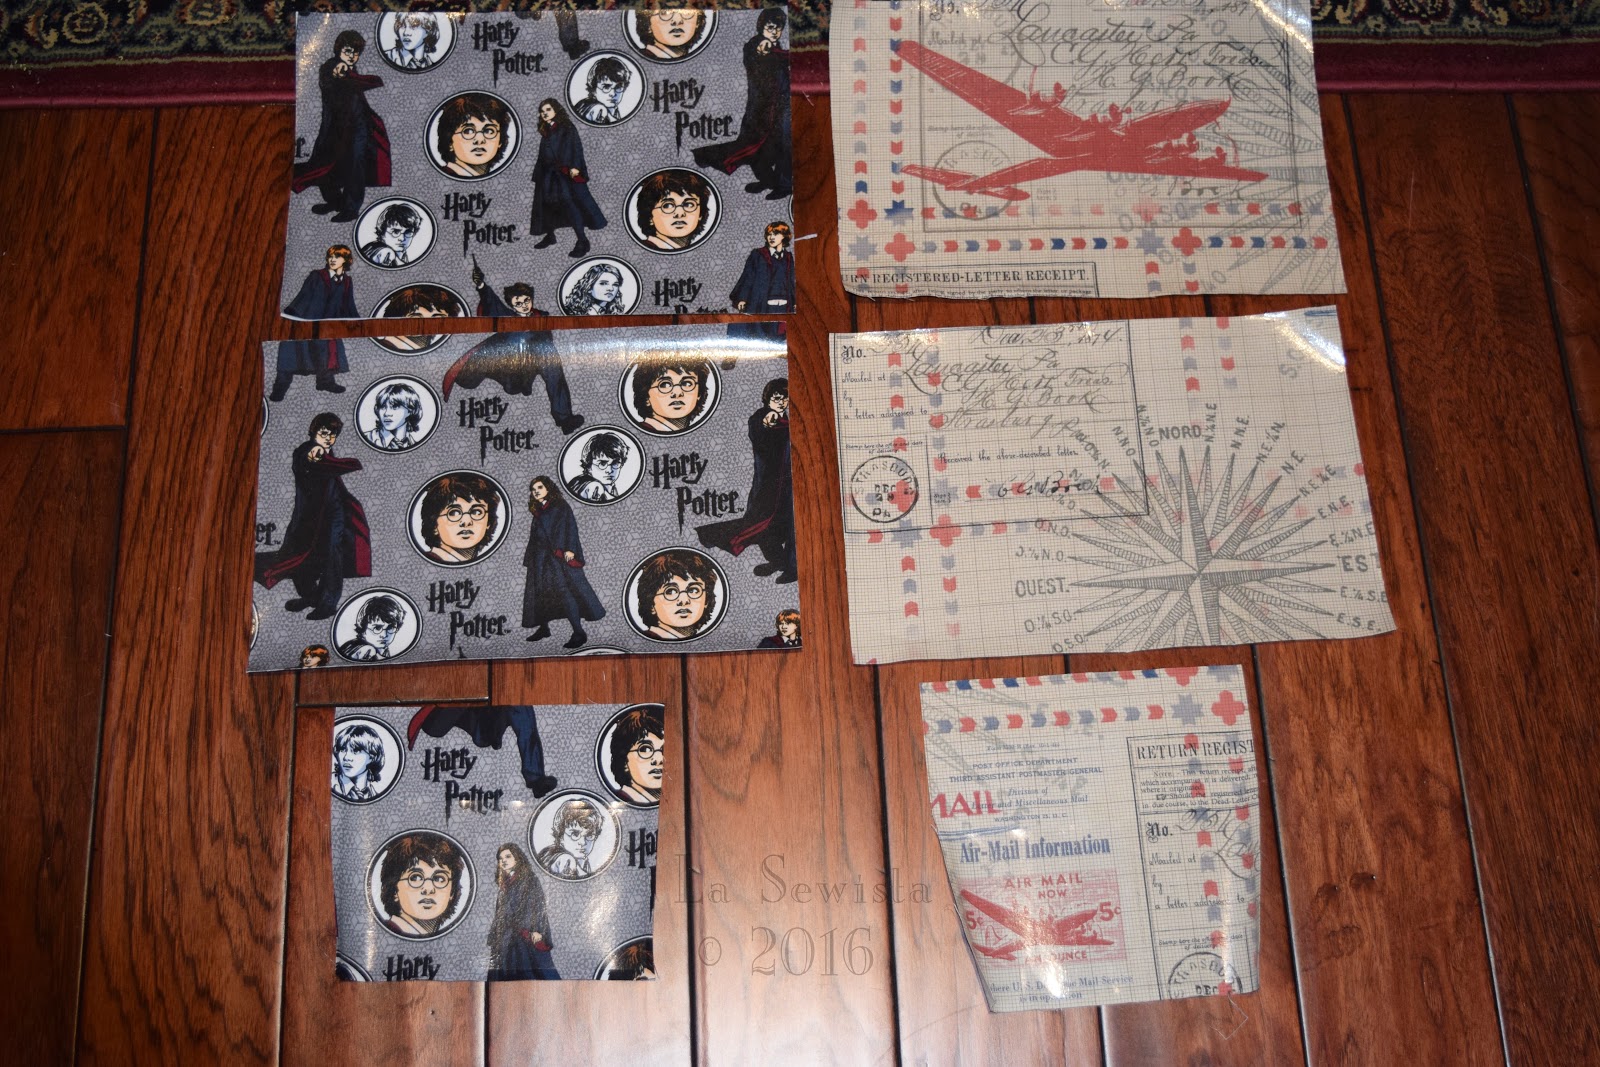
All is fused now with vinyl and interfacing. I blocked fused the large pieces so the vinyl is in the seam allowances. The pockets had the vinyl cut back from the seam allowances and from one half of the square that will be the lining of the pocket when sewn.

Here's a closeup of the fused pieces. I love how it prevents the edges from ravelling.

The exterior pieces had the vinyl, the fabric, fusible fleece and SF101 interfacing. How to keep the bulk down? I took a piece of batiste and cut it the same size and shape as the bag exteriors. I then fused the fusible fleece, with no seam allowances to the batiste. I turned it over and then fused the SF101, again with no seam allowances, to the other side. Now I will just stitch the batiste into the seam allowance of the bag, so basically a sewn in interfacing.
One thing I have I've been impressed with is the well thought out and "proven before market hit" way Indie bag designers use and specify interfacings. Most bags have at least two types, Many have three. But in nearly every pattern out there Pellon SF101 is used, A LOT. It is a woven interfacing and works well in these bags. I will honestly tell you that I don't use Pellon products in my garments but for these bags, the SF101 and the foams work really well. Also, I wanted to fuse my fleece to a separate fabric because on past projects I found it could pick up wrinkles while turning and handling during the construction process.

All pieces are now vinylized, fused and ready to stitch. I will need to do some stitching samples before sewing all this vinyl and that is next!..........Bunny


