
Sunday, October 31, 2010
Winter Arrives!
Friday, October 29, 2010
Krazy for Koos!
I have loved Koos Van Den Akker for a long time. He has inspired me more than once to make a collaged garment or bag. Koos is all about the fabric which he puts together with great abandon and then ties together esthetically with strips of binding or ribbons. I have never felt the need to buy one of his patterns because I just did my own collage thing with a pattern that I already knew worked for me. That has all changed since I saw and purchased his latest two Vogue Patterns and also saw one of them made up by Shams. If you haven't seen this amazing coat, check it our here. She did her own interpretation and it is fabulous.
I purchased these two yesterday at the Joann's sale on Vogues and opened and read them the minute I got home. Just too cool.
Here is the one Sham's did first:

 The buttonholes on this are faced, turned squares that are then pleated, really cool. While these dragon back scallops add bulk, I love how Shams stitched them down. What fun to combine the fabrics. And speaking of fabrics, this coat takes a total of 9.825 yards of fabric, NOT including the lining. I have visions of stalking thrift stores for some of the pieces.
This is my favorite however:

I absolutely love this design, especially the back. I like how he has the binding hanging off the collar and wiggling down the coat back and front. One thing I don't like about this pattern is that the line art does not match the design as shown. I think once you see the line art on this you will now why it is just so awesome.
 Do you see that big circular applique with the ribbon trailing thru? I know this is pretty different but I would definitely wear this and get use out of it. I would love to add this to the queue and spend time searching out all of the different elements.
 Now I am not crazy about everything Koos does and think this design is just horrendous. I don't know anyone that this could look good on. What was he thinking? Here you can see a lot of images of his clothing. His sense of abandon seems forefront in so many of his designs and it is all so about the fabric. I like that.
******************************************************************************
The CJ is on its final hours of stitching. What's left is to set in the sleeves, finish the handworked BHs on the cuffs, put on the pockets, and last but not least, stitch on the chain. I am going to save that as my final act. I really want to make another one of these soon and am already searching out fabric....Bunny
I purchased these two yesterday at the Joann's sale on Vogues and opened and read them the minute I got home. Just too cool.
Here is the one Sham's did first:


This is my favorite however:

I absolutely love this design, especially the back. I like how he has the binding hanging off the collar and wiggling down the coat back and front. One thing I don't like about this pattern is that the line art does not match the design as shown. I think once you see the line art on this you will now why it is just so awesome.


******************************************************************************
The CJ is on its final hours of stitching. What's left is to set in the sleeves, finish the handworked BHs on the cuffs, put on the pockets, and last but not least, stitch on the chain. I am going to save that as my final act. I really want to make another one of these soon and am already searching out fabric....Bunny
Wednesday, October 27, 2010
What Doesn't Belong and Why?

As a lover of cooking and gardening, I have been putting up food since my early marriage. I love to put up food. To me a full freezer and pantry full of Ball jars is a beautiful sight. So 2 days ago I went and bought a 50 pound bag of carrots for 8.00. They came from Canada, bagged up and washed, and were still wet. To properly store them in our root cellar they needed to be dry. So we spread out this blanket, under the ceiling fan, and spread the carrots, all 50 pounds out on the floor of the family room for an overnight stay. The next morning, yesterday, I started packing them up in the root cellar. I got this far and decided I should take a picture before I finished putting them all away. So, you see, I am not crackers, or living some double life up here in the Adirondacks. Now, on to boring pictures of the CJ;;;;;

The sleeves are in good shape. I had two issues, however. I was not sure of the length and couldn't interface the hem edge until I got the length right. Issue two: I simply did not have enough charmeuse to line the sleeves. The extra wide seams needed in this style of construction ate up the silk a little more than I had expected.
I stitched the three sleeve pieces together and then pin basted the center sleeve seam. Its not visible on the fashion fabric but both large sleeve sections are eased in the elbow area to the narrow under sleeve. Next it was off to a mirror for a try on and pin to the jacket to establish the sleeve length. Once that was done I interfaced the hem edge with a lightweight hair canvas. It was catchestitched to the bottom edge and the seams and ends. But what about the lining for the sleeves?

Well, I had a few options. One was to interface the sleeve with a different fabric, no way. Or, I could squeeze out whatever I could from the tiny amount of remaining charmeuse. I decided on option two. It would look better, to me anyway and as long as I maintained the same grainline there should be no problem. So that is what I did. The sleeve back is entire. The sleeve front has a center section as does the undersleeve. You can see better in the lining where the large sections are eased to the center narrow undersleeve. This built in area for movement allows the sleeve to be narrower than you might normally wear, more like a sweater. I have to tell you I have taken an inch out of the two large sections and 3/4s of an inch out of the undersleeve. The sleeves in this pattern are W I D E . There was over 5 inches of ease around my upper arm. So beware if you are making this pattern. I have heard no one else make this comment on PR so maybe my bouncy little post-meno arm flaps aren't that big after all. I don't know. I just know that the sleeve fits much better and there is not a soul on this earth who will see the inside of this sleeve but me. So I am happy with my sleeves. This afternoon I got the trim all stitched on the sleeves and the lining stitched to the fashion fabric. This pattern has you match the lining and shell seams on the either side of the undersleeve. You then stitch them together with a running stitch for about 2/3s of the length. The lining will never twist around this way. Pretty clever! Tomorrow I'll start working on the sleeve buttonholes and then installation. We are almost done!!! I am up to near 90 hours now on this so the home stretch is approaching. I think I will go have some carrot sticks now!....Bunny
Monday, October 25, 2010
A Meme with no Meme
Some time back two of my loyal readers, Kristine and Jana , passed along a meme and a reward to me along the lines of "a wonderful blog". I apologize for not responding sooner or at all which was very rude of me. It was at the opening bell of Bun & Ern's Bed & Breakfast, also a family crisis ensued (now water under the bridge), and life goes on. I thank all of my followers for their recognition and loyalty. I appreciate each and every one of you. Now to the fun part: ten things I bet you didn't know about me.
#1 For several years, some time back, I was a gym rat as well as a runner. I did it on the verge of compulsion. Yes, it was compulsion. I lost my periods for over two years as there was just no body fat left. Did I look good? Not so sure. One day I looked in the mirror and I had huge muscles from my neck to my shoulders, a la weight lifter, and thought I looked disgusting, very masculine. On that day I quit the weight lifting and cut back on the running and got back to a more feminine look. I still try to exercise as much as I can today but no more compulsion.
#2 I have six brothers and one sister.
#3 Minus one year (which I detested) I attended all girl convent schools from first to twelfth grade. For me it was something I totally enjoyed and would do again in a heartbeat. The convent was my refuge from the six brothers, all very close in age. It gave me sanity.
#4 I absolutely love to cook, with an emphasis on baking. DH says I am pretty good at it. I will try most anything, and have had my share of failures. All in all he likes most of my creations.
#5 Years back in Massachusetts, my next door neighbor and close friend was a bookie. She is truly one of the most wonderful people I have ever known. At the foot of her bed was a safe and a LARGE statue of the Blessed Mother on top. At times I would walk in and she would be finishing up her rosary on her knees at the end of her bed. I never knew if she was praying to the Madonna or the safe, LOL! She truly was one of the kindest, dearest people I have ever met. And I could play the numbers with her!
#6 I worked in the only television station on Cape Cod, none now, when Ted's car went off the bridge in Chappaquidick. I had a front row seat on history and had in my hands the first news film of the story. I saw all the key players, including Teddy. I will never forget it.
#7 My official job at the television station was assistant to the art director. Talk about fun! I made props, colored photos off the teletype, did a lot of production for commercials, worked a hot press and all sorts of creative "stuff". I did it for three years while in H.S. and college.
#8 My dad was an engineer and my mom was an opera singer, contralto. She also did commercials and had a syndicated radio program on opera.
#9 I am killer proud of our children. They really never gave us any grief and have turned into very happy, healthy, productive adults. The oldest is vice president of human resources for one of the biggest companies in the country and the proud mother of twins and an 8 yr old and wife of a great husband. My youngest is a practicing dentist with a great practice and the mom of an almost 9 yr redheaded delightful son and a 5 year old spitfire of a daughter. Her terrific hubby is an orthodontist. Most of all, they are just good, kind, generous people.
#10 At one time I did a lot of oil painting. I also had moments of jewelry making, caligraphy, and silk screening that I enjoyed as well. I went thru a "fimo" phase too. There was a period of about ten years when I was seriously into quilting, even competively. Now I feel like it is done and I don't want to go back. Thru all my "hobbies" I always sewed clothing and it was always my first love.
I hope you enjoyed this trip into my "ten things."
The CJ continues. I am working on the sleeves now and still stitching on trim. I am up to about 70 hours. Every day when I go down to the sewing room I mark down the amount of hours from the day before. Dang, I sew a lot!...Bunny
Friday, October 22, 2010
Chanel Jacket Details


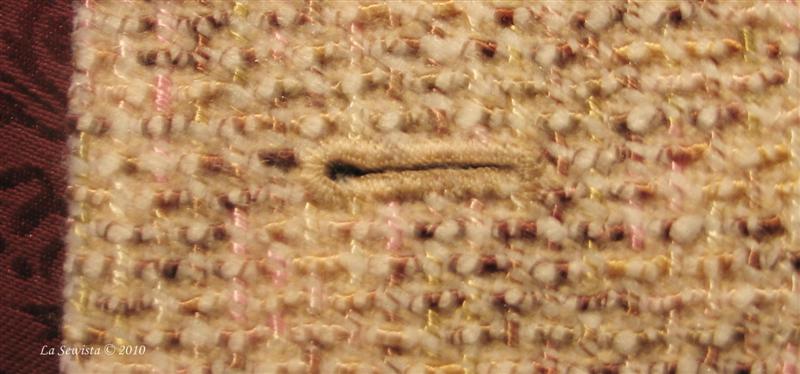
Once the lining was done I started on the buttonholes. The first one was dreadful. It was ripped out and redone but the rest went fairly smoothly. I referenced Claire Schaeffer for this technique. You can see the buttonhole has been basted around on the lining side. Pins were put in on the front thru to the lining to indicate the length of the BH. The hole was cut this length plus an additional 1/16 of an inch on each end. Then I did a little triangle cut on each end.


Slowly I am getting there. The sleeves will finally be dealt with after the trim is installed. This sleeve measure 16 1/2 inches around at the upper arm. I just know this is way too big so I am going to make a muslin up before I cut the fashion fabric. My upper arm is 11 1/2 inches around. 5 inches ease? I don't thinks so. One of the hallmarks of the Chanel jacket is its narrow sleeves. So a new muslin will happen for the sleeves. The sleeve I am using is the 3 part sleeve from the Claire Schaeffer pattern Vogue 8259, OOP.
I am concerned about the trim showing thru in a lumpy way to the overlap on the bodice front. I laid it out and it doesn't seem to be a problem, yet. Anyone have experience with this on their jackets? Your experience using the three piece Schaeffer sleeve? Thanks.

I have had several obvious hints that "certain parties" would like bags for Christmas. I also have a couple of commisions for bags that will then be given as gifts. It looks like a lot of bag making is in my future. This green fabric is one combo I am considering using. I love that green zebra...Bunny
Monday, October 18, 2010
Back to the Chanel Jacket!
It took a while but I am back to sewing. Our final wave of fall foliage visitors has left and we are not expecting any more until Christmas. Bun and Ern's Bed and Breakfast is closed! I loved having our company and we made some great memories but it does feel good to just sit and absorb the quiet!

The first order of business was to return to the CJ. The lining is all seamed, except for the sleeves. The sleeves haven't even been cut out and won't be until the front is complete. I needed to make some templates for the neckline and the pockets and did so out of file folders hanging around. The neckline has a rounded corner at CF and I placed the template on the fabric front and pressed the fabric around it to get a nice shape. I used the back neckline template to adjust the neckline as it had stretched some. After all of the neckline was pressed over the templates the 3/4 SA was catchstitched in place. Then a selvedge tape was catstitched on top of that, easing in the excess. After that the neckline was pressed and looked great. You'd never know I eased that neckline back into shape.
After the neckline it was time to deal with pockets and trim.
 I didn't use any particular guide or direction, choosing instead to make patch pockets the way I always do. I cut out the pocket with half inch seam allowances from the fashion fabric. I add another half inch to the top as well as this will fold to the inside of the pocket and you won't see a lining edge. Then I line up the upper edge of the fashion fabric pocket with the selvedge edge of the lining and stitch the half inch seam. Using the selvedge edge here stabilizes the pocket and prevents stretching at the upper edge, all without taping the edge. You can see that the lining is way bigger than the pocket. As far as a pattern, I forgot to trace it off. Instead I used my wearable muslin, but cut down the pocket size even further. Being petite, I always cut down the details and felt the last jacket's pockets could have been just a touch smaller. I press the seam open. Then I fold the lining and pocket to the back, leaving a half inch margin at the top as shown below. Next comes another good press.

 Next I take my rotary cutter and cut the lining to match the front of the pocket as seen above. Now it is time to stitch on the trim.
 My final choice was to pull some of the threads from the fabric and weave them thru the braid in groups of four, two brown and two pink. This is handstitched across the top of the pocket with a healthy inch and a half extending beyond the pocket edge. Once the braid was stitched on I turn the lining and FF right sides together and stitched the pocket, leaving an opening to turn.
 You can see here how each side of the pocket is pinned on the opposite side. This is so I can stitch directionally from each side of the opening and still be able to pull out my pins. Make sense? Directional stitching should help the pocket retain its shape. I am close to finishing the hip pockets and the breast pockets are complete. When doing patch pockets on anything always check and recheck that the pockets are the exact same size. It is amazing how they can pick up discrepancies in their sizes from stitching and stretching, albeit unintentional. They need to be a perfect match. I had to do a couple of adjustments on these to get them just right. The opening for turning was left on the center bottom of the pocket. It was turned and pressed and is ready to be stitched on.

I am pretty sure that I am going to place the pockets differently than the pattern dictates. I really like the smaller pockets placed at the waistline with just a bit of space between the hip and upper pockets, just like you see on Coco above. This is the way the pockets are placed on the Khalje jacket in the Threads article and I think it is a less boxy look and more flattering to the feminine form. I believe Erica B did her jacket this way.
Tomorrow will be either the backside of the button holes in the lining or the hem. Back with more....Bunny
The first order of business was to return to the CJ. The lining is all seamed, except for the sleeves. The sleeves haven't even been cut out and won't be until the front is complete. I needed to make some templates for the neckline and the pockets and did so out of file folders hanging around. The neckline has a rounded corner at CF and I placed the template on the fabric front and pressed the fabric around it to get a nice shape. I used the back neckline template to adjust the neckline as it had stretched some. After all of the neckline was pressed over the templates the 3/4 SA was catchstitched in place. Then a selvedge tape was catstitched on top of that, easing in the excess. After that the neckline was pressed and looked great. You'd never know I eased that neckline back into shape.
After the neckline it was time to deal with pockets and trim.


I am pretty sure that I am going to place the pockets differently than the pattern dictates. I really like the smaller pockets placed at the waistline with just a bit of space between the hip and upper pockets, just like you see on Coco above. This is the way the pockets are placed on the Khalje jacket in the Threads article and I think it is a less boxy look and more flattering to the feminine form. I believe Erica B did her jacket this way.
Tomorrow will be either the backside of the button holes in the lining or the hem. Back with more....Bunny
Tuesday, October 12, 2010
Fall's Fading Beauty
We have had heavy frost for the past three nights and the leaves are falling to the ground in a race to see who gets there first. The deer have been chomping away daily at our apple trees, being flushed out by area hunters. The beauty of Fall is fading fast and winter is looming large. Here are a few pics I took yesterday morning.
The first is in our back yard. The deer have been enjoying the last remnants of our hostas. This is a mother and her two yearlings. She is lame in her right front leg and has been visiting the yard the past 3 years. We call her Limpy. Her limp doesn't prevent her from a fast run, however. I love how the light streamed thru the trees in this one.
 After years of selling elaborate window treatments and furniture we find we like our home simply decorated without a lot of excess stuff. I don't like anything on my windows to disrupt the view toward the river. I love how you can see the trees in all of their glory outside our "great room" windows. I hope you do too.

And finally, what is prettier than white sheets blowing in the breeze on a crisp fall day? They smelled so so good when I brought them in. They went right on the beds for our next wave of houseguests. Lately we have been running a bed and breakfast, but no problem. DH and I enjoy it. We really enjoyed our last guests, two families with young children visiting at the same time. Yeah, things were everywhere, but the kids had a ball and so did the adults. They made forts under the ancient hemlocks, climbed trees, gave us a puppet show they all worked on for a few hours, and helped cook a lot. The adults and kids enjoyed a bonfire out on the river with some good wine and cheeses while they tossed rocks in. It was quality time. Wednesday our next group arrives and now that we have had a day or so to rest up we are looking forward to it. By early next week we should be all quiet again with more crispy clean sheets on the bed for the holiday round of visitors.
 *************************************************************************************
I don't have any close by sewing friends. One of our houseguests this weekend can't sew a button but she has been cross stitching since the age of 15 and is now in her 40's. Her work is fabulous and she specialized in primitive and sampler design. She has a great eye. She and I went through my stash of buttons and also played with the trims for the CJ. Her imput was terrific. We both agreed on a different path for the buttons and trim and I will have more on that later. I will just say that now I am finally very happy with my choices. Isn't it great to have another set of eyes? eyes that can understand? When we visit her in the upcoming months she is going to take me to a cross stitch shop in the Syracuse area where I can buy my heart out on over dyed threads and such for my smocking and embroidery. I am so looking forward to it. I wish I had a picture of her work to show you...Bunny
The first is in our back yard. The deer have been enjoying the last remnants of our hostas. This is a mother and her two yearlings. She is lame in her right front leg and has been visiting the yard the past 3 years. We call her Limpy. Her limp doesn't prevent her from a fast run, however. I love how the light streamed thru the trees in this one.


And finally, what is prettier than white sheets blowing in the breeze on a crisp fall day? They smelled so so good when I brought them in. They went right on the beds for our next wave of houseguests. Lately we have been running a bed and breakfast, but no problem. DH and I enjoy it. We really enjoyed our last guests, two families with young children visiting at the same time. Yeah, things were everywhere, but the kids had a ball and so did the adults. They made forts under the ancient hemlocks, climbed trees, gave us a puppet show they all worked on for a few hours, and helped cook a lot. The adults and kids enjoyed a bonfire out on the river with some good wine and cheeses while they tossed rocks in. It was quality time. Wednesday our next group arrives and now that we have had a day or so to rest up we are looking forward to it. By early next week we should be all quiet again with more crispy clean sheets on the bed for the holiday round of visitors.

I don't have any close by sewing friends. One of our houseguests this weekend can't sew a button but she has been cross stitching since the age of 15 and is now in her 40's. Her work is fabulous and she specialized in primitive and sampler design. She has a great eye. She and I went through my stash of buttons and also played with the trims for the CJ. Her imput was terrific. We both agreed on a different path for the buttons and trim and I will have more on that later. I will just say that now I am finally very happy with my choices. Isn't it great to have another set of eyes? eyes that can understand? When we visit her in the upcoming months she is going to take me to a cross stitch shop in the Syracuse area where I can buy my heart out on over dyed threads and such for my smocking and embroidery. I am so looking forward to it. I wish I had a picture of her work to show you...Bunny
Wednesday, October 6, 2010
The Wooly Mammoth

That is what Susan Khalje calls this stage of the construction. I call it a zombie costume for the Thriller video. What you see here are the large irregular seam allowances, lining quilted to the shell fabric and folded and pinned out of the way, first stage of buttonholes completed, seams all basted, and pressing to the wind at this point.
I took the jacket off of the dress form and the next thing I did was check the fit. My shoulders and rib cage are very narrow, particularly in relation to my C Bust. I find that a shoulder princess seam gives me great opportunity to fine tune a fit. If I remember right it took 3 muslins and then a wearable muslin to get the fit right. I still wanted to check it in regards to the front bodice. I put it on, pinned the center fronts together and saw that I still needed to take in under the bust, that S curve area and adjust the curve of the bustline. Here is what I have done for the last few shoulder princess seam garments that I have made to fine tune the fit and I like the ease and result. Have all seams basted. Press the princess seam allowances toward the center front. Try the garment on. Pin center fronts together. With pins put a pin at the top of the area of the princess seam that needs to be adjusted. this was about 3 inches below the shoulder seam for me. Put another pin horizontally at the bottom of the area that needs to be adjusted. This was about an inch above the waist for me. Take the jacket off and undo the basting between the two pins. Remember, the seams must be larger than needed, at least an inch, and ironed to the CF. Put the jacket back on. You will now see the side panel spread away from the CF panel. That's what you want. If you had just pinched in the area that was too large you would have taken in from the center front panel. You don't want to do that. That line needs to flow evenly from the shoulder seam down to the hemline. A pinch would have curved it in and looked "not good". By pressing the seam allowances toward the center front you will see that nothing changes with the adjustment on the CF, but the side panel moves to right where it wants to be. Raise your arms. Move a little bit. Then go back to the mirror and smooth the CF over that side panel. Pick up your pins and start pinning the CF to the underneath side panel. Ease it in where necessary with the pins. You are still wearing this so watch those pins! Once both sides are pinned, take the jacket off. Another advantage of this method is that you have accommodated any difference between your left and right side.

Next I lay the princess seam over a pillow with the CF right side up and again both seams underneath toward the CF. Time to get a needle and start slip stitching! The seam is slip stitched on the outside the full length using 1/4 inch stitches. Make sure the bottom stitch goes all the way through to the wrong side of the side panel. This will be your visual marker for your machine stitching. Slip stitch the seam. When done, open it up, and with the side panel up, sew along the slipstitching line to make your permanent seam. This is very similar to the way plaids are matched on the outside of a garment with slipstitching and then sewn. Give this a try on your next shoulder princess seam project. I can't tell you how it would work on an armscye princess seam as I stay away from that style, not the best for narrow upper chest, IMO.
Next on the agenda all seams were given their final machine stitchings. I decided on the length so proceeded to tie the knots on the quilting at the bottom of the jacket. The quilting threads are pulled between the lining and shell and tied off. I used a square knot but I know there is another one out there that is the "proper" type of knot to use. I can live with a square knot. Its going no where.

With knots tied off it and all vertical seaming complete, I unbasted the shoulders and gave it all a proper press. Now I will cut the seams back to 3/4 of an inch and catchstitch them all down, great TV watching work. By cutting back and catchstitching only one seam at a time I will keep the unraveling down. Boucle is marvelously forgiving when it comes to fit and stitching but it ravels mercilessly.
Couturette asked, "I wonder if you could post a detail picture of the front edged of the jacket, did you use a ribbon on the edge?"
I used a piece of selvedge from some mystery lining fabric I had to stabilized the front edge of the jacket. Here's a closeup and welcome to the blog Couturette. Appreciate the question.
 I have lots of seams to catchstitch. Until the next time........Bunny
Tuesday, October 5, 2010
Vintage Finds


So babies, where are you? My fingers are itching!
***********************************************************************************

Anon asked why these hand made BHs took an hour to do just one. First off, the thread for each one is waxed and ironed. I use a 36 inch piece of thread, per C. Schaeffer, so there is no stopping while making the BH. Because the thread is so long, even when nearly doubled, it can loop up and knot very easily. Therefore each stitch has to be slowly laid out and pulled through the loops. Inevitably I have to back track and rip out a few stitches and then get going again. I can thank the nubby fabric for that. Each stitch has its little purls set in the right position which is more fiddling. And most of all, I want to do this right and well and that takes time and close attention. There is no rush here nor should there be.
Now I am at the point of basting the jacket all together for some trial fitting. I know I will need to adjust the princess side seam as I made it extra large for insurance purposes. I should be able to try it all on tonight. There is so little of these CJs that is machine done, maybe ten percent. I am really anxious to wear this and just see how scrumptious it will feel.....Bunny
Friday, October 1, 2010
Trims and One More Button to Go...
Our mystery item is a shuttle from one of the looms in a textile mill in New Bedford, Massachusetts. As mills closed people would bring these shuttles home, stuff the centers with dried flowers, and hang on doors or such. Sometimes candles would be jammed into the interior space. You would see them everywhere. To me they are an item of beauty. The wood has that glowing patina that only years of use by oily hands could make. I found my shuttle this past weekend during a major cleaning blitz. I've uncovered quite a few neat things that I will share as we go along here.

I did quite a few more buttonhole samples before starting on the jacket. I am pleased. Once again, this is lumpy bumpy fabric so a perfect buttonhole as you would see on a beautiful piece of worsted this isn't, but I am pleased. I have only one left to do on the CJ. It takes me one hour to do a buttonhole.
I have also started playing with trims. Here are just a few tries. I am not there yet and will play some more. The trim just may be as simple as the selvedge. We'll see.


 I have houseguests right now and another wave coming at the end of the week. The only downside has been the dreary heavy rainfall that has hit the Northeast but we have been having a good time. I took this pic this morning between downpours at 8:00AM. It is amazingly dark at this time. Our river is up a good 2 1/2 feet in water level and just roaring whitewater. It has gone up another half foot since this picture has been taken. I hope all of you out there experiencing this storm are safe.....Bunny

I have also started playing with trims. Here are just a few tries. I am not there yet and will play some more. The trim just may be as simple as the selvedge. We'll see.


Subscribe to:
Posts (Atom)
Had to Refurbish This One!
About 6 or 7 years ago , during the dawn of the Zipper Trend, I bought one of my rare retail items. It was a blush pink and black bord...

-
 Other than some early married years, I have lived on or within a quick walk to the water. As I teen I lived on Lake Street and spent countle...
 -
I have finally found a woman I can really relate to, someone who gets my love of color, love of painted natural fabrics , and love of t...
