Sewing Vloggers

Wednesday, June 22, 2011

White Linen Top


Back to my favorite fabric, linen. This time it is in white. I decided, stepping out of the box here, that I would make a sleeveless linen blouse. Claire Kennedy's latest newsletter references the over fifty sleeveless issue with some very good suggestions. But a hot summer day has made me decide to walk on the wild side a bit and just go for it.

I'm away from home right now so you have to humor me a bit. I didn't finish the blouse as I wanted to before leaving but will as soon as I get home. What you see above is my TNT Simplicity  2501     . This blouse has a peplum. For the bodice front and back I used a double layer of the pretty sheer hanky linen. For the peplum I used a single layer. I lined the bodice so the darts seams would be facing the outer bodice dart seams, giving a real clean finish. This also enabled me to hide the interfacing on the interior of the lining. This really hides the interfacing show through on the front. By lining the blouse this way I eliminated the facing specified in the pattern. The edges are finished with a bias binding and topstitched. I wanted this blouse very plain. It has a flounce down the front. It's attached and if it weren't all graded and trimmed I would remove it. There is just not enough flounce to the flounce IMO. I will live with it.

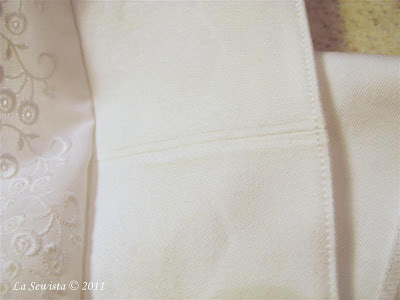
Once the darts were completed, interfacing installed, and the two layers placed wrong sides together, it was time to do the side and shoulder seams. These were French seams as you can tell in the pic. So this has a nice clean finish on the interior. The flounce and bindings came after that.

When I return home I will be able to share the finish with you. I may even get brave and model this one, not so sure about that though. Till my return around the end of next week.............Bunny


Sunday, June 19, 2011

Color, Line, Texture and..........Boats

Other than some early married years, I have lived on or within a quick walk to the water. As I teen I lived on Lake Street and spent countless days swimming and ice skating with friends there. For 21 years we lived in Weare, NH on Lake Horace. We moved from there to living on the Deer River here in upstate NY. That house in New Hampshire came with a boat, a pretty sad excuse for one, but we bought into the lifestyle and quickly traded up. It was a wonderful thing to live on the lake and enjoy boating, particularly when the girls were teens. If you have a teen, you definitely want to have  the house where the kids all want to hang out, and we did. Boating and skiing were a big attraction for friends and DH and I spent many sunny hours towing kids and friends around Lake Horace and other lakes in NH. Up here we live not too far from the Thousand Island area of the state, a stretch on the St. Lawrence river between Canada and the US. The river is very clean, beautiful, and the boats plentiful. This past weekend we attended the annual Poker Run out of Alex Bay. It was a glorious summer day and I was so taken by the beauty and art of these extremely fast "cigarette" boats. (Don't know why they call them that.) I took loads of pics. Since I know that anyone who loves fashion loves beauty and surely has an eye for line and color, I am sharing a few pics with you. To say the boats are incredible is an understatement as with a photo you can't pick up the sound of the jet like engines or the warmth of the sun crispying up your back. Check out the dashboards first on a couple of these babies, just poetic! Check out how perfectly coiled the rope is while the owner has left for lunch.
These boats run about 45 feet long, cost a fortune, and reach incredible speeds. The next boat, Aquamania, holds the speed record on the St. Lawrence, 205 MPH, same as a F5 tornado! It has reached 250 mph, has 3900 HP once the nitrous burst kicks in and two engines each costing over 900,000.00! Never mind the incredible paint job. The drivers have neck braces, helmuts, fire proof gear, much like Nascar.
Sort of nuclear looking, isnt it?
The engines on these boats are cleaner than my toilet after my French Canadian husband has scrubbed it. They sparkle beyond showroom new.

Check out the engine exhaust on this one. The scale is deceptive as the back end here is about 10-12  ft wide.
I have decided that the male equivalent of "diamonds are a girl's best friend" is "chrome is a guy's best friend."  Men cannot get enough chrome in their lives, can they? And like diamonds, the bigger and shinier, the better!
There were probably about 30-40 similar boats, all just as amazing, but I'll stop here. We had a wonderful day soaking up the sun and having boat fantasies. Boat fantasies work well for us at this stage. Years back our nicest ever boat needed to go to colleges so it was time to enter a new phase of life. The trade in for our children's education was a no brainer, something we would do again in a heartbeat. In the meantime we keep buying those lottery tickets....
*********************************************************************************

THANK YOU, thank you, everyone, for the overwhelmingly positive comments on the funky pants. Does a girl good, you know! Sometimes we just have to get out of our comfort zones, something I am not any better at than most people. This one paid off.

I will be leaving tomorrow for NH, North Shore, and then the Cape for almost two weeks. I will try to have a post while I am gone so keep tuning in. Thanks for indulging me in my boat pics. Hope you enjoyed them and if boating is not your thing, come back for more sewing posts soon! I just like to keep it interesting now and then and you, dear loyal followers, make it interesting for me....Bunny

Thursday, June 16, 2011

Burda Style 7535

In a nutshell: love the design and finished product. The pattern SUCKS and is 98% useless. While a beginner could handle this design fine, the horrid, poor excuse for what should be instructions bumps it up to the more experienced stitcher. On to the finished pants...

The Pattern:  Burda Style 7535, from the catalog at Joanns. I knew the catalog patterns had seams and hems included but I didn't know their directions were as obtuse and nearly non existent as the magazine patterns. Lesson learned! I love this design and will make it again. I think it is flattering for a short pear bottom like me and would recommend it to any petite with the appropriate adjustments.

I mentioned previously how the triangle flap stretched out on the muslin. The first direction on the pattern sheet tells you to stabilize the bias edges of the flap with fusible interfacing. This worked great and I had no further issues. Where the crotch seam meets the beginning of the flap is a dot. 3/4s of an inch up is a little dark bar. At no point do the instructions reference any of the many dots on the pattern pieces. Who knows what they are they for? But where the crotch seam ends and meets the flap you are instructed to snip at the snip mark. What snip mark? There is a dark line close by that could be a snip mark so I snipped.It was against my better judgment.  This just did not work and the pants front would not lay flat when I did this. I had to take this out and literally flat fell the seam by hand  as it faced up on the right side to get things flat.Oy.....The pattern then instructs you to topstitch for about an inch on the start of the flap, right where I had the issues, and this seemed to get things back under control. Once topstitched the flap layed flat as it should.
The front has inward facing pleats and the legs have huge darts front and back near the bottom so these pants will hang on the straight but get pulled hither and yon. It is the same on the pattern photo and I am fine with that. They are VERY comfortable and in linen, just summer fabulous. About the funny leg darts:
There is a dart front and back on the leg. They are about 4 inches wide at the seam and hang perfectly cross grain. Now, it doesn't take much gray matter to figure out this will pull up the hem once stitched. That is fine and that is the design. But the tech drawings on the pattern show the hemline hanging perfectly horizontally. There is no way this can happen with the way the pattern is drafted. Yes, you the sewist could make it happen, but, hey Burda, don't show us something in your line drawings that just isn't going to happen, OK?  Good thing I like this funky hem! In looking at how the pants hang on the pattern model photo, mine are similar.
I am pretty happy with the butt fit although I did make a booboo. I always alter for a high right hip. I made the adjustment on the pattern and cut all my pieces. I usually cut for the right hip and then cut back the left hip to normal. Once the waistband was all installed and topstitched I realized I didn't cut back the left hip so they both were installed with the high hip adjustment on both sides. You can see my right side is not hanging as nicely as the left side, but you know, I can live with this. As they say in New Bedford, "Tahkee!" to anyone who has an issue!These are big, baggy summer pants, alright?

The Fabric: This is 100% linen from who knows where. If I see linen at a good price I buy it anywhere! I love the color.Linen takes so beautifully to topstitching which you saw in the last post. It truly is my favorite fabric to sew and it is just heaven to wear. I made a pair of white linen pants a long while back and wore them till they were frazzled. Then I wore them for pajamas, great pajamas. Those pants had a 12 year lifespan. I hope these do as well and I think the funkiness of the design helps that.

Conclusion: I will definitely make this pattern again and even now consider it a TNT with all the adjustments it took to make it work for a petite. I can see it in a nice black ponte for winter. I also can see it without the leg darts in a white cotton twill,  a great summer "sailor" look. That might be my July pants. I also think it would make great shorts as well, so there are a lot of possibilities here. I highly recommend this pattern if you can make a pair of pants without a pattern. It is a bit too lacking in information for a beginner and I plan to get on PR and say so. I will be at the Cape next week and these pants will be PERFECT.
********************************************************************************

I have already cut out a sleeveless white hanky linen top, Simpliciy 2501, View E,  similar to the one shown on the pattern cover for 7535. Of course I had to do a bit of fiddling with the design and you will see the results soon. I hope to get it done before I head down to Massachusetts....Bunny
Oh, if you noticed in the first photo that there are only two buttons on the pants and it is being held up by a binder clip, you are not the dull knife in the drawer! I got my makeup on, hair decent and started to dress in the pants for the photos. The buttons literally fell apart as I dressed with every backing coming off these vintage babies before I had a chance to secure them. Of course the pants were beautifully ironed at that point. So now I had to put on 4 new buttons, still vintage but not perfect, and re iron the pants, Nothin's easy!....Bunny

Tuesday, June 14, 2011

Burdastyle 7535, The Funky Details

These pants are complete except for the detail you see above. I found some spot on buttons colorwise from the vintage buttons Ima gave me. I proceeded to make the buttonholes and when it came time to sew on the buttons I realized that one had lost its backing as you can see in the picture. With the pants totally complete otherwise, I have to wait to see if I can find button backs at JA's or at the worst, some new buttons. The buttons are prominent on this pattern, Burda Style 7535 so this is quite critical to the look. I want something flat in case I wear a knit top on the outside. I don't want  "button lumps."

The buttonholes were made on the Pfaff, only because  I had lots of seamless space around them and therefore didn't have to fear the outcome. I did cord them with two strands of matching embroidery floss. I like that look. Here's a few more details.

My biggest worry with this pattern was the fit. I knew it could go very wrong or very right with this unique design. I cut the pattern by the hip measurement so I knew the waist would have to come in. This high waistband was shortened by a 1/4 inch at the top. That was not a fit issue so much as my custom to decrease the size of details to accomodate my  petite frame. Because of "hourglass" issues I cut down the center and added seam allowances to the center back waistband section. I left the top inch of the hips and the waistband side seams and center back seam unsewn as you can see above. I tried them on and adjusted the fit as needed. When you are swayback you really need to add a center back seam and use it to adjust the fit on just about anything. Here, this move worked out really well as you will see once I get this modeled for you.
I finished the seams as shown here. They were triple zigzagged and then pinked. I didn't want the bulk of anything else showing through once pressed so I kept it simple. The waistband was ditch stitched to the facing which you can see a bit to the right of the pic. It is invisible on the right side.
The waistband sections and the big darts on the lower legs were all topstitched.

The color here looks very pumpkin. They are actually more of a burnished gold. I saw a nice knit to make a coordinating top but also favor the good old white shirt with these. Once those buttons are attached I will give it a model and have some pics for you.
**************************************************************************
I love how the color of the lupines plays against the orange poppies in this  perennial bed. My gardens always have a bit of "gawdy" going on....Bunny

Sunday, June 12, 2011

Burda 7535, aka, The Funky Pants

Let's not kid ourselves here. These pants are not your usual trouser cut. They are wide and they have big darts at midcalf. The waistline/hip seam is below the waist but the waistband is high, extending into the ribcage. Because I have a narrow upper torso and my body can always use some lengthening, I thought this pattern could possibly work. At the least it would be a roomy, comfortable, sort of artsy type of garment. It would take major adjustments to make it work for a 5 foot tall petite hourglass.
It's a given that these will be very roomy at the bottom and that dart would make things fall "interestingly", shall we say. But all of this appealed to me for a summer linen pair of pants. The pattern is Burda  Style 7535, one that you can pick up at any Joanns.  I started with a muslin. The fabric for the muslin is some I was gifted, a poly blend of some sort so it did not press well, hate those polies.  The linen will press beautifully. The first muslin was made with only the length adjustments. The original pattern is meant for someone 5"6' and I am 5"0' so we had to do a lot here. I shortened the crotch length a half inch. Then I took out 3 inches at mid-thigh and 3 more inches at mid-calf. Next length adjustment was to move the leg darts down 3 inches. I did your basic cut out the dart box and shift it down. I was not sure how this would work in real life as the pants angled in sharply from the dart to the hem. Here is the first muslin with length adjustments only.
You can see how it bags out at the side. I put a green line to show what I will take in. The waistband is also too big from the center of the waistband to the top edge.
You can see my hand pulling it out with no effort. These pants have no zipper. A triangular shape overlaps at center front. On this muslin I did not trim down the crotch seam or slash at the start of the triangle in case I needed the extra fabric in SA.  It is therefore  doing some serious pulling. One thing I did learn with my muslin, aside from fit issues, is that this triangle needs to be stabilized immediately upon cutting. Look at how it stretched out just from handling at this point.
So now we are on to muslin number two. I think it is a bit better. I will now tweak the actual garment even further and am ready to cut. I think once the triangle is stitched and slashed some of the tension will be released and it will hang better in front. Fingers crossed!
Here you can see some of the adjustments and truing that happened with this pattern. Because so much length was removed some serious truing of the seams had to happen.  Notice how much wider the back leg is than the front!
 The linen is now cut and I will start sewing tomorrow. First will be fusing that wide waistband.
**********************************************************************************
Another photo from our last hike. This tree canker can bring forth a lot of imaginary creatures with very little thought....Bunny

Thursday, June 9, 2011

Another Tiny Heirloom Dress


 Has a bit of a peasant/Mexican look, doesn't it? This was such fun to make and I think took care of the smocking fix that needed attention. The fabric is 100% handkerchief linen, probably my all time favorite fabric. I don't think you could make this stuff look bad if you tried. Even once its all wrinkled it still has the "look." This is the same Joan Hinds pattern that I used for the microcheck bishop of a few weeks back. It is also the same smocking design. I used bright colors of floss, something I have wanted to try on white linen for a long time. Neither of my DGDs needed such a dress so the dolly got it.

 I couldn't just leave a plain hem for some reason. What I did was use a template to draw the scallops on the right side. I faced the hem with a two inch strip of linen. The unstitched edge was left raw. Then the scallops were stitched on with a twin needle and tight tension. Then I did what Martha Pullen seems to do a lot of. I simply cut the wrong side of the hem back to the edge of scallops and called it finished. This is such an easy, pretty technique for hanky weight linen and could be wonderful on front facings or sleeve ends. 


**********************************************************************
I have my "Funky Pants" altered and ready for a muslin cutting. These are either going to darling or an absolute horrid fashion blunder. I know I am short. The pants, Burda Style 7535, have a dart that should be about midcalf. On me, it was at my knee level so that needed to be lowered. I cut the dart box out and moved it downward. But now I had to angle back in to the original hemline and that may not look right. This will be fun to work through and could just get chalked up to a learning experience, one that teaches, "oh, no, you can't wear those funky things."  Time will tell. Tomorrow I should be able to get that muslin together.
***********************************************************************
Last Saturday DH and I and company went hiking up at Paul Smiths. Yes, that is actually the name of the town. This butterfly was following us along the trail. The dots on its tail were a bright blue, much more so than what is shown here.

Tuesday, June 7, 2011

A Tiny AG Bishop

I cut this little bishop out last night and got it stitched and pleated this morning. At this point 4 rows of smocking are complete. I may finish this tonight. Once I started smocking I realized these sure look like Mardi Gras colors to me! The fabric is a lovely hanky linen.

I like to hem the sleeves flat. For this dress I used a technique found in my tutes, the Piped Hem.  What I then did was a catch stitch in orange floss  across the hem above the piping.
Next is a pair of pants that need a muslin made, rather different than my usual....Blogger is giving me grief so I will try to get my other pic up later....Bunny

Monday, June 6, 2011

Making a Pillowcase or...

...how I returned from my sewing hiatus!  In the past two weeks I have done a lot of purging. I knew I had lots of tablecloths, maybe more than the average hostess. That's what happens when you love fabric. Some I have donated or given to others but I had this one 50x50 inch really lovely heavy damask tablecloth. What to do....... I decided I would never use a tablecloth that size again, sort of card table size, if you know what that is, but it sure would make some awesome pillowcases. A few years back I purchased some 450 count Egyptian brushed cotton linens for our bedroom and they are my favorite of all time. I love the heavy brushed effect and it feels yummy next to the skin. This heavy damask gave me the same feeling so the pillowcases were a no brainer. Here is a simple tute of how I did it.
  • You need to end up with a cut piece of fabric 40 x 30 inches. Layed out flat, the finished PC will be 20 x 30, so you need the 40x30 for both sides. That's a finished size. Add seam allowances. If you are one of those super sharpies out there, you just figured out that 30 and 30 add up to 60 and I don't have enough fabric in my 50 inch tablecloth. Well I do. First, I cut the tablecloth in half. Then I folded and pressed down the middle so the pattern of the damask would be balanced as much as it could. I cut it so I had 40x25 inch pieces but I also had ten inches of width left over. This I cut into five inch wide strips. Hope I haven't boggled your mind with this. No matter, you will probably never use a 50x50 piece of fabric for your two pillowcases. 
  • All trim is added "in the flat" before sewing up any side seams. I searched the stash and came up with some lovely eyelet as well as some beading. Next I found white 3/8ths inch grosgrain to fill the beading. First I stitched on the eyelet with a 1/4 inch seam.
  • Next I dealt with the leftover 5 inch wide strips. These were pieced so I ended up with two long pieces, one for each pillowcase. I managed to use a selvedge edge so only stitched it in a 1/4 inch seam. This was pressed open and then placed at the center of the 40 inch edge on top of the eyelet. That way, when the PC (pillowcase from hereon) was pressed, the seam landed on the fold and was not obvious. The eyelet will be covering most of this seam anyway.

  • After stitching on the strips and eyelet, I ran the seam through the serger. PCes need to be tough and have to take a lot of washing.  All seams possible here were stitched, serged, and then topstitched. The edgestitching foot is invaluable here.  It was time to add some beading. I played with it a bit and decided the beading  looked best applied 3/8ths inch away from the strip seamline. It gave the "cuff" more depth this way. Grosgrain ribbon was run through the beading.

All this time the PC is still flat. Once the edge is hemmed and fully trimmed, you can sew up the long side seam with a half inch seam. Again it is serged after and pressed to the side. Next step is to sew the closed end of the pillow case with a straight stitch. I used a 1.0 stitch length when I got to the corners. This closed end is then serged and pressed to the side.

I apologize for any difficulty viewing the photos. I had to do some major tweaking because of the all white fabrics and trims. This was a great one day project for getting me back into my sewing groove.
************************************************************************************

The whole sewing hiatus was a good thing. Our veggie garden is in. 95% of our landscaping issues are dealt with. House guests have been enjoyed and sent back home. Six pounds were lost from not sitting on my arse sewing and moving around the gardens instead. (That really scares me.)It was a "good thing" as Martha says. I am refreshed and feel much pressure removed and that is what it is about. Next in the queue is a smocked hanky linen bishop for the AG doll and a pair of Burda Style pants for moi. After some more gardening tomorrow morning, those projects will begin. Thanks for sticking with me through my absence......Bunny

Had to Refurbish This One!

    About  6 or 7 years ago , during the dawn of the Zipper Trend,  I bought one of my rare retail items. It was a blush pink and black bord...