Sewing Vloggers

Showing posts with label Simplicty. Show all posts

Sunday, April 10, 2016

Simplicity 1166


What Simplicity calls a "1950s Vintage" skirt is complete. I am pleased with the results and should get a lot of use out of this for work. I love wearing skirts. I like short skirts, too, and just above the knee is probably my best length. Where I work there is an open staircase that the public  is constantly near or under. It is not a place for shorter skirts, but  since I love skirts I just make them longer if they are planned to be for work wear. And this one's long! Its an inch longer than the last denim skirt as that seems to be a bit more flattering.

Forgive me for not modeling. I plan to make the white blouse on this vintage reproduction pattern and when that is complete I will model the entire outfit. In the meantime here are details to share.


Fabric:

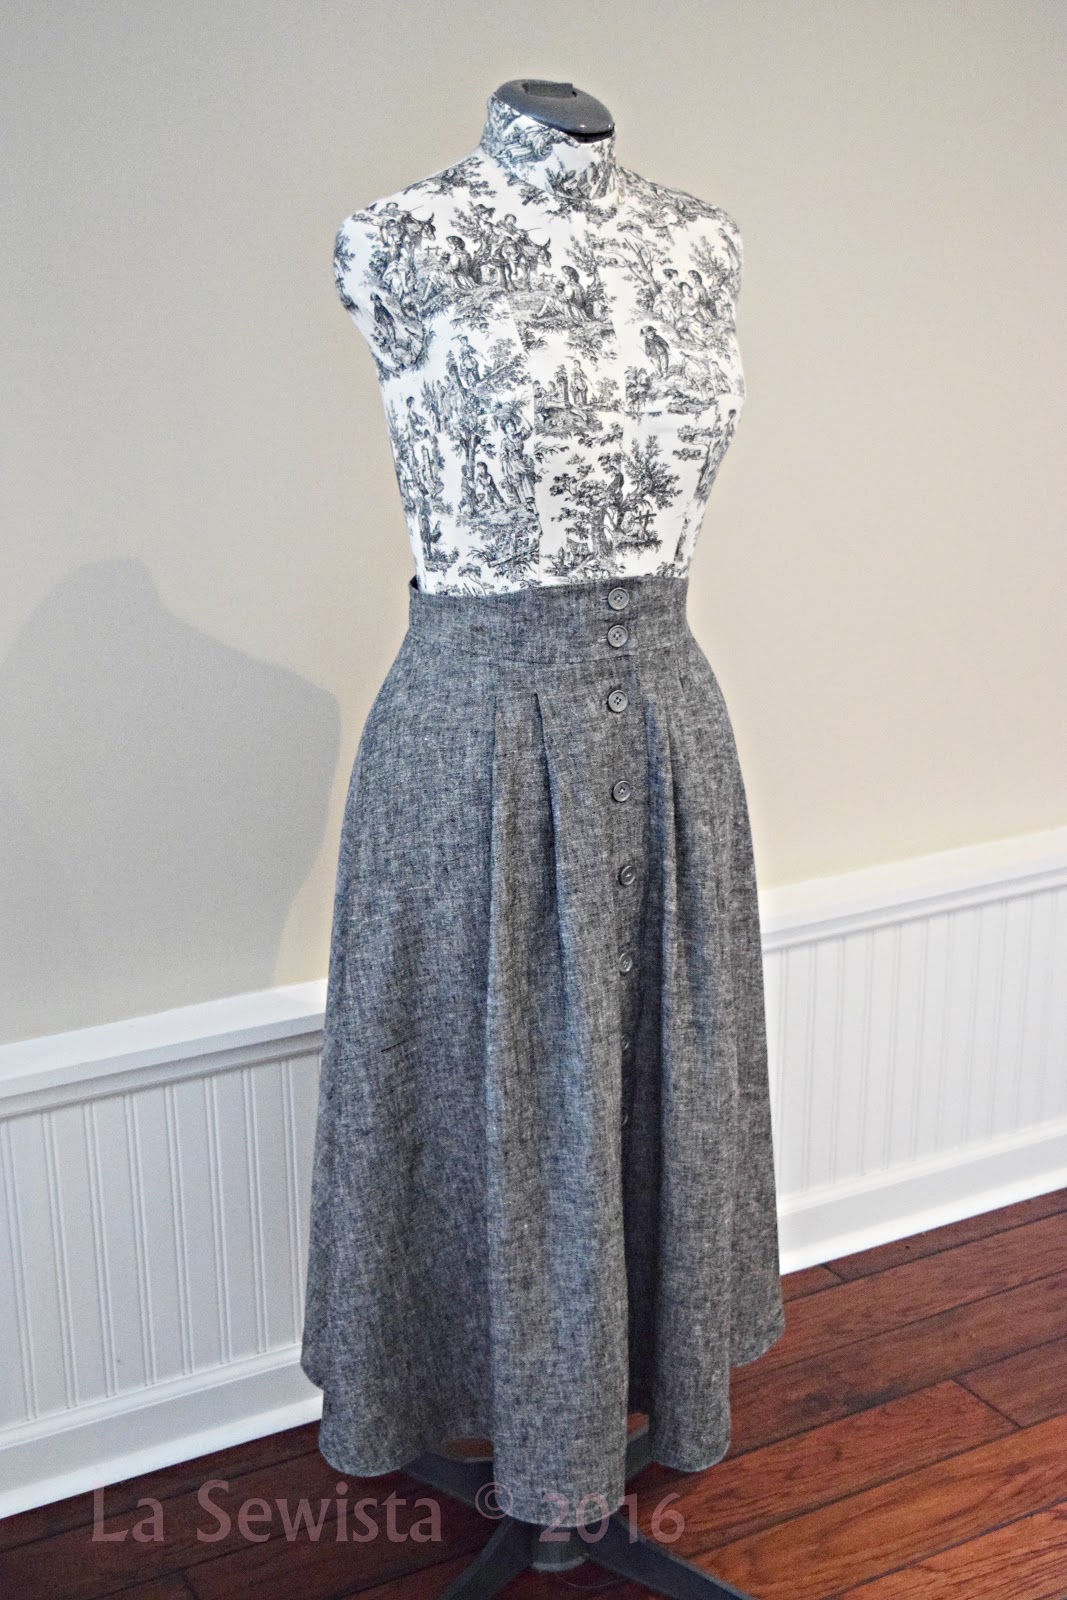
This is made from Kaufman's Essex linen blend which I usually get from Fabric.com, amazon prime and all. It is a yarn dyed fabric made of linen and cotton threads. It appears the white threads are the cotton. In the last post I gave info on matching threads to yarn dyed fabrics. Above you can see how the gray thread is pretty unobtrusive in the topstitching. That is something you want here because of the stitching irregularity that can happen when you use one of the matching thread colors. I'm pleased with the gray and it was perfect for the buttonholes.

Pattern:  

This is Simplicity 1166. The pattern is self described as "1950s Vintage" and consists of this skirt, a half circle  with pleats and a shaped waistband that is higher in front. There is also an interesting shirt and a bra top in the pattern as well.

Things I did differently from the pattern: My seams  were all Hong Kong finished. The waistband was attached and the facing had a serged finish. It was then stitched in the ditch from the public side to secure. The pattern has you turn under the facing and ditch stitch from the front. By serging and leaving it "out" bulk is reduced, important at a waistline!  The hem is also serged and topstitched on the very edge of the hem as well as an inch and a half in.  I cut out but forgot to put in the pockets, shame on me! A snap is specified to go at the waistband seamline under the overlap. I used a pants hook instead, It's shining in the second pic below.  It's really needed as the waist is snug and there is a lot of weight in the skirt trying to pull it down. The hook keeps it all in line.


Issues with the pattern? The pleats. The pattern has lines marked on the front skirt piece to match and  make pleats. I had one leftover. There was also one pleat marking on the skirt back. Perhaps brighter souls won't have any issue but the pattern is not clear at all, IMO, on how the leftover pleats go together. Finally I figured out that they met at the side seam line. I basted them in and put the skirt on the dress form. That did not work. It made the side seams stick out and didn't fall smoothly at all. I wasn't doing that! So, I manipulated this and that and after a lot of fiddling I pleated the leftover front line to the side seam. That lay fairly smooth. The remaining ease for the back pleat was moved to the center back seam where I did a small inverted box pleat which when I tried it on seemed more flattering anyway. But it took a bit of aggravation to get to that point. You can see how above the seam ends up inside the pleat and folded. At least now it lays smoothly.

If I made this again and I might, I would just go straight to manipulating the pleats like I did in this one. Much of the skirt is on the bias and the skirt hung for a week before hemming. 

The other issue I had was the overlap of the waistband and center front. It seemed pretty meager and was just not enough in my opinion. So when I moved around the pleats I made the overlap bigger as well. I'm glad I did.  Something this pattern does, like jeans do, is that when you have pockets or pleats close to CF and there is that overlapping the pleats can look lopsided like you seen in the technical drawing. I know there is nothing you can do but it bugs me. 

Conclusion:

This is a classic skirt design and one that I love. In the summer it will be cool and flow-y. It will work great for my work and I really look forward to making a white shirt from the same pattern to wear with it. I wouldn't say "highly recommend" because the pleat issues could confuse the less experienced or the less patient as they did me. But if you are willing to work through I think you will have a good basic skirt to add to your wardrobe. 

I am not going to start the white shirt immediately. I have the fabric but need to order interfacing and will tonight. In the meantime I want to make a spring/summer bag. I love the big tapestry bag I recently made but the warm weather is coming and making a new bag will be a nice change of pace before settling in with the shirt.  Today I played with some samples for the bag. I am not decided on how this will work out yet but here is one of my samples and I think it will work well for summer.


.....................Bunny


Monday, September 29, 2014

The Ikat Jacket, Simp 2153, again!


This really is meant to be a lightweight summer jacket but Mother Nature and my constant recent delays made for some Autumnal modeling shots today. I really like  this jacket and will get a lot of use out of it. Our summers are generally in the fifties at night so a lightweight jacket is a must. Factor in a lot of jeans wear and I think this will become a staple in the closet. Here's the 411:

Pattern: 
This is Simplicity 2153. It is the same jacket I used for the Threads Fall Jacket Challenge last year. A good anorak pattern is a great thing to have in the stash and this may not be the last time I make this. I can see me making it in some rainwear as well.

The pattern itself is fairly easy but I made quite a few changes and because of those changes did not follow the sequence in the pattern. More on that..........

Fabric:
This is 100% cotton home dec fabric, maybe, just maybe from Fabric.com. I do know the selvedge says it is a Raymond Waites design called "Tincia" (?), can't tell. It's hard to read. It also says it was made for Mill Creek Fabrics. I love the texture. It is like a heavy textured linen which you can see better here.

I prewashed this fabric removing the "soil and stain repellant finish" listed on the selvedge but it got a really nice soft hand to work with after that, more like clothing. I love to sew with home dec fabrics. I can't remember one, even tapestries, that I didn't throw in the washer and dryer. It softens them up and makes them much more wearable and sewable. Don't hesitate to look at home dec fabrics next time you are shopping. 

The lining is rayon Bemberg lining. Interfacing is a woven from Fashion Sewing Supply. Have to get more of their product as I am close to out!

Construction:

I made quite a few changes. The pattern does not specify a lining. I did a bound lining (formerly named flat lining) that you can see how to do here. It gives a really nice finish to a more casual garment like this. This fabric was quite ravelly and I am glad the seam edges were bound from the beginning.  The bodice pieces were all flat lined before starting construction. The sleeves were lined using the Nancy Zieman method which can be found in the tutorials. The armscye edges were bound with Bemberg lining. 

This pattern does not have a facing that goes around the neckline. I made one and much prefer how that finished up with the bound edges compared to a partical facing and lining run up to the neckline. I've never been a fan of that technique. 

I dropped the casing down a half inch as I felt it was a touch too high in the first iteration. 

Pockets were cut on the bias simply to add a bit of interest and to help the fabric move away from the home dec vibe. The hip pockets were cut at a slant with cuff. Rivets were used to secure the pocket corners and were intentionally put in upside down as I liked the back of the rivets better than the front. Pockets were topstitched with a triple stitch. 

I used simple drapery cord for the cording which I may change if I find something better. I am not 100% happy with that and am still looking. There is a pony bead at the end of each cord, simple, and cord locks at the waistline . 

I added two inches to the length which I find kind of interesting as I am only five feet tall. So watch the length if you make this. I faced the hem instead of folding it up. 

Split cuffs were added to the sleeves with a deep facing. The sleeves on this run huge. I took a good inch out of the width. Usually I am adding width to accommodate those late in life accumulations under my arms but this pattern actually had to be made smaller, so beware. 

It took extra effort and fabric at the cutting stage to insure that all the prints matched and were symmetrical throughout. 


Conclusion:

I am pleased with the pattern, once again, and the outcome. I love Ikat designs and this project let me express that choice. I highly recommend the pattern but suggest lining it one method or another and making a full facing that goes around the neckline. If I find the right rainwear fabric I may give this a go one more time!


*****************************************

I've had some questions regarding the iron I just purchased. I used it throughout this project and knocked down my ironing pile today as well. I am very pleased with it. It pushes out more steam than any iron I have ever had,no drips. It is a Rowenta "Steamforce" which I got through Amazon. My favorite feature, however, is that skinny little point with the steam holes in it. It is wonderful for ironing seams open effortlessly. No burned fingers! And those are all steam holes, not dimples, unlike my last Rowenta. 

******************************


I often get asked about my little bunny labels. I picked up this roll, half of which has been given away, quite some time ago. I got it at the much missed "Fabric Fix" store for one dollar for the entire roll. I would love to think that one day I will actual run out of little bunny labels. Now that's a sewing fantasy!...................Bunny

The Hanbok Vest

  I love this little vest. I thought about it for a long time. I am excited to tell you it's story.  Pattern: This is the Hanbok Vest by...