Sewing Vloggers

Showing posts with label skirts. Show all posts

Saturday, August 18, 2018

Viva Cuba!


Now, now, don't be afraid. I know this fabric is over the top. I recently showed it to someone and their eyes nearly popped out of their head. Their response was "you're not going to wear that, are you?". Well, yes, maam, I am.

This is Viva Cuba from emmaonesock and I was  smitten. What can I say? The colors are incredible.  I have two panels, the other laying on top of my work table. I have ideas and as of this afternoon, construction is in motion.


The selvedges are really deep, almost 3 inches on each side but it is still about 52 inches wide. I will make use of them as you will see. Let's hope that old car isn't in for a bumpy ride.......Bunny

Monday, August 13, 2018

Is it just too Simple - icity?


I have two  evening weddings to attend this fall. I am considering something along these lines.

Here is another version I like:


What I really like about these two outfits are the tops. I cannot find anything in patterns with the extended scooped out neckline like the red one above. Simplicity has a wonderful possibility in  Simp 8380 which could easily be worked up into a top with the scarf effect. I love the forgiving value of that scarf on the shoulder!


There are lots of versions online of this look. I think it is so feminine and very "Amal" and of the moment. These skirts have been a favorite of mine for many years, featuring my waist and hiding those wide hipbones and booty. I think I can work this. Here's another:


What I really want to talk about here is Simplicity Patterns. Ah, the name, Simplicity, Simple, right? I really don't think so. In my very young sewing days, when I was far more observant than skilled, I decided I didn't like them. Just     too   simple.     I really think they were back then. I can remembert my mom saying "We'll start you off with Simplicity patterns" and it sort of stuck. By fifteen I was knocking out the Vogues and criticizing the Simps. My biggest complaint which some may remember and which I thought at the time was just horrible, is that every pattern had two darts at the back shoulder seam. I would see those darts on the backs of people I knew and tell myself, "that's a Simplicty. Look at those two darts." Rarely did the Vogues have them. What impresses us in our teens, who can explain and what little did I know about shaping?

Fast forward and today I feel totally differently. I know we all have our favorite pattern companies and I would probably still say Vogue for numerous reasons. But, time and time again when I am searching for a design still nascent in my head, I start my search with Vogue, then McC, then Butt, and lastly Simp. Every stinkin' time exactly what I am look for pops up quickly in Simplicity. And the really interesting thing is that it is almost always a Cynthia Rowley design, my favorite designer.


This will easily make my envisioned top with the scarf on the shoulder. I will lower the darts obviously, and probably build a bra into the lining. I hate strapless bras, but we will work it all out. Funny how I still can't get over my dart issues with this company but keep finding just the right styles for five foot tall me and in my favorite designer. I wonder if   Rowley is petite?...Bunny


Wednesday, July 18, 2018

The Walk in the Woods skirt


The Walk in the Woods skirt is done and I love it. It is very comfy, cool and I like the look. Here's the deets:

Pattern:

There is none. I worked up the design myself which utilized the fact that I had two digitally printed panels to work with. One panel made the front and the second panel was split in half to make a back that would accommodate a zipper. Luckily the print is nebulous enough to not require precise matching.  I wanted a curved bottom edge and slits up the side. The waistband is elastic. 


Fabric:

This is a rayon knit. It is thick enough to be decent and is digitally printed with the design of a forest with blurred out details, rather pointillistic.  The colors are warm. Actually "warm and fuzzy" would be a good description. It is yummy to wear. I THINK it came from Emma One Sock but it is not on their site now. They do have some exceptional digital prints on their site. I can see this fabric working in the winter with boots and a sweater yet it is very comfy to wear today which is brutally hot and humid. Love skirts in the hot weather!


Construction:


This was a no brainer for the most part. I put an invisible zip up the back using Kenneth King's method which is one of those things that once you try there is no  going back. It is so simple and the results are great. For the waistband I used an 1 1/4 wide waistband elastic. I needed it to be fairly wide to cover my tumtum with short tops like the one I'm wearing. The panels were not shaped in any way but the fabric was thin enough to gather up on the elastic really nicely and fairly bulk free. After putting in the zip I had several inches of fabric to turn over the waistband elastic as you would a facing on the zip but I stitched the elastic into that seam as well. It snugs up really nicely on the waist. The elastic is secured at the zip, as mentioned, and ditch stitched into the side seams as well. No twisting! 


I wanted the curved hem and that was easy enough to draw out with a French Curve. As I did each of the four sides I matched the same numbers on the ruler to the fabric edges. The small hem was then interfaced with tricot and turned once. No ravelling with this knit so I wasn't about to add the bulk of a double turn, just no need to. Then I did my favorite knit hem technique, sewing on the very edge and then sewing a bit away, in this case about 3/8 of an inch. At the curve the interfaced hem was clipped and that handled the curve just fine. I used a 3.0 stitch length but the nature of this knit just sucked in the stitches and they look smaller. 


You can see how smoothly the back hangs with the zip. My hip to waist ratio is such that it really works better to add a zip rather than have a full pull on type of elastic waistband. The length was really determined by the most flattering layout of the digital print. I brought the darker stripe up to the waist area instead of the hips which  a longer version would have done.

In Conclusion:

This is simple, basic skirt construction, wide enough to not fret over fit other than length and the waistband elastic. I have actually ordered another digital print panel design that was so much an impulse buy and can't wait to make that up in a fuller, more classic version with a flat waistband. It was an impulse buy but I think it will be one of those things I will wear for years. I won't be using a pattern for that one either. Hey, maybe there's a future in becoming an Indie designer of rectangle pieces of fabric.............just kidding...........Bunny
ETA 08/01/18: Just want to say this has turned out to be a big thumbs up garment. It is so comfortable in this heat and so easy to wear. I've garnered compliments every time I put it on and look forward to wearing it in the winter with maybe a black turtleneck or sweater. I would make another pictorial digital print in a rayon knit in a heartbeat. ...Bunny


Sunday, April 10, 2016

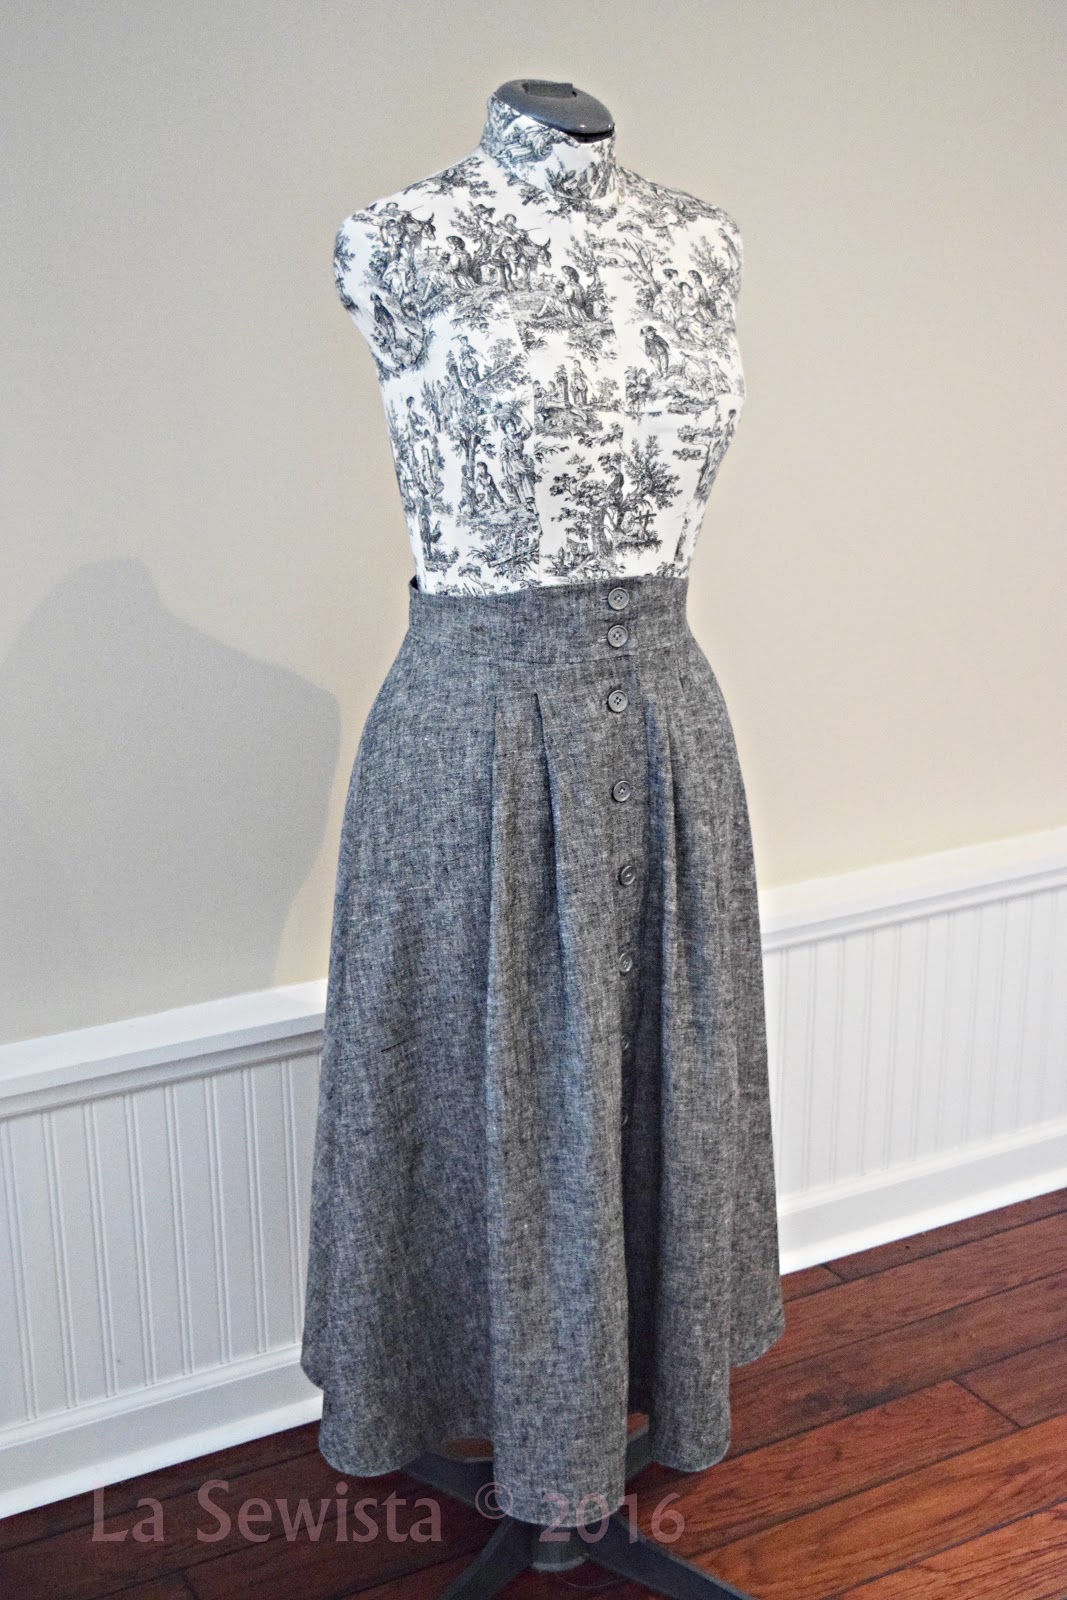
Simplicity 1166


What Simplicity calls a "1950s Vintage" skirt is complete. I am pleased with the results and should get a lot of use out of this for work. I love wearing skirts. I like short skirts, too, and just above the knee is probably my best length. Where I work there is an open staircase that the public  is constantly near or under. It is not a place for shorter skirts, but  since I love skirts I just make them longer if they are planned to be for work wear. And this one's long! Its an inch longer than the last denim skirt as that seems to be a bit more flattering.

Forgive me for not modeling. I plan to make the white blouse on this vintage reproduction pattern and when that is complete I will model the entire outfit. In the meantime here are details to share.


Fabric:

This is made from Kaufman's Essex linen blend which I usually get from Fabric.com, amazon prime and all. It is a yarn dyed fabric made of linen and cotton threads. It appears the white threads are the cotton. In the last post I gave info on matching threads to yarn dyed fabrics. Above you can see how the gray thread is pretty unobtrusive in the topstitching. That is something you want here because of the stitching irregularity that can happen when you use one of the matching thread colors. I'm pleased with the gray and it was perfect for the buttonholes.

Pattern:  

This is Simplicity 1166. The pattern is self described as "1950s Vintage" and consists of this skirt, a half circle  with pleats and a shaped waistband that is higher in front. There is also an interesting shirt and a bra top in the pattern as well.

Things I did differently from the pattern: My seams  were all Hong Kong finished. The waistband was attached and the facing had a serged finish. It was then stitched in the ditch from the public side to secure. The pattern has you turn under the facing and ditch stitch from the front. By serging and leaving it "out" bulk is reduced, important at a waistline!  The hem is also serged and topstitched on the very edge of the hem as well as an inch and a half in.  I cut out but forgot to put in the pockets, shame on me! A snap is specified to go at the waistband seamline under the overlap. I used a pants hook instead, It's shining in the second pic below.  It's really needed as the waist is snug and there is a lot of weight in the skirt trying to pull it down. The hook keeps it all in line.


Issues with the pattern? The pleats. The pattern has lines marked on the front skirt piece to match and  make pleats. I had one leftover. There was also one pleat marking on the skirt back. Perhaps brighter souls won't have any issue but the pattern is not clear at all, IMO, on how the leftover pleats go together. Finally I figured out that they met at the side seam line. I basted them in and put the skirt on the dress form. That did not work. It made the side seams stick out and didn't fall smoothly at all. I wasn't doing that! So, I manipulated this and that and after a lot of fiddling I pleated the leftover front line to the side seam. That lay fairly smooth. The remaining ease for the back pleat was moved to the center back seam where I did a small inverted box pleat which when I tried it on seemed more flattering anyway. But it took a bit of aggravation to get to that point. You can see how above the seam ends up inside the pleat and folded. At least now it lays smoothly.

If I made this again and I might, I would just go straight to manipulating the pleats like I did in this one. Much of the skirt is on the bias and the skirt hung for a week before hemming. 

The other issue I had was the overlap of the waistband and center front. It seemed pretty meager and was just not enough in my opinion. So when I moved around the pleats I made the overlap bigger as well. I'm glad I did.  Something this pattern does, like jeans do, is that when you have pockets or pleats close to CF and there is that overlapping the pleats can look lopsided like you seen in the technical drawing. I know there is nothing you can do but it bugs me. 

Conclusion:

This is a classic skirt design and one that I love. In the summer it will be cool and flow-y. It will work great for my work and I really look forward to making a white shirt from the same pattern to wear with it. I wouldn't say "highly recommend" because the pleat issues could confuse the less experienced or the less patient as they did me. But if you are willing to work through I think you will have a good basic skirt to add to your wardrobe. 

I am not going to start the white shirt immediately. I have the fabric but need to order interfacing and will tonight. In the meantime I want to make a spring/summer bag. I love the big tapestry bag I recently made but the warm weather is coming and making a new bag will be a nice change of pace before settling in with the shirt.  Today I played with some samples for the bag. I am not decided on how this will work out yet but here is one of my samples and I think it will work well for summer.


.....................Bunny


Thursday, March 24, 2016

Simplicity 1166, my next skirt


This is my next skirt project. I had a skirt like this at one time and wore it till the seams unravelled, rayon that it was! I love the vertical line of the buttons and this silhouette usually works for me. The back of the skirt is a full a-line so attention to fit is a bit more important than on the last skirt.  Lots of bias drape here. 


The fabric is this cross dyed linen made by Kaufman. It has a black and white thread, nice skirt weight and a lovely drape for the bias.  I've used this fabric before and really liked the final result. 

Unable to find anything with appropriate crispness to make the blouse in the pattern, I asked sewing friends about finding shirting. Mrs. Mole hit the jackpot, suggesting I try Farmhouse Fabrics. Now I know about Farmhouse Fabrics and their wonderful stock geared to the heirloom sewing crowd. I've bought from them before. It never occurred to me to check them out for shirting. Well, they have wonderful shirting and great prices as well. I purchased a white Italian cotton shirting and it is on its way. So the plan is to make the blouse in the above pattern when that arrives. Also on tap is a new spring bag. I'm thinking a basic tote but with some really fun color. 

I hope to get on this as soon as I feel up to it. Happy sewing, everyone!...........Bunny

Monday, March 14, 2016

Simplicity 1484


I love skirts. But skirts mean legs and years of working on my feet during 12 hour shifts have taken their toll. But now there are awesome boots, leggings with flats and even Sally Hansen leg makeup, which I adore, by the way! So I am on a skirt tear. I've ordered some black cross dyed linen for a vintage look pattern but it won't be here until later this week. In the meantime, this stinkin' skirt bug has hit bad.

I pulled out all my bottomweights, opened them up and started measuring. I also pulled out all my skirt patterns. Could I find enough yardage to make the skirt I wanted, once I figured out what that was? It was like haggling at a yard sale, but eventually we had a meeting of the two participants. It would be Simplicity 1464  and the blue denim border  print you see above. I had just enough to make it in a longer length. I think it would be cute in the shorter length but it was the waist I was concerned about and I had thoughts that it could make this project one condemned to the back of the closet.


It's been a while since I've worn a full profile skirt with a waistband. This could be one of those reality moments that hit post meno. Fingers crossed, I proceeded.  That style was one of my favorite and most flattering in younger years as my waist to hip ratio worked well with that look. This pattern says the waistband sits one inch below the natural waist. I didn't want that. I was going to make this sit higher, closer to my natural waist. It needed to be fairly stiff so it wouldn't wrinkle with bending and would keep its crisp look. I would not do the band shown as the border print would add interest.


Fabric:

This fabric was purchased long ago, I think maybe from the now departed Fabric Fix in Manchester, NH. ( tears ). It is 100 cotton denim but very lightweight. It looks just like jean fabric but is the weight of a chambray, so nicer for the skirt.  It has little snowflakey motifs and a border. I like that I had to run the border on the length as I think it's probably a better look for my height. Where the little snowflakey motifs hit near a seam and in one case, the bottom of the lapped zipper, they looked more like unravelling denim. I took out a Tee Juice fabric marker and painted the motif that peeked out of the bottom of the zipper making it look like a poor installation. Worked like a charm!  Sewists need permanent markers nearby for these sorts of moments!  There is no lining, none really needed and the waistband is backed with a medium weight fusible cotton interfacing. It's working well to keep it all upright in the waist. I thought about doing boning but the interfacing has it under control. 

Pattern:    

This is Simplicity 1464. It has pants, shorts and  long and short version of this skirt, having bands decorating the lower part of the skirts. There are three box pleats in the front, three of the same in the back and a side lapped zip. It is unlined.  I added 8 1/2 inches to the short version to get the length I wanted. I like that the skirt is curved at the hemline, therefore falling much better than a simple tube. The pattern has shape to the sides, no tube here!


Construction:

This was really Sewing 101 and would make a great beginner pattern. I did things a bit differently to make sure the waist fit. I sewed the front waistband to the front skirt panel, then did the same for the back  pieces. The notches and seams  matched perfectly. There are only three pieces to this pattern, front and back being the same. This way I was then able to baste the two sides together to check fit. Good thing.....seems I imagined my waist to be much bigger and ended up taking out another inch on each sewn side seam, down from the size six. That was blended down into the hipline and also made the waistline raise, my goal. . This skirt has a really nice hipline curve. 

Seams were all serged before sewing started. They were then machine stitched and pressed open. The waistband facing was the last thing to happen and was serged at the bottom and then ditch stitched on the public side in the waist/skirt seamline. That made the waistband finished and the innards hidden. This has a lapped zipper that I ran to the very top edge, no snaps, tabs or buttons. I do that almost all the time as it gives a cleaner look. The 5/8ths inch hem was serged and topstitched, all very simple.


In conclusion:

This project gave me great pleasure. That is because it was very simple, great fabric, it fit in the end and most of  all went quickly. I don't espouse sewing fast nor do I belong  to the Make It Tonight, Wear it Tomorrow Club. But I really enjoyed starting cold turkey on something at 11.30 in the morning and having it nicely completed at 4:30, the same day.  I can't tell you the last time that has happened for me and I took my time, too. I think my lesson is: let the pattern and fabric talk. Choose a simple design, Don't race and just enjoy the process. And don't always feel you have to change it up, "make it better", embellish it further, or use a couture technique. This is real sewing that anyone can achieve. I like that. Highly recommend this one, a very enjoyable make. ...Bunny

Sunday, March 29, 2015

Vogue 8499 #2, the beige linen skirt


I am so stinkin' happy with this skirt! I think it looks quite upscale and does more so in person when you see the yummy linen up close. Since this is the same pattern I reviewed in the last post I am going to focus on what I did differently.

Fit: 
I followed Lorrie's advice and my gut instinct and took three inches of ease out of the area of the skirt above the zippers. It looks so much  better and more flattering now. All I did was take out 3/8ths of an inch on each seam = 3 inches. I tapered to nothing above the pocket zippers. I am really pleased with the fit now.

Construction:
First, my apologies to Mrs. Charisma/Smith. Yes, I whipped out the simple black version on an afternoon but this puppy took me all day, 9-5, and I loved every minute. What took so much longer?

The zippers! Why? I didn't do them as the pattern suggested. The pattern has you put the right side of the lower side of the zipper to the right side of the pocket top. Then you make a seam . Turn over and topstitch. What I didn't like about this is that both sides of the zip were being treated differently. I wanted both sides to have the same look, whatever that was. So I serged the top edge of the pocket and pressed in a small hem. I placed the zipper bottom edge ON TOP of the right side and top stitched with a triple zigzag stitch. That stitch gave the white garment a bit more casual interest.  When it was time to put the pocket on the skirt I simply laid it on top of the side front and stitched the top edge of the zipper in the same way.

Now the pocket was installed the same way all around. Hubby says I can rob a store in this skirt! Those are deep pockets.

Those were the pocket zippers. Now I had to do the back zipper. I figured it wouldn't hurt me to  look at a few videos and tutes so off to the Web I went. There are MANY "exposed zipper tutorials" out there. None had the look I wanted. There were some real good ones as far as installation but they all had the two bottom "legs" of the zipper folded under and topstitched. I wanted something with a bit of a cleaner finish.


I was able to slip the zipper legs behind the fashion fabri and still have the zipper fully exposed and stitched for the rest of it's length. It was a bit involved to do this and I will have coming up a separate post on how to do it. It took LOTS of pictures.

This back CB  zipper was also triple zigzagged to secure.


This zipper LOCKS and that rocks! It actually clicks in and is very secure, love it. I love the vertical line this adds to the design as well. You can't see it here but the bottom of the zipper, on the beige linen, it is also triple zigzagged. I am on some sort of triple zigzag binge. Don't know what that's about!

Another addition to the construction, which you can see above, is that I topstitched the top edge of the waistband. I think that is always a more professional finish to an elasticized waist. I did that after the top edge was serged and turned down and pressed. Then I put in the elastic under the fold and simply stitched in a casing.


At this point, the back casing area was looking pretty nasty. So before I closed up the casing I went digging and came up with some beige silk dupioni. That was wrapped around the end of the casing and stitched in place when the casing was stitched. The top edge you see is the actual selvage edge of the dupioni. It is so much prettier now.

Again, all seams were sewn, serged, pressed to one side and topstitched.

I think you can see why this one took a full day to finish but finished it is and ready for the warm weather.

Fabric:
This linen is much heavier than the black linen of the original effort. It is what I would call a Home Dec Linen or bottom weight. For some reason, this skirt is heavy. The pockets I thought were a little too "Marcy" for me, I now love. The pockets are big but big means lots of fabric and lots of weight. That  keeps the skirt from ballooning out and looking silly. I really like the way they affect the drape of the garment and the weight they add.

This pattern has now been given the sacred status of


I love that. Highly recommend......Bunny


***********************************


Do you think I may have worn out my IDT, aka, walking foot? I can get it to work just fine with this bull clip!..........Bunny

Friday, March 27, 2015

Vogue 8499 finis!

Those of you who have followed this blog for a while know I love Marcy Tilton's designs but they rarely work for me, something about the neckline fit. This time I scored! I know you are looking at a basic black linen skirt but it does have it's details and I love it. I can't wait for the weather to warm and to wear it with a sleeveless off white tunic I have, a lot less structured look than what I show here and a more summery vibe. There is a lot to like about this pattern: quick, easy, and a bit of sewing and fashion detail. Sorry for the over corrected photos. You know how black is. 
Pattern:

This is Vogue 8499, a Marcy Tilton design. The pattern consists of three funky designs, two pants and the skirt. The skirt has large kangaroo pockets that I left off but the next version will have them. From pictures I've seen they add a nice weight to the skirt and "pull down" the fabric. This design is easy-peasy and can easily be made in an afternoon.

Fabric:
This is 100% black linen from who knows where. It is a nice bottom weight. I LOVE LINEN. It truly is my favorite fabric to sew and wear, so comfortable! It is a fabric that just gets better with time, the more you wash it the better it feels. There is no lining here. 


Construction:

The hem is stitched by machine. It's about an inch deep and I used my "lightening" stitch to sew it down. I plan to wash and wear my linens a lot and over compensate on the stitching, no regrets. Above you can see how the lower 4 inches of the  hem curves in at the four side seams, kind of cool. It's not an overblown bubble look, just a hint of curve. All the seams got stitched, then serged, pressed to the side and topstitched. Rugged! I did draw in a slight upward curve on the hem of the center front panel but truthfully, it barely shows. Next time I will do the hem as suggested. 

This skirt has a zipper in the back yet still has an elascticized waistband. It's OK but next time I will put in a couple of darts and cut back the fullness in the top third of the skirt. There's a zipper in there so why not? I think it will give a slimmer line, but given that I will most likely wear an overblouse with this skirt, the elastic waist is not a biggy deal. I did not follow the direction for the wiastband, choosing instead just to serge the edge and fold over and stitch. 

In conclusion:

I will definitely make this again and will try the pockets and darting the waist. I highly recommend this for a summer skirt. Now that it is done, seams pressed, etc. I will throw it in the wash to give it the beloved blistery look of much loved linen clothing. This pattern is simple, quick, has a bit of style and was fun to make. 

ETA: I decided to add the information on the blouse for those who asked. I did put it in the comments section but can make it linkable here. Here are the posts on the blouse as I made a big change to the design. 


Leave it to a white shirt to upstage a black skirt!

**************************************

This "Mag Eyes",  which I won in a contest by Sigrid way back when blogging was newer,  has been a Godsend in my beading/ weaving upstart. Those beading needles are a bitch to thread, thick thread and the world's tiniest eyes! This has saved my life. At loom class, two of the "professional" beaders showed up with high tech versions like the dentist uses, very expensive but that is how they make their living. I will have to check and see if my daughter has any castaways!...........Bunny


The Ray Pinafore, 2025's Epic Fail

  Happy New Year and welcome to my epic fail of 2026. I guess you have to have one, right? This is the Ray Pinafore from Paper Theory Patter...