Sewing Vloggers

Showing posts with label home dec. Show all posts

Sunday, November 22, 2015

The Taco Bag, McCalls 6532


I am anxious to start my Taco Bag, McCalls 6532.  First, the fabric which you see above. It was recently purchased at a Joanns fifty off home dec clearance sale. I truly regret not having bought more. Because I needed to place the motifs, the yardage amount was really compromised. Oh, I really had enough. I just didn't have the extra I thought I would. Of course this was in the store the day I bought it and never more. It is a black denim with very heavy rayon embroidery all over, huge repeat. I am showing  it to you all scrunched up to make a point.  This just came from the washer, dryer and iron. Before that it was like any home dec fabric, stiff, yucky and loaded with finishes. I wash home dec fabrics all the time. The hand on this changed in such a positive way that if I had more it would have become a rather Koos type coat, not a bag. It now has a beautiful drape and will be much kinder to sew, the biggest reason I wash Home Dec. That really helps eliminate stitch problems.  I do know that the marvelous new drape won't make any difference as I interface the hell out of the bag parts, but it does just feel nicer to work with. Moral: don't be afraid of those big ole nasty stiff but pretty home dec fabrics. WASH THEM!


Here you can see why I call it the Taco Bag. It's shaped like a taco! All reviews say they were surprised at how large it was but I want a large bag. I need one to schlep my books and stuff to work. This should do it. I will be doing View A, the view with no contrast bottom fabric. This is how I cut the motif. The big flower will be bisected by a zippered pocket but that should be below the center of the flower.


This pattern has a rather odd way of sewing in the zippered top. Actually, it's not odd. What's odd is that the gusset is not run down to the bottom edge of the bag, ending instead half way down the side. That means inside corners  to deal with. Add in that Peltex is recommended and you can see where this could get a bit sticky, something reviewers mentioned. I am going to pass on the Peltex and use my tried and true combo of Decor Bond and fusible fleece. It won't come out with the luggage look but that  is fine with me. It should still have some serious body.
***************************************

I am still working on beads and jewelry at night while watching TV and still enjoying it. I purchased and painted sheets of Tyvek, that stuff they wrap houses with, and hope to make some beads with that real soon. In the meantime, the holiday hustle is on. I am off to make one of my deserts to bring, Gooey Pumpkin Butter Cake from the Betty Crocker site which is down today "for maintenence" and wind out a bit of fresh pasta for dinner. Once you've gone that route its tough to go back to Barilla!..........Bunny

Saturday, November 21, 2015

Linen cushions are finally, finally done!


The cushion project for DD#2 is finally done. Cushion number one went perfectly, taking no extra time and falling into place like a snowflake on Christmas. Cushion number two: let's just say it was a friggin' nightmare. It took me five passes around the last boxing edge to get it finished. I've since calmed down, and the cushions are ready to be delivered on Thanksgiving. Here's the low-down.


DD wanted two cushions to fill the window seat of her bay window in the family room, 110 inches wide and 17 inches deep. On her own, she purchased the fabric and asked if I could make them. The fabric was a linen drapery fabric with a large repeat. Her purchase was done without my input. The linen was too light, IMO and would there be enough with the huge match? As far as the match, I made it with a six inch square piece to spare. Talk about close! But it matches nicely, on the covers and the boxing. Since the linen was too light, IMO, but was perfect for her room, IHO, I backed it all with fusible tricot interfacing, better.  For the insides I used the high density foam, thank you Joann's, and wrapped it with poly batting. The batting was loosely stitched together around the core and then was good to go.

I made miles of piping, 23 yards to be exact and too much but you just never know, and I used the technique for making bias found in the tutorial tab. The plan was to stitch the piping to one "cover" and then stitch the boxing to it following the previous stitching. That worked well and the first cushion came out perfectly.  The second cushion, not so much.

It took me five passes around the final boxing seam before I was finished. I sewed the boxing to the top and then took a couple days off to go to work. Then I stitched the remaining boxing seam to the bottom or so I thought. I am using my Kenmore and you can't see the spool from the front of the machine. I sewed the first four inches beautifully. Little did I know that the spool was empty after that. Remember in seventh grade Home Ec class they told you to look at your edge, not the needle? Well I did and thne stitched the entire boxing to the bottom with no thread, Pass Number One. OK, take a day off, start again with a full bobbin and spool of thread. It's going well. I got all the way around and about 12 inches from the end realized I had ALL THIS EXTRA fabric bunching up  at the end, GAhhhhhh. The boxed corners didn't match up from top to bottom either, Am I losing it? I am just shoving this away.

Another weekend and I rip out all the previous stitching that should have finished the cushion. Try again. This time I was really careful, lining up my corners nicely and spreading out any ease. Looked good and I decided I would baste it first just to be sure. I baste stitched all around  and all look wonderful. We are now into Pass Number Three. Let's finish this baby! I grab the cushion cover and start sewing.  I am excited to be done. and wha.....I restitched the OTHER boxing seam which was just fine, Pass Number Four. Can you hear my primal scream? Ok, here's comes Pass Number Five and I am going to get it right this time and I did! The Sewing Gremlins definitely took up residence in my sewing room for this project. Is not any project for someone else, whether we love them or not, doomed to major frustration? Sometimes I think so. But it is now done, and I am sipping my glass of wine as I write here.

Below you can see the two cushions. Because they are so long I couldn't get them all in the pic or close enough for detail. They are the same size and match nicely despite some sort of optical illusion going on.


I will be bringing the two cushions to New Hampshire and will  place them in their new home on the window seat in the way wide bay window. In the end, I think they will look nice and DD will appreciate my efforts. I am just glad it's done.

Hanging over the couch and visible in a few pics is the tapestry for my next project. I can't wait! I will be working on a much needed new bag for winter. Reading Marie Kondo's organizing book conned me into chucking nearly every bag I own. They didn't  "spark joy" in me. My next project will be making a bag that "sparks joy" in my heart. Better not have any gremlins.....................Bunny

Friday, October 30, 2015

Those pesky cording/welting ends!

While I have several posts on the blog about my previous excursion into cushion making, it occurred to me today that I didn't show what to do when you have finished stitching the cording/welting to the home dec fabric. They need to meet in a smooth, rather unnoticeable way and that can get a bit tricky to do.

On this project I am attaching welting all around the rectangle of fabric that will make the top of the cushion. The bottom of the cushion will get the same treatment. There will be a band of fabric, aka, "boxing" running around the perimeter of the cushion but that's later!


On the seam that attaches  the welting to the rectangular base, both raw edges are met, just like sewing any seam. I've made my seam and my welting seam allowances just a hair under a half inch . Stitching will begin about 2 inches up from the end of the welting. The welting is attached all around the rectangle.Stop sewing approximately two inches before the start of the seam.


You should now have an unsewn area of about two inches on the rectangle and  couple of dangling pieces of covered welting.


Trim the right hand welting to one inch in length. Open up the stitches on the left hand welting. Put some Fray Block on both ends to stop unravelling.


Go to the ironing board. Move the cord out of the way. Trim and fold back the end of the left hand welt and press into place. The left hand welt will need to be trimmed so that it is long enough to cover the right hand welt by about1/2-3/4 of an inch once folded and in place.


Wrap the fabric covering the left welt over the trimmed right welt. Trim and Fray Bloc the left cord so it meets up with the right cord.


Pin and take it to the machine. You can see my wet Fray bloc in all the pics.


Stitch with a 1.5 stitch length over the unstitched area. 


Still wet with Fray Bloc but done! Two points: this technique can be used with any sort of corded piping. Here it is on Home Dec but I have often used it with baby piping. Also, an effort should be made to plan the welting so that the joins are far away visually, in this case on the short side of the cushion.  Happy welting!......................Bunny

Monday, September 29, 2014

The Ikat Jacket, Simp 2153, again!


This really is meant to be a lightweight summer jacket but Mother Nature and my constant recent delays made for some Autumnal modeling shots today. I really like  this jacket and will get a lot of use out of it. Our summers are generally in the fifties at night so a lightweight jacket is a must. Factor in a lot of jeans wear and I think this will become a staple in the closet. Here's the 411:

Pattern: 
This is Simplicity 2153. It is the same jacket I used for the Threads Fall Jacket Challenge last year. A good anorak pattern is a great thing to have in the stash and this may not be the last time I make this. I can see me making it in some rainwear as well.

The pattern itself is fairly easy but I made quite a few changes and because of those changes did not follow the sequence in the pattern. More on that..........

Fabric:
This is 100% cotton home dec fabric, maybe, just maybe from Fabric.com. I do know the selvedge says it is a Raymond Waites design called "Tincia" (?), can't tell. It's hard to read. It also says it was made for Mill Creek Fabrics. I love the texture. It is like a heavy textured linen which you can see better here.

I prewashed this fabric removing the "soil and stain repellant finish" listed on the selvedge but it got a really nice soft hand to work with after that, more like clothing. I love to sew with home dec fabrics. I can't remember one, even tapestries, that I didn't throw in the washer and dryer. It softens them up and makes them much more wearable and sewable. Don't hesitate to look at home dec fabrics next time you are shopping. 

The lining is rayon Bemberg lining. Interfacing is a woven from Fashion Sewing Supply. Have to get more of their product as I am close to out!

Construction:

I made quite a few changes. The pattern does not specify a lining. I did a bound lining (formerly named flat lining) that you can see how to do here. It gives a really nice finish to a more casual garment like this. This fabric was quite ravelly and I am glad the seam edges were bound from the beginning.  The bodice pieces were all flat lined before starting construction. The sleeves were lined using the Nancy Zieman method which can be found in the tutorials. The armscye edges were bound with Bemberg lining. 

This pattern does not have a facing that goes around the neckline. I made one and much prefer how that finished up with the bound edges compared to a partical facing and lining run up to the neckline. I've never been a fan of that technique. 

I dropped the casing down a half inch as I felt it was a touch too high in the first iteration. 

Pockets were cut on the bias simply to add a bit of interest and to help the fabric move away from the home dec vibe. The hip pockets were cut at a slant with cuff. Rivets were used to secure the pocket corners and were intentionally put in upside down as I liked the back of the rivets better than the front. Pockets were topstitched with a triple stitch. 

I used simple drapery cord for the cording which I may change if I find something better. I am not 100% happy with that and am still looking. There is a pony bead at the end of each cord, simple, and cord locks at the waistline . 

I added two inches to the length which I find kind of interesting as I am only five feet tall. So watch the length if you make this. I faced the hem instead of folding it up. 

Split cuffs were added to the sleeves with a deep facing. The sleeves on this run huge. I took a good inch out of the width. Usually I am adding width to accommodate those late in life accumulations under my arms but this pattern actually had to be made smaller, so beware. 

It took extra effort and fabric at the cutting stage to insure that all the prints matched and were symmetrical throughout. 


Conclusion:

I am pleased with the pattern, once again, and the outcome. I love Ikat designs and this project let me express that choice. I highly recommend the pattern but suggest lining it one method or another and making a full facing that goes around the neckline. If I find the right rainwear fabric I may give this a go one more time!


*****************************************

I've had some questions regarding the iron I just purchased. I used it throughout this project and knocked down my ironing pile today as well. I am very pleased with it. It pushes out more steam than any iron I have ever had,no drips. It is a Rowenta "Steamforce" which I got through Amazon. My favorite feature, however, is that skinny little point with the steam holes in it. It is wonderful for ironing seams open effortlessly. No burned fingers! And those are all steam holes, not dimples, unlike my last Rowenta. 

******************************


I often get asked about my little bunny labels. I picked up this roll, half of which has been given away, quite some time ago. I got it at the much missed "Fabric Fix" store for one dollar for the entire roll. I would love to think that one day I will actual run out of little bunny labels. Now that's a sewing fantasy!...................Bunny

Tuesday, May 28, 2013

Bulletin Boards, anyone???

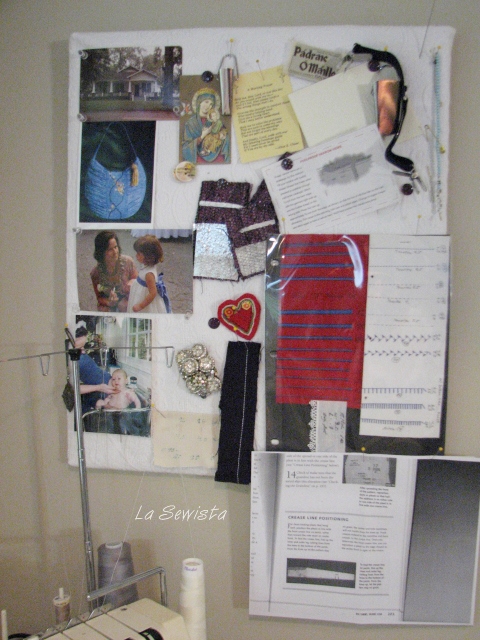
I'd be willing to bet that a good 85% of all  our sewing spaces contain a bulletin board. I'd also bet we each use them differently. Some are strictly inspiration,  others tracking centers and even other family albums. Mine seems to be a little bit of all of those things. What is on yours? I would love to know. Here's my breakdown.


  • The home I grew up in and loved in Lafayette, Louisiana. They tell me now its on the National Historic Register. Those are huge pecan trees that we used to pick by the sackfull.
  • A holy card remembrance from my Mom's passing. 
  • A bias tape maker
  • Buttons that I love and think are so pretty but can never find a use for
  • A pic of my smocked bag that came in honorable mention in the Kaufmann fabric challenge.It toured the country too!
  • A piece of wool boucle with an attempt at foiling on it. I like it but who wants to foil expensive wool boucle. There is a lot more of that boucle in the stash. 

 
  • A picture of Sophie with Bunbun in her flower girl dress made by same. She is eight now and growing to be such a beauty. 
  • Me bathing my first born grandchild. This was the thrill of my life. His parents left him with me for a weekend. You grandmothers all understand. He is eleven now and so tall.
  • A brooch I made out of rhinestone buttons I picked up at a Hadassah Thrift sale. The suit was awful but the buttons were great. Once in a while I actually wear it and it looks great on a black coat. 
  • Sample of a topstitching technique. 
  • Practice piece of embroidery with bullions on some red cashmere. This became one of many embroidered hearts on a little cashmere coat for Carly. 
  • Notes on a fabric swatch regarding stitch length, tensions, etc.
  • A lonely black button???

  • Another bias tape maker
  • Label provided with some Irish wool that a family member gifted me. 
  • Clip for pants of swayback women. You clip it from belt loop to belt loop to pull in the back. Haven't tried it yet.
  • My bracelet from the hospital where I was born. My Mom always kept it and I found in her box of special things when she passed. At one time you did not get a plastic bar coded bracelet as a hospital ID. You got a bracelet made of ceramic beads with  your name spelled out. It has my name right but clearly gender difference were not being made with the color of the beads. 
  • Morning prayer to start my day on the yellow card. 
  • Thank you from a treasured sewing friend I helped. 
  • Directions from Threads for a tiny hem technique, not the Kenneth King one.
  •  Chart I made giving tensions, widths, lengths of stitches I use frequently. This has been invaluable. 
  •  Photocopy of a page from somewhere telling how to get the straight of grain/crease on a pant leg. I always seem to forget this. 
This little bulletin board, covered in white metalasse, thank you, really says a lot about me, about what I value. What does your sewing room bulletin board say about you? Are you strictly fabric swatches and patterns? tons of family pictures? pics of garment completed? I would love to hear what's on your board. Curious minds are asking...........Bunny

****************************************************************************

We live pretty close to that area that got the 36 inches of snow in upstate NY two nights ago. It is now melting and coming downstream. Our river is now roaring but as always safely away from the back door. But the roar!!!! You can't imagine...................Bunny


Sunday, January 13, 2013

A Quickie No Sew Project

I sure hope you don't get the flu. I am getting over being sick enough to be out of work for a week and sicker than I've been in many many years. I wouldn't wish this on anyone. And I and my three co workers, who were just as sick, all had our flu shots, too!

This was a small no sew project that  gave me a bit of sewing satisfaction this morning. I guess I should call it Faux Sewing because not a needle moved on this one.
I have two of these chairs. They have never been outside or in the sun at all. But they have been in my basement packed away for seven years. They are heavy duty, sturdily built and worth saving. I have always loved them. But age has faded their glory. I switched them out in the big remodel and brought them upstairs to replace two nasty chairs that I never liked. We have a "light" look to the great room and I think they fit in nicely. But those big boring cushions.....oy...

 I got 2 1/4 yards of home dec fabric and just cut it in half. I serged the raw edges.


 I centered the cushions on the fabric over on my island, just a convenient spot. Then  I proceeded to fold and pin with safety pins. The straight front piece needed to be nice and flat.


So it was a simple matter of fold and pin. I may make a nice piped cushion further up the road but this gave me some immediate satisfaction, something I really needed after not having sewn for a while. I like the result.
In the spring the chairs will go outside to be spiffed up. My research has shown me that a gel stain will make these look like new and then a quick coat of urethane spray to finish. I think they will look great when all is said and done but in the meantime they look better than what was previously in this space. I think you can see their potential. When hubby was in a furniture moving mood I had to take advantage and get them up here. Now on to some real sewing! (The camera angle makes it look kind of skew but it's not.)

Sunday, December 9, 2012

An Introduction...

Let me introduce you to Mrs. Mole. The name will be self explanatory shortly. Mrs. Mole writes one of the best sewing related blogs I have seen in a while . She is a career alteration expert, has a degree in fashion design, a highly entertaining sense of humor and has been sewing for over forty years, not a bad resume! Her blog,  "Fit For a Queen" , tells the tales of her many clients for whom she alters clothing. Her stories are hilarious and her skills impressive. But what Mrs. Mole has more of than anything and anybody is Patience with a capital P!

Mrs. Mole's posts are mostly text except when it comes to showing her often very complicated alterations. She does do wedding gowns and formals by the score but has her share of clients that she would prefer to throw under the bus, or should I say kick under the sewing machine"?  I have just recently found her blog through links on Pinterest and am so glad I did. Check her out. The entertainment value will have you smiling, laughing and wondering where she gets all that patience. I think she could be a diplomat to the Middle East. Just thought I would share this wonderful find with you all. If you have ever thought of going into the alteration business, you really need the reality check that this blog brings to that type of work.Through it all, Mrs.Mole still passionately loves altering clothing. I think she is a saint.

When telling her tales she changes names and occupations and never reveals her true identity, therefore the name, "Mrs. Mole."  I don't blame her. She is brutally honest in her assessments of her clients. Her honestly is coated with the best humor which makes it all a good read. Highly recommend.
*********************************************************************************


Halleluiah!  The floors are all installed and we are so glad we waited for what we wanted. They are gorgeous hickory with a yummy red undertone. They look great. Now we have to fill in all the nailholes in the millwork and give a quick second coat to the white trim. We are really happy. Some of the new furniture needed has been ordered and we are still shopping for the rest. The worst is behind us. We have guests arriving the week after Christmas so the hustle is on. When  all is said and done you will all be invited to the Grand Tour, big sigh of satisfaction here. I can't wait to get back to some serious stitching.

**********************************************************************************

Can you tell I attended a website building seminar for work this week? I came home and started playing with the blog as a result. I would like to publicly thank Shams, of Communing with Fabric,   who graciously answered a question for me and was a big help in my final decision about the "look".  I am thinking it will be fun to change my header photo about once a month to keep things interesting. What you see in the header today is a piece of silk brocade my daughter brought me back from Singapore. It is one of those fabrics I just like to admire and it reminds me of my daughter's thoughtfulness while on the other side of the planet on business. Happy Sewing!.....Bunny

Sunday, May 13, 2012

Roman Shades Begin!

 photo courtesy Robert Allen Design  Dialogue

This is what I am shooting for the Great Room windows but as a stationary valance that is a tad less formal. You have seen my fabric which I love. We now have the lumber to mount them on and DH will cut that soon. The big challenge here is the ribbon. I have ten windows, two one yard strips of ribbon on each window so I need 20 yards of ribbon. Ya think a bit costly? I sure do. So here is what I did today.
Rolls of Offray grosgrain ribbon I can afford, particularly with the right coupon from the right source. The ribbon matches the beige embroidery on the fabric. I got the idea of possibly stenciling the ribbon and spent a good part of the afternoon making samples. The room is a soft green, white trim, and assorted pieces of furniture in greens, black and grays and a bit of off white. I did stencils in those same colors and here are the results. Keep in mind this motif is not what I would use. I was just testing color here. I was also trying to figure out if I wanted a softer more stenciled looking effect or a more crisp edge to the paint.

After this I decided to see what Mr. Pfaff could do. I picked out a stitch motif on the machine. You all know I am not a machine embroiderer, just never caught the bug. Then I picked out the threads. I put stabilizer under the ribbons and after a few tries, adjusted the stitch to what you see here.  Here are the results.

 
On this one I used a gray rayon thread. 

Above you can see the same in a regular dual duty thread in the same green as the fabric. 

And here is my final choice, a taupe plum-y color rayon thread. I like this one as it shows but is not too garish, just enough contrast. Whatcha think? I find grays can just die and have no life so this taupe shade has a bit more life than the gray and the green washes out IMO. I want the ribbon to contrast as it does in the original and add a bit of zip.

I hope they enough ribbon at the Joanns for me...and lots of thread too! I will be at this for a while!

********************************************************************************

Hope you are all enjoying a wonderful Mother's Day today. Mine was as good as it can be when one is so far from their children but all checked in, we skyped, and I received some lovely gifts . DH gifted me with something I think is pretty special.

A bucket of mealy worms for our bluebirds! These are dehydrated so have no fear. We are both avid birders and the bluebirds love these. Ours have returned and need a bit of their favorite treats. If you are into birding I just read a wonderful book, recently published, called "The Bluebird Effect". It is not what you think. This is the story of a woman passionate about birds who despite obstacles made them her life's work. Her knowledge of birds is like no other I have seen when it comes to understanding their behavior. The book is full of her many drawings,  many drawn right at the nest as she watched. She is an artist too! Her story and her love for birds is a joy to read about. Her name is Julie Zickefoose.


Friday, February 10, 2012

Office Chair Slipcover

My valance project is waiting for a measurement from DD and until I get it I can't continue. So while that project is in a holding pattern I decided to get going on the office chair. I made the welting this morning and have the back front and seat complete at this point. I can't  do the back of the back (!) until I have the seat and ruffle complete and I'm not there yet.This has been a journey, I tell ya'. Once the front was all welted and sewn to the band it was time to connect the back, or so I thought. My plan for the back totally fell apart as my brilliant idea would not make a smooth transition to the sides/front of the chair. Back to square one for the back. I decided it would be wiser to get the seat completed and then fit in the back last. Hope I'm right, but who knows?
This matelasse is like sewing iron curtains. I wanted a gathered skirt utilizing the scallop of the bedspread. Are you kidding? There is no way this stuff gathers. So I am putting in box pleats which by the time they are stitched in look like soft gathers. I really like that look. I should have jjjuuuusssttt enough scallop border to go around. We are close to the end and I should finish this weekend. Then maybe, just maybe, I might get to sewing some clothing for myself. Many things have been on the back burner for my own wardrobe since last fall and I am itching to get started on some. I also need to get a handwork project going as well, not sure what yet.

And as happens whenever anyone sews an all white project, the never fail needle prick spits blood here and there, always before you feel anything. I am hoping the spit treatment will work.

We are rounding the bend with this decorating project in the studio.  Tomorrow DH and I are hitting Lowes for some crown molding shelving for over the cutting table. Hopefully that will be up soon. I'll post a grand tour when all is done....Bunny

Wednesday, February 8, 2012

Home Dec Returns, Scallops Tute

I am working on a valance for DD#2. She has shown me a design with a scalloped edge on the top. There are loops at the high point of the scallops that will traverse a pretty rod. We decided using the full width of the Home Dec fabric would give a gentle fullness between the loops. Too much fullness and the effect of the scallops is lost. Here is how I got the perfect sized scallops across the valance without benefit of a math wizard close by.

* Figure out your finished width of fabric. This measurement will not include seam allowances but you will be adding those to the total width for cutting later. In other words I had a 54 inch width. With two half inch SAs I would have a FINISHED WIDTH of 53 inches. Hold that number!

* Get yourself some adding machine tape or a very long strip of paper taped together. Make it at least three inches wide. Cut it to the FINISHED WIDTH of the valance, in this case 53 inchs.
* Fold the strip perfectly in half. Saying that word "perfectly" so reeks of Martha Stewart. Ok, now fold it in half again, then again, and keep folding in half until you get the width of the scallop you want for your window treatment or hem or whatever you need a scallop for. This is your guide. Crease it sharply. Unfold it and place it against your valance width. You should have a perfect fit with a half inch extra for SAs on each side. Yippee! Now to get it on the fabric and cut.
* Now you need a manila folder or some other type of card stock. Cut two pieces appx 4 inches high and the exact width of your finished scallop, basically the width crease to crease of one scallop.  Use your rotary cutter to get an exact length and width  cut. Find the center and mark with a vertical line. At this point we are only considering finished measurements here. Don't worry seam allowances yet. Decide how deep you want the scallop to be. I used one and a half inches.Line up a bowl or other round object to mark your card stock with this shape. Make sure at the corners you leave a seam allowance. This will accommodate the loops. The scallop does not go from corner to corner because of that.  I wanted a half inch finished space at the top of my scallops so I needed each scallop started a quarter of an inch in from the edge. You can see the bowl is not on the point of the card but its edge is a quarter inch in from the edge of the card. This is card number one. Cut the scallop out. Trace its line onto the folded paper tape and cut that out. Unfold your tape and you now have a finished size template for placement on the fabric width. You also have a card the same shape of one scallop.
* Now cut another card the same rectangular size as the first card. Don't cut out any scallop. Use the first card to trace the shape of the scallop on to the second card. Add your seam allowances to this second card. They are ONLY added to the top edge of the scallop, no side edges. You can see the paper tape template is the same size as the line drawn on the second card as well as the SAs added.

* So here is Card 2 with seam allowances added to the top edge. Take a ruler and line it up with the bottom edge of the finished scallop, the scallop  line closer to the bottom of the card. Mark two spots equidistant from the bottom edge on the left and right sides and the same distance away from the lowest point of the finished scallop. Put a tiny notch on this side, where the arrows are.
* Lay out the wrong side of your valance fabric. It should be cut to the proper width including seam allowances. Decide how long it will be. Use your finished Card 1 to figure out placement of the low point of the scallop on your fabric. Mine was 12 1/2 inches from the bottom edge, the bottom edge being a half inch SA. Mark that and make a line across the width on the wrong side at that mark, 12 1/2 inches for me. Take Card 2 and line up the notches with this drawn line. Trace around the scallops on Card 2 to give you the cutting line for the top edge. Move Card 2 down the width butting the left side to the right side of the previous scallop. If you are using my measurements, this will give you a one inch seam allowance across the top point of scallop. I am calling this a seam allowance only because this is where my loops will be sewn.  What you see above shows the cutting line for the valance top edge. If you did it right it will be a perfect fit across the width of fabric with just the right size SAs remaining on the sides. Which brings me to say that when you start laying out your card two for marking you must start in a SA's width away from the edge, very important.

Now all I have to do is cut my lining the same size and stitch it up pillowcase style, easy peasy. I'll show you how I do the loops and bows when I get to that. I need to buy some lining in town tomorrow. I don't even have an old sheet I can scrounge. Any  questions, let me know.

This technique would also work nicely for hems on a skirt ...Don't forget Thing One and Thing Two, oh, I meant to say Card.....Bunny

Thursday, January 5, 2012

Next in the Queue - A Slipcovered Office/Sewing Chair


I am embarrassed to say I finally found my white matelasse bedspread right here under my nose. It was one of four layers of blankets on the guest bedroom bed. (It gets a little cold here.) I went to change the linens and saw it there. How did I miss this?  It quickly became a non blanket and future slipcover for my sewing/office chair. Don't tell DH I am cutting it up although by now he has pretty much seen me cut up just about anything that doesn't move.


Once again Pinterest provides the inspiration. Thank you, Pinterest! This chair is from "Cozy Cottage Slipcovers" and I think just darling. I want a longer skirt, however, as I use this chaired jacked up quite high. That's because my machines are at counter height and by raising the chair and having a box under my counter to rest my feet I am able to comfortably sew for hours.  I am not sure if I will do the bow on the back or a couple of rows of big buttons down the pleat. This design looks quite simple but here is my chair:
Check out the arm setup. It actually  would be quite easy to remove the arm and do a more upholstered type of cover but I want the ability to take it off easily and just throw it in the wash. I know it will get covered in threads and the occasional spilled cup of coffee. I like the heavy texture and the fact that it is very washable. I like the looser "slip covered" look but hope it doesn't look like a messed up bedspread after I have sat in for a few hours. I can see I will need to pull out my faithful Sunset "Slipcovers and Bedspreads" book. You saw me use it for Audrey's cushions.

Which brings up another dilemma - what about the welting? Do I want a contrast or do I want it all white OR do I want to do something like a ruffle instead, or a tiny pleated trim? Hmmmm....And do I want to use velccro to pull it all together or would some ties look cute? This is a great opportunity for some dressmaker details.  You can see this hasn't all quite gelled yet but the fact that I have the fabric now means its a go.

I have a large job for a client this week, one involving many uniforms, so this project will be hit and miss for a few days. I also have yet to put together my wall unit. Today I counted out and matched all the pieces up to the schematic. We are good to go. This thing is incredibly heavy and the idea of it hanging on the wall really scares me, I mean really heavy. The sides and top are substantial in a nice sort of way. While this makes them look great, it also makes them need some engineering to keep them all from falling on the floor. I sure hope my eyes weren't bigger than my stomach here and that my wished for unit works out.

Thanks everyone for all the congratulatory comments on the Threads recognition. Makes a girl feel good and is always appreciated. Congratulations to Cenetta, too, beautiful dress!   Now off to the uniforms....Bunny

The Ray Pinafore, 2025's Epic Fail

  Happy New Year and welcome to my epic fail of 2026. I guess you have to have one, right? This is the Ray Pinafore from Paper Theory Patter...