
Viva Cuba! While this skirt has been done for a while, the fashion pics have been fighting with what has become a rather active social life lately. Sewing continues but I am now working and weekends are spent sharing with family. Life is good....
Sewing with these digital print panels definitely presents specific challenges, the biggest being the limited shape and size of the fabric and how best to utilize the designs.Luckily in my favor was the fact that I am short but I am sure with thought any print panels could be worked up for any height person to enjoy.

Pattern:
There really was no pattern used here, just my own evolving design. I knew I wanted a flowing skirt with a waistband to best show off the print and it's lovely colors, which really are magnificent and even more so off the computer. I used a lapped zipper on the side, a waistband interfaced with wide elastic and a hem machine top stitched on the edge and further up as well. I needed to get all of the width into the waistline and that was the biggest challenge but I think I pulled it off comfortably and with no crazy bulk.

Fabric:
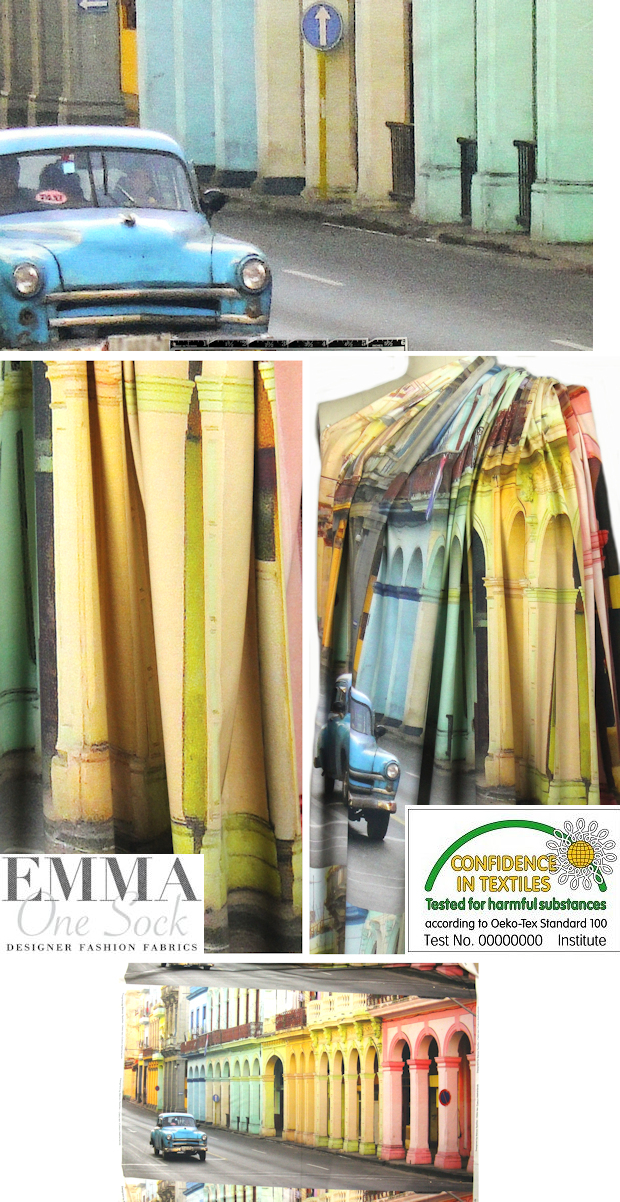 |
| courtesy emmaonesock |
This is "Viva Cuba" from Emma One Sock.It is a digital print panel designed and manufactured in the Netherlands and one of several they offer. The panel is 31 inches long so that is what I would have to use for the length and hems of my skirt and the width is 60 but there are 2 1/4 inch selvedges on each side. These wide selvedges came in VERY handy as you will see. . In the end, the length of the finished hem of my skirt was 120 inches. Emmaonesock says the fabric is a " cotton/lycra blend with 40% stretch in both directions." It is a very thin but totally opaque fabric, really nice quality and perfect for this skirt as bulk was a worry. Think very high quality white tee shirt fabric. When I first received it I was a bit put off by the feel of the public side as the photo process seemed to make it a tiny bit "plastic-y". I swear, as I worked with it, it seemed to soften up and lose that feeling, particularly once it was ironed a couple of times. In the end I am really happy with it and the way it feels. I think it is too thin for a body con type of garment but any design that moves away from the body would be perfect. While this digital photo of what appears to be Old Havana is beautiful, my goal was a garment that let the print and its lovely colors flow together and not let me look like a tourist billboard, pretty as it was. I wanted to just show the amazing colors as they moved around the skirt in a rather diagonal fashion. ETA: I just checked the EOS site and this fabric is no longer available bu there are other great Dutch digital prints and they can be found under "conversational prints". Go figure. Another ETA: the print panel is back in stock. Yay!


(Please forgive the shadow on the left edges of everything in several pics. Life is just too short for me to change into everything again and visually lose 15 pounds by retaking the pics. Thx for your understanding.)
Construction:
I'm going to break this down into the different stages it took to complete this design.
The first challenge was cutting out the skirt. The fabric was a 31 x 60 inch rectangle panel with additional very wide white selvedges. I purchased two panels. The challenge was to design a skirt, utilizing every inch of the panels, that would be feminine and would accentuate the colors and drape, not so much the subject. This meant there would be no shape to the pattern pieces as in curved hems or angled side seams. That would have been a waste of my fabric dollars and frankly the fabric was pricey. In the end the challenge was met.

I cut the waistband from a length of one panel's selvedge and it included an inch and a half of panel that would become the public side of the waistband.

The white selvedge side of this strip would become the back of the waistband. It would eventually be folded to the back and ditch stitched on the front as in Nancy and Debbie's technique (more later). The strip, minus seam allowances, was fused with fusible tricot. (green arrows). Normally with the process I used to interface the waistband this isn't done but this fabric was quite thin and would need to carry a lot of weight.

I cut the waistband from a length of one panel's selvedge and it included an inch and a half of panel that would become the public side of the waistband.

The white selvedge side of this strip would become the back of the waistband. It would eventually be folded to the back and ditch stitched on the front as in Nancy and Debbie's technique (more later). The strip, minus seam allowances, was fused with fusible tricot. (green arrows). Normally with the process I used to interface the waistband this isn't done but this fabric was quite thin and would need to carry a lot of weight.
To the zipper! I did a classic lapped zip on the side. This allowed my panels to be sewn uninterrupted with only a seam at each side. I installed the zip with one side seam sewn and the other left open, all to make the pleating easier and as you can see below. That final seam wasn't closed until all pleating and gathering were completed. I always use zips longer than needed and extend them beyond their end in the garment. I then catch the zip in the waistband seam allowances, no lumps, no bumps.

Here you can see that one side of the zip is sewn with yellow thread and the other with salmon-y color, all the better to match in the end. I was constantly changing thread colors with this project.

The next challenge was figuring out how to fit 120 inches of fabric into 26.5 inch waistband. Yikes! I loved the look of box pleats and really hoped I could make that work. Well, math was never my strong suit and after a bit of frustration, what I decided to do was to make 3 inch box pleats and then do a slight gather to fit them into the waistband. This avoided all those math issues and the fabric is thin enough to pull this off without signs of bulk. The panels were marked every 3 inches and the fabric was brought from the marking to the center back of each pleat with lots of pins to hold it there. Behind each 3 inch box pleat on the wrong side are two pleats kissing each other. They are the edges of 3 inch box pleats on the wrong side of the skirt. After all was pinned in place hand basting was used to keep it there and the pins removed. I am doing more and more hand basting all the time. I find it really saves time in the end.

Here you can see that one side of the zip is sewn with yellow thread and the other with salmon-y color, all the better to match in the end. I was constantly changing thread colors with this project.

The next challenge was figuring out how to fit 120 inches of fabric into 26.5 inch waistband. Yikes! I loved the look of box pleats and really hoped I could make that work. Well, math was never my strong suit and after a bit of frustration, what I decided to do was to make 3 inch box pleats and then do a slight gather to fit them into the waistband. This avoided all those math issues and the fabric is thin enough to pull this off without signs of bulk. The panels were marked every 3 inches and the fabric was brought from the marking to the center back of each pleat with lots of pins to hold it there. Behind each 3 inch box pleat on the wrong side are two pleats kissing each other. They are the edges of 3 inch box pleats on the wrong side of the skirt. After all was pinned in place hand basting was used to keep it there and the pins removed. I am doing more and more hand basting all the time. I find it really saves time in the end.

I am really pleased with how the gathered pleating worked out and for those whose math is more fuzzy than accurate, it's a great way to fit a lot of fabric into a small waistband. Three inch box pleats and then gather it all in! I only fudged one pleat and you would never know which one! The pleats were hand basted a 1/4 inch and a 3/4 inch away from the top edge of the panels. They were then gathered to fit the waistband and were ready to install. See how smooth that waistband is? It is slightly gathered when off the wearer from the interior elastic used for interfacing.

I wanted to use a wide non roll waistband elastic as the interfacing. I learned this technique from Nancy Zieman back in the eighties and honor her by using it in this garment today. I've used this technique many times but with my sewing hiatus of nearly a year I thought it would be wise to refresh my memory with a bit of Googling. While I couldn't find a video from Nancy, I did find Debbie Cook's fantastic version of this technique. Forgive me Nancy, but I am preferring Debbie's. Nancy has the elastic included in the "laps", the short ending seam allowances of the waistband. It can give a pulled effect. Debbie's version has the elastic hanging freely in the end of the waistband and the laps are filled with regular interfacing, a big improvement. No unsightly pulls and easier to install buttons, snaps and such! I highly recommend you check out her tutorial for a clear description of how I did my waistband on this skirt. It's an awesome tute. Thank you very much, Debbie. (Oh, laps are the over and underlaps where the zipper closure is.)
Pleats and gathers done. Waistband is all interfaced, elasticized, connected to the skirt and then ditch stitched on the front to secure. Yay! I did have to do some futzing on the over and underlaps to get it all even and matched. For some reason the elastic wanted to flare out at it's open cut ends so I used my pinking shears to shave it back a bit and that worked fine. All is now equal in shape and size. I can't stress enough how important it is to match and rematch like areas of garments while you are sewing. Don't just cut a collar out and sew it. Cut the top and bottom out and then match the two sides as well. Recut them if they are not perfectly matched before you sew them for that final time. Things stretch. I am now in the habit of doing this for anything that has a mirror image of itself.
The final stage and I think what gave me the greatest satisfaction with this no pattern project was the hem. I did samples first and they taught me that it really didn't make much difference which choice of interfacing I used. I used my final choice simply because I had plenty of it. Remember also, I am trying to keep as much length to my skirt as possible. I don't want to lose any of the digital image in a turned up hem and I don't want my skirt too short. Early on I decided on a faced hem. The lower edge of the print is in various shades of gray, being the street the car is on. I found a great, similarly thin rayon knit in gray that I would use to face the hem and then top stitch it down. But then I had one of my middle of the night Eureka Sewing Moments. You all get those, right? It's when I bolt out of my sleep with a solution or better solution to a sewing challenge, in this case the lifeless, thin knit hem of 120 inches!


(If you look closely in the middle of the facing you can see where I overlapped the cut edges of the facing strip. It is cut with pinking shears to prevent transfer through.)
I made samples with various interfacings and in the end did my hem by stitching a one and a 1/4 inch strip of 100% cotton woven fusible interfacing to the hem edge. Right side of interfacing (no glue) to right side of skirt. I used a fat 1/8th inch seam allowance. I pinked the short edges of the interfacing and lapped them as need to make the full width of the skirt hem. When that was all stitched on I went to the iron and wrong side of skirt up, turned the interfacing to the wrong side leaving about an 1/8th of an inch of the panel showing on the inside of the skirt. I fused this down. My interfacing became the hem facing. The edge appeared to be corded on the inside and it gave a beautiful finish. This was then top stitched a fat 1/16th of an inch from the hem edge and again one whole inch from the hem edge. Then it was pressed and hung.I was amazed at how well it came out and the pretty folds the hem makes. I say that because a couple years back I did a full knit skirt on a dress and used a one inch horsehair braid to get this same effect. It was awful, just too bouncy and sticking out. I donated it after wearing it once. The hem on this skirt of panels came out the way I wanted that first knit hem to look, with just a beautiful curve and movement, nothing trying to hard to look vintage. I hope you agree. So facing the hem with a fusible woven interfacing, cut on the cross grain and then turned and topstitched was a success and I will definitely do that again!
In conclusion:
I will be wearing this with black tights, black flats and a black tee to an upcoming "casual" restaurant get together of old friends. We will be enjoying a meal and drinks so it's a good thing that waistband stretches! All in all I am happy with my fabric, my skirt and most of all the pleasure the challenge the digital print and no pattern provided. Sure, I made little dirndl type skirts for my Barbie eons ago and could probably still do so in my sleep but the challenge of this skirt along with the width of all that fabric, making the wonderful print design work with my vision and utilizing modern techniques really made this a most fun project. I hope you have enjoyed this journey as much as I have..........Bunny

***********************
 |
| courtesy fabric.com |
Fabic.com also has some digital print panels, too. These panels are out there but each vendor gives them a different name so it's a tough search. If anyone out there has further search suggestions please let us know your terms. Oh, I/we am not looking for quilting cotton panels here but thank you, anyway. At Fabric.com they have what are called "photorealism wall decor panels". They could be great in a Jean jacket or a bag. Marcy Tilton has some as well that are "digital print panels" and of French origin. Have fun searching and make sure you know which way the print lays out in regard to the measurements! ....Bunny


