Sewing Vloggers

Sunday, November 30, 2008

The Intersection of Facing and Jump Hem


This can be a nasty little area to deal with. It is often forgotten about until the lining is all bagged. Then you are faced with a raw edge from the bottom hem edge to the jump in the lining hem. I've yet to see a pattern that refers to this either. Sometimes the lining can cover a lot of it. Sometimes it can be turned under with a tiny hem. If you deal with it before installing the lining you can finish it a couple of ways. One is to simply turn it under about a 1/4 inch and hand stitch. The other, and in my opinion a much nicer finish, is a simple little Hong Kong seam finish on this edge. Here's how I go about it.

Sew the facing to the lining. Iron the seam toward the lining. One half inch above the end of the seam start trimming the seam back to a `1/4 inch. Before proceeding, pin the lining and its seam allowance way out of the way.


Cut a bias strip of the lining fabric a rough inch and a quarter wide. Match the edges with the raw edge of the SA that you DID NOT trim. Sew a 1/4 inch seam. Trim it down to a healthy 1/8 of an inch. Be VERY careful that your lining is folded out of the way and that you don't cut it by accident.
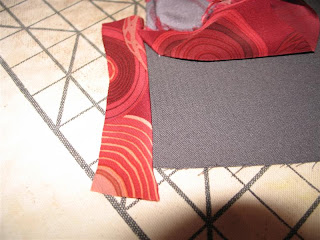


Press the bias away from the facing. Trim it evenly to about 3/4 of an inch.


Wrap the bias around the seam allowance tightly and press. Be careful of your fingers. I used a press cloth which is a little awkward but can be done.


Set your stitch length at 1.5 and stitch in the ditch to catch the seam allowance on the back. Press. Trim off the extra fabric at the ends of the Hong Kong finish. This is now ready to show its pretty face to the world when you whip open your new coat and casually expose that expensive silk lining! ;) See the top photo.........You know, I wish they had a name for this intersection. Maybe there is one. If you know it let me know. Its kind of like that funny space between your nose and your upper lip. What's that called???......Bunny

Sunday, November 23, 2008

Now the Lining!

All interior seams of the coat have been catchstitched to the underlining. The hem is faced to add additional length. And now its lining time. Anyone who has tracked my sewing efforts thru the blog knows that I have a sewing "fatal flaw." I can't leave things alone. So in that spirit, I have decided to add some additional detail to where the lining meets the facing. I did not want to do piping. I use piping all the time and wanted something different. I haven't firmed up on this yet but one idea is a wrapped rat tail cord. another is some featherstitching or other embroidery. I feel some samples coming on here............


This Daisy Kingdom pattern from Simplicity is my next inspiration. I am talking the Woman's vest here. First let's say the bows will be nixed. Give me a break! What I like, and it is not evident from the picture, is that there is a band the goes down the CF and the hem. I am looking for something with a band so I can use my tooled leather in combo with the fur. I like the way the shoulders are slightly extended, the better to give a little width to balance out my hips. And I like the collar. I am thinking I will have to extend the band at the CF so it will overlap and I can use either some snaps or buttons from the leather. I am also thinking of making the collar deeper, to get more fur up around my face. So that's what I am aching to stitch up as soon as my coat is in the closet. I am feeling another healthy week of sewing to get it done and with Thanksgiving coming up, this may be the Christmas coat.


Tomorrow, early AM, we will be leaving to see our babies in NH and Mass. for a couple of days. Then it will be up to Cape Elizabeth, Maine for the holiday and a few days with my sister. I am so looking forward to seeing my little angels and commiserating with my sis. We will have a large dinner with lots of extended family on Thanksgiving day and have been discussing menu and recipes for days. We all love to cook. My assignment is the stuffings and the pies. I will be doing two stuffings, a Sage, Hazelnut, and Sausage bread stuffing, and an Oyster stuffing. My pies are Brown Butter Pecan Pie, a traditional pumpkin pie laden with heavy cream, and a cold Pumpkin Mousse Pie. Can't wait to start cooking with sis and family.

I sincerely hope and pray that all of you are able to sit around the table with your loved ones. May they have safe traveling to your home and may you all celebrate in the feast of shared food and thanksgiving. Happy Thanksgiving everyone!......................Bunny

Thursday, November 20, 2008

Prickstitching, Pockets, and Buttonholes, Oh, My!


Lots going on with the Cashmere jacket and I thought I would point up a few things I have done contra the pattern. Come to think of it, can't really say that I have actually looked at the pattern. Maybe a cursory view now and then, but that's it. You can see my lining fabric. I love it. Its a silk crepe de chine that has a wonderful shade of the necessary gray amidst all those red circles. I don't like the idea of lining fabric, especially a red one, peeking out of my pockets so I cut a piece of the facing fabric 2 1/4 inches wide by the length of the pocket. I cut with the selvedge on the edge so the selvedge would stay the pocket opening and I wouldn't have to further tape it. This strip was attached to the pocket and then it was installed in the seam. I get the great feel of the silk pockets but no possiblity of red peek a boo.

Cashmere is a pisser. The nap is long and therefore very difficult to mark accurately, even with basting. The best I could come up with was using 1/4 inch quilter's tape for my marking needs. I planned on prickstitching most of the seams. I made some samples and decided on the thread I would use for the prickstitching. (Luv that word.) Once that was set, the challenge of how to accurately mark this deep nappy stuff had to be dealt with. I wanted my stitches accurate and equal. I thought of tiger tape which is hard to find and only comes in 1/4 inch increments that I know of. So I decided to make my own tiger tape.
I used 1/4 inch masking tape and laid it down an 1/8 of an inch from the seam. Then I took my trusted sharpie and a crappy little plastic ruler and marked it out in 3/8 inch increments. That was the measurement that seemed to work best with the samples. This worked great. As of tonight most of the coat has been marked and stitched.
You can see how this worked out on the inseam pockets above.

Then came the bound buttonholes that have so set me to procrastinating. Loads of samples once again. Do I do windowpane or strips? I wanted to do the windowpane method but the fabric was just too bulky. I did the strip method and was pleased with the final results. Again, the biggest challenge was the marking, absolutely critical for BBs. I went to the 1/4 inch masking tape again. One trick with using this method is to make sure you pull the tape off with the nap so as not to damage the fabric.
So I taped off the grid for the buttonholes, made myself a few notes on placement, and forged ahead. I went really slowly with the stitching. The tape worked beautifully here and I would highly recommend this technique if you are dealing with nappy fabric and BBs. In the end I am pleased with the results.

Next I did some tweaking on the fit in the armscye area. Ever try your garment on and you see something thats not quite right but just in an ever so teeny way? That was the armscye. I took it in a little more deeply from notch to sides seam and it all worked out fine, more comfortable too!

So as soon as all prickstitching is done, next will be a hem facing and then the lining. Will this make my turkey day deadline? No.........................Bunny

Monday, November 17, 2008

Molding Sleeve Caps


I thought as I go thru my jacket project that if I do anything different from the norm or "my way" as opposed to "other ways" I publish the details. As I was working on the second sleeve the camera was handy. I love a well molded sleeve cap and this shows part of the way I try to achieve that. On the left you see my June Tailor sleeve mitt. I LOVE this pressing tool and find it indispensable. I can squeeze it into the smallest areas and literally can press on my hand with it. You can see the sleeve is underlined with the flannel and the Acro is on the bias across the cap. I chose to attach my interfacings to the flannel to prevent possible ridge show thru. The sleeve head is gathered notch to notch. I don't know who taught me this years ago, but I always leave the half inch left and right of the shoulder seam flat, with not gathers pulled up. So the gathering is is from a half inch left and right of the shoulder seam to the notches and it pulled up. You also see my organdy press cloth.

The sleeve mitt is put into the sleeve cap and tucked up into the gathers. The press cloth is placed under the sleeve.


The press cloth is then pulled around the sleeve cap tightly.


Heavy steam is used to mold the cap while holding the press cloth tight with the other hand. Be careful you don't burn your self here. After I remove the iron I hold the cloth around the cap tightly for a minute or so till it cools down. Then I just let go and let the sleeve lay there and cool down on its own. Don't move the sleeve until its cool, the longer the better. After these steps are completed I install my sleeve into the bodice and then put in a sleeve head. I used a folded layer of more of the flannelette for the sleeve head. .........Bunny

Sunday, November 16, 2008

Bonnet Done!


The little bonnet to go with Blue Hyacinth is done! As you can tell I couldn't frufru this up enough. It was lots of fun to sew. I threw in a pair of socks to match as well. On the socks I stretched out the edge of the cuff and stitched on the large ricrac. When released the ricrac ruffles. It was one of those techniques where having a third hand would have helped. I had to stretch the sock out as much as possible with one hand and feed the ricrac slowly with the other. Kind of like the gum chewing tummy rubbing enigma, but worth it.

I have a go2 bonnet pattern I use all the time but it did not have the scalloped brim. That was easy enough to achieve with a roll of tearaway I had that I simply measured and traced. When sewing the scallops I did two stitches across in the depths of the points. This made it curve a little better and turn nicely.

The netting is not that scratchy nylon ick. It is a lycra stretch netting I picked up on clearance a while back for a dollar a yard. I bought tons. It is very soft and you would swear it was the uber expensive imported cotton netting. Given that its very washable, its a great choice for little baby. I cut the edges raw, no ravelling here, and simply gathered them up and hand stitched inside the brim. I know this will frame her face so sweetly and have that retro look.

The back of the bonnet has a circle crown in the blue flower print that is encircled by the tiny ric rac. At the bottom of the circle near the neck the ricrac is crossed and a lavender flower placed on top like the ones on the brim. That flower has the tiny beads lumped up in the center.

This project is now in the bag and ready to be wrapped and shipped to shower headquarters. I have motivated myself to finish the jacket with a purchase of some really good looking faux fur. It goes beautifully with some tooled faux leather I have and I am working in my brain the design to combine the two. I have promised not to touch this project until the jacket is finished! Smack me if I do......Bunny

Thursday, November 13, 2008

Blue Hyacinth


This is surely candy sewing. A couple of days ago Summerset spoke of the need to do some fun, simple sewing in between working on intense projects. I concur completely and that is exactly what my little Blue Hyacinth provided for me. I needed a shower gift for a baby that will inherit tons of newborn items and thought it would be nice to have something in a 6 month size which this is. My inspiration was the dress on the cover of Kari Mecca's book "Sewing with Whimsey."
I was unable to use her pattern, which is included in the book, because it was in larger size, but the inspiration was there. I used my go2 bodice from Simp 5279 (vintage) as the base. Triangular sections are cut from center shoulder to opposite side seam for the bodice and from the notch to the opposite side seam for the sleeves. These were self faced and the large ricrac inserted between. They were then placed on the white linen bodice and basted in place. The same was done with the sleeves being careful to have the overlaps mirrored. I followed Mecca's direction but if I do this again I will have the diagonals on the straight to prevent stretching, an issue here but overcome with steaming. I am not so sure I would have all those layers either. There was no bulk here as the fabrics were thin but on anything heavier this could be an issue.
I think these sleeves are darling and the triangular overlays really make them stand up and stay puffy. This whole dress has a precious retro look in my opinion and I am dying to make a little scalloped white linen bonnet to go with it and emphasize the retro look. Also contributing to the look is the hem length. Back in 1963, when this pattern was made, little girl's dresses were much shorter than today's traditional counterparts. And, I added 2 inches to the length!
The hyacinth fabric is 100% cotton and a Patty Reed design. Love her stuff! The white is a lightweight linen, not quite handkerchief. You can see I put some little purple iridescent beads on the cuffs and neckline. They are Mill Hill Petite beads. I figure even baby girls need some bling! Self made piping is added to the cuffs also.

I detest zippers in little girl's dresses. I mean really detest and that seems to be how the Big Four do most of their patterns. Because of my boundless enthusiasm on this project I didn't plan for the placket at the cutting stage but it worked out fine in the end. I extended the back overlap a half inch by just taking a 1/8 inch seam. For the underlap I added a one and a half inch extension to the lining and the bodice underlap. Took a quarter inch seam, and it was good to go. For the skirt I took a one inch seam ( all were serged) and it all fell into place nicely. No bottom of the placket unevenness here.
On this I used probably my favorite hem treatment, a tuck. The hem is folded up and machine stitched. The fabric is then folded so the raw edge is enclosed in the fold and the tuck is stitched. Its a real clean finish. These are often called growth tucks but I think those that sew them will probably sew more for the child before a hem needs to be let out!


I really felt like I was eating a box a chocolates while making this one and we all need some candy sewing now and then. Now I can get serious and back to the cashmere jacket. The facing fabric has been purchased. It is a relatively thin poly suiting whole color works great with the lining. There are so many shades of grey and many of them have a green tinge to them. I really had to look at the fabrics in different lights to pick out the right one. Using this facing fabric will eliminate bulk and make a nice facing for the bound buttonholes. Have you felt me procrastinating on those? I have no excuses now..Bunny

Sunday, November 9, 2008

Rhiannon's Christening Gown and Slip


Here is Miss Rhiannon's Christening Gown and Slip. The gown fabric is a 100% cotton striped voile. The lace is new. The smocking was done with three shades of palest pink DMC floss gradating from dark to light toward the hem. The smocking treatment is what is called an overlay and thanks to Martha of Southern Matriarch I finally got it pleated neatly with no "y's". Her suggestion was to NOT baste the two layers together and let them just flow separately but equal into the pleater. It worked! Thanks, Martha! The pattern is Trudy Horne's Shoulder Button Bishop and you can see the rear view with the closure on the shoulder above. A word about this pattern: Placket! Like most heirloom patterns this one has 3/8 inch seams. That is what you are given to fold, make a placket, and put the buttons and loops too. Now whenever I use this pattern I make my own interfaced placket with a bias strip, much nicer. So be forewarned. Did you know that most heirlooms sewists would die at thought of interfacing their little treasures? I don't get it. Just look in one of the magazines at all the curled up collars!
Another sewing friend, Nonie, some time back told me about this Velcro Fusion. It is iron on and " gets stronger with washing" per the box. It is soft and so much easier to use in these tiny closures than buttons and loops. I like making loops but have found them very aggravating to close a garment on a wriggly newborn. So I am thinking of the mother here! In the pic you can see how it is applied to the shoulder of the slip. You have to make sure you get all the edges rounged and surrounded by fabric. Don't want any irritations on their angelic skin! The neck binding is the stripe cut on the bias with some interfacing to back it. I used FormFlex. The fabric was too sheer otherwise.


The hem is hand embroidered with double featherstitching. This treatment needed to be done to balance out all the frufru at the top of the dress. This is one of my favorite hem treatments and I went into a little more depth on it a few posts back. There is a great video of how to do it on that post.The sleeves have the lace attached with entredeaux to the fabric the pink floss is run thru. The floss is pulled to gather up the sleeve and tied in a little bow.


The slip is made out of a poly cotton blend. These blends do not iron up or stitch like the natural fibers but they do provide Mom with some sort of cleanability. Babies do sprinkle after all. All of the edges, including the hemline are stitched with shellstitching, another one of my machine favorites. That stitch gives you so much bang for your effort and really should be in everyone's toolbox. The heart on the bodice is of shape lace from my collection. It is appx 80 years old. The inside of the heart has Rhiannon's initials and birth date embroidered with a back stitch. Backstitching can give you lots of maneuverability around curves and corners and is great for numbers and letters. The bodice is joined to the skirt with entredeaux. Pink floss is then run thru the entredeaux and tied in a tiny bow at CF. I love making little girls slips. You can just get so feminine with them. The pattern for the slip is pretty much non existent. I took a bodice from Simp 5279, the dress. This is my go to bodice whenever I want to "make it my own." I extended one back shoulder a 1/2 inch and the matching front shoulder an inch and a half. After the shell stitching was done the velcro was applied, the shoulders lapped and shut. Again, easy for Mom to get Rhiannon out of her gown. I also didn't like the idea of two layers of hard little buttons sticking in her. One is enough!

*********************************************************************************

The gown is ready to be shipped out tomorrow morning. I have spent most of today working on "reverse tulip" sleeves on a tiny little dress for a baby shower gift. These little outfits are just such fun, candy sewing. Back to the jacket soon! then Christmas, Yikes!........Bunny

ETA: My go to pattern, Simp 5279 is old, and I had no idea how much. While looking for a pic on Simp's site, it was out of print. Further googling let me know that it is from 1963! Wish I had pics but the only one I have found is a really poor one on ebay.

Friday, November 7, 2008

Christening Gown and More

I am all over the place today but the bottom line is I spent hours all having to do with sewing and that's always a good thing.

What you see at left is the palette for my next "little" project. We have another baby girl on the way in the family and I am going to do a puffed sleeve little number for her baby shower gift that will have beads, ric rac, and more. I am itching to cut this out but you know my rule, only two projects at a time! Tonite I finished the christening gown and the slip. I spent all day on the slip today. It is not my best work but it is pretty and will go under the gown beautifully. It has a hand embroidered monogram of the baby's initials and birth date, some entredeaux, and some shell stitching which I love. I think I put more work into the slip than I did the gown. I pretty much did 90% of the work on the slip today. Tomorrow all will get a good press and I hope to have pictures and a post for you. Till then here's a few teasers:
For the monogram I played around with Word. I did my first effort in a satin stitch and was not happy with it at all. The satin stitch made the monogram out of scale to the tiny garment. I regrouped and decided to do the entire motif in a tiny backstitch in pale pale pink floss, one strand. This was a much more delicate treatment, appropriate for a little baby.
Next came the lace shaping. For the lace I used some of my antique lace. It has a header thread which is absolutely necessary for lace shaping. You can see on my pic above that there are little dots from a drafting pencil in a heart shape around the initials. Then the inside edge of the lace was pinned to the dots, the header pulled to shape it, and the whole thing steam pressed.
Sound simple but its actually pretty fussy work.


When it was all done, the inside edge of the lace was stitched. The background was then cut away right up to the lace. This was then laid on the bodice and the outside edge was stitched to the bodice. I did a basic zigzag. I just didn't feel like taking time to do pin stitching. I think it looks nice anyway. Then after the outside edge of the lace was stitched the interior of the heart "base fabric" (the bodice) was cut away .
And here we go. Once this was done I proceeded to make the slip, doing a shell stitch on all neck and armholes and the hem, and entredeaux between the bodice and the gathered skirt. More pics tomorrow when that is all pressed up.


And if that isn't enough, when I went to town today I hit the fabric store and finally came up with buttons for the cashmere jacket. I brought my sample of fabric to the store with slits cut in it and auditioned lots of buttons. I have been unable to find anything on line that works. I got it down to three choices and proceeded to hit on every person in the store to get their opinion. Most lined up with my opinion and here it is, live and in person from JHB:
...........................Bunny

Wednesday, November 5, 2008

One Sleeve Tweaked and Done!

At 6:00 this morning, while reveling in the post election joy, pride, and punditry, I went back to the first sleeve on my jacket. It was installed and after numerous try-ons, twirls around, and re-inspections, I decided the cap was too low. The sleeve did not make that nice extension and roll the way it should. I have been using Simplicity 2812, one of the Project Runway patterns. My version is the short jacket with the stand up collar in the center of the pattern cover. (No view letters here!)

I did this pattern in a size 6 and did an FBA, and "petited" the pattern by eliminating a half inch between the shoulder seam and the first notch, front and back. That is my usual MO. Upon try out, I decided I need maybe 1/4 inch more shoulder extension and a higher cap. My sleeve was already installed and trimmed, sleeve head and all. So what I decided to do was rip out only the area from notch to notch at the top of the armscye. This had the full seam allowance still intact. Then I simply resewed the seam at 1/4 inch instead of 5/8ths tapering in as needed. This worked great except I now did not have the bulk of the full SA to extend into the sleeve cap. In that sleeve cap I had installed Acro interfacing on the bias for about 3 inches of the cap, and a flanellette sleeve head already but it needed just a teeny bit more help. This was accomplished very simply by moving out the shoulder pad a bit. That works great for me as my narrow shoulders usually have the inside edges of the pads pushing on my neck and they have to be trimmed. So I am pleased with the result and will go on to install the other sleeve today.
The pattern called for a tab or a pleat on the sleeve and I was not crazy about that, too much bulk with this fabric. I decided to do two darts instead, giving a slight balloon to the sleeve. These sleeves are fairly full, but the better to go over all those turtlenecks on those cold Adirondack January days.

Yesterday I worked up some samples of toptstiching using all sorts of threads. I have decided on a double strand of carpet thread with a prickstitch, aka backstitch, every 1/4 inch. It makes a nice little slightly glossy bead that shows. Everything else I tried sunk into the fabric and heck, why bother if it doesn't show. So there will be a lot of handstitching to do before inserting the lining in this puppy. I am done with my handwork project, the Christening dress, so am ready and willing for some more handwork.

The christening dress is done! I also worked up the pattern for the petticoat, a definite requirement with the sheer fabric of the dress. I need to play with my fonts in Word to get the style and layout for the embroidery I'll do of the baby's name and birthday. Hope to have that out in the mail by Monday morning. Pics coming...............Dang, I'm productive before the sun comes up!.....Bunny

Sunday, November 2, 2008

Cashmere Jacket Continues.....


Two posts in less than 24 hours! But I have been blessed to be able to spend a lot of time in the pink cave the past couple days. Today's emphasis was on the cashmere jacket. I started with basting all of the seams on the upper bodice together and then a trial fit. You can see that the princess seams needed a little tweaking. After that and a quality press, I think it looks a lot better. I know once the skirt is connected there will be further tweaking. I am v. concerned about the back as I am v. slender there and there seams to be a lot of extra space in that area. my normal problem. I am thinking however, that once the skirt is connected things may, a big may, fall into place. I feel like if I fit the back now it will be over fit and not indicative of the only slight hourglass of the pattern. So I am going to wait on any adjustments to the back until I get the skirt on. I may be crying for help at that point. Don't hesitate to tell me what you think, now or anytime. All comments are greatly appreciated. Now some details and an apology for the self photos:

If you remember, this jacket is totally interlined with well shrunk cotton flanelette. We live in one of the coldest areas of the country. Saranac Lake, 20 miles up the road and the same elevation as us, is the official coldest city in the country. This morning it was 14ยบ at 7:30 am. We hit 40 below at least a few times every winter. So a cashmere jacket with a flannel interlining is just what is needed around here.

After the seams were stitched and before serious pressing, the flanelette was cut away in the seam allowances. You may remember that this was glued down with Sobo glue. After trimming close to the seam line, I do a quick steam press and the unwanted flannel lifts right off. I firmly believe in reducing bulk whenever possible in sewing (thanks, Roberta Carr) so all extra interfacing and flanell is cut away. All cross seams are cut on the diagonal as well prior to sewing.

A proper "tailor's press" made a big difference in the hang of this bodice. Once everything was trimmed away all seams were pressed as sewn, then pressed open over a ham or seam roll to provide shape. When tailoring I like to use a dauber. I make my own.
It is a folded piece of the cashmere, wound up tight as I could, and then held together with an elastic. When I press my seams it is with a dry iron. The seam is finger pressed open over the seam roll. The dauber is dipped in water. Then the dauber is used to wet thouroughly the valley of the seam. Nothing else gets wet or steamed. A press cloth and dry iron are then used on the seam to press. The piece is left to dry to a cold touch undisturbed.

The collar was attached this afternoon and I will put the skirt together before attempting the bound buttonholes. Those buttonholes will require some serious sampling before committing to machine.

This jacket is blah, lets face it. I will wear it with a grey fox hat so that will be nice, but since my personality does not allow me to leave anything plain and blah, I have been thinking how I could embellish this. Its a classic look and I want to maintain that. Given that, my plan is to prickstitch all the seams for emphasis. I will do some samples with regular buttonhole twist, maybe some other threads, and definitely a silver metallic thread. I am leaning heavily toward using the silver metallic thread for the prickstitching (love that word). I think it would be a subtle accent appropriate to the fabric and style. We will see how this develops. Design is such an evolution sometimes.

I will leave you today with a picture of the 16 inches of snow we got this week. I took this when I woke up, a little after sunrise. I am so not ready for this..........................Bunny

Saturday, November 1, 2008

Double Featherstitching and More.


I am in the final leg of my journey regarding the christening gown for our favorite niece's new baby girl, the first baby girl on her side of the family. The dress is smocked with a lace overlay and all that business at the top of the dress really needed some balance. So the hem became a challenge. I thought of entredeaux or pinstitching, ruffled more of the same lace, and other ideas. The fabric of the dress is gossamer to say the least and I really had to be careful of the treatment I chose so as not to over work the fabric. It is a sheer voile stripe that I tea dyed. I decided to do one of my favorite treatments, double featherstitching the hem where it meets the skirt. It enables me to also balance the color used at the top. I used this stitch on a christening suit I made for my nephew's baby boy a couple of years ago. It is a little sailor suit with the double featherstitching around the collar. This link shows a much closer picture of double featherstitching. You can see the precision compared to the current project. The twill had body and was washable. On that garment I started by drawing in pencil 3 equidistant parallel lines around the collar. Having these barely visible pencil lines is what enables the precision. On the fragile voile of the current gown, pencil lines were out. Because of the tea dyeing of the fabric and lace if it needed a Biz soak to take out the pencils lines, well, that was something that could take out the tea dying as well. Heaven forbid it would discharge the tea dye unevenly. So on the current gown, no pencil lines allowed. On the sailor suit I used a fine drafting pencil very lightly, soaked it in Biz, and it washed out beautifully. The Biz did its magic well. If you are going to do this technique make sure you do some practice pencil lines and Biz soaking before committing the pencil to your garment. A see thru acrylic ruler also helps with the accuracy. Can you tell the other markers out there make me nervous?

Back to the current gown - I used the folded under 1/4 inch of the hem upper edge to gauge my stitching and my eye. This was far from perfect but I could see it thru the top layer of fabric. I have toyed with the idea of doing a tutorial on this but found explaining it step by step is really difficult to put into words. Photos looked almost the same so instead I found this wonderful video . Why they call this double featherstitching beats me as it takes 3 stitches back and forth on the diagonal to do the stitch. This stitch can be done very finely or on a larger scale and still look really pretty. The stitching on the gown is not the perfection of the sailor suit, but gives a soft look which I think is in keeping with the rest of the look.

The dress just needs the buttons sewn on and the slip made. It buttons in the back on the diagonal on the shoulder. I used a very soft iron on Velcro called Fusion in a thin strip in the placket area. The button application will be "faux" on top. Having made this dress a few times, I find this is the best closure situation.

**********************************************************************************

Most of today has been spent working on the cashmere jacket. Everything is underlined and interfaced. The interfacing was fused or stitched to the flanellette interlining. I used a combo of fusible weft insertion, Acro, mustlin, and Fusiknit, depending on the area. Some areas, like the upper back, have double layers of interfacing. On the upper back I used Acro on the bias for the longer interfacing and a fusible weft insertion on the bias fused to the Acro for a shorter distance. The biases are opposing. All of this is to give some serious support to the heavy coating. The underarms got muslin. The fronts got WI and an additional layer cut on the bias for the chest piece. I really need these chest pieces and with my narrow high bust and lower full bust it really prevents the cave in. The hem areas all got bias Acro strips. My next step will be the bound buttonholes. I always do a few trial runs on those before I commit to the garment. There are so many ways to do these. I have my own method but think I will give Claire Schaeffer's method a shot. Keep ya' posted..........Bunny

Had to Refurbish This One!

    About  6 or 7 years ago , during the dawn of the Zipper Trend,  I bought one of my rare retail items. It was a blush pink and black bord...