My BFF will be welcoming her third grandchild into this world shortly. This little angel did not come by her arrival easily but will be here by caesarean in a couple of weeks. I always make something in a sixth month size as new moms just get tons for the newborn but maybe not so much a bit further up the road. A cute little smocked dress is planned.
My coat is done for the most part. I have found that since where the facing meets the lining, where that colorful little strip is, well since that facing is not secured to the shell of the coat it BILLOWS and I am not likeing that. I can see this ballooning out on one of our windy cold days up here. So I have pinned together the facing/lining SAs to the shell/coat SA and will hand stitch them together. They are pinned together and it hangs much better now. So there is that handwork to do, make the belt, and fussy up a label. We will see what the weather provides for weekend pictures and hopefully will have those up soon.
My next big project will be jeans. I have to master them. We are allowed to wear jeans to work but they must be with nice shirts or sweaters, jewelry, etc, nothing sloppy or looking ready for floor washing duty. Since jeans do age and not look so well after a while I use a lot of them and need to get this down. I have taken the RTW Fast pledge and these jeans are a big priority. In the meantime I will have some fun with this little baby project. I always like to have a hand project and machine project going at the same time anyway. This little dress will be hand smocked. I haven't settle on the design yet and need to do a bit more research.
The fabrics are a quilter's cotton in a rose pattern that I just fell in love with and two white eyelets from the collection. One eyelet is 24 inches deep so I cut off the some of the plain batiste to do my smocked insert. There will be an eyelet underskirt and maybe something special going on with the rose top skirt. I am not finalized on this design yet. I also have an allover eyelet that I will use for the sleeves . The eyelets match perfectly.
The pattern is McCalls 6015 and you see the area on view F that will be perfect for the smocked insert. I will do the little cap sleeves from view E. I love that type of sleeve on chubby little baby girl arms. There will be some white eyelet panties too. All in all, this will be vivid and fun to make so stay tuned for this one. At this point the batiste is backed with a tricot interfacing and ready to hit the pleater. I won't cut out the rest until that is complete.
I need to make a muslin for my jeans. I picked up this stretch cotton twill at Joanns for that. I'll be using my Sure Fit Designs sloper and the Sure Fit DVD for jeans. I figure that fit won't be too off but if it is, this print will hide things so I can still wear them and get in some good practice on the topstitching, rivets and such. Then it will be on to heavy denim. Does anyone have a preference as far as the weight of the denim? I'm not a big fan of stretch denim so that will affect the fit also. I really don't want stretch denim. And the weights, it's looking like an 8 ounce might be right? Any input appreciated.
This is the state of my sewing right now. I should be able to get a lot done on this weekend and am planning it. The next weekend, a long one, I will be travelling to the Boston area to get my implant finished, I hope. It will be great to see family and hopefully wear my new coat!.........Bunny
Well, I did manage to get a little sweetness done this weekend. I found this UFO while cleaning. I think I was working on it when I started back to work and it just slipped through the cracks somehow. It is for Sophie's AG doll and is a little nighty. The pattern is the "Emily" from Genine over at Etsy.
Genine's shop is called GennieWren. I have made her patterns up before and they are a delight to sew. Genine goes to great lengths to have various testers try out her patterns before she commits them to sale. It shows. They match up beautifully and the instructions are very clear. NAYY, just want to help out another sewist, particular when her efforts are so exceptional.
The fabric used for the nightgown is what I would call a dimity, something inherited from my elderly neighbor and certainly vintage. It is just lovely. It is like a brushed heavier version of a voile with a tiny diamond texture to it. It's way too soft for any sort of regular clothing but perfect for a dolly's special nighty! The pattern comes with this lovely smocking design too!
********************************************************************************
The Danny Project keeps evolving and I made major headway today. One facet of this project is a real stickler and I am trying all sorts of methods to see what works best. Once the sticky part is worked out it will be home free and on to my muslin for the wedding outfit. Of course I found the absolute most perfect shoes today but hesitated buying as the dress isn't even cut out yet.
Thanks for the comments on the "Hijack" post yesterday. It was greatly appreciated. I appear to be home free now but went to a blog today who also had the same thing happening. I wondered if she knew and left her a message. I went to lots of blogs and such today but only that one had the same issue. ....Bunny
Yesterday, after the gardening chores were complete and I backed out of painting our little barn, I decided to have some fun playing with some dyeing. I had read a couple of techniques recently on Pinterest and wanted to give them a try. Here's my review with a rather unexpected ending.
The first technique I tried required Sharpie permanent markers, rubbing alcohol, and an eye dropper. The technique came from The Art Girl Jackie on Pinterest. It seemed easy enough, avoided a lot of mess by using the markers, and gave a permanent finish without any further treatment.
I used silk dupioni that had been washed. It was then soaked in a half water half vinegar solution for half an hour as a mordant process. Then the piece was ironed dry. Keep in mind that this was just a fun play project for me and if it worked, well, I was on to something new for the toolbox.
First you draw some vague designs with your Sharpies. Only prob here was that all I had were fine points. This would have been much more effective with regular Sharpies. Then drops of good ole rubbing alcohol are dropped on the marker scribblings to do their thing. The ink will disperse and blend. It continues from what you see above but again would have been better with the heavier tipped markers. Opinion: metza metza, and bette with the right Sharpie. Not a total waste of time however. I have found when I do these tiny dye jobs that further embellishment can totally change their look so this is no loss here.
The next technique came from Pea Soup of the Day. She wanted to do some dyeing with her kids that wouldn't be toxic and this really appealed to me. Seemed simple enough. I pulled out my Wilton paste dyes for this and used her wool dyeing technique on more strips of dupioni. These strips will eventually be smocked and I like the edges to have more definition.
I followed her directions more or less. I dipped a damp Q tip into the paste and rolled it and dibbed and dabbed it around the damp strips. I liked the effect. Now it was time for the microwave. I layed my strips on some paper towels which was on top of a dinner plate. I didn't want the dinner plate to get all yucky so I wrapped it in plastic wrap. DON'T DO THIS! I have dyed with food coloring many times before and found it to be quite safe and fun. The issue became the plastic wrap. She has you put the textile into the microwave for five minutes and check now and then that it continues to be damp. Towards the end of the five minutes I could smell a slight plastic-y smell but barely. I took the strips out of the micro, sprayed them with water to remoisten and nuked them FIVE MINUTES MORE! Does seem like a too long time, doesn't it? At about 3 minutes into the second nuking the plastic smell became very strong and I figured I needed to remist the the strips. I opened the micro door and in a flash I went down for the count. With the help of some cabinet knobs I pulled myself up and got to the front door where I called my husband. My legs could barely hold me up and I felt horrendous. He came over, smelled the smell, and helped me to fresh air. We nearly called 911 but with fresh air I was slowly coming around. After about twenty minutes I was back to myself with a huge lesson learned, HUGE. Don't nuke anything with saran wrap for ten minutes unless you want ot visit your good friends at the local ER. The plastic wrap was melted INTO the dish which we threw out, of course. DH aired out the house with fans and all doors and windows open and life got back to normal pretty fast.
Here are my results. Not sure it was worth losing my health over!
I changed course and decided to smock some silk velvet. This was a play date with myself and other than the plastic wrap incident something I found highly enjoyable. I've always loved dyeing things and like the intensity of playing with small efforts. It will be interesting to see how these get worked up into something. Hope your efforts aren't quite as exciting as mine....Bunny
It's been another glorious weekend up here in the Dacks so you know that means non stop gardening for DH and me. I must say it is looking pretty nice around here and we are almost at the point of relaxing in this beautiful outdoors. Today we limbed up many trees, chopped down quite a few trees, and cleaned up almost all the remaining beds. That chain saw was humming! We cut limbs so that from our back porch there is a lower understory of brush and a high canopy of foliage, not much in between. It gives a beautiful backdrop and if you have ever laid down on the ground in the woods and looked up you know how special a forest canopy can be. Being on our back porch puts you right into the clear space under the canopy and you can see the birds flying across and it is so pretty.
Bottom line, at this time of year, if it rains, I am sewing. If not, I am gardening. Just the way it is.
I do have some handwork going. There is always TV time and minutes before work and at lunch that I can get a few stitches in so I make sure there is some sort of hand project with me, my trusty ziploc in the pocketbook. My choice will be a top for either Carly or Sophie from the soon to be defunct and oh so wonderful Australian Smocking and Embroidery. Actually it is one of their special publications dedicated to Tots to Teens so some nice big girl choices are here. I am actually going to make the top on the cover which you really can't get a good idea of. It has a bit of smocking at the top edge, lots of puffy gathers across the chest and then more smocking below the chest. The original design shows embroidery on the straps and across the center of the smocking. I will more than likely change that as the fabric choice is a pale turquoise and cream design of sand dollars. Didn't you just love sand dollars as a kid? It was so special to find one on the beach.
Here is the fabric which I think is just so sweet for a summer outfit, 100% cotton but nothing I picked up in a quilt department.
Here is some of the smocking done, not much more to do. The top edge is "baby hemmed" after pleating. The pleats are totally spread out flat and the top edge hemmed. Then the pleats are pulled up snug again in prep for the smocking. This can get tricky sometimes with the pleats developing little "Ys" but this wasn't too bad. I chose a dark teal thread for the smocking, again, my sewing friend Lainey's lesson to take the lightest or darkest color in the fabric and go a shade or two even lighter or darker. This will be picked at during the week and next rainy day will be put together. There will be embroidery but it needs to work with the sand dollar and colors so some thinking is in order for that.
I hope you are all enjoying fabulous summer weather and get to play in the dirt if that is your heart's desire. There is just something so satisfying about busting your hump in the dirt and then at the end of the day seeing all you have accomplished. And if it gives you a sense of beauty, what could be more wonderful?....Bunny
Yes, it's the time of year when my heart gets tugged to the earth. I love to garden and we had to really put some effort in this year. You may remember that our septic tank was dug up and all sorts of ruination happened to my beds and the walkway. I have spent every moment this weekend getting it all back in order and I think it looks pretty good. The bed was expanded a bit and new perennials were put in. The hydrangea survived and a few perrenials came up in the piles of dirt that were shoveled aside so I was able to move them back into their spots. right below the "Sewista" you can see a brown square which was the corner of the tank and it will need to be reseeded. DH is talking about a new system although things seem OK for now. So this may all get moved around again. Everything is small and it is still early here in the Adirondacks but there are lots of astilbes, herbs, heucheras, ligularias and even roses in this bed. Next is to clean up the bed you see on the right and my way to the front door will be lovely.
This had to be done but I have been sewing and using fabric as well. My window boxes are the black iron with the cocoa mats and I find they just drain too easily. I found a way to help this while perusing the mags in the supermarket line the other night. They suggested lining the cocoa mats with felt. Now don't have a heart attack here. I have this grey and green piece of wool double cloth that I have looked at so many times and just can never get excited about. Olive green is NOT my color. I happen to have over three yards of this at sixty wide so didn't hesitate to cut into it. I am glad it is finally seeing some use. My window box cocoa mats are lined with wool double cloth and I am happy about it. Pick yourself up off the floor now. FWIW, they drain much more slowly and I'm happy about that too.
I have been sewing, really, but it is pickup sewing. That's what I call what is in a ziploc along with scissors and thread in the bottom of my bag. I take it out any time I have a few minutes and am getting a lot done. I making all sorts of little smocked gems to utilize in any number of ways. More to come on that later.
I do have some "light" sewing planned for myself. I am going to make this cotton stripe into one of Sham's famous tablecloth skirts. I want to outline the square that surrounds the waist with a teen bit of flat piping to jazz it up a bit. Not sure which of these fabrics I will use yet. I will give them each an audition and go from there.
We get lots of company at our home in the summer so the pressure is on to fix things up around the house and that has become the priority right now, gardening, cleaning, painting, home dec sewing. As long as I have that ziploc with its needle, thread, and scissors in my bag though, I feel like I am sewing productively. How is your summer going? I hope your weather is as glorious as ours has been. I have been both places and Adirondack summers beat out New England weatherwise any day....Bunny
I got most of my client work done, one more thing this morning and then it is home free time! I did manage to get a lot of silk and linen strips pleated and dyed and here are some drying out on the line. There were lots more than you can see here. It looks like those close pins are squeezing the life out of my pieces but in reality they only touch the part with no pleats Dyeing is just such fun. You never know what is going to come out, at least the crazy way I do it. These all started out as strips of white linen or pale solid silks. I have some wool I hope to get dyed soon, too.
You can see Spring is just starting here. Yesterday we had the hummingbirds arrive so the feeders went right up. Hopefully they will establish here. Each years seems to bring a couple more, maybe offspring?
In case you haven't looked since the first time, I added some more types of smocking to the last post. You may want to check it out.
I need to shop for my slipcover fabric. Wait till you see this horrendous chair, one that is solid and well built but, UGLY. I just never know what DH will bring home when bartering....Bunny
What's in a name? A rose by any other name.... Hanging out on Pinterest does let you see lots of what's going on out in the sewing world, some of it incredible, some pretty inexcusable. That's OK. It's a free press where anyone can post pretty much anything that's decent and that's a good thing. Just remember that because something is on Pinterest does not mean it will work, be correct, be properly attributed, or even be real. Heard of Photo Shop?
So this hanging out I've been doing has led me to do a post on smocking in its many forms. There are all kinds, you know! And there are things called smocking that aren't even close but the name does make the sewist feel good, it seems. So without further ado:
First some definitions, definitely meant to confuse the issue:
From Collins English Dictionary:
(Clothing, Personal Arts & Crafts /
Knitting & Sewing) ornamental needlework used to gather and stitch
material in a honeycomb pattern so that the part below the gathers hangs
in even folds
---Well, not really. I have never done anything with the honeycomb stitch, as lovely as it is, but I have done some serious smocking.
From wikipedia:
Decoration on a garment created by gathering a section of the material
into tight pleats and holding them together with parallel stitches in an
ornamental pattern
This one is pretty close. I like it.
From Webster's:
a decorative embroidery or shirring made by gathering cloth in regularly spaced round tucks
Tucks? Well, I guess you could call them that. Sometimes they are round. Sometimes they are sharp and flat. There's also that "shirring" word. More on that later.
From Dictionary.com:
embroiderystitchesusedtoholdgatheredclothinevenfolds. I think I like this simple explanation the best.
So not all clear. What most of the smockers I know call smocking is the gathering of fabric into pleats Which are then secured with embroidery on top. If you feel differently let me know. There are many types of smocking and here are examples found.
English Smocking:
Tiny pleats are gathered with a pleating machine or by hand with dots. The pleated surface is then decoratively embroidered. ( By the way, please feel free to disagree and correct me in any of this. I am always open to learning.) This is a garment I did a couple of years back using variegated threads.
This is also known as Canadian Smocking or American Smocking. The pleats are formed by picking up stitches in a pattern of dots on the back side of the fabric. Wish I could wear that on my hips!
Italian Smocking:
Photo from the Smocking Index, original work by Patricia Timmons, published in Sew Beautiful #95
Italian smocking also has the pleats formed by picking up dots on the back of the fabric. The pleats are very close and quite sharp. Often there is beading as well. Designs are usually all over. Wish I could get you a better pic.
ETA: See Dawn's comments below for a more knowledgeable explanation of Italian Smocking. Thanks, Dawn.
Now we get to the fun stuff:
Yo Yo Smocking:
Leave it to Nancy Zieman. I think this is quite clever and if smocking is picking up stitches of fabric on the back side to make pleats I guess this will loosely fit the definition. Either way, it's pretty dang clever.
I think I might try it. As always, Nancy makes it all very clear.
The smocked area is gathered, either by a pleater or by machine or hand running stitch. A machine embroidery disc provides the design which is then done on top of the pleats or gathering. I have seen these be quite wonderful, at least the ones done over pleater pleated fabric. But if you are going to the labor of pleating by hand, why not smock it by hand as well? Doesn't take that much more time IMO. That machine embroidery is quite nice, isn't it?
And here's the one that sticks in my craw for some reason. When I was fifteen, this was called Shirring. Today it's still called shirring. But over and over I hear it called smocking. Really?
Shirring is made by stitching with elastic thread, usually in the bobbin or zigzagging over elastic thread to create gathered rows of stitching. The gathers are irregular. No hand stitching is involved. It's pretty but not the precision of a pleated, smocked piece.
If anyone cares to share more info or correct me, please assert your civil rights. It's always good to share and learn.
ETA: Forgot a couple of other important smocking types. There's also ...........
Picture Smocking:
photo and garment by Bunny Pepin
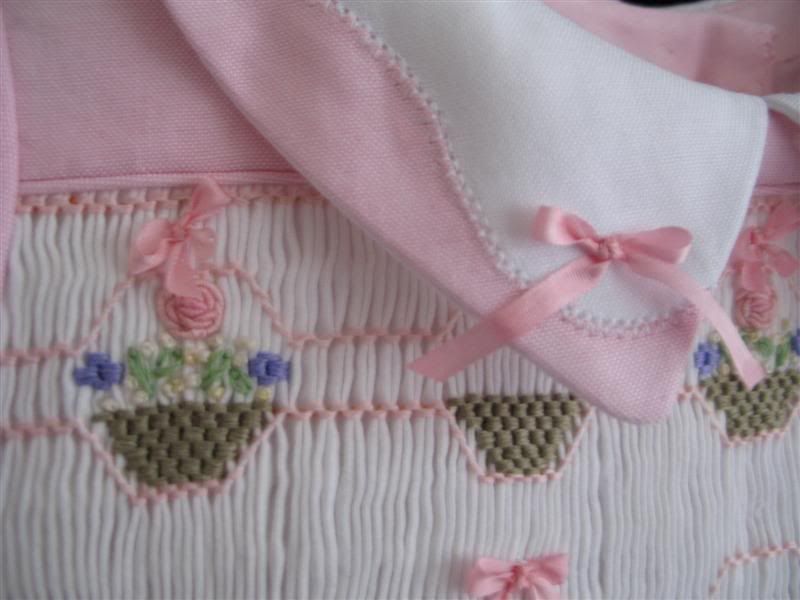
This is done over the pleats but the embroidery utilizes stacked cables which line up to make pictures. Here you can see the Easter baskets I made for this dress. I think the plate might have been in a Creative Needle mag. You can learn this one of two ways. Many, without any books or lessons, just go to it and do great. They are the "never overthink it" school. Then there are those of us who have to read the directions, do the research, and pretty much overthink. We have a much harder time learning to do this type of smocking. I admire anyone who can do this well. It IS NOT easy. There are many idiosyncrasies to getting those cables to stack nicely.
Counterchange Smocking:
The first smocked garments I did were done with counterchange. Once again, this type of smocking is done by picking up stitches in a graph pattern created by either a gingham check or some other evenly spaced motif. This delightfully vintage design works up to make hearts in a row. Many counterchange patterns manipulate the fabric to make sailboats, fruit, and all sorts of motifs. Props go to Pat Garretson Designs for this sweet retro dress. She has many types of smocking patterns and gives great service. Nayy.
ETA again! Origami (?) or Japanese Smocking
I found one more very new form of "smocking" which I have seen referred to as "Japanese" smocking. It has a distinct origami look and technique and I think is quite special. Kudos to the artist, Hiroko, who designed the pattern for HM Textiles. I think it is quite brilliant. The pattern is new to market and should be in quilt shops soon. For more please check out this link: http://dimill.typepad.com/di_mill/2011/11/new-bag-pattern.html
photo courtesy of Di Mill, Fabric Rep (wouldn't you love her job?)
ETA 05/12/12: Forgot TEMPLATE SMOCKING:
Totally forgot Template Smocking which is what I did on the Tablecloth Dress which you can see more of on this post.On the post is a more thorough explanation of the technique. Templates are made. The fabric is pleated. The shapes are outlined with a removeable line right over the pleating. They are then stitched around with outline or stem stitches and then filled with stacked cables. It is a great way to get a realistic subject converted to the geometry of pleats and cables. If you are a good tracer you can do this one.
(Who knows what I will remember next for other types of smocking? If I have neglected anything here, please shoot me an email and let me know. I think I will post this up on the sidebar as a reference. Sound good? )
So when all is said and done, smocking pretty much breaks down to two types. There is that which is worked over pleats and that which is made by picking up threads of fabric with small stitches to form a design. Either way, it is a comforting enjoyable art form,conducive for sure to children's clothing but now being utilized on the couture runways as well. I love the challenge of using it in more adult garments or accessories. Sorry for all the crazy font sizes. Blogger is not cooperating with me today.
I have been wearing my smocked jewelry lately and the response has been quite surprising and encouraging. I think I may be on to something. Here you see silk and linen strips ready to pleat and dye. I am doing a lot so I will have a new handwork project going. I am also in the throws of sewing for a couple of clients but as soon as that is done it will be on to the window treatments. I have also been eying some white denim for a chair slipcover for the newly painted living room. One thing at a time, though!....Bunny
Today consisted of much catching up type sewing. These smocked jewelry pieces have finally been worked out. I have worked on these off and on for a long time. Once done I would wear one for the day and that made me aware that they needed to be heavier, or needed a better backing, etc. It's been a journey just finding the proper glue but finally, this week, I got that worked out. So now they are finally wearable without falling apart and hang much better. I will make more in the future for gifts and bartering but until now did not feel they were "good" enough. Now I'm happy.
This is off white dupioni silk that I dyed, smocked and turned into this piece of jewelry. There are metallic threads. It is actually hard by the time I am finished all the processes on it. The chain is a pretty black/copper.
Same applied to this one. It has a leather backing and my signature in gold on the back. Has sort of a Southwest vibe, doesn't it? I hope to dye some more pieces soon to make more jewelry. I have big dyeing plans but will wait till warm weather. I like to do as much as I can outside due to fumes, staining, etc.
***********************************************************************************
The pink and orange felted wool bag is finished. I would do things differently if I did it again but its usable and will be a cute nod to the color blocking trend. Time to put the wools away! I tried to needle felt the pink bow wool into the orange wool and it was just too much. I ended up triple zigzagging all of the edges instead and that worked fine. I tried hand stitching but it just did not look right. A peek at the lining was in yesterday's blog. I don't know if this is right or not but this is how I winged the lining, a bit different. When attaching handles to a lining it helps to work flat.
First I made and edgestitched straps. They were placed equidistant from the center of the handle and taped into position. Pins tighten them even further. See those big yellow heads?
Here you can see ONE side of the lining is sewn together so that the entire lining can be worked on flat. The top edge is folded under and the straps pinned in place. You MUST leave enough room for your edge stitching presser foot to fit between the top edge of the lining and the handles, a healthy half inch here. I then edge stitched the entire top edge of the lining to secure the straps in the right place. The open seam was then sewn shut and the lining finished like any tote bag.
I think next on the agenda will be that shopping cart seat for the baby shower. Good thing my nieces don't read my blog!...Bunny
Pattern: Simplicity 2171, a "Sarah Rose" design. Frankly, I don't know who Sarah Rose is and must do a google. This dress is easy, peasy with little fit issue. It is called a knot dress among the cognoscenti as the straps, which are sewn into the back bodice, come over the shoulders and in through a buttonhole and after adjusting, are tied in a knot to hold the dress up. In this case I used the heavy turquoise lace I got at Fabric Place Basement for the straps. I did not want to knot the lace until I try it on Sophie so what you are seeing are rolled up balls of lace, not the knots. This pattern has an optional apron which I gave a bit of smocking to as well as some ruffly bloomer type pants. Originally I was going to do the pants but there is enough volume here and I think this will be cute with a little white tee and some white leggings.
(The buttonholes appear uneven. Not.)
Construction: There is nothing complicated here and this would be a great design for a beginner who is not afraid to make the big buttonholes on the front bodice. I did make a few changes, however:
* I added piping to the waistline seam. Smocking just is not pretty butted up to a plain seam.
* I found the fabric just didn't have enough oomph to carry all of the volume of the skirt and apron. I backtracked at the end and interfaced the bodice. This helped prevent seam show-thru from the waist seam as well as give it needed support. Highly recommend you interface back and front bodices. You will be glad you did.
* To finish off the inside facing the seam was understitched as you can see. This is not recommended in the pattern. Again, all that skirt weight will pull those facing out, guaranteed. So, understitch!
* To further secure the facings, the raw edge was serged and then the facing was ditch stitched in the well of the underarm seam to prevent roll out.
I pretty much followed the embellishment ideas from the pattern other than adding the smocking to the top of the apron, the extra row of lace to the bottom of the apron and the piping to the waistline.
I will definitely be making this again, for Carly next time. I am on the hunt for fabrics but so far have struck out. I highly recommend this easy, quick to make dress for any little girl who wants to twirl and catch a few rays in the sunshine...Bunny
Here is the corner of the apron on the skirt of the dress I am currently making for Sophie. I decided to over embellish and use some of the lace I just picked up at Fabric Place. This is a Knot Dress and there are a couple of patterns out there for this design. The straps are sewn into the back bodice, come over the shoulder and go through buttonholes in the front. They are secured with a knot. I like this because it allows the garment to be adjusted and re adjusted as the child grows to just the right length, pretty smart. It does pose a small challenge but more on that later. I am using Simplicity 21 71. It works up VERY fast and I should be finished today. I will have more details when I finish, but you know that!
Thank you, everyone for the great response to the D & G jacket. It was a very satisfying project made all that much more so because of your support and encouragement. Not sure what is next in the queue and will do some stash re arranging today to get some inspiration. I have all those lovely wools to work with but I really need to think Spring....Bunny
Happy Birthday, Sew Beautiful! This magazine is a celebration of that milestone. I decided to do a review as this is not your usual SB. It also has had pros and cons out there on the internet. I don't know what I expected. I expected BIG, new, splashy, I don't know, just not this. Instead I got a wonderful commemorative issue that I think is very special.
What first struck me was the heavy stock of the cover, sort of like what's used on Altered Couture, maybe heavier. It gives this a lot of presence and contributes to the feeling that this is not something to be tossed once read but kept and reread over and over. Then I went inside. I love how the editors picked the most popular Martha Pullen Company designs and their many many iterations to showcase the versatility and timelessness of heirloom sewing. The classic designs are shown many different ways by many beautiful little models. Lots of paper is given to boy designs, designs for teens and tweens and Moms. It is a real celebration of heirloom sewing all preserved in one quality issue.
But the very best part, I think, are the very clear instructions on how to do heirloom sewing. If you want to ever try that sort of stitchery this is all you need. The technical drawings are clear, large, and lovely. The verbage is easily understandable . Lace shaping, puffing, and all sorts of entredeaux, fabric, and lace joinings are shown and taught clearly. This makes this issue an excellent investment for the sewing library.
When I first thumbed through this I thought, "oh, there's the Pascal again, and the Frannie, and the....". Then I read it through a second and third time. Now I realize that this is a Commemoration, a celebration of all things heirloom and of the influence that Martha Pullen and Company have had on the sewing world. It belongs in the library of everyone who ever wanted to learn or does practice heirloom sewing. You won't need much more, for either inspiration or tutelage.....Bunny (NAYY!)
Still doing catchup around here but should be able to finish Sophie's latest this weekend. Then it may be on to some bag making, not sure. Here's a peak at the smocking for the top of the apron.
I swear, if I hear "cheesy grits' one more time....................................
While this dress has bullions and a big bow, it also has a "butterfly back", an additional layer attached to the back skirt. It is cut on an angle using a "wavy" acrylic ruler and rotary cutter. I have seen this back treatment on a few designer coats out this year and thought it would be a nice feature to translate to a child's dress. The two "butterfly" pieces are slightly gathered then pleated with a couple of large pleats. They are then treated as one with the gathered back skirt. The end of the "tail" is embroidered with several bullion roses and a few are placed along the wavy edges as well. The front of the dress is pretty traditional. It has a center panel of smocking done on the horizontal and princess seams. I draped little Sophie on my last visit and got this bodice all worked out. Once the smocking was done I wanted a bit more length in the panel so decided to add the ruffle at the top.
Pattern: Other than the sleeve, and I truly don't remember where I got it from, the design is original. I was inspired by this Kate Spade trench with its back bow and panel. and Kathy Dystra's gorgeous pinafore from AS&E. Some of the details were worked out as I went along as is often the case when working out your own design.
Fabric: The fabric is a quilting cotton from a new to me quilt shop I discovered this summer. There are two separate yardages, the allover print and the stripe. It was a pleasant challenge to figure out how to work out the print. The only thing I would redo on this is maybe cut the back butterfly panel on the bias to give it further emphasis. The piping and ruffle are from a dark red silk dupioni. I think it is the perfect foil for the gray. I used DMC floss for the embroidery and this time I am happy with the colors I chose.
Construction: The Butterfly Back panel has a baby hem and assorted bullions here and there. It is in two sections so that it could accommodate the placket which I showed how I did in yesterday's post. The bow is interfaced with bias cut hair canvas.
For buttons I used vintage mother of pearl buttons. The bow is attached on the left with some tacking stitched and on the right with fabric covered snaps. This way it can be opened to put the dress on.
One Christmas dress done. Audrey has several occasions where Sophie will wear this dress over the holidays. I am on the hunt for fabric for one for Carly now. I will need some white velvet and hope to pick that up while in NH in a couple of weeks. I have lots of fabric shopping planned for that trip. Hopefully I will find all on my list.
********************************************************************************
Since I completed the dress yesterday I have been pleating away on strips of silk. I have also dyed quite a few. These will be used for more Christmas presents. More to come on this.
Next project is a window treatment for Audrey. Back with more soon....Bunny




 I tried to needle felt the pink bow wool into the orange wool and it was just too much. I ended up triple zigzagging all of the edges instead and that worked fine. I tried hand stitching but it just did not look right. A peek at the lining was in yesterday's blog. I don't know if this is right or not but this is how I winged the lining, a bit different. When attaching handles to a lining it helps to work flat.
 Here you can see ONE side of the lining is sewn together so that the entire lining can be worked on flat. The top edge is folded under and the straps pinned in place. You MUST leave enough room for your edge stitching presser foot to fit between the top edge of the lining and the handles, a healthy half inch here. I then edge stitched the entire top edge of the lining to secure the straps in the right place. The open seam was then sewn shut and the lining finished like any tote bag.


 The front of the dress is pretty traditional. It has a center panel of smocking done on the horizontal and princess seams. I draped little Sophie on my last visit and got this bodice all worked out. Once the smocking was done I wanted a bit more length in the panel so decided to add the ruffle at the top.


