Sewing Vloggers

Saturday, April 30, 2011

Simplicity 2464


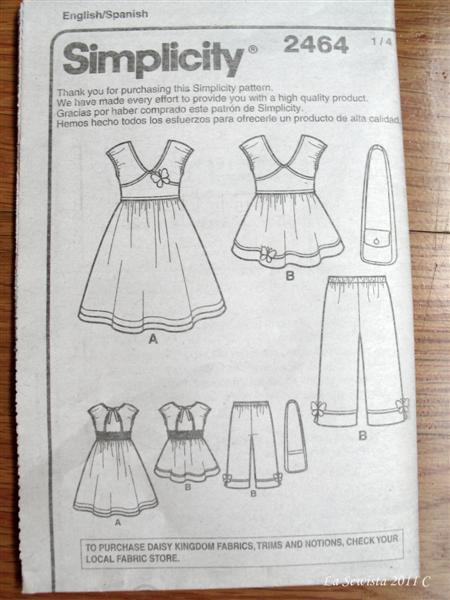
Today I cut out the rest of this pattern, Simp Daisy Kingdom 2464. If you think you will be making this up here are a few suggestions. 

First, this is a pattern that you must read through carefully at least once before starting.  It goes together much like a traditional heirloom dress with the complete fronts and backs sewn first, then the side seams stitched up. Following sequence is important with this pattern so really take time to read it through first. Take each pattern piece as it is mentioned as you go along because.....

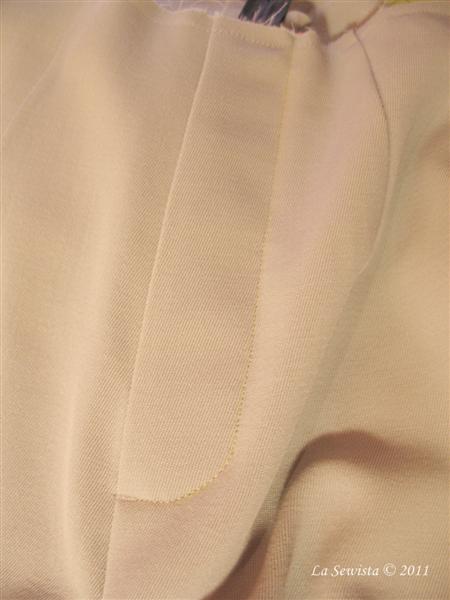
There are many pieces. Dress view A has eleven pieces. Many of them are rectangular and very similar in size, some needing to be on the fold, some not. I found it a tad confusing so took time to pay a bit of extra attention to the cutting process. One of the confusing things is the name of these pieces. It didn't clearly indicate where the piece went.I wrote on each one a better description, for example, this piece goes on the "upper waist on either side of the top of the midriff. " 

This pattern is not lined. I have interfaced and will line the upper bodice above the midriff. I think this will give a much cleaner finish on the neckline, sleeve edges, and back peek a boo hole. I will do this by sewing the two bodice pieces together, the "bee" ones, and then the two lining bodices. Then I will just lay them together and stitch the the neck and peekaboo edge and the sleeve edges only. Then I will turn it right side out and I think topstitch. Keep you posted as I do this. It won't happen for a while as I am still doing bees. 

************************************************************************************
Today DH and I went for a hike at Lake Meachem, one of our favorite spots up here in what locals call "the Park." (Adirondack Park). Here's a couple of pics:
We also found snow along side the road.  Isn't tomorrow May?...Bunny

Friday, April 29, 2011

Ah, the Hats!

As with any fashion noteworthy event, there are successes and there are failures. Sorry, gang, but these two hats are both horrendous. Add in that blue print with the bows on a too emphasized bust and this borders the ridiculous. I do like the beige outfit with the rouloux neckline but she killed it with the hat. You two babes fail! You do win the Ridiculous Award, however! Congrats! Oh, these are Fergie's daughters. How did I know that? Meow!


Fascinators seemed to be the order of the day for the younger set. I think I actually figured out that if you were a single young guest at the wedding, you wore a fascinator. If you were a married member of the guest list, it was on to the big picture hat.

Well, I guess the stunning Ms. Beckham blows that theory! Isn't her hubby just as gorgeous?
This hat was my favorite and is really prettier from a different angle. Her hair did this wrap thing that fit right into the hat and she gained height next to her husband. Just stunning. 


Kate's mom was the perfect image of the mother of the bride, the one we would all like to look like. Her outfit is a bit restrained, not to detract from her daughter. The tailoring is exquisite. Did you see the curved slit at the back of the coat? The scale of the hat is perfect, again not to upstage the festivities, and the color so absolutely lovely. They say a man should always look at his future mother in law to see what he will be married to in forty years. I think Willie picked right. Kate's mom is as beautiful as she is.

Why can' we do hats here? I mean really do hats? Rare is the woman that a hat doesn't flatter. Those who say they can't wear hats just haven't found the right style. In the days of mandatory hats for Mass in the Catholic church you could go in every department store to an actual hat department, not just a hanging rack or a small wall, but a place with mannequins heads backed with wall size mirrors so you could try the hats on and see them from any angle. I can't tell you how many hours I spent doing that as a young teen. I would save my baby sitting money to buy hats. Should I still be doing that? I will say that when I go to a wedding I try to always wear a hat. It's my only opportunity for this little eccentricity. So far, people aren't laughing at me, at least I don't think. My daughters would never let me have that happen.....Bunny


Thursday, April 28, 2011

Insane Weather!

Over the past few years, before even blogging, I have spent quality time visiting and getting to know some lovely women over the internet who share a  passion for sewing. Many live in the South and right in Tornado Alley it seems. The stories I have heard regarding these storms are incredible, from children riding out the tornado in a closet with a cell phone to  a grandma sitting in the bathtub with her two year old grandchild for protection  Tornadoes  are such a horrendous phenomena, so unpredictable and so damaging, the US version of tsunami madness. I hope and pray you and your families have all weathered these storms with everything in tact. You are in my thoughts and prayers.

Some of you may know DH and I live on the Deere River in the Adirondacks. The river is 100 feet from our back door. It runs rather "level" from its start  in what is locally called the "flow" , a bog area with springs. But directly behind our home it drops very rapidly, giving it little chance to extend beyond its normal high water mark, thank goodness! However, that drop makes for some wicked white water as you can see in the photo above. When you get out of the car at my house, all you hear is roar, the roar of the river. Last year our next door neighbor got sucked down the river from about 50 feet from where this picture was taken to the bend at the far end of the river that you see in the picture. He survived by getting hooked up on a log and screaming. I heard him from inside my kitchen.

I mention this because up here there has been major flooding and loss of property from our end of this horrid storm. It certainly pales next to what has happened in the South. Lake Champlain has never been recorded higher. Today the ferries stopped and many towns became landlocked. It just all reminds one of the awesomeness of nature and how helpless we are to control it. 

*************************************************************************************
Today I felt great, I mean really great, no loopy fuzzy headed feeling or nausea  and back to my old self. My bruises are getting worse and some are coming out that didn't even exist originally so I am  still scaring small children but I feel fine so all is well in my world. I have been working on bumble bees and will start some sheers for the bath soon. Thanks again for all your kindness and caring. Glad you all like the bees. They are fun to make and I may start those wings soon.....Bunny

Wednesday, April 27, 2011

A HUGE BOUQUET OF THANKS TO ALL OF YOU!

Thank you, each and everyone of you, for all your well wishes, kind thoughts, prayers and just being there. It means a lot. I had doubts about publishing the post but it was DH who thought it up and urged me. I did it to make a point of the "lesson learned over and over and over" as that lesson just keeps rearing its head thoughout my life. I need to pay attention.

Again, thank you all! Today I am being quiet and will work on my bumblebees. I think they are awful cute and they don't even have their wings yet! I backed the linen with some Pro sheer interfacing from Fashion Sewing Supply, perfect for this. There will be a total of over 40 bees. The wings will be turkey work and those will go on after all the bullions are done. They do go rather fast. Perfect work for the given situation. I use two threaded needles at the same time, black and gold to make quicker work of it all. The interfacing helps keep nasty back threads from show through.

I received an email asking which Creative Needle Magazine had all the "bug" inspiration. It is issue April 2007. However my bumble bee embroidery was from the dress on the cover of August 2006. I really do miss that magazine. Its clothing was so wearable, not over the top heirloom, but really wearable and soo cute.

I am off to the couch to do some "bees". The swelling has receded but now I have bruises that have appeared all over the side of my face. As long as I don't touch, I'm fine. But I am truly lookin' nasty! That's OK as it could have been much worse. Thanks again. You are all so special....Bunny

Tuesday, April 26, 2011

Freaky Accident - Warning, Graphic!

If you are squeamish, now is the time to go read a different blog. If you are curious, read on but don't say I didn't warn you.
DH goes to bed with his heavy duty ear plugs at 8:00pm and gets up at 5:00. I go to bed around 11:00pm and get up around 7:00. This is our habit. We like a dark bedroom. The shades are drawn, the lights are all out, and the door is shut. I entered the bedroom as I have done a million times and shut the door behind me. It was pitch dark but I knew by heart where everything was. Off  came the top. Off came the bottom. All that was left were the socks, those tight wooly support ones DD gave me. I tried to rub them off with my toes and that wasn't working. So, all naked, I bent down to pull them off. I didn't see the corner of my bureau and hit it full bore. I mean see stars, howl with pain,  totally disoriented and can't get my bearings full bore. I feel like I am going to throw up my soul. I am yelling for my husband but he is sleeping through all this which I just can't believe. I managed to make it around the bed to him but was too weak to beat him awake. I made a decision to leave him be and head to the freezer for an ice pack. Nausea continued. I sat with the ice pack on my cheek till midnight but I had a feeling this was  bad. I went in the bathroom and looked in the mirror. Dear Lord almighty, what  a mess. I now had a headache, still nausea, and took my ice pack and went to bed with thoughts of should I sleep or not. I wanted to sleep despite the pain.

Around 5:00AM I awoke with an incredible headache, continued nausea and DH rummaging around getting ready for work. I got up to see him and he was in total shock. He asked me what the hell happened last night and I found great difficulty putting my words together. I told him to just get a bucket so I could throw up. In a moment or two we both looked in the mirror and I am not exaggerating, it was Rocky Balboa in the last round. My face was all swollen on the  hit side. My eye was swollen shut and the bruising was starting. He called work immediately I put on yesterday's clothes that were in a lump on the floor and we headed to the closest ER. On the ride he was  trying to relax me and cheer me up with Rocky comments. My mind could only focus on Liam Neesons wife. We both knew the minute we got there they would think he beat the crap out of me. We planned for him to stay with me at all times and just keep holding my hand. That was what I needed anyway.

The nurses scooted me away from him the minute I came in but he followed. It didn't take long for them to realize I just did a really dumb thing in the middle of the night. A much appreciated dose of Dilaudid (?) for the worsening headache  and something for my increasing nausea helped a lot once it kicked in. I went for CAT scans and was diagnosed with a concussion and whiplash. I still can't believe all this.

Right now the swelling is down and I can open my eyes, but damn, this is ugly. The Rocky jokes continue and I am thankful I have such a dear husband to take care of me. I can't be alone for the next 48 hours and he is by my side. It was his idea to put this up on the blog.

Throughout my life I have a lesson I relearn over and over again but I still forget over and over again. It is that all  the many things I seem to worry about almost never happen. And, I worry a lot. But, the strangest pile of crap can land in your lap when you never ever expect it or even dream it could happen. Once again this lesson is learned. I have to not worry so much. Here is a pic I took a few minutes ago. Now, to send him out for a night lite and to just rest the next few days per doctor's orders......Bunny

Oh, I thank God this didn't blind me...Bunny

Sunday, April 24, 2011

April 11 Pants

 
The April pants are nearly complete. All that remains are waistband and hem. I may do a waistband technique that I haven't used in a while, something I learned from a Nancy Zieman program many years ago. I like my zipper. You can see that I used an almost flesh colored chiffon to do the Hong Kong seam treatment. I ran a bias strip across the bottom of the zipper tape and around to the back of the fly extensions and felled it down. This pic was taken before the pants went together. 

If you haven't YOU MUST learn the Sandra Betzina method of putting in a fly zipper. You can see the results, inside and out, here. It is easy, fast, and worth checking out. It is NOT complicated and probably one of the best techniques I have learned during my sewing career. I like to do a tiny zigzag at the beginning of my topstitching at the bottom of the fly, like you see on jeans.  Does anyone else do this? I think it looks nice on all fly applications and certainly makes for a sturdier zipper. As a child with 6 brothers I was often fixing zippers that came unstitched. I wish I knew this little zigzag trick  back then.This fly looks a bit strange due to the camera angle. It is precisely 1 1/4 inch wide but looks like the bottom of the fly is bigger, not. Just another one of those quirky camera thingies.

Once I finished with the fly and all the Hong Kong seams I basted the pants together for a trial fit.  Never trust the perfect pattern as every fabric drapes differently. (This is the same pattern that I thought looked horrible on me in last months's pants.) It didn't look like I had to change a thing. So then I restitched them permanently. Now to press the seams open. This wool/lycra blend is a bit weird to iron. My steam is shot on my iron, time for a new one, and I am using a fine mist in a spray bottle. Wherever the wool gets damp it bubbles up once the heat hits it, then after a few minutes its flat again, strange!   Rather than fight with it I just decided to use a dry iron for most ironing and its working well. I did want some moisture to press the seams open and did an old tailors technique. A thin line of water is brushed in the well of the seam and it is then pressed. This worked beautifully with these pants. You can see in the pic I used a clean stencil brush to apply the water along the seam. worked like a charm. You can't see it, but a seam roll is underneath. This is critical to prevent show thru of the pressed seams. That's where we are now and hopefully time will allow me to finish tomorrow. 

Hope you all had a wonderful holiday, whatever your traditions, and enjoyed the day you as you hoped it would be. We had a wonderful dinner on this end and now are "sitting it off." Tomorrow's walk is really needed....Bunny

Saturday, April 23, 2011

S2464, The Bumblebee Dress

The issue with Simp 2464 and Sophie is that she is very tall and thin. The very odd shaped bodice piece needed to be lengthened and this is how I did it. I began by tracing the size 4 pattern as it came out of the envelope. I wanted to preserve the various sizes and decided to trace rather than cut the pattern out. I lined up my triangle with the straight of grain to get the cross grain and marked that at what I arbitrarily decided was the shoulder, or at least where a shoulder seam would go if there was one. Drew that line.
The bodice needed to be lengthened one inch on front and back. On either side of my arbitrary shoulder line I drew a red line one inch away. Doesn't this piece have a confusing shape? I ended up labeling everything as you will see.
I put the original tracing, now cut out, on the white table. I laid another piece of tracing paper on top. Then the area with the shoulder line only was traced out. I slid the bottom piece up one inch, keeping the grainlines matching and meeting the black shoulder line with the red line.  I traced that "end" part of the pattern piece. I then did the same thing to the other side of the bodice, sliding the black line down one inch to the red line and drawing in the area at the end of the pattern piece.


 The bottom tracing sheet was then slid back into place with the black shoulder lines matching and the remainder of the piece was traced and completed. You can see the two pieces traced out and the different lengths.
The traced, extended bodice piece now got traced onto the block of linen. I used a wheel and wax free dressmaker's carbon, only outlining the pattern piece on the cutting line, no other details like notches, etc. After that was complete I realized I marked two right sides. No problem. The linen was the same on either side so I just flipped one bodice over. Since it is such an unusual shape and sometimes you just don't want to leave things to chance, I marked the block outside of the cutting line with what part of the bodice it was, ie, neckline, front waist, etc.

This technique of "sliding" can be used with most shapes that need extension and preservation of the details. It does require truing the seams a bit. Using a curve will help here. Now my blocks are complete and I am ready to make bumblebees! I will start with a few practice bees. This bee thing could take a while so I am also full bore on the April pants. Today I got the fly in, pockets and stays in, and the front leg seams "Hong Konged."  Hopefully it will be a fairly quick finish tomorrow.


We did our Easter last week when we traveled to visit family so hubby and I will have a quiet day tomorrow. I will bake a ham and cook the asparagus. May the peace of the Lord be with you all tomorrow, whatever your beliefs may be. And let's pray some warm weather arrives around here! A holy and happy Easter and Passover  to all!....Bunny

Friday, April 22, 2011

Bumblebee Dress Part 2

 
This is what I decided on for the Bumblebee Dress, Simplicity Daisy Kingdom 2464. I just love this pattern. The back is elasitcized and the shoulders tie together at the back neck making a peek a boo hole, too cute! My plan is to do the shoulder areas, trim at waist and chest and the hem out of the white linen. It is a linen poly blend. I want this to be washable. Its another quality fabric from Ima's legacy. The midriff and skirt will be the black and white check, 100% cotton that washed beautifully. It barely needed ironing.  The white shoulder area will be embroidered with BULLION BEES! I think this will be lots of fun.
Because Sophie is so tall and slender it will be a size four with some height modifications. I will add an inch to the upper chest and back and 3/4 of an inch to the midriff, then a couple of inches to the skirt. First order of business is getting the embroidery done. That means I will have to adjust that shoulder pattern piece. It goes from back waist to front waist and is an unusual shape with the back tie and hole. More on that tomorrow! Once the pattern is adjusted I will trace the shoulder pieces on to a block of white linen and proceed with the bumblebees. One the embroidery is complete, the shoulder pieces will be cut out. I think I will line this, at least the top.
*********************************************************************************
 
Now on to the pants...First order of business is to make the piping for the slant hip pockets. Here you can get an idea of the size of cord I like to use. It's a fine crochet cord, 100% cotton.  I did NOT cut the cover  fabric on the bias as there is much lycra stretch and cutting on the straight lets the twill wrap around the cord with a bias look. You all know I am a big believer in sample making. I made a decision to wrap the piping with floss but wasn't sure of the color. I did three possibilities on a piece of cording and then installed it into fabric as it would show in the actual pocket. While I did this with the faux garment parts on the wrong side of the fabric, I think you get the idea. 

My choice is the center floss, the lightest one, a subtle effect. A hint if you decide to do this,,,the hand stitches can be spaced out by counting the actual machine stitches for the piping. I came out on every third machine stitch. I used all six threads of the floss.

Once the piping and pockets are installed I will put on the Hong Kong seam finish. One advantage of a Tried and True pattern is that usually only minimal adjustments are necessary and the seams can be finished in the flat stage, much easier.

I have found that this fabric is yummy but sewing this lycra/wool blend requires that I lift the presser foot every few inches to prevent "pushing", even with my even feed foot. But, so far so good with Ms. Lycra B. Wool......Bunny

Thursday, April 21, 2011

I Got My Mojo Workin'...

The mojo is back! That's what will happen after reading thru mucho issues of Creative Needle and Sew Beautiful the past two days. I have settled on my heirloom project. One of the outstanding issues of CN had a ''bug" theme. There were garments with bees, ladybugs, dragonflies, etc. These were the cutest doggone dresses. I decided on bees, bzzzzzz, bzzzzz, bzzzzz.....I am not solid on the design yet but it will use the black and white check, some white linen, these ribbons and of course, some bees. The skinny ribbon has tiny white dots on it that you can't see here. I am not sure if this will be for Sophie or Carley, depends on what I find in my patterns. Tonight will be pattern searching time after dinner.
For my machine project and April pants I will be using this fabric. It is a tad more grey blue than what it reads here. The fabric is gorgeous. Slap me if I start screaming on this project, though. With the March pants I swore I would never touch lycra again. Uh, not! I couldn't resist this yummy wool/lycra blend. It has a beautiful drape, like crepe, but the weave is a twill. the recovery seems really good too. It reminds me a lot of a four ply silk. I will not be lining these pants but they will have Hong Kong seams. I am hoping that by using a quality fabric this time instead of the cheapo lycra blend I used last time that I will have better results. At this point the fabric is cut and marked. My first order of business is to get the pockets done and that will include piping. I want to pipe the pockets and wrap them with floss. So that is tomorrow's sewing plan. I do have a great knit to make a coordinating top but haven't decided what pattern yet, maybe an Anthro knockoff. I went to their site looking for inspiration as well.

Those Liberty ribbons were a hit and Claude will be glad to know how you all loved them. Claude and I have been close friends since we were fifteen and DH since first grade. DH was best friends with her first husband, now deceased and also her second husband, both great guys. There is just something special about lifelong friends that you have shared so much with over the years and wow, we could tell you the stories!....Bunny

Tuesday, April 19, 2011

Liberty of London Treats!

During our trip south, we were able to hook up with some dear friends. Claude  had just come back from London and presented me with just the perfect gift. The lucky babe was able to go to the Liberty of London store. Claude doesn't sew but definitely can appreciate my efforts. When she walked in her first thought was, "OMG, Bunny would go crazy in here."  And, yes I would! She brought me back these two darling stars filled with beautiful ombre ribbons. They are a 1/4 inch wide and gorgeous, a perfect size for a sweet baby's garment. Her suggestion was to hang them on the Christmas tree, a pretty good idea I thought. I hope you are all blessed with friends that understand your passion like Claude does mine. THANKS, CLAUDE!...Bunny


*************************************************************************************
Right now I am on a simplify and purge binge, using Craig's list bigtime. I need to get going on my April pants and some smocking. Let's see what inspires me.......

Sunday, April 17, 2011

New Bedford Architecture

I think all who sew, dabble in clothing design, and appreciate texture and color can also appreciate architecture. My husband and I lived in the greater New Bedford, Massachusetts area in our teens and early marriage. We grew up with Moby Dick, Johnny Cake Hill, Seaman's Bethel and the illustrious history of the whaling industry all around us. We knew where Herman Melville had his drink, where the fish houses were, where the ships got their gear, where the prostitutes plied their trade,  and where the fish auctions took place. We knew where to purchase exquisite antique scrimshaw from long gone whalers who etched the teeth in their hours of monotony waiting for  sperm whales. It was an area steeped in history. But most of all we knew where the whaling captains lived. The whaling captains who would leave their wives and children for 2-3 years at a time to seek their fortune in whale oil and bring back to their spouses riches and wealth from all over the world. When I started working my first "real" job it was County Street where my employer was located. It was on Hawthorn Street that I went to the doctor. It was on Union Street that I shopped.  These streets and there neighbors were on a hill overlooking the deep prosperous harbor of New Bedford.  The captains chose this elevated spot to build their homes and show off their wealth. Every home whose portico faced the harbor had a widow's walk on the roof, the better to watch for their incoming loved ones and ships. Inside the homes of the whaling captains (I've been in a few) spoils from all over the world were incorporated into the interior architecture. Newel posts carved like massive maidenheads lon  ship's prows, stained glass that took your breath away, mirrors I can't even begin to describe, amazing hand blown gas lamps to light the parlors. The captains of this industry could afford the best artisans and their homes belied that ability. No detail, ornament, or curve was confined to budget. These men were very wealthy and they wanted the homes that their families occupied in their absence to be very grand, as if to remind the spouses and children why they were gone so long.

It is with this history that I show you just a handful of homes of the whaling captains.  I spent much of last week right in this area as my sister in law is just a few blocks up. Time was limited as we were dealing with  family issues but I did manage to take a few pics. Because the pics were taken from the street you can't see many of the widow's walks. Also, know that this is just a tiny sampling. There are many more of these magnificent homes, blocks of them.  I always enjoy looking at them and hope you do too. On my next trip down I will try to take more...Bunny


This home is one of my favorites having a scallop shell carved into the eave over the porch. This home used to be painted a shiny brown enamel all over. I think I liked that better. It really showed off the magnificent carving .
 This one has a gorgeous widow's walk  and an amazing carriage house that you can't see from this angle.
Many of these homes have amazing iron work fences and gates.

I think this doorway is just magnificent and the paint colors perfection.
And here are a couple of smaller homes.

These homes continue for blocks going West, up from the harbor and this is but a small sampling.

I would like to say that with a heritage like this it can't help but affect you. If you have lived in this area you will know that a home is where the disposable income is put. In New Bedford they don't buy skidoos and motorcycles and boats until they have the home maxed out and beautifully landscaped. You can see small modest homes just so well taken care of, very different from what I see up here in the Adirondacks. And while I did not get to sew at all this past week, I did get to enjoy color, shape, texture, and I got to admire how a three dimensional shape can be spectacular, much like fashion. I hope you enjoyed the tour. Back to sewing tomorrow!...Bunny

Friday, April 8, 2011

Raggy Fabric Flowers

These fabric flowers can be seen everywhere right now, on home dec, garments, handbags, etc. I made this one from the hip and made a second one to show you how. That will end up as a hair ornament for Sophie. There are subtle differences between the two which taught me the best way by the time I was done the second one. Here we go:
Spray starch your fabric if it is limp like this cotton. Draw a circle on your foundation fabric the size of the completed flower.
Cut out with pinking shears. Starting in the middle draw a spiral. This will not show when complete and need not be perfect. Give yourself a healthy 1/4 inch between rows.
Cut a bias strip or strips one inch wide. Stitch together as needed to give yourself about 20 inches. You can simply overlap the strips instead of accurate seaming. You are going for a "shabby chic" look here. Once the strips are cut and sewn iron them in half, BUT, favor one side by about an 1/8th of an inch. I did this with the first flower and it looks much better even with the backside being a different shade.
Now comes the only tricky part. This went swimmingly on the first flower but took three tries on the second. Let me save you the aggravation. It is really important to line up the strip as you see above. Take the folded edge and place it to the right. Put that fold on the beginning of the line at the center of the circle. Take a few anchor stitches. Get yourself out a shishkabob stick, stiletto, or a dental pick like you see here. With the folded edge on the pencil line, stitch the strip down. Every few stitches use the stilleto to force a pleat into the strip as you stitch. This is a bit futzy but the entire flower will only take you minutes to sew. You do not need perfection here. Continue around the spiral until you reach the end. You may or may not use all of your strip. Remember the bigger the flower, the longer the strip you need.
You will be left with a space in the center once it is all stitched. Wad up a piece of the strip, a couple of inches, and just tack it down in the center. You are just filling space here and it needn't look pretty. It will be covered with the floss stamens.
Pick out the color floss you want to use for the stamens. Wrap around two fingers till it looks like the above. Take the loop off your finger and place it in the center of the flower. Stitch it down back and forth a few times, the narrower the better. Once stitched down, cut the loops, trim shorter if needed, and fray out a bit. Take your pinkers and cut back the foundation to the last stitched line of the spiral. Trim  threads. You can do a few things here. Depending on the fabric, you can favor the folded edge not at all or a lot, for different effects. You can trim the edge with pinkers for a different effect. You can combine two fabrics to make your spiral strip, something I have seen in retail, like a linen and and organza of the same shade. These literally take minutes to make and I think are pretty cute and certainly on trend. Have fun!
  I like my first flower better with the favored edge and the straight edges. This will be cute in Sophie's hair, however.

***We will be leaving tomorrow for a trip to Cape Cod to deal with Ern's mom's health issues. She is 84 and experiencing severe dementia and the police found her roaming in the middle of the night last week in her  nightgown and socks at 1:30 in the morning. She was hospitalized with hypothermia and severe dementia and is moving into a nursing facility. The family is rallying around and much needs to be said and done. My heart goes out to any and all of you dealing with these issues. Sad to say we have prior experience with my own Mom when it comes to this. Till next week....Bunny

Had to Refurbish This One!

    About  6 or 7 years ago , during the dawn of the Zipper Trend,  I bought one of my rare retail items. It was a blush pink and black bord...