Sewing Vloggers

Saturday, December 27, 2014

McCalls 6938


The Christmas holidays have been wonderful here. The laughter of children is truly a heavenly sound. We have hiked, launched bottle rockets, knitted, played games and ate, ate and ate too much! We even sewed a bit, too. The house will be so silent when our daughter and family leave tomorrow. I hope all of you have been able to spend your holiday just the way you wanted to. We have been blessed to have done so and for that I am truly thankful.

The tiny ski suit was completed just in the nick of time. Those skis really were more of a project than I thought they would be but they look pretty good. Carly L O V E S her dolly's ski suit and it matches ner new vest. Santa left a matching hat for her as well as you can see above. DD's family opened Christmas presents Christmas morning, had breakfast and then headed out on the five hour journey to our home up North. Seems Santa did not deliver Carly's number one item on her list, but being the little trooper that she is , she was totally content with what she recieved. Halfway through the long ride she told her Momma, "maybe Santa will leave a ski suit for my dolly at Bunbun's house". He did and to say she was thrilled is an understatement. I think she thought it was a lost cause but Santa came through. Now for the reality of it all: I was finishing up ski poles at 3:15. They arrived at five! Let's do a review.

*****************************************


Pattern:

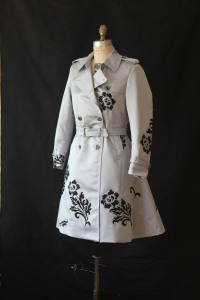
This is McCalls 6938. It consists of  a tennis outfit, swimsuit/beach outfit and bag, ice skating ensemble and the ski suit and accessories. This pattern alone could keep you going for a long long time making dolly clothes. Making the full ski outfit does take time with most of it on the shoes, skis and poles. The hat, which I love, and the suit are pretty simple and fun.

Fabric:

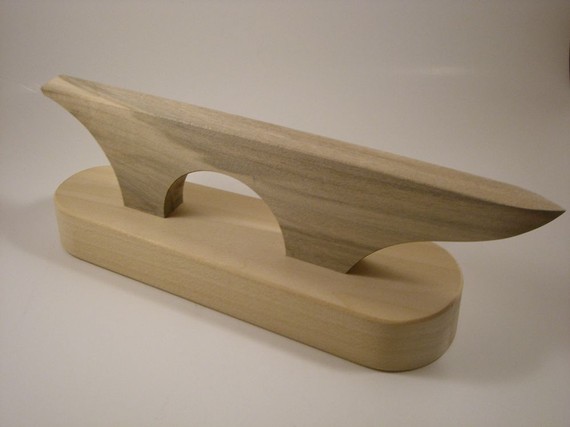
The suit, boots and hat are made from fleece, green, blue and white. The goggles are made from white poly felt and a clear piece of plastic from a produce container, in this case salad greens. The ski boots also used findings such as large hook and eyes and clasps for closing pants to give them that more authentic look. While it wasn't a perfect reproduction, I think it is pretty stinkin' cute. The ski's are made with layers of cardboard glued together, boning like we use in formal wear for shape  and duct tape. Duct tape was pretty critical to this entire project. The ski poles are knitting needles that have been cut down with the handles and bottoms out of clear plastic and  duct tape again. The zip is a separating zipper that I cut down.

Construction:

This was involved and took more time that I thought it would but was worth it in the end. I would say the skis were the most fiddley. Honestly, with the skis and poles I went with the "idea" of the instructions, adapting to my own ideas. For the ski poles I searched "American girls ski outfit" on Pinterest and numerous DIY methods came up for the skis and poles. I think I took a bit of technique from each. The design on the skis was done with a Sharpie, much like the trim on the jacket. And the flag, after all, our girl is an Olympic skier, was made by a much appreciated blog follower, Penny H. She even sent me six different sizes to choose from. I just simply hand stitched the flag to the jacket.  I think the most fun was making the hat. It literally took me ten minutes and was so cute I made a larger version for Carly to wear  with her doll. If you attempt this project, know that you are getting into fiddly business but nothing too complicated that any beginning sewist couldn't handle. It just takes time, so don't underestimate that like I did or you may be still at it right before the gift is due!

Conclusion:

This is a great pattern with lots of cute, very detailed options. If you have shopped for anything American Girl you know that the prices are beyond the pale and to be able to make them yourself allows you to gift nearly any of the collection to your young lady. There are myriad patterns from the Big Four, great to stock up on with the 99 cent sales. And there are also free patterns on the web as well. This is fun sewing and I highly recommend it. This particular pattern was clear enough to follow with a successful result. Know that there is also much on the web about making clothing and accessories for these dolls as well. You really can craft a great gift for your favorite young lady and her American Girl doll friend.


Monday, December 15, 2014

NLS #10, Pressing Matters

Pressing matters, that subject head has certainly been used before in the sew blogging community but it's true. Pressing really matters a lot. It is probably the most important thing you will do to contribute to a professionally sewn garment. And notice, the word is "pressing", not ironing.

Ironing is moving the iron horizontally back and forth over your garment or fabric to smooth out the wrinkles. Pressing action consists of pressing your iron down on the garment, hopefully with a press cloth in  between, then lifting directly up. There is NO horizontal movement.

June Tailor Press Board from sews.com


The more you sew, the more aware you will be of proper pressing. Your new habit will spur you to do it better each time and to help you get the best "evidence of effort", to quote Roberta Carr, there are tools out there to help you gain quality results. These tools pretty much have been around for generations and are time tested and worth the investment. If you see yourself getting into any tailoring efforts, they are necessary. They make the process easier. 

Above is the June Tailor Press Board,aka, tailoring board. It is available at smaller vendors like  Heirlooms Forever as well as places like Nancy's Notions and Amazon. Most of what I will mention is available from these vendors so won't link further on. 

OK, this press board is quite impressive with all it's points,  angles and curves. Why would you press a seam on a board like this? For one, the edges of the seam allowances hang off the edge you are using on the board and thus prevent show through ridges on the public side of the garment. Look at this thing and imagine pressing open hip curves, princess seams, tiny sleeves on heirloom children's garments, etc. An the point  is priceless. A point presser  like this can allow you to press open graded seams on collars to give you a beautiful point when turned. I also like to trim down my points while the collar, cuff, whatever is on the point of the board. It makes it much easier and less prone to accidental cutting. I know Santa's coming but if you don't want to spring the fifty-sixty dollars for this sweet toy, use what I use:

This tool is a point presser/clapper. I like how it has a really sharp point. The larger bottom is used to literally clap/slap/pound your garment details into submission. It is great for taming welt pockets and bound buttonholes and other details with various thicknesses. Over pounding can make your seams transmit to the public side of the garment. You can get around that by having a very well padded surface underneath like a doubled up towel. Other times you want that clapper to bang the fabric into total flatness and submission like on the edge of an edgestitched  blouseweight. With practice you will learn what to have underneath your fabric before you pound. To prevent shine, always use a press cloth between the clapper and the garment. I use this a LOT. It's indispensable for collar making, IMO. 

Then there is the lowly ham and the not so lowly ham:

Courtery stitchnerdcustomshop.com


courtesy bblackandsons.com


Hams are absolutely essential to sewing. All those curved seams, ie, princess seams, are pressed to perfection on a ham. It is probably  best known for setting the shape into a collar which you wrap around the ham like a neck. The collar is securely pinned and heavily steamed while on the ham, no touching. I mean heavy steam. Then you can leave it overnight to dry before installing in your jacket or coat.  I use the basic plaid ham but would I ever love one of those custom hams from Stitch Nerd. Wowsa!

( google hassling me on photo, I'll try later.)

Complimenting the ham is the seam roll, something I love but did without for a long time. My sub was a rolled up thick magazine which worked fairly well. Seam rolls are great for getting into pant legs and sleeves that are already stitched up. 

There are items around the home or that you can DIY that will help your pressing a lot. There are wooden dowels for pressing long seams without ridges. Porch railings work the best as they have the curved surface on top and a flat area below preventing rolling. I use my dowel quite a bit. 


Above is my treasured dawber, made from a tight roll of cashmere, and a cheap paintbrush. These are great for dipping in water and placing the water drops in the well of the seam on the wrong side to press open. This is done on fabrics that you don't want to overpress like cashmere or fine heavy wool coatings, suitings too. A word about cashmere: it is very sensitive to pressing, scorching and getting overpressed and damaged quite easily. I like to iron it as little as possible and use my daubers a lot to tame the details. An iron with a good point helps a lot here as well. You just place that iron tip in the well of the seam after it has been daubed with water. Once again, over a presscloth. 

And speaking of press cloths, favorites are silk organza as it allows you to see the garment underneath and takes high heat.  Poly organza will melt in this situation. I also have handy some old well worn men's handkerchiefs. You can buy them by the pack  at the box stores and they make great press cloths. 

My favorite pressing tool of all, partly because June Tailor doesn't make them anymore:


You can see my June Tailor Pressing Mitt is well worn. I literally place it inside an installed sleeve and steam from the outside. It does a great job of getting rid of any puckers in the sleeve head. I also like to use it to shape sleeves in tailoring like you see here:

For more on how I use this tool to mold sleeves you can check out this link.    Stitch Nerd does make these but I think with a little creativity you can probably make your own. 

I haven't gotten into technique much here  and that is because others have done it all so much better than me. Ann Steeves of Gorgeous Fabrics ( and they are  gorgeous) was so moved by the lack of pressing seen in the sewing community that she did a very funny and educational video on how and why to press. Check out her Pressinatrix Video.  It truly is the best out there.  (Scroll down.) And when she says to iron the seam as sewn to meld the seams, BELIEVE HER. There is a well known sewing instructor out there who says it is not necessary. Ann will show you the proof why she is wrong. Check out this blogpost of hers for proof. Another great pressing video is from Nancy Zieman and can be found here

As Roberta Carr said, "Sewing is Pressing". Quality results are not achieved without pressing. I think my new motto is "effort in, evidence shown", to paraphrase Roberta once again. Please share you tips and techniques to help others with their learning curve on pressing skills. I greatly appreciate all your experiences, no matter how unique. What works for you?

*******************

Next Level Sewing will take a break over the holidays and will return on January 5th. Hope you have a glorious and wonderful holiday with your families. Maybe Santa will see this post and get a few hints for your sewing basket!..........Bunny

Saturday, December 13, 2014

Community


When I first started the tiny ski suit, I casually mentioned the little flag shown on the pattern. Clearly this doll is an Olympic competitor! I wasn't sure how I would pull off the flag and mentioned the possibility of drawing something with a Sharpie or some such. That post no sooner was published than an email arrived in my inbox from loyal reader, Penny H. She kindly offered to stitch out the tiny flags on her embroidery machine.  She not only stitched out the tiny flag but provided an assortment of little sizes to make sure I got the right scale.  How thoughtful can you get?

I was blown away by her kindness, but not surprised. I've been blogging since 2007 and have found out a few things about our cyber neighborhood. The majority of sewing bloggers and readers are truly caring individuals who love sharing their passion, their trials and tribulations at the machine, their skill growth and so much more. I have seen them rally around divorcing sewing bloggers, laid off sewing bloggers, grieving sewing bloggers, ill sewing bloggers as well as travelling sewing bloggers, moving sewing bloggers, marrying sewing bloggers and bloggers sharing the joys of their lives outside of sewing.  It's a great community, a very generous one as well.  I am thankful I am part of that. 

You can feel the excitement in this community when they fit a nasty  sleeve, see the results of that first FBA and binge on a fabric shopping spree. You often are witness to the generosity of sharing an obscure resource for a more obscure fabric or notion. You may even be sent that notion. These are the blogs I follow, the blogs I love to read and I find new ones all the time. Many new young sewists have the bug as bad as I do and who doesn't want to share passion?  It makes my heart feel good and hopeful about our next generation of sewists.  I will be updating my blogroll soon to reflect some new blog finds that I think you will enjoy. 

Again, in the spirit of the season, I am grateful for being a part of this grand community. Thank you  all and thank you for those tiny little flags, Penny.......................Bunny


Wednesday, December 10, 2014

The tiny ski suit

Back to sewing!  The little ski jacket has been fun. I've been alternating between the painted jacket and the ski outfit. What you see above is still awaiting bands on the sleeves and a wider one around the waist. I am going to put a flap under the zip as I don't like the space that will happen once that waistband is installed. For bias accents, and there's more on the back, I used a cotton print but added the blue dots with blue sharpie. I felt I needed to pull in the blue from the fabric into the trim. I looked at some dolly zipper purveyors but could not find a five inch separating zip so did my own. It's a bit out of scale but I think it will be ok in the end.

On the jacket front, I've decided on the edge treatment. I will serge all the edges and then do more decorative bias strip on top. I've used this before and it adds some stability and looks pretty good. I also added some raglan shoulder pads and that makes a big difference as well. I have to cover them. The cuffs of the jacket have been painted as well and have decided on a few design changes. I may have a sash around it and an uneven hem. I'm going for a soft sweatery look here. It's developing as it goes along, the way these things often do for me.
 *************************

Wasn't Claudine's guest post wonderful? I think we all learned a lot and that video was great. Sometimes more experienced sewists get a bad rap, We DO want to share our knowledge and see the next generation of sewists get quality info and so many do on venues like Pattern Review and through blog comments. I thank all the stitchers out there who so generously share what they know with those less experienced and so willing to learn. We are here to pass on the passion to everyone interested in using a needle. Each one teach one! 

Here's hoping the current forecasted storm will provide a day off from work for sewing! Hope that happens to all of you who work in the Northeast outside the home. Stay safe and happy sewing!...Bunny

Monday, December 8, 2014

Who's got the button? Guest Blogger Claudine of Rolling in Cloth!

It is my great pleasure to have teaching us tonight, Claudine from Rolling in Cloth. She is an amazing seamstress, fabric dyer and painter and has a very creative fashion view point that wonderfully surfaces in her garments. I was thrilled when she contacted me to do a guest post on Next Level Sewing. She feels strongly about our newer sewists getting quality information and generously shares her knowledge tonight. We often think of the lowly button as an afterthought when it comes to technique but Claudine shows us the right way to install buttons and some new tricks to make them look good and last long. I learned a technique totally new to me and I think you will too.  Let's begin!

************************************************

When Bunny started this Next Level Sewing series, I thought it was a fantastic idea, and wanted to be somehow involved.  It can be hard to know where to go online to get good information that is not linked to product sales.  I asked Bunny if I could take over for a week and do a post of my own, and she graciously accepted my offer.  For those who don't know me, I normally blog at Rolling in Cloth.


Aren't buttons great? There’s such a variety available, and it feels so good to find just the right one for a project. They’re my favorite thing to buy as a souvenir when visiting a city. Then when I use the button that I purchased, I can think about my trip again. There’s a huge variety of buttons available, some of which are pictured above. The top left buttons are metal; top right are plastic; bottom left are fabric-covered buttons; and bottom right are natural and dyed shell. 


You know how to sew on a button. Obviously, you do. Even people who “don’t know how to sew” know how to do it. But, as with a lot of things, there is a right way and it may not be as obvious as you might think.
The picture above shows a well-sewn-on shirt button. The top view picture does not tell you much, since most buttons look passable from the top. When you turn it over, you see a few small stitches on the wrong side and no loose threads. From the side, you can see a thread shank that lifts the button slightly, allowing room for the buttonhole to rest under the button. The following video will go over my method for sewing this button on.


There are loads of different kinds of buttons. Most buttons have 2 or 4 holes to pass the thread through. Other buttons have a shank for attaching to the garment. The video above shows how to sew on a shirt button with 2 holes. You would need to extrapolate a bit to use these directions for a shank button or a 4-hole button, but the process is very similar. The main difference when sewing on a shank button is that you will sew it directly to the fabric. You won’t need to add the thread shank.


Use whatever thread you prefer. I like to use cotton thread for most applications. One exception is the button on the waistband of trousers, where I use the strongest thread that I have. Lately, I have been using artificial sinew that I bought from Dharma Trading to sew on trouser buttons.


Jackets (like in the photo above) can have backer buttons. Backer buttons add stability and durability if you are working with an unstable fabric. Make sure you match the number of holes in the backer button to the number of holes in the functional button, and sew them on simultaneously. I used backer buttons on the jacket above because the tweed fabric is very unstable, and I was afraid that the buttons would tear right off. I used whatever buttons I had around for backer buttons, but you can buy buttons that are specifically designed as backer buttons. They are very flat and are made of clear plastic.


Backer buttons
If you have a shank button that is non-functional (such as on a double-breasted jacket), you can sink the shank in a hole in the fabric made with an awl, then sew the shank button to a backer button very tightly through the hole. This will keep the button more flush with the garment fabric and keep the button from drooping. In the picture above, you can see that the button on the left is resting on top of the fabric, making it droop slightly and move around more. The one on the right is sunk into the fabric, causing the button to lay flatter. Honestly, I have never done this on a garment outside of school, but I have a couple of coats with drooping decorative shank buttons that I wish I had done this with.
On the subject of double-breasted jackets, sew the decorative button on the right side and the functional button on the wrong side separately. This will keep the decorative button in place if you lose the functional one.


Heavy or unusually shaped buttons are often non-functional. Generally, you would sew the button on the right side of the garment, then sew a snap underneath the button to keep the garment closed.


And lastly, when using a 4-hole button, never, ever sew it on with the threads crossed. Crossing the threads is not a design decision. It is poor technique.
 

***************
Thank you so much, Claudine. You made us realize how important it is to sew a button on correctly. Your method of making a hole with an awl to seat the shank button is brilliant. It is a new technique for me and I would guess many. It is so wonderful that you have shared with our newbies and all our sewing sisters your methods.  Isn't her video great? She has the patient voice of a great teacher. I think I speak for all when I say I have a new appreciation for sewing on buttons and I thank you immensely for that. 

If you have any questions feel free to put them in the comments and Claudine will answer them as she can. She is looking forward to it. Thanks again, Claudine.....Bunny

Thursday, December 4, 2014

McCall's 6938


I'm continuing work on my jacket but it seems to have evolved into an epic effort at this point. I've decided to add topstitching, using rayon embroidery thread and the machine. As I put the pieces together, and I knew this would happen, twigs would get cut off and mismatch so it was back to the paint pot to add some corrections. I didn't want the design to look chopped off at the seams and darts. I'm also not sure where to put additional "twigs" and won't until the entire jacket, other than side seams, is together. So a lot more painting and stitching is in my future before I can call this project done. Luckily the construction will be quite easy. I've been playing with edge treatments as well. 

In the meantime, I have (unusually) started another project, one with a Christmas deadline. On the top of my dear Carly's Christmas list was a ski outfit for her AG doll. She is a big skier, nearly every weekend and they have a second home in the mountains. Her dolly comes with her so the ski outfit is a necessity! A friend recommended McCalls 6938 and it is spot on. It even has directions for making the poles, goggles and skis! But a visit to Pinterest and a search for "American Girl doll ski outfit" brought up some really cute things. 


There were several tutes on making the skis. One used boning like we use in wedding gowns. Most used duct tape. Some further decorated the duct tape with cute designs. I think the trickiest part will be getting the skis to curve evenly at the tips. Why do I have a feeling this will be more monumental than the jacket? Do you see the hooks and eyes to close the straps on the boots? Is that not the cleverest? And where do I get that flag applique? I think a bit of fabric sharpies will come to the rescue on that one! Any way, it should be fun. Today I will hit Wally World for some cut duct tape. 


I didn't veer very far from the pattern photo for my fabrics as you can tell. The prints are being considered for the bands where  the pattern specifies a bias binding. Carly's ski jacket is very bright and floral, much like the floral so I thought that would be cute. We'll see what develops. Also on my list are shish ka bob sticks for the ski poles, oy...........

In the meantime, I'll leave you with my experiment on edge treatments and stitching for the jacket. I think it is prettier IRL. Ignore the white paint that leached through from the sample on the other side.  I have  a day to myself next Monday so a sewing day is booked and hopefully both of these projects will make some major headway. What are you stitching for Christmas? Fancy party dress? PJs? dolly clothes?................Bunny


Monday, December 1, 2014

NLS 9, "The rules of sewing", HuH?


I love to read before I go to sleep at night. Often what I am reading are sewing books. Many I re-read.  They say what you read before bedtime is learned well so who am I to question that wisdom? Right now I am re-reading "Couture, the art of fine sewing" by Roberta Carr for I think the fourth time, cover to cover. I have had this book since the eighties and yet the technical information in this book always seems perfectly applicable, not matter the year. I highly recommend it. You'll need to look past the the exquisitely sewn but Dynasty/80s clothing and occasionally amusing non internet viewpoint but other than that, it is a great book, one we can all learn a lot from. The illustrations and text are very clear and don't let the word couture fool you. This is a great book for beginners to have on their shelf.

I had my lesson planned for tonight but a couple of nights ago I hit Chapter Four and there in big bold letters was a nifty little bit of prose:  "The Rules of Couture Sewing". I started reading them and while more than appropriate to couture, much of what she said applies to good old every day sewing. Her thoughts provide a wonderful lesson that I will share with you tonight. I'll give you her couture version and then my interpretation for our new and returning sewists. She makes a lot of sense.


The Rules of Couture
by
Roberta Carr

1. Sew with your head.

2. Maintain accuracy.

3. Let grain be paramount in all decisions.

4. Talk to fabric and listen to the fabric talking to you. 

5. Reduce bulk whenever possible.

6. Understand that couture requires judgement. 

7. Know that your hands are your best sewing tools. 

8. Accept that pressing and sewing are synonymous.

9. Anticipate that the final garment will show "evidence of effort."

10. Enjoy the process as well as the result. 


Now for my interpretation as to how her couture rules can work for any sewist, new or experienced. Remember, Next Level Sewing is not to learn couture but rather good basic skills.  

1. I am going to say "use your intuition". Every time that little nag in the back of my head told me to do something to my sewing, something that wasn't in the pattern, I regretted it ten times over if I didn't listen to that nag. Madame Intuition has an uncanny way of being right almost all of the time. Follow your gut. It's only fabric. And I am willing to bet that your way will be the right way almost always, despite what the pattern directions say. In time you will learn to listen to that voice and gain confidence in your skills.

2. Accuracy? Goes without saying when it comes to all sewing, including the most mundane. Do you really want things to look "home made" ? How about "custom made"? Accuracy can give you that. Paying attention to stitching, seam lines. button placement, collar points matching equally, etc... will say "custom", not inexperienced.

3. Heard that catchy tune, "It's all about that base"? Well, in sewing  IT'S ALL ABOUT THAT GRAIN!  Learn to be fastidious about your pattern layouts, matching plaids and stripes, sewing the bias. One whirl through the washing machine and the best made garment, if cut off grain, will revert to an often unwearable mess. Number three is definitely for ALL sewists, ALL the time.

4. I'm not so sure about this one. LOL! I do know that fabrics often tell me they need to jump into my shopping cart when I first see them. They do tell me that personally! But what Roberta meant on this one, I can only guess.

5. Reducing bulk is often referred to in her book as "the cardinal rule of sewing". I agree that it is. Often, as new sewists, fabric and a garment's interior can be a bit intimidating. It's OK to trim corners back at intersecting seams, darts where they pass the stitching line, pretty much bulk anywhere. Your garment will be easier to press, giving a more professional finish. When making a judgement call in sewing, use Carr's "bulk rule" and reduce whenever you can.

6. I am not all that clear with this one either. Perhaps others can illuminate. I do know that we are constantly making choices in sewing. Do I pick a fabric not listed on the pattern envelope? Can I do three big buttons instead of five smaller ones? Is it OK to cut off the sleeves so they are 3/4 length instead of full length? On and on..... I am not sure what requiring judgement means to Carr. I do know that making these judgments gives us experiences as newbies trying new ideas of our own. With each success, comes more sewing confidence. With each non-success ( I will not use the F word) comes experience from which we learn and that also gives us confidence. Make your judgements. Live with the consequences, and pass or fail, know they all contribute to your skill set and sewing confidence and that's a good thing.

7. Our hands are truly a gift from the Divine. Lose them and you will learn how incredibly valuable that are to every aspect of your life. And to think that they can sew, embroider, quilt, cut, mark, hem and so much more that can bring us  joy is very humbling. Even the most inexperienced of sewists, finding joy in using her hands, is a wonder to behold. That's really what it's all about. Maybe Roberta would agree?

8. I am just restating Carr's words on this one because it is so important to every sewist, no matter what the experience level, or type of garment/fabric they are sewing. ACCEPT THE FACT THAT PRESSING IS SYNONYMOUS WITH SEWING. Nuff said. Thank you, Roberta!

9. Can I get an "AMEN" on this one? Remember the early days of computing? "Garbage in, garbage out"? I guess all we do in life "shows evidence of effort" but it is not something I really think about very often or in regards to sewing. Maybe I should and maybe we all should. If we whip something out in a couple of hours we need to expect that it will look like we did. If we take a bit more time it will show also. "Evidence of effort", I am going to be thinking about this one for a while. It certainly can apply to all sewing, not just Roberta's couture efforts , but all of our efforts, whether they be sewing or just making breakfast. Life today is so fast that we often have to choose where we put our "effort". Sometimes knowing that you have that one place (sewing) that you can go to and can get lost in,  totally focusing and putting out your best efforts, can be a very comforting place. I do know it has carried myself and many sewing friends through distracting times. Having your own mental place where you can put forth effort and focus can be a real lifesaver. Enjoy seeing your evidence of effort in your sewing. I think of the times when I have completed something and just stared and stared at it, sort of in amazement, sort of with pride and with much critique. Those moments are when we take in our evidence of effort and it is pure joy. It is why we sew. It is because our effort shows, no matter how humble or beginner it may be and it is a joy.

10. See Number Nine.


So, dear newbies, while Ms. Carr's Rules of Couture may not appear at first  to apply to your learning, I think with a bit of word play in regards to every day sewing, they can. Let's be mindful in our sewing. It can bring joy, skill and confidence.
*****************************


Next week we will have a lesson by Claudine of Rolling in Cloth. She is a gifted sewist and a very good teacher as you will see.  Check out this trench coat she made of Duchesse Satin and silk screened with the rose motif. Fabulous! She has made an awesome video to share her lesson with you and I am really excited about it. She has been so generous to offer her experience and skill and I am very thankful to her. Until then................Bunny


Had to Refurbish This One!

    About  6 or 7 years ago , during the dawn of the Zipper Trend,  I bought one of my rare retail items. It was a blush pink and black bord...