And it's even a hand painted wearable muslin!

If you've followed me through the ages, you know I don't believe in wearable muslins. The reason I caved on this pattern is because I wanted to find out how deep the back neckline was, did it show a bra band, and could I play with the design and get some "bump outs" to work. The original pattern is great on it's own. It is New Look 6866. Make sure you don't read that upside down!


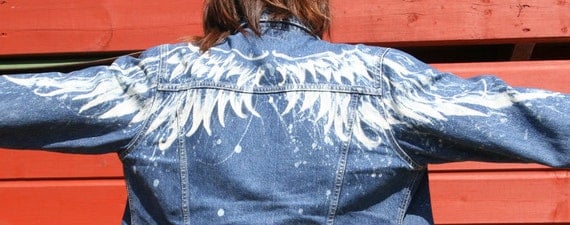
I love the look, the "bump outs", the painting and particularly that deep, shaped hem band. Thank my sister for naming them "bump outs". Sounds appropriate to me! I had some beautiful periwinkle cross dyed linen but I needed to work out the design before cutting into it. I did and will tell you what I figured out from my first wearable muslin. It was a worthwhile experience but a new one for me. I just don't do wearable muslins!
Fabric:
I wanted something with some body as my linen would be underlined. Dig and dig. Well, if I am going to wear it, and surely just in the garden digging, I might as well use some off white denim I've owned for years. I bought yards and yards years ago with intentions of slipcovering the moon, I think, and it has been the gift that keeps on giving. But, oh, my, is it blah. The more I worked with it, the more blah it got. Hmmm,,,,,,,As I was experimenting with the pattern, placing, tucking, etc, I kept looking up and around to see all my painting supplies for another project I was working on. Paint, that's it! If it looks awful, well, who cares? I had a cute stencil for a dandelion puff and I layed some paints down on the dress front pieces with dry brush techniques to give some color and depth to the dandelions. Then I decided to stencil in the dandelions on top of the colors with royal blue paint. The stencil had no stems so I had to paint them in as well. I was pleased and this was headed in a good direction.

The denim was prewashed three times and the paint got my usual "make it stick" technique and that worked great. I have washed this dress three times, once in hot water, and the painting hasn't budged. Yay!
Signed my artwork, too!

Construction:
I tried to keep this simple, muslin being and all, but it was denim, and I was going to wear it. I went jeans style, stitching, serging and topstitching all the seams. This dress is rugged. It actually comes out of the wash, like a pair of jeans, with a shake and it totally wearable!

Above you can see the hem band and I will do a post on how I managed that deep, shaped hem and the bumpouts in a few days.

The arms and neckline were simply bound with a muslin quilting print turned and topstitched.

This dress has no zipper and easily slips over my head. I did not use the facings included and simply pressed open the serged seams and catchstitched them down.
Edited to add that I just did a blogpost on how to alter an A line shape for bumpouts. Here:

In conclusion:
Lots of good take aways from my first ever wearable muslin making.
*It IS wearable, not perfectly fitting, but wearable.
*I need to raise the armscye to prevent bra show.
* I like the bumpouts but will make them a bit more shallow in the "good" version.
*I LOVE the wide hem band. It is not from the pattern. I added that change.
* I will remove some volume from the back only. My SIL and I did some playing around and that was much better.
*I will make the next one shorter. I really thought this would be mid calf but it's not. Up it goes!
* I love the back neckline. I used to think my back was my best feature and still decent enough to bare on a hot day. But not anymore..........My arms are my best feature. They have held more babies, comforted many fevers, hugged in wild passion, wrapped around the dying, and stitched probably a million stitches. You judge for yourself but I think they are my best feature.